Adding a watermark to your videos or images is a quick and effective way to protect your visual content from unauthorized usage. Watermarks can also be used to indicate ownership or copyright, making it easier for your audience to identify your work. In this article, we will explore how you can create your own watermark using various online and desktop tools, depending on your preference and needs.
One of the most common and simplest ways to create a watermark is by using an online editor like Img2Go or PicMonkey. These platforms allow you to easily upload your files and then make the necessary changes to add a watermark. You can select the image or logo you want to use as a watermark and adjust its size, opacity, and position to best fit your needs. Once you are satisfied with the settings, you can then apply the watermark to your photo or video with just a few clicks.
If you are looking for more advanced options, you can also use desktop software or specialized watermark makers. These tools offer more features and customization options, allowing you to create watermarks in different shapes, sizes, and even with text or wildcard search. Depending on the tool you choose, you can also change the color, font, and weight of the watermark to make it more unique and better suited to your branding.
Remember, the purpose of a watermark is to add a layer of protection and indicate ownership, so it should be placed in a visible and prominent location on your photo or video. However, it should not overpower the main content or distract from the intended message. Finding the right balance between visibility and subtlety is key.
In conclusion, creating your own watermark is a simple yet effective way to protect your visual content and ensure that your work is properly credited. By following the steps and tips mentioned in this article, you can easily add watermarks to your videos and images, whether you prefer using free online editors or more advanced desktop software. Remember to consider your audience and the intended usage of your photos or videos, and adjust your watermark accordingly to achieve the best results.
- Your search for returned results
- How to Watermark Your Video
- Make a watermark logo with PicMonkey templates
- Add watermark logos
- How to add a watermark
- Add watermarks to photos
- Options for watermarks
- File safety all the way
- More image options
- Add watermark online
- FAQ
- How do I watermark my photos quickly
- Should you watermark photos
- How do I watermark a jpeg image
- How can I add a watermark to my photo
- What does it mean to watermark your photos
- Where do I place a watermark on my photo?
- How do I add a watermark to a photo for free
- How do I add my logo as a watermark
- Video:
- Make your own watermark
Your search for returned results
When you search for ways to create your own watermark, you will find many options. Depending on your preferences and the level of customization you desire, you can choose between different watermarking tools and techniques.
One popular option is to use an online photo editor like PicMonkey. They offer a watermark maker where you can upload your own logo or select from their templates. You can then customize the size, position, opacity, and other settings to make the watermark fit your photos perfectly.
Another commonly used method is to use desktop software specifically designed for watermarking, such as Img2Go or Visual Watermark. These tools provide more advanced features and options, allowing you to create and apply watermarks to multiple files at once.
It’s important to remember that adding a watermark is not only about visual appeal, but also about copyright protection. Watermarks indicate ownership and make it harder for others to use your images without permission. This is especially important if you are sharing your photos online or using them for commercial purposes.
There are many ways to make a watermark, but the best approach is to find one that suits your needs and audience. You should consider factors such as the type of images you are watermarking, the level of protection you require, and the ease of use. Some tools offer more simple and user-friendly options, while others provide more advanced customization features.
In order to create a watermark, you will typically start by selecting the image or logo you want to use. Depending on the tool you are using, you can either upload the image or drag it into place. Then, you can make changes to the watermark’s position, opacity, and other settings to achieve the desired look.
Once you have set up your watermark, you can apply it to your photos or videos by either clicking a button or following a few simple steps. The exact process will vary depending on the tool you are using, but the general idea remains the same.
In conclusion, your search for ways to create your own watermark has returned many results. By using online photo editors, desktop software, or other tools, you can easily add a watermark to your images for both visual and copyright protection purposes. Just remember to choose the method that best suits your needs and follow common terms and guidelines for watermarking.
How to Watermark Your Video
Adding a watermark to your videos is a great way to protect your work and ensure that others do not use your content without permission. In order to watermark your video, you can follow these steps:
1. Choose a watermark image or logo: Start by selecting a watermark image or logo that you would like to add to your video. This image should represent your brand or your identity as a content creator.
2. Edit the image: Depending on the software or editor you are using, you may need to make some changes to the image. You can adjust the size, opacity, and position of the watermark to better suit your video and audience.
3. Open your video editor: Once you have your watermark image ready, open your video editor. Most video editors will have a feature that allows you to add watermarks to your videos.
4. Add the watermark: In your video editor, locate the option to add watermarks or overlays. Click on this option and then select the watermark image that you want to use. Drag the image to the desired position on your video.
5. Adjust the settings: Depending on your video editor, you may have additional settings to adjust the appearance of the watermark. This includes changing the opacity, size, and even applying effects to the watermark.
6. Save your video: Once you are satisfied with the position and appearance of the watermark, save your video. The watermark will now be embedded in your video, providing copyright protection and ensuring that others know it belongs to you.
Remember, adding a watermark does not mean that your video is completely safe from unauthorized usage. However, it does provide an additional layer of protection and serves as a visual indicator of ownership.
If you’re looking for an easier way to add watermarks to your videos, you can also use online tools such as Img2Go or PicMonkey. These tools allow you to quickly upload your video, choose a watermark image, and make any necessary changes before adding the watermark.
In terms of adding text watermarks to your videos, the process is very similar. Instead of selecting an image or logo, you would choose a text and customize its appearance. This is a common way to add watermarks to video files.
So, follow these steps and make sure your videos have the necessary watermarking in place to protect your work and ensure it is only used as intended by others.
Make a watermark logo with PicMonkey templates
If you want to create a professional-looking watermark for your images, PicMonkey templates can help you achieve that with ease. PicMonkey is a user-friendly online photo editor that offers a wide range of tools and templates to enhance your photos and add your own personal touch.
First, you need to sign up for a PicMonkey account. Don’t worry, it’s free to use and there is no watermarking on the images you create with it. Once you have your account, you can start creating your watermark logo.
To start, upload the image or logo you want to use as the watermark. You can choose from a variety of templates or create your own from scratch. It’s up to you!
Once you have selected your template or uploaded your own image, you can customize it to fit your needs. PicMonkey allows you to change the size, opacity, color, and even add text or other graphics to your watermark logo.
If you’re not sure where to start, PicMonkey has a helpful FAQ section that answers the most common questions about watermarking and copyright protection. You can find it by clicking on the “Faq” button in the top right corner of the editor.
When you’re happy with your watermark logo, click on the “Save” button to download the file. PicMonkey gives you the option to save it as a PNG or JPEG, depending on your preferences.
Now that you have your watermark logo, you can start adding it to your photos or videos to protect your work and make it more professional. PicMonkey has a desktop app that allows you to easily place your logo on multiple files at once.
Remember, using a watermark is a way to indicate copyright and usage terms. It does not guarantee complete protection, but it is a positive step towards safeguarding your images from unauthorized usage.
So, whether you are a professional photographer or just love taking photos, using a watermark maker like PicMonkey can help you create a unique logo that enhances your work and adds that extra touch of professionalism.
Add watermark logos
In order to protect your images and make them more recognizable, adding a watermark logo to your photos is a great way to go. A watermark is a visual mark, often in the form of a logo or text, that is added to an image. It serves as a copyright symbol and indicates that the photo belongs to you.
There are many online tools available that can help you add watermark logos to your photos. One of the most popular and user-friendly options is a free online photo editing tool called PicMonkey. Once you open the editor, you can select from a variety of templates and editing options, depending on what you want to achieve.
To add a watermark logo to your photo using PicMonkey, you need to upload the image file first. Once your photo is uploaded, you can either drag and drop the watermark logo onto the image or select it from the image gallery. You can also change the size and opacity of the watermark to make it more or less prominent.
When adding a watermark logo, it’s best to choose a position on the photo where it won’t interfere with the main subject. For example, placing it at the bottom right or left corner is a common practice. However, the exact placement depends on your preference and the visual impact you want to achieve.
Remember that the purpose of a watermark logo is not only to add your brand or copyright symbol, but also to deter others from using your images without permission. By adding a watermark, you are sending a clear message that the photo is protected and should not be used without your consent.
It’s important to note that while watermarking your photos can offer some level of protection, it does not guarantee absolute safety. There are ways to remove or bypass watermarks, so it’s always a good idea to follow best practices for copyright protection and consider other measures to safeguard your work.
In summary, adding watermark logos to your photos is a simple and effective way to protect your images and make them more recognizable. Whether you use an online editing tool like PicMonkey or another software of your preference, make sure to choose the right position, size, and opacity for your watermark. And always remember to follow copyright laws and take additional steps to protect your work.
How to add a watermark
Adding a watermark to your images or photos can help protect them and provide recognition for your work. A watermark is a logo or text that is overlaid on top of an image, making it clear that the image belongs to you. In this tutorial, we will discuss how to add a watermark using different tools and techniques.
One popular and free option for adding watermarks to your images is using online editors like Img2Go or PicMonkey. These editors provide simple, user-friendly interfaces where you can easily upload your images and add watermarks in just a few clicks. Keep in mind that the features and options may vary depending on the editor you choose.
Before you start adding a watermark, make sure you have a logo or text that you want to use as your watermark. You can create a logo using graphic design software or simply use text with a specific font and style. The opacity of the watermark is also important – you can choose to make it more transparent or more visible, depending on your preferences.
Once you have your logo or text ready, follow these steps to add a watermark:
- Upload the image or photo you want to add a watermark to. Most online editors allow you to do this by clicking on the “Upload” or “Choose File” button.
- Open the editor’s watermarking tool or option. This can usually be found in the “Edit” or “Effects” section of the editor.
- Choose the location where you want to place the watermark. You can typically drag and drop the watermark to the desired position on your image.
- Adjust the size and orientation of the watermark. Some editors provide options to resize, rotate, or flip the watermark for a better fit.
- Set the opacity of the watermark. This determines how visible the watermark will be on your image. You can usually adjust this using a slider or input field.
- Make any other changes or add additional effects to your image if desired.
- Click on the “Save” or “Apply” button to save your changes and download the watermarked image.
Remember that adding a watermark is not a foolproof method of protecting your images, as it can be removed by determined individuals. However, it adds a layer of safety and implies that the image is copyrighted by you. Watermarking can also have a positive effect on your brand recognition, as it creates a visual association between the image and your work.
Some online search engines or editing tools also offer templates for watermarks, which can be handy if you want to quickly apply a common watermark design to multiple images. This saves you time and ensures consistency across your photos.
In summary, adding a watermark to your images is a simple process that can be done using various online editors. By following the steps outlined in this tutorial, you can easily protect and add recognition to your work.
Add watermarks to photos
If you want to add an extra layer of protection to your photos, adding a watermark is the best way to do it. Watermarking your images not only helps to prevent unauthorized usage, but it also gives your photos a professional touch.
There are various tools and online editors available that can help you quickly and easily add watermarks to your photos. One of the most popular options is PicMonkey, a powerful photo editor that offers a wide range of features and templates for adding watermarks. By using PicMonkey, you can select from many different shapes and text options to create a watermark that best suits your needs.
To start adding a watermark to your photo in PicMonkey, open the editor and upload the image you want to watermark. Once your image is open, click on the “Text” option in the editor’s sidebar. This will open a text box where you can enter the text or logo you want to use as your watermark.
In order to make your watermark visible, it’s important to place it in a position that doesn’t obstruct the main subject of the photo. The bottom right corner of the image is a common place for watermarks, but you can also place it in any other position that works best for your photo.
When adding a watermark, you can also make changes to its size, transparency, and color by selecting the text box and using the editor’s settings. This way, you can customize your watermark to ensure that it is well-suited to your photo.
Once you are happy with your watermark and its placement, you can save the edited photo by clicking on the “Save” button. Depending on the editor you are using, you may have different options for saving the image, such as downloading it to your desktop or directly sharing it online.
It is important to remember that while adding watermarks to your photos can provide some level of protection, it is not foolproof. Determined individuals can still try to remove or cover up the watermark. Therefore, it is always a good idea to include copyright terms and usage instructions in the FAQ or terms section of your website or image gallery.
In conclusion, adding watermarks to your photos can provide better protection and give your images a more professional look. By using tools like PicMonkey, you can quickly and easily add watermarks to your photos and customize them to suit your needs. Just remember that a watermark is not a guarantee against unauthorized usage, but it can still help deter most people from using your photos without permission.
Options for watermarks
When it comes to adding watermarks to your images, there are several options available. Depending on your needs and preferences, you can choose from a variety of tools and techniques. Here are some common options:
1. Using a dedicated watermark maker: There are many online tools and software programs, such as PicMonkey, that allow you to upload your images and quickly add watermarks. These tools often have pre-designed templates and settings for adding text or logos to your images.
2. Adding a watermark in a photo editor: If you already have a photo editor or image editing software on your desktop, you can use it to add watermarks. Simply open your image in the editor, select the watermark tool, and choose the position, size, and opacity of the watermark.
3. Using an online image editor: Websites like Img2Go offer online image editing tools that allow you to add watermarks to your images. Simply upload your image, select the watermark option, and customize the text or logo you want to use.
4. Manually adding a watermark: If you prefer more control over your watermarks, you can manually add text or a logo to your images using a photo editor or graphic design software. This allows you to have more creative freedom and tailor the watermark to your specific needs.
5. Using a wildcard watermark: A wildcard watermark is a type of watermark that automatically finds and adds your watermark to all of your images. This can be a useful option if you have a large number of images and want to save time.
6. Customizing the watermark shape: While text and logos are common choices for watermarks, you can also experiment with different shapes or symbols. For example, you can create a watermark in the shape of a heart or a star to add a unique touch to your images.
Remember, the best type of watermark to use depends on your specific needs and the usage of your images. While watermarks can provide an extra level of protection and copyright, they should be used in a way that does not negatively impact the visual appeal of your photos.
In order to find the best approach for adding watermarks to your images, you can search online for tutorials, FAQs, and examples. By following the tips and techniques shared by others, you can create a watermark that not only protects your work but also enhances its visual appeal.
FAQ:
Q: What does it mean to add a watermark?
A: Adding a watermark to an image means placing a visible semi-transparent text or logo over the image to protect it from unauthorized usage.
Q: How can I make my watermark look better?
A: To make your watermark look better, you can try different font styles, sizes, and weights. You can also experiment with different positioning or opacity settings to find the balance between visibility and subtlety.
File safety all the way
When it comes to protecting your files, adding a watermark is one of the best ways to ensure their safety. Watermarks are visual marks or logos that you can add to your images as a means of copyright protection. They not only serve as a deterrent for others who may want to use your files without permission, but they also make it easier for you to track and identify your own work.
If you have a large number of files that you want to protect, using a watermarking tool can be a quick and efficient way to get the job done. There are many online tools and desktop software options available that allow you to add watermarks to your images with just a few clicks. Some popular examples include PicMonkey, Img2Go, and even the well-known Adobe Photoshop.
Depending on the tool you choose, the process of adding a watermark to your files may vary. However, the general steps typically involve selecting the image or images you want to protect, choosing the shape or text for your watermark, adjusting the opacity and position of the watermark on the image, and saving the edited files with the new watermark applied.
It’s worth noting that adding a watermark does not mean that your files are completely protected. While it does provide a level of deterrence and helps with identification, determined individuals may still be able to remove or edit the watermark. To further enhance the protection of your files, you should also consider using other common file safety measures such as encryption and password protection.
When it comes to file safety, it’s always better to be safe than sorry. By adding watermarks to your files, you can ensure that they are marked as your own and deter others from unauthorized usage. So, remember to follow best practices for file protection and make use of watermarks to safeguard your creative work.
And if you have any questions about the process of adding watermarks, be sure to check out the FAQ or help section of the tool you are using. They often provide useful information on how to make the most of the features and options available.
More image options
When it comes to creating your own watermark, you have even more image options to choose from. Depending on what you want to achieve and the purpose of your watermark, you can use various tools and techniques to make it stand out.
For example, if you want a quick and easy way to add a watermark to your images without any hassle, you can use online tools like JPEG.IO or Img2go. These platforms allow you to upload your images and add watermarks with just a few clicks. They provide templates and options to customize the size, placement, and opacity of your watermark.
If you prefer a more visual approach, you can use desktop software like PicMonkey. This tool allows you to open your images and easily drag and drop your watermark onto them. You can then select and change the size, shape, and position of your watermark with just a few clicks.
Another option is to use image editing software like Adobe Photoshop or GIMP. These programs offer a wide range of advanced tools and settings that allow you to create custom watermarks with ease. You can add text, images, or even use shapes and logos to create unique watermarks.
When adding a watermark to your images, it is important to remember the copyright and usage terms. If you are using copyrighted material, make sure you have permission or that you are using it within the terms of fair use. You should also consider the audience and the impact the watermark will have on the overall visual appeal of your images.
In terms of file type, you can use JPEG, PNG, or other common image formats for your watermark. It’s also important to note that watermarks do not significantly affect the file size or image quality, so you don’t have to worry about any major changes in the weight of your image.
If you want to protect your images even further, you can choose to add multiple watermarks or use different variations of your watermark. This means that even if someone removes one watermark, there will still be another one in place. This can provide an extra layer of protection and deter unauthorized use of your images.
Overall, the best way to create your own watermark is to find a tool or method that suits your needs and preferences. There are many options available, and it’s up to you to select the one that works best for you. Take the time to explore different tools and techniques, and don’t be afraid to experiment and get creative with your watermarks!
| Question | Answer |
|---|---|
| Does adding a watermark mean I have copyright over my images? | No, adding a watermark does not automatically grant you copyright over your images. It is a form of visual identification and can help deter unauthorized use, but it does not provide legal protection. To secure copyright, you should follow the appropriate legal procedures in your jurisdiction. |
| Can I add a watermark to any image file? | Yes, you can add a watermark to any image file, including JPEG, PNG, and others. The process may vary depending on the software or tool you are using, but the general idea is the same. |
| What should I do if I want to search for my watermarked images on the internet? | If you want to search for your watermarked images online, you can use reverse image search engines like Google Images or TinEye. Simply upload your watermarked image, and the search engine will show you where it has been found on the web. |
| How can I change the opacity of my watermark? | The process of changing the opacity of your watermark will depend on the software or tool you are using. In most cases, you can adjust the opacity using a slider or by entering a specific value. This allows you to make your watermark more or less transparent, depending on your preferences. |
Add watermark online
If you want to add a watermark to your images but don’t have access to an image editing software, don’t worry! There are many online tools available that can help you with this task. These online watermark makers allow you to easily add watermarks to your photos or other visual content. They are free to use and require no software installation.
One popular online watermark maker is PicMonkey. With PicMonkey, you can upload your own logo or choose from their wide range of templates. You can also adjust the opacity and placement of the watermark to suit your preferences. Once you’re satisfied with the changes, simply click the “Add Watermark” button and your image with the watermark will be ready to download.
Another popular online watermark maker is Img2Go. It provides all the options you need for adding a watermark to your images. You can upload your own logo or choose from their pre-designed watermarks. You can also select the size, position, and opacity of the watermark. Img2Go supports various image formats, including JPEG, so you can add watermarks to your photos without any hassle.
When adding a watermark online, it’s important to consider your audience and the purpose of the watermark. Adding a watermark can provide copyright protection for your work and also serve as a way to promote your brand. However, it should be done in a way that doesn’t distract from the main content of the image. The watermark should be placed in a non-intrusive and visually appealing manner.
In order to make the best use of online watermarking tools, here are some common FAQs and usage tips:
- What is a watermark? A watermark is a visual identifier that is placed on an image or video, often in the form of a logo or text. It indicates ownership or copyright of the content.
- How do I start using an online watermark maker? Start by searching for a reliable online watermark maker. Click on the tool’s website and select the option to upload your image. Once the image is uploaded, choose the type of watermark you want to add and make any necessary adjustments.
- Can I add a watermark to multiple images at once? Yes, many online watermark makers provide the option to add watermarks to multiple files at once. This can be a great time-saving shortcut, especially if you have a large number of photos that need watermarks.
- What options do I have when adding a watermark? Depending on the online tool you use, you may have various options for adding a watermark. These can include selecting the watermark position, adjusting the opacity, and choosing from different templates.
- What does it mean to change the opacity of a watermark? The opacity of a watermark refers to its transparency. If you decrease the opacity, the watermark will become more transparent. Increasing the opacity will make the watermark more visible.
In conclusion, adding a watermark online is a simple and effective way to protect your images and videos. There are many free online watermark makers available that offer a wide range of options and templates. By adding a watermark, you can ensure that your work is properly credited and prevent unauthorized usage. Just remember to choose a watermark design and placement that is visually appealing and doesn’t detract from the main content.
FAQ
Here are some frequently asked questions about creating your own watermark:
- How do I add a watermark to my photo?
- When should I use a watermark?
- What does a watermark indicate?
- Can I upload my own logo as a watermark?
- Are there any free options for watermarking my images?
- How can I change the opacity of my watermark?
- What is the best way to add a watermark to multiple photos at once?
- Is it better to use a visual or text watermark?
- What are the most common file formats for watermarks?
- Are there any desktop watermarking tools available?
- Can I drag and drop my watermark to a specific place on my photo?
- What are the copyright terms for using watermarked images?
- What are some quick and easy ways to create a watermark?
- How can I make sure my watermark is not too distracting to my audience?
Remember, adding a watermark to your photos can help protect your intellectual property and prevent unauthorized use. It also adds a professional touch to your images, indicating that they are your original work.
Depending on your needs, you can select from various options such as text-based watermarks, logo watermarks, or even use templates provided by online watermarking tools like img2go or PicMonkey.
When using watermarks, it is important to find the right balance between visibility and subtlety. The watermark should be noticeable enough to deter unauthorized use, but not overpower the main subject of the photo.
Watermarking is a common practice among photographers and graphic designers, and it is always a good idea to search for the best practices and tips in this field. Online forums, tutorials, and communities can be valuable resources for learning more about watermarking techniques and how to make the most of them.
How do I watermark my photos quickly
Img2Go is a free online editor that allows you to easily add watermarks to your images. To get started, go to the Img2Go website and click on the “Upload Image” button. From here, you can either drag and drop your photo into the designated area or click the “Upload” button to browse your computer for the image you want to watermark.
Once you have selected your image, you will be taken to the editor where you can make changes to your watermark. This includes choosing the type of watermark you want to add, such as a text or a logo. You can also adjust the size, position, and opacity of the watermark depending on your preferences. Img2Go also offers advanced options, such as adding a wildcard to your text watermark, which allows you to automatically replace certain words or phrases in all your images.
After making all the necessary changes to your watermark settings, simply click on the “Apply” button to add the watermark to your photo. Depending on the size of the image and the settings you have chosen, the process should only take a few seconds. Once the watermark has been added, you can download the watermarked image to your computer.
Using an online tool like Img2Go has several advantages. First, it saves you time by allowing you to quickly add watermarks to your photos without the need for any advanced skills or software. Second, it offers a wide range of options and customization settings, allowing you to create the perfect watermark for your images. And finally, it is free to use, making it a cost-effective solution for anyone looking to protect their photos or add a professional touch to their work.
In conclusion, if you need to watermark your photos quickly, using an online tool like Img2Go is the best way to go. It provides a user-friendly and efficient interface, allowing you to add watermarks to your photos in just a few clicks. Give it a try and see the positive results for yourself!
Should you watermark photos
Watermarking your photos can be a great way to protect your work and add a sense of ownership. It is especially important if you have a large audience or if your photos are frequently shared on social media or the internet. Adding a watermark can help ensure that even if your photos are used without your permission, you will still receive credit for your work.
Watermarks can also serve as a visual deterrent to discourage others from claiming your photos as their own. A watermark indicates that the photo is copyrighted and should not be used without proper permission. Additionally, if someone does use your photo without permission and you find it, having a visible watermark can strengthen your case when seeking legal action.
However, it is important to note that watermarking your photos is not a foolproof method of protection. There are ways for others to remove a watermark, such as cropping or using editing techniques. Watermarks can also be an annoyance to viewers, especially if they are large, distracting, or cover a significant portion of the image.
Depending on your usage and the desired outcome, there are both desktop and online options for watermarking your images. For example, you can use image editing software like Photoshop or picmonkey to add text or logo watermarks. Many online editing tools also provide templates or allow you to quickly create your own watermark.
When watermarking your photos, consider the size, position, and opacity of the watermark. The watermark should be visible enough that it cannot be easily removed or cropped out, but it should not overpower or distract from the main subject of the photo. It is also important to follow copyright laws and include your name or a copyright symbol in your watermark.
In conclusion, whether or not you should watermark your photos depends on your individual needs and preferences. Watermarking can provide an added layer of protection and ownership, but it is not a guarantee against unauthorized use. Consider the pros and cons, and make an informed decision that best suits your goals and the nature of your work.
How do I watermark a jpeg image
When it comes to adding a watermark to your JPEG image, there are several options you can choose from. One popular choice is using an online photo editor such as PicMonkey or Img2Go. These platforms provide easy-to-use tools for adding watermarks to your photos.
To start, open your desired photo in the editor of your choice. Look for a feature or setting that allows you to add text or logos to your image. This is where you will place your watermark.
Depending on the editing software you are using, you may have many options for customizing your watermark. You can choose the font, size, color, opacity, and even the position of your watermark. It’s generally recommended to choose a watermark that is subtle yet visible, so it doesn’t distract from the main content of your image.
If you have your own logo or text that you want to use as a watermark, make sure to have it ready in a file format that is compatible with the editor you are using. Most editors accept common image file types such as JPEG.
To add the watermark, select the text or logo tool in the editor and click on the image where you want the watermark to appear. Some editors may also have templates or preset watermarks that you can choose from.
Once you have placed your watermark, you can adjust its size, position, and opacity to your liking. It’s generally a good idea to make the watermark semi-transparent, so it doesn’t completely cover the original image. The opacity can usually be adjusted by dragging a slider or entering a number.
After you have finished editing your image, save it with the watermark applied. Depending on the editor you are using, you may have options to choose the file format and quality settings. It’s always a good practice to save a copy of the original image without the watermark, so you can easily make changes in the future if needed.
Adding a watermark to your JPEG image not only indicates that you are the rightful owner, but it also adds a level of professionalism. It helps protect your work from unauthorized use and ensures that your audience finds your content coming from you, not someone else.
How can I add a watermark to my photo
Adding a watermark to your photo is a simple process. There are many ways to do this, depending on the tools you have available and the changes you want to make to your image.
If you’re looking for a quick and easy way to add a watermark, you can use an online watermark maker like Img2Go. Simply upload your photo and select the watermark template you want to use. You can choose from pre-designed text logos or upload your own logo or image. Once you’ve made your selection, you can drag and drop the watermark into position, change its size, and adjust its opacity as needed. Then, click “Start” and the service will quickly add the watermark to your photo.
If you prefer to use a more advanced photo editor, you can open your image in a visual editor like Adobe Photoshop or GIMP. From there, you can add text or shape layers to create your watermark. Remember to keep the overall design simple and unobtrusive, as the purpose of a watermark is to protect your work without distracting from the main content of your photo.
In order to make your watermark more unique, you can also consider adding your copyright information or a URL to your website. This can help deter unauthorized usage of your photos and provide a way for people to find more of your work.
It’s important to note that adding a watermark does not mean your photo is completely safe from unauthorized usage. Watermarks can be removed or tampered with, especially if the original image file is easily accessible. However, adding a watermark can be a deterrent and can make it more difficult for others to use your photos without permission.
When it comes to the best size and placement for your watermark, there are a few common practices to consider. Many photographers choose to place their watermark in the bottom right or left corner of the photo, as this is a less obtrusive location. Additionally, using a lower opacity can help ensure that the watermark doesn’t distract from the main content of the image.
In conclusion, adding a watermark to your photo can be done using online tools or advanced photo editors. Whether you choose a simple text watermark or a more complex design, the goal is to protect your work and ensure proper attribution. Remember to consider the placement, opacity, and overall design of your watermark to achieve the best results.
What does it mean to watermark your photos
Watermarking your photos is the process of adding a visible mark or logo to your images. This is commonly done to indicate ownership or to protect your photos from unauthorized usage. Adding a watermark to your photos not only changes the visual appearance of the image, but also serves as a safety measure to ensure that others don’t claim your work as their own.
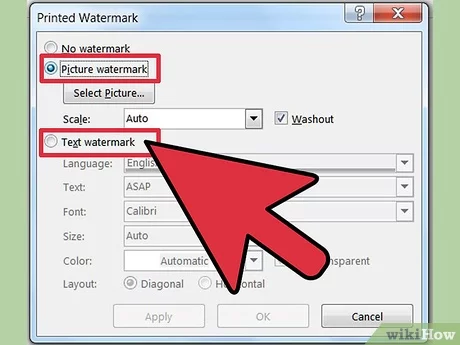
There are several ways to create a watermark for your photos. One way is to use templates or pre-made watermarks that you can select and customize. Another way is to create your own watermark by adding text, shapes, or even a logo. Some photo editing software programs offer built-in watermarking options that allow you to easily add a watermark to your photos by clicking a few buttons.
In order to create a watermark, you can choose to add text or an image to your photo. If you choose to add text, you can select the font, size, color, opacity, and position of the text. You can also add a shape or a logo by dragging and dropping the file onto your photo. Depending on the software or tool you are using, you may have different options available to customize your watermark.
When adding a watermark, it is important to consider its placement. Most commonly, watermarks are placed in the bottom right or left corner of the photo. However, you can place it anywhere you want, depending on your preference. It is recommended to choose a position that doesn’t obstruct the main subject of the photo but is still visible enough to deter unauthorized usage.
Watermarks can be created with varying levels of opacity. This means that you can choose how transparent or visible you want your watermark to be. Some people prefer a lighter opacity to make the watermark less intrusive, while others prefer a higher opacity to make it more prominent. The choice is yours and depends on your personal preference and the purpose of the watermark.
Adding a watermark to your photos also indicates that the photo is copyrighted. This can serve as a deterrent for others who might be tempted to use your photos without permission. However, it is important to remember that adding a watermark does not guarantee complete protection. Watermarks can be removed or edited, and there is always a risk of unauthorized usage. It is always best to follow copyright laws and protect your photos through other means, such as registering them with the appropriate authorities.
In summary, watermarking your photos is a way to add a visible mark or logo to indicate ownership and protect your work. It can be done by adding text, shapes, or images to your photos, and you can customize the placement, size, color, and opacity of the watermark. While watermarks can serve as a deterrent, it is important to remember that they are not foolproof and should be used in conjunction with other copyright protection measures.
| FAQ | How do I create a watermark? |
| To create a watermark, you can use photo editing software or online watermarking tools. These tools allow you to add text, shapes, or images to your photos and customize the appearance of the watermark. | |
| Can I remove a watermark from a photo? | While it is possible to remove a watermark from a photo, it is considered unethical and may be a violation of copyright laws. It is best to obtain permission from the owner or creator of the photo before using it. |
| What are the best practices for watermark usage? | When using watermarks, it is recommended to place them in a non-obtrusive position, choose an appropriate opacity level, and follow copyright laws. It is also important to regularly check for unauthorized usage of your photos. |
Where do I place a watermark on my photo?
When it comes to adding a watermark to your photos, the placement is key. You want to ensure that it is visible enough to deter unauthorized use, but not overly distracting from the main focus of the image. Here are some best practices for placing your watermark:
- Start by considering the visual flow of your photo and choose a position that doesn’t disrupt the overall composition.
- In general, it’s recommended to place the watermark in a corner or along the edges of the image. The bottom right corner is a common choice.
- Keep in mind that some people may try to remove or crop out your watermark, so consider placing it in a way that covers a significant portion of the photo.
- Depending on the shape and size of your logo or watermark, you can also try placing it diagonally across the photo for added visual interest.
- Remember that the opacity of your watermark is important. You want it to be visible, but not overly intrusive. Adjust the opacity settings depending on the background and color scheme of your photo.
- It’s also worth noting that you may want to place a copyright symbol or some text indicating your ownership rights near the watermark for added clarity.
Overall, the placement of your watermark will depend on your personal preference, the type of photo you are watermarking, and the intended usage of the image. It’s best to experiment with different positions and see what works best for you and your photos.
How do I add a watermark to a photo for free
Adding a watermark to your photos is a simple way to protect your work and add a professional touch. A watermark is a term used for an overlay that is added to an image to indicate ownership or copyright.
There are many free online tools and desktop applications available that can help you quickly and easily add a watermark to your photos. One popular option is PicMonkey, an online photo editor that offers a free version with watermarking capabilities.
To add a watermark using PicMonkey, follow these steps:
Step 1: Open the PicMonkey website and click on the “Edit” button.
Step 2: Upload your photo by clicking on the “Open” button and selecting the file from your computer.
Step 3: Once your photo is uploaded, click on the “Text” tab located on the left side of the editor.
Step 4: Click on the “Add Text” button to insert a text box.
Step 5: Type in the text for your watermark. This could be your name, company name, or any other text you prefer.
Step 6: Customize your watermark by changing the font, size, color, opacity, or even adding a shape or logo.
Step 7: Drag the watermark to the desired position on your photo.
Step 8: Adjust the opacity of the watermark to your liking. This will determine how transparent or opaque the watermark appears on your photo.
Step 9: Once you are satisfied with your watermark, click on the “Save” button to download the watermarked photo to your computer.
It’s important to note that while adding a watermark can provide some level of protection and deter unauthorized usage, it does not guarantee absolute safety or copyright protection. It is always a good practice to copyright your images and be aware of their usage.
If you prefer using a desktop application, another popular option is Img2Go. This free online editor has a dedicated watermarking tool that allows you to add text or an image as a watermark to your photos. The steps for adding a watermark are similar to PicMonkey.
In conclusion, adding a watermark to your photos is an effective way to protect your work and add a professional touch. By following the steps provided by popular online editors like PicMonkey or Img2Go, you can quickly and easily add a watermark to your photos for free.
How do I add my logo as a watermark
If you want to add your logo as a watermark to your images, there are a few ways to do it depending on your needs. In this article, we will discuss some of the best online tools and desktop software that you can use to quickly and easily add your logo to your photos.
One of the most common ways to add a logo as a watermark is by using an online photo editor such as PicMonkey. With these editors, you can simply upload your logo and then drag it onto your image. You can also make changes to the size, opacity, and position of the watermark. Once you are happy with the changes, you can save the image with the watermark in a common file format such as JPEG.
Another popular option is to use a dedicated watermarking tool such as the Visual Watermark. With this tool, you can easily select multiple images and add your logo as a watermark to all of them at once. You can also create templates for your watermarks and even use wildcard terms to automatically insert information such as the file name or the date when the photo was taken.
If you prefer to work with desktop software or want more advanced features, you can consider using Adobe Photoshop or other similar image editing software. With these programs, you have more control over the placement and appearance of your watermark. However, keep in mind that they can be more complex and require some knowledge of image editing.
When adding a logo as a watermark, it is important to remember copyright and usage terms. Make sure that you have the rights to use the logo and that you are not infringing on anyone’s copyright. Additionally, the watermark should be placed in a way that does not obstruct the main content of the image, but is still visible enough to deter unauthorized usage of the photo.
In conclusion, adding your logo as a watermark can be a quick and easy way to protect your photos and assert your ownership. Whether you choose an online tool or desktop software, follow the instructions provided by the respective makers, and you’ll be able to add your logo as a watermark in no time.