YouTube has become one of the most popular platforms for content creators to reach a wide audience. If you’re looking to make it big on YouTube, there are a few key steps you’ll need to follow. First and foremost, you’ll need to create a YouTube channel and come up with a catchy title that relates to your content.
Once you have your channel set up, it’s important to have a clear understanding of your target audience. Knowing who you’re making videos for will help you tailor your content to their interests and preferences. Additionally, you should be aware of other channels and topics that are related to yours, as this will give you a better idea of what viewers are looking for.
When it comes to creating your videos, there are a few considerations you’ll need to keep in mind. First, make sure your videos are short and concise. YouTube viewers tend to have a short attention span, so it’s important to get your message across quickly. You should also add a timestamp in the description below your video, which will allow viewers to easily navigate to specific sections of your video. Additionally, consider using storytelling techniques to engage your audience and keep them coming back for more.
- 18 Easy and Free Ways To Get More Views on YouTube in 2024
- What are YouTube Shorts
- How to Make a Tutorial Video
- 1 Start with a storyboard
- 2 Script out your content
- 3 Plan when you’ll be shown on camera
- 4 Set up your equipment and record
- 5 Edit your tutorial video
- 6 Publish your video
- Who can Create a Post on YouTube
- How to upload your first YouTube video and optimize it for search
- Title
- Description
- Add Tags
- Choose Category
- Video:
- Small Channels: Do THIS and the Algorithm Will LOVE You!
18 Easy and Free Ways To Get More Views on YouTube in 2024
Are you looking to increase the visibility of your YouTube videos and attract more views? Below is a comprehensive guide outlining 18 easy and free ways to optimize your YouTube channel and get more views in 2024:
| No. | Step |
| 1 | Create concise, attention-grabbing titles for your YouTube videos. Make sure to use keywords and be descriptive. |
| 2 | Optimize your video’s thumbnail. Use eye-catching images and design that accurately represents the content of your video. |
| 3 | Add tags that are relevant to your video’s content. This will make it easier for users to find your videos when searching on YouTube. |
| 4 | Include timestamps in your video description. This allows viewers to jump to specific sections of your video. |
| 5 | Use the appropriate category and subcategories when uploading your videos. This helps YouTube’s algorithm understand your content better. |
| 6 | Create engaging and informative video content that caters to your target audience’s interests. |
| 7 | Optimize your video’s audio quality. Ensure it is clear and easy to understand. |
| 8 | Plan and script your videos beforehand. This helps to ensure that your content is well-structured and keeps viewers engaged. |
| 9 | Make use of YouTube’s free analytics tool to track your video’s performance and gain insights into your audience’s behavior. |
| 10 | Take advantage of YouTube’s “YouTube Shorts” feature that allows you to create and upload short videos. This can help attract a different audience. |
| 11 | Share your videos on other platforms such as TikTok, Instagram, and Twitter to reach a wider audience. |
| 12 | Create an eye-catching, professional-looking channel banner that represents your brand or content. |
| 13 | Embed your YouTube videos on your website or blog to drive traffic and increase views. |
| 14 | Engage with your viewers by responding to comments and questions on your videos. This builds a sense of community and encourages viewers to stay engaged. |
| 15 | Publish regular content to keep your audience engaged and coming back for more. |
| 16 | Create a storyboard or outline for your videos to ensure a logical flow of information and to keep viewers interested. |
| 17 | Make use of multiple social media platforms and share behind-the-scenes footage or sneak peeks to generate excitement around your video content. |
| 18 | Be aware of YouTube’s algorithm and stay up to date with any changes or updates that may affect your video’s visibility and reach. |
By following these 18 easy and free steps, you can significantly increase the number of views on your YouTube videos in 2024. Start implementing these strategies now and watch your channel grow!
What are YouTube Shorts
If you are wondering what YouTube Shorts are, we are here to explain it to you. YouTube Shorts is a new feature on YouTube that allows creators to upload short-form videos of up to 60 seconds. This feature is similar to TikTok, where users can create and share short videos, but with YouTube Shorts, you have the opportunity to reach a wider audience on a platform that already has billions of users.
With YouTube Shorts, you can choose from a variety of categories for your content, such as music, comedy, cooking, fashion, and many more. You only need to select a category that suits your content, and YouTube Shorts will recommend your video to viewers interested in that particular category. This way, you can get more visibility and reach a larger audience than with a regular YouTube video.
If you’re already familiar with TikTok, you’ll find that creating YouTube Shorts is quite similar. You can record your shorts using your phone’s camera, and there are various editing tools available to add effects, filters, and music to your video. You can even draw and add text to your videos to make them more engaging.
Once you’ve recorded and edited your YouTube Shorts, you can upload them directly to your YouTube channel. YouTube Shorts will then show your shorts to viewers who are browsing or searching for similar content. This way, you can gain more followers, views, and potentially even boost your sales or awareness of your brand.
In addition to uploading your YouTube Shorts to your channel, you can also embed them on your website or share them on other social media platforms. This gives you even more opportunities to reach a wider audience and gain more views.
When creating YouTube Shorts, there are a few considerations you should keep in mind. First, make sure your video is in a vertical format, as Shorts are designed to be viewed on mobile devices. Second, pay attention to the thumbnail and headline of your Shorts, as these can significantly impact click-through rates. Third, use short and catchy titles that clearly convey what your Shorts are about.
As for the future of YouTube Shorts, it’s still relatively new, and there’s a lot of room for growth. YouTube is actively working on implementing new features and tools for Shorts creators, such as better editing options and audio tracks.
In conclusion, YouTube Shorts is a great option if you’re looking to create short-form videos for a wider audience. It’s a fast and easy way to practice your video recording and editing skills and gain more visibility on the platform. So if you haven’t tried YouTube Shorts yet, give it a go and see the results for yourself!
How to Make a Tutorial Video
Are you interested in teaching others about a specific topic? Making a tutorial video is a great way to share your knowledge and expertise with a wide audience on YouTube. Below, we’ll guide you through the steps to create a tutorial video in a concise and engaging manner.
Step 1: Plan Your Tutorial
Before you start recording, it’s essential to have a clear plan for your tutorial video. Define the topic you want to cover and brainstorm the key points you want to address in your video. This will ensure that your tutorial stays focused and informative.
Step 2: Gather the Needed Equipment
To create a tutorial video, you’ll need some basic equipment. A good quality microphone is essential to ensure clear audio. Choose a headphone with a built-in microphone or a separate microphone for recording. Additionally, make sure you have a quiet and well-lit space for recording.
Step 3: Select a Video Recording Tool
There are several options available for recording your tutorial video. You can use software like WeVideo or other free screen recording tools. Research and choose the one that best fits your needs. Make sure to test it out before starting to ensure it works properly.
Step 4: Create a Storyboard
Before diving into recording, it’s helpful to create a storyboard. This will serve as a visual guide to help you stay organized and on track during the video creation process. Map out the different scenes or steps you plan to cover in your tutorial.
Step 5: Start Recording
With your storyboard in hand, it’s time to start recording. Be aware of background noise and ensure your audio settings are optimized for clear sound. Speak clearly and at an appropriate pace. Remember, concise explanations are key to keeping your viewers engaged.
Step 6: Add Music and Customize
To make your tutorial video more engaging, consider adding background music. Choose music that complements the topic and sets the right mood. Additionally, you can customize your video by adding text overlays, transitions, and other effects based on the editing tool you’re using.
Step 7: Edit and Tweak
Once you’ve recorded your tutorial video, it’s time to edit and tweak it. Remove any mistakes or unnecessary footage and ensure the video flows smoothly. Add captions or subtitles if needed. Pay attention to timing and pacing to create a professional and polished final product.
Step 8: Upload and Optimize
When you’re satisfied with your tutorial video, upload it to your YouTube channel. Choose an attention-grabbing title and make use of relevant tags and descriptions to optimize your video for search. This will help increase its reach and attract more viewers.
Step 9: Embed and Share
After you’ve uploaded your tutorial video, embed it on your website or share it on your social media platforms. This will help drive traffic to your video and increase its visibility. You can also consider creating shorter teaser videos or posts to generate interest and awareness about your tutorial.
Step 10: Practice and Improve
Making tutorial videos is a skill that improves with practice. Pay attention to viewer feedback and adjust your approach accordingly. Experiment with different styles, formats, and topics to keep your content fresh and engaging. Continuous improvement will help you build a loyal following on your YouTube channel.
By following these steps and considering the tips mentioned above, you’ll be well on your way to creating high-quality tutorial videos that attract views and provide value to your audience. So, start planning, recording, and sharing your knowledge with the world!
1 Start with a storyboard
One of the first steps in creating a successful YouTube channel is to start with a storyboard. A storyboard is a visual guide that outlines the content and flow of your video. It helps you plan out what shots you need, the order they should be shown in, and any audio or animation that should be added.
Storyboarding is a good tool for both beginners and experienced YouTubers. It ensures that your video has a compelling structure and helps you stay on topic. By creating a storyboard, you can also tweak your script and make sure that the words you choose are enough to engage your viewers.
When creating your storyboard, there are a few things to keep in mind. First, make sure you know your target audience and the type of content they are looking for. This will guide the topics you choose and the style you adopt for your videos.
Next, set a timeline for your video. This will help you allocate enough time for each section and ensure that your video is not too long or too short. It’s also important to be aware of the search visibility of your video. By adding keywords, related tags, and a compelling thumbnail, you can increase the chances of your video being discovered and watched by more viewers.
Within your storyboard, you can also plan for any special effects or animations you want to include. This could be as simple as adding some text or graphics on the screen, or it could involve more complex animations. Be sure to add any necessary notes or instructions to your storyboard so you know what needs to be done during the editing process.
Lastly, think about the audio and sound effects for your video. Choose the right background music or sound effects that align with the mood and tone of your video. Be mindful of copyright laws and ensure that the music or sound effects you use are royalty-free or properly licensed.
Storyboarding is just the first step in the process of creating a successful YouTube channel. It guides you through the planning stage and ensures that you have everything you need before you start recording. By starting with a storyboard, you have a clear plan of action and can create high-quality content that will engage your viewers and keep them coming back for more.
2 Script out your content
Creating a compelling video starts with a solid script. Before you start recording, it’s important to have a clear plan of what you want to say and how you want to say it. By scripting out your content, you can ensure that you deliver your message effectively and engage your audience.
One option is to create a storyboard. This can help you visualize your video and plan out the shots you’ll need. You can sketch out the scenes and add notes about what you’ll be saying or explaining in each one.
When scripting your content, consider the following:
1. Know your audience: Who are you trying to reach with your video? What are their interests and needs? By understanding your audience, you can tailor your content to better meet their expectations.
2. Create a catchy title: Your video title is what draws viewers in. It should be descriptive, concise, and attention-grabbing. Think about what words or phrases people might search for when looking for content like yours. Use those keywords in your title to increase visibility.
3. Optimize your video description: Use keywords and tags related to your video to optimize its visibility in search results. Provide a brief summary of what your video is about and include relevant links or timestamps to make it easier for viewers to find what they’re looking for.
4. Consider your thumbnail: Your video thumbnail is the first thing viewers see before they click to watch. Create an eye-catching thumbnail that accurately represents your video and makes people want to click.
5. Set up good lighting and sound: Good lighting and sound quality can make a big difference in the overall look and feel of your video. Invest in basic equipment like lights and a microphone to ensure your video looks and sounds professional.
6. Get to the point: Viewers have short attention spans, so it’s important to grab their attention quickly. Start your video with a strong introduction and get to the main point right away. Avoid rambling or going off-topic.
7. Edit your video: Once you’ve recorded your video, take the time to edit it for a smoother viewing experience. Trim out any unnecessary footage, add captions or subtitles, and make sure the audio levels are balanced.
By following these considerations, you’ll be able to create compelling and engaging video content that stands out on YouTube. Remember to be consistent with your uploads and interact with your viewers to build a loyal following. With time and effort, you can make it on YouTube!
3 Plan when you’ll be shown on camera
When creating content for your YouTube channel, it’s important to plan when you’ll be shown on camera. Here are a few key things to consider before hitting the record button:
- Set a schedule: Determine when you’ll be recording your videos. This will help you stay consistent and ensure that you always have content to publish.
- Tweak your appearance: Make sure to look your best before you start recording. This includes things like grooming, choosing the right outfit, and adding any necessary makeup.
- Practice speaking: If you’re not used to speaking on camera, practice beforehand. This will help you feel more comfortable and confident while recording.
- Plan your content: Create a storyboard or outline for your video. This will give you a clear direction and ensure that you cover all the important points.
- Optimize your recording environment: Make sure that the lighting, background, and noise levels are all suitable for recording. Consider using tools like a ring light or soundproofing to improve the quality of your videos.
- Edit your videos: Once you’re done recording, take the time to edit your videos. Cut out any unnecessary footage, add any additional visuals or effects, and optimize the video description and title.
- Address frequently asked questions: If you have a Q&A section in your video, select a few frequently asked questions from your viewers and make sure to address them in a clear and concise manner.
- Experiment with different video formats: Try out different formats like how-to videos, behind-the-scenes content, or video shorts. This will keep your channel fresh and attract new viewers.
- Keep practicing: The more you record videos and experiment with different styles, the better you’ll become. Don’t be afraid to try new things and learn from your mistakes.
By following these steps and planning when you’ll be shown on camera, you’ll be able to create engaging and compelling content that will boost your YouTube channel’s visibility and attract more viewers.
4 Set up your equipment and record
Before you start recording your videos for YouTube, it’s important to set up your equipment properly. Having the right gear can make a big difference in the quality of your videos. Follow these steps to ensure you have everything you need:
- Select a quiet and well-lit room where you can record your videos. Make sure the background is clean and free from distractions.
- Choose the right equipment for your needs. You’ll need a good quality camera or smartphone to capture your video. You may also want to invest in a microphone to improve the sound quality.
- Create a storyboard or script to plan out what you’re going to say or do in your video. This will help you stay organized and ensure that you cover all the necessary points.
- Set up your equipment before you start recording. Make sure your camera or smartphone is secure and at the right angle. Test your microphone to make sure the sound is clear.
Once you’re ready to start recording, follow these steps:
- Press the record button on your camera or smartphone to start capturing your video.
- Speak clearly and confidently, and make sure to maintain eye contact with the camera.
- If needed, add some background music to your video to make it more engaging. You can choose from a variety of free music options available online.
- Record for as much time as needed to cover all the points in your storyboard or script.
- After recording, review your video to make sure everything looks and sounds good. You might need to re-record some parts if necessary.
Once you’re satisfied with your recording, you can proceed to the next steps of editing and publishing your video on YouTube.
5 Edit your tutorial video
Once you’ve recorded your tutorial video, the next step is to edit it. Editing is an important process to make your video look professional and engaging. Here are some tips to help you edit your tutorial video:
1. Considerations before editing:
- Timestamp your video: Adding timestamps to your video helps viewers navigate through it easily and find the information they are looking for.
- Add music or sound effects: Music or sound effects can enhance the overall experience of your tutorial video and make it more engaging.
- Track the order of your guide: Make sure your video flows logically and the steps are shown in the right order.
- Consider adding audio: If you’re speaking in your video, make sure the audio is clear and easy to understand.
- Tweak your videos: Trim out any unnecessary parts or mistakes to make your video concise and to the point.
2. Customize your video:
- Add text and graphics: Use text overlays, arrows, or circles to highlight important points or instructions in your video.
- Use a variety of shots: Switch between different camera angles or show close-ups to keep viewers interested.
- Add a thumbnail: A visually appealing thumbnail can attract more views and make your video stand out on YouTube.
3. Use editing software:
- WeVideo: WeVideo is an online video editor that is easy to use and offers a wide range of editing options.
- Camtasia: Camtasia is a powerful editing software with advanced features for creating professional tutorial videos.
4. Optimize your video for YouTube:
- Add relevant tags, keywords, and a descriptive title to your video to improve its visibility in search results.
- Write a compelling video description: Use keywords and provide a brief summary of what your video is about.
- Add a call-to-action: Encourage viewers to subscribe to your channel or check out other related videos.
5. Upload and track your video:
- Upload your edited video directly to YouTube or your preferred video hosting platform.
- Track your video’s performance: YouTube provides analytics that show how many views your video receives and other valuable metrics.
By following these steps, you’ll be able to edit your tutorial videos faster and make them more appealing to your audience. Remember, the more professional and engaging your videos are, the more likely you’ll reach a wider audience and increase your channel’s sales.
6 Publish your video
Once you’ve recorded and edited your video, it’s time to publish it to your YouTube channel! Here are the steps to get your video out there for the world to see:
- Choose a video category: When publishing your video, YouTube will ask you to select a category that best fits your content. This helps viewers find your video more easily through search and browse.
- Add a compelling title and description: Make sure to create a title and description that grab the viewer’s attention and accurately describe what your video is about. Use relevant keywords and tags to make it easier for people to find your video.
- Customize your video’s thumbnail: YouTube automatically generates thumbnail options for your video, but you have the option to choose a custom thumbnail. This can be a short, eye-catching image that makes people want to click and watch your video.
- Edit the video’s playback settings: In the video settings, you can tweak options such as whether the video is public or private, whether it can be embedded on other websites, and whether comments are allowed.
- Set a publish date and time: If you want to schedule your video to be published at a specific date and time, you can choose this option. Otherwise, the video will be published as soon as you hit the “Publish” button.
- Add tags and a timestamp: Tags help YouTube understand what your video is about, so be sure to include relevant tags that will help your video appear in search results. A timestamp can be added to indicate a specific section of your video that you want viewers to jump to.
- Considerations before you publish: Before you hit that publish button, there are a few things to consider. Make sure your video is edited well, that there’s no background noise or other distractions, and that the lighting and audio quality are good. Additionally, it’s a good idea to have a plan for promoting your video through social media and other channels.
Publishing your video on YouTube is just the first step. In order to make it more visible and reach a wider audience, you’ll want to address a few more options and considerations.
One option is to upload your video to a website such as WeVideo, where you can edit and customize it further. Another option is to create behind-the-scenes stories or how-to guides that relate to your video content. This can help build a deeper connection with your viewers and keep them coming back for more.
You might also want to explore the “Coming soon” category, which will show a short preview of your video on your channel’s page. This can generate excitement and anticipation among your subscribers and other visitors to your channel.
By following these steps and considering these options, you can make sure your YouTube videos are compelling, well-crafted, and reach a wider audience.
That’s it! Now you’re ready to publish your YouTube video and make your mark on the platform. Good luck!
Who can Create a Post on YouTube
Creating a post on YouTube is a great way to reach a wide audience and increase your visibility on the platform. Speaking of YouTube, it’s important to know that anyone with an internet connection and a device such as a computer, smartphone, or tablet can create a post on YouTube.
To create a post on YouTube, you’ll need a few key pieces of equipment. First, you’ll need a camera or a smartphone with a good built-in camera. This will allow you to record high-quality video for your post. Additionally, having a good quality microphone or headphone will ensure that your audio sounds clear and professional.
Before recording your video, it’s a good idea to create a storyboard or a script. This will help guide you during the recording process and ensure that you address all the important points you want to make in your post.
Once you have your video recorded, you can use video editing software like WeVideo to edit and customize your video. You can add music, text, and different effects to make your video more engaging.
When you’re happy with the final edit, you can upload your video to YouTube. While uploading, you should optimize the title, description, and tags of your video to improve its visibility in search results. Choosing the right category and adding relevant tags will help YouTube understand what your video is about and show it to the right audience.
After you’ve uploaded your video, there’s an option to create a post using a section called “Post” on your YouTube channel. In this section, you can add a concise and catchy title for your post and write a description to give viewers a brief overview of what they can expect from your video.
Additionally, you can choose a thumbnail image that best represents your video. You can either select a thumbnail from the options provided by YouTube or customize it by uploading an image of your choice.
When you create a post, you also have the option to embed your video on your website or other platforms. This allows you to share your video with your website visitors or followers on other platforms such as social media.
Creating a post on YouTube is an easy process that can be done in a few simple steps. It’s important to remember that creating engaging and high-quality videos takes time and effort. However, with the right equipment, planning, and editing, you can create videos that not only draw in viewers but also keep them coming back for more.
In conclusion, anyone can create a post on YouTube as long as they have the necessary equipment and know-how. With the right approach and strategy, you can create videos that capture the attention of your audience and boost your visibility on the platform.
| Step | Description |
|---|---|
| 1 | Record a high-quality video with a camera or smartphone. |
| 2 | Create a storyboard or script to guide your video content. |
| 3 | Edit your video using video editing software like WeVideo. |
| 4 | Optimize the title, description, and tags to improve visibility. |
| 5 | Choose a thumbnail image for your video. |
| 6 | Create a post on your YouTube channel using the “Post” section. |
| 7 | Embed your video on your website or other platforms. |
How to upload your first YouTube video and optimize it for search
Creating and uploading your first YouTube video can be an exciting, yet challenging experience. In order to make your video stand out and reach a wide audience, it is important to optimize it for search. Here is a step-by-step guide on how to upload your first YouTube video and optimize it for search:
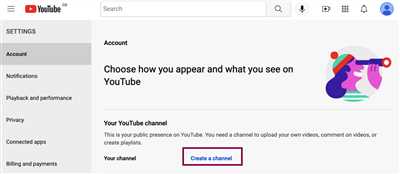
Step 1: Create a YouTube Channel
The first step in uploading a YouTube video is to create your own YouTube channel. This can be done by signing in to your Google account and going to the YouTube website. Once you have created your channel, you will have an address where your videos will be shown.
Step 2: Choose a Topic and Create Contents
Before you start recording your video, it is important to know what topic you will be addressing. Ensure that you have a clear understanding of the subject matter and create a storyboard or outline to guide you through the video. This practice will help you stay on track and deliver a well-structured, informative video.
Step 3: Gather Your Equipment
In order to create a high-quality YouTube video, you will need some essential equipment. This includes a camera or smartphone with good video capabilities, a microphone for better audio quality, and lighting to ensure that your video is well lit. It is not necessary to invest in expensive equipment at this stage, but having the basics will greatly improve the overall quality of your video.
Step 4: Record and Edit Your Video
Once you have everything you need, it’s time to start recording. Start by setting up your camera or smartphone in a stable location and ensure that the lighting is sufficient. Record your video according to the storyboard or outline you created earlier. Keep in mind that shorter videos are often more engaging, so aim to keep your video within the 18-minute limit. Once you have finished recording, you can use editing software such as WeVideo to trim the video, add music or sound effects, and make any necessary modifications.
Step 5: Upload Your Video
After you have finished editing your video, it’s time to upload it to YouTube. Simply go to your YouTube channel and click on the “Upload” button. Choose the video file from your computer and fill in the required details such as the title, description, and tags. The title should be descriptive and include keywords related to your video’s content. The description should provide a brief overview of the video and include relevant keywords. Adding tags will help YouTube understand the topic of your video and improve its visibility in search results.
Step 6: Optimize for Search
In order to increase the visibility of your video in search results, it is important to optimize it for search. Here are some ways you can do this:
| Optimization Method | Description |
|---|---|
| Use Keywords | Include relevant keywords in the video title, description, and tags. This will help YouTube understand the content of your video and improve its search ranking. |
| Create Engaging Thumbnails | Design eye-catching thumbnails that accurately represent your video’s content. This will encourage viewers to click on your video when it appears in search results. |
| Write an Informative Description | In the video description, provide a detailed summary of your video’s content. This will help viewers better understand what your video is about and increase the likelihood of them watching it. |
| Add Relevant Tags | In addition to including tags in the upload process, you can also add tags in the video description. This will further improve its visibility in search results. |
| Optimize for YouTube Shorts | If your video is shorter than 60 seconds, consider uploading it as a YouTube Short. Shorts are a new feature on YouTube and often get more exposure. |
By following these steps and optimizing your video for search, you can increase the chances of it being discovered by viewers. Remember to frequently upload new content to your YouTube channel and engage with your audience to build a loyal subscriber base.
Title
In this guide, I will show you how to make it on YouTube with just 5 short steps. Whether you want to post videos on your website or create a YouTube channel, these tips will help you achieve more views and visibility.
Step 1: Create short videos
Instead of long videos, consider making shorter ones that are around 2-4 minutes long. Short videos can hold viewers’ attention better and are more likely to be shared. For instance, you can create how-to guides, behind-the-scenes posts, or even record short music clips.
Step 2: Optimize your video description
Take the time to write a compelling video description that includes relevant keywords. This will help YouTube categorize your video and show it to viewers who are searching for related content. You can also add tags to further optimize your video’s visibility.
Step 3: Customize your thumbnail
Before you upload your videos, choose a catchy thumbnail that will grab viewers’ attention. A good thumbnail can significantly increase the click-through rate and get more people to watch your video.
Step 4: Use YouTube Shorts
If you’re looking for an additional option to reach a broader audience, consider using YouTube Shorts. This new tool allows you to create and upload short vertical videos that are up to 60 seconds long. YouTube Shorts is a great way to showcase your creativity and attract more views.
Step 5: Engage with your audience
Don’t forget to interact with your viewers by responding to comments and addressing their questions. This shows that you care about your audience and helps build a loyal community around your channel or website.
In conclusion, making it on YouTube is not as difficult as it might seem. By following these 5 short steps, you can optimize your videos, increase your visibility, and reach more viewers. So, go ahead and start creating amazing content on YouTube to make your mark in the online world!
Description
The description is an important section when uploading a video to YouTube. This is your opportunity to draw viewers in and provide them with a brief overview of what they can expect from your video. In this section, you should include keywords related to your video’s topic to improve its visibility in search results.
When creating a description, it’s important to consider some factors. First, address the title and topic of your video in the first few words to grab the viewer’s attention. You can also include a timestamp to direct viewers to a specific section of the video, especially if it’s a how-to or tutorial video.
Next, explain what your video is about in a concise and engaging way. Use around 300-500 words, as longer descriptions are less likely to be read. Be sure to mention any key points or steps you’ll be covering in the video to give viewers an idea of what to expect.
You can also use this section to mention any additional resources you’ll be providing, such as links to websites or other videos. If you’ll be mentioning any music or sound effects used in the video, consider including the title and artist in the description as well.
Another option to consider is adding timestamps to the description. This allows viewers to quickly jump to specific parts of the video, saving them time and improving their experience.
Lastly, for increased visibility, you can tweak your description by including some popular keywords or tags related to your video’s topic. This can help your video appear in related searches and increase the chances of it reaching a wider audience.
Remember that viewers may be watching your video on different devices or platforms, so make sure to provide a clear and concise description that can be easily understood regardless of the viewing context.
For faster and more efficient video editing and recording, there are some tools you can use. Some popular options include WeVideo, Adobe Premiere Pro, and iMovie. These tools allow you to edit and post-process your videos with a variety of features, such as adding music, effects, and transitions.
In order to make your videos more engaging, consider some additional considerations. For example, good lighting and sound quality are important for creating a better viewing experience. You might want to invest in some lights and a better microphone to improve the overall production quality of your videos. Also, practice speaking clearly and confidently to keep viewers engaged.
Once you’ve created and edited your video, it’s time to upload it to YouTube. In the upload window, you’ll need to fill out the description section. Copy and paste the description you’ve created into the respective field.
Finally, select a compelling thumbnail for your video. The thumbnail is the image that viewers will see before they click to watch your video. Choose an image that accurately represents your video and is visually appealing to grab viewers’ attention.
When everything is ready, click the “Publish” or “Upload” button to make your video available to the public. After a few seconds or minutes, depending on the length and size of your video, it will be loaded onto the YouTube platform and ready to be watched by your audience.
Keep in mind that YouTube is not the only platform where you can post your videos. TikTok and YouTube Shorts are two popular options that you might want to consider in order to reach a different audience.
In conclusion, the description section of your YouTube video is crucial for providing viewers with a preview of your content and improving its visibility. Take the time to craft a compelling and informative description that entices viewers to watch your videos.
Add Tags
Tags play a crucial role in increasing the visibility of your YouTube videos. By adding relevant and specific tags to your video, you can help your content reach a wider audience and attract more views. In this section, we will guide you on how to add tags to your YouTube videos for better search optimization.
Step 1: Plan your tags
Before you start adding tags, it’s essential to have a clear plan in mind. Think about the category and topic of your video. What are the frequently searched keywords related to your content? Address these questions to create a variety of tags that are concise and descriptive.
Step 2: Add tags when uploading a video
When uploading a video, YouTube provides a section where you can add tags. You can enter multiple tags by separating them with commas. Use words that best describe your video and are relevant to your target audience.
Step 3: Edit tags after uploading
If you need to tweak or change your tags after uploading a video, you can easily do so. Simply go to the YouTube Studio, locate the video you want to edit, and click on the “Edit” button below the video window. From there, you can add, remove, or modify your tags as needed.
Step 4: Optimize your tags
Tags should not only be relevant but also optimized. Use specific keywords and phrases that are likely to be searched by your target audience. For instance, if you are creating a tutorial video on how to draw curtains, some optimized tags might include “curtain drawing tutorial,” “how to draw curtains step by step,” and “window curtain drawing.”
Step 5: Add tags using timestamps
If your video contains different sections or steps, consider adding tags with timestamps. This allows viewers to navigate directly to a particular part of the video they are interested in. For example, if you are explaining a step-by-step process, you can add tags like “start at 0:30,” “step 1 at 1:15,” and “final result at 5:45.”
By following these steps and adding relevant tags to your YouTube videos, you’ll not only increase the visibility of your content but also reach a wider audience. Make sure to customize your tags based on your content and audience to get the best results.
| Benefits of adding tags: |
|---|
| 1. Better search optimization |
| 2. Increased visibility |
| 3. More views |
| 4. Reach a wider audience |
| 5. Boost your video’s ranking |
Adding tags to your YouTube videos is a simple yet effective way to optimize your content and attract more viewers. Practice using relevant and optimized tags, and for a good measure, track the performance of your videos to see which tags are contributing the most to your success. The more you know about your audience and their search habits, the better you can optimize your videos to gain even more visibility and reach on YouTube.
Choose Category
When you’re starting your YouTube channel, one of the first steps is to choose a category or niche for your content. This will help you focus your content and target a specific audience. Here are some tips to help you choose the right category for your YouTube channel:
- Tutorials: If you have expertise in a particular area and enjoy teaching, creating tutorial videos can be a great option. Tutorials can range from how-to guides to step-by-step instructions on various topics.
- Vlogs: If you enjoy documenting your life and sharing your experiences with others, vlogging might be the right choice for you. Vlogs are a great way to connect with your viewers on a more personal level.
- Fitness and Health: If you’re passionate about fitness and wellness, creating videos related to exercise routines, healthy recipes, and wellness tips can help you build a dedicated audience.
- Adventures and Travel: If you love exploring new places and want to share your adventures with others, creating travel vlogs or adventure videos can be a great way to showcase your experiences.
- Technology: If you’re knowledgeable about the latest gadgets and tech trends, creating content about tech reviews, tips, and tutorials can be an excellent option.
- Entertainment: If you have a creative side and enjoy making people laugh or engaging them through storytelling, creating entertaining videos, such as skits, comedy sketches, or animations, can be a great choice.
Remember, it’s essential to choose a category that you’re passionate about and have sufficient knowledge in. This will help you create compelling content that keeps your viewers engaged and coming back for more.
Once you’ve selected a category, you can further customize your content by tweaking your recording equipment, camera setup, lighting, and audio. Experiment with different ways to make your videos more visually appealing and professional.
Additionally, consider optimizing your video titles, descriptions, and tags to make sure your content is discoverable within the YouTube search window. Theres are many ways to boost the visibility of your videos, such as employing proper SEO techniques, increasing viewer engagement, and embedding your videos on other platforms like TikTok or your personal website.
When it comes to creating content, good storytelling and concise explanations are key. Plan your videos in advance by creating a storyboard and script to ensure a smooth flow of ideas. Practice speaking clearly and confidently before hitting the record button.
Remember to address your viewer’s needs and provide value through your content. If you can solve a problem or teach something useful, your videos are more likely to gain traction and generate higher views.
Keep in mind that growing a YouTube channel takes time and effort. Don’t get discouraged if you don’t see immediate results. Stay consistent with your posting schedule and continue improving your content.
By choosing the right category, optimizing your videos, and creating valuable content, you can increase your chances of success on YouTube and reach your goals by 2024 and beyond.