

Stickers are a fun and creative way to express yourself and add some flair to your belongings. However, if they aren’t sticky enough, they can quickly become a nuisance. Whether you want to stick them on your laptop, window, or other surfaces, this article will provide you with some tips on how to make your stickers last longer.
Firstly, you need to choose the right sticker material. Vinyl stickers are a popular choice because they are durable and suitable for both indoor and outdoor use. Before applying the sticker, make sure the surface is clean and free of any dirt or dust. You can use a damp cloth or some water with a little soap to clean the area. This step is crucial to ensure a strong adhesive bond.
Next, peel off the backing paper from the sticker, but be careful not to touch the adhesive side. Position the sticker in the desired area and slowly apply it, starting from the center and working your way outwards. Use a firm and even pressure to reduce the air bubbles and ensure a smooth application.
If you have any bubbles or wrinkles, use a sharp object like a credit card or a squeegee to gently push them out towards the edges. Be cautious not to scratch the surface or damage the sticker. Take your time and work from the center to the edges to prevent any creases or wrinkles.
After you have applied the sticker, give it some time to settle and adhere properly. Avoid exposing it to extreme temperatures or water for at least the first 24 hours. This will allow the adhesive to fully bond with the surface and prevent any premature peeling or lifting.
If you want to remove the sticker at some point, make sure you choose a removable adhesive product. This way, you can easily peel it off without leaving any residue or damaging the surface. Check with the sticker manufacturer for the best removal method and suitable adhesive for your needs.
So, next time you want to make your stickers stickier, remember to clean the surface, choose the right material, apply them firmly, and give them some time to settle. By following these simple steps, you can ensure that your stickers will stay in place longer and look great wherever you stick them!
Источники: gs-jj.com
Things You Will Need
- A clean surface or material that you want to apply the sticker to
- A removable vinyl sticker or adhesive sticker
- Water or a cleaning solution to clean the surface before applying the sticker
- A cloth or paper towel to dry the surface after cleaning
- Some masking tape or painter’s tape to help position the sticker
- A squeegee or credit card to remove any air bubbles
- A ruler or measuring tape to ensure accurate placement of the sticker
- A pair of scissors or a utility knife to trim any excess sticker material
- Patience and a steady hand
Before you begin applying the sticker, make sure you have all of these items handy. Proper preparation and the right tools are key to ensuring a successful application and long-lasting stickiness of your sticker.
How to Make Any Sticker a Removable Sticker
If you’re tired of using stickers that are difficult to remove, there’s a simple solution. By following these steps, you can transform any sticker into a removable sticker. Here’s how:
Clean the Surface: Before you apply the sticker, make sure the surface is clean. Use water and a suitable cleaning product to remove any dirt or dust that may prevent the sticker from sticking firmly.
Check the Adhesive: Take a closer look at the adhesive side of the sticker. If there are any bubbles or dust particles, use a clean cloth to gently remove them. This step is important to ensure the sticker sticks better and lasts longer.
Choose the Right Sticker Material: Not all sticker materials are suitable for removable stickers. Vinyl is a good choice because it can be easily removed without leaving residue on the surface. Visit gs-jj.com to choose the right material for your needs.
Apply the Sticker: Take the sticker and peel off the backing paper. Align it with the area where you want to stick it. Start from the center and slowly apply it to the surface, working outwards. This technique helps to reduce the chance of air bubbles forming under the sticker.
Press Firmly and Peel: After you’ve applied the sticker, press firmly over its entire surface. This ensures proper contact with the surface and helps the adhesive bond. If you ever want to remove the sticker, gently peel it off from one side. The sticker should come off easily without leaving any residue behind.
Prevent Contact with Water or Oil: To keep the sticker removable, it’s important to avoid contact with water or oil. Clean the surface around the sticker carefully, especially if you’re using the sticker on a cooking area or a glass window.
By following these steps, you can make any sticker a removable sticker. Whether you’re using stickers for decoration or labeling purposes, this technique will ensure that you can easily remove them without any hassle.
Do vinyl stickers last longer than paper stickers
When it comes to choosing stickers for your product or any other purpose, you’re faced with the decision of which material to choose. One material that is often recommended for its durability and long-lasting adhesive properties is vinyl. So, do vinyl stickers last longer than paper stickers? Let’s find out.
When working with stickers, the first step is to clean the surface where you’ll be applying the sticker. Whether it’s a window, glass, or any other suitable surface, make sure it is clean and free of dirt or dust. This will ensure that the adhesive has a firm and clean contact with the surface.
Vinyl stickers are known for their strong adhesive properties, which help them to stick firmly to surfaces and last longer. The adhesive used in vinyl stickers is typically water-based, which means that it will not only stick firmly but also prevent air bubbles from forming underneath the sticker.
To apply a vinyl sticker, start by peeling off the backing paper from one side. Then, carefully align the sticker with the desired area and apply firm pressure from the center to the edges. This will help to reduce the chances of air bubbles and ensure maximum adhesion.
In contrast, paper stickers generally have a lower adhesive strength and may not last as long as vinyl stickers. They are more suitable for temporary or indoor use, as they might not withstand exposure to outside elements as well as vinyl stickers.
When choosing between vinyl and paper stickers, it’s important to consider the specific needs of your product or project. If you want a sticker that will last longer and can withstand outdoor conditions, vinyl stickers are the way to go.
However, it’s always a good idea to check with the manufacturer or supplier to see if they have any specific recommendations or guidelines for using their stickers. This will ensure that you’re choosing the right sticker for your specific application.
In conclusion, vinyl stickers generally last longer than paper stickers due to their stronger adhesive properties and ability to withstand outdoor conditions. They are a great choice if you want a long-lasting and durable sticker for your product or any other purpose. Just make sure to clean the surface before applying the sticker and follow the manufacturer’s instructions for best results.
Choose the right sticker material and adhesive for your needs
When it comes to making stickers sticky, it’s important to choose the right sticker material and adhesive for your specific needs. There are some factors you should consider before making a decision.
The first thing you need to do is determine where you want to stick your stickers. If you plan on placing them outside, you’ll need a material that can withstand various weather conditions. Vinyl is a popular choice for outdoor stickers as it is durable and weather resistant.
If you’re working with a material that is sensitive to heat, like glass or some plastics, you’ll need to choose an adhesive that can withstand high temperatures. Make sure to check the manufacturer’s instructions for the recommended adhesive for your specific surface.
Before applying the sticker, make sure the surface is clean and free from any dust or dirt. Use a damp cloth to wipe away any dirt or dust, and then dry the area thoroughly. This will ensure a firm and long-lasting bond between the sticker and the surface.
To apply the sticker, start by peeling off the backing paper from one side. Then, slowly lower the sticker onto the surface, starting from one edge and working your way to the other side. Take your time to prevent any bubbles or wrinkles from forming. If you do encounter any bubbles, use a squeegee or a credit card to push them out towards the edges.
After applying the sticker, give it a firm press to ensure proper contact with the surface. You can use a clean cloth or your fingers to do this. Make sure to apply even pressure across the entire sticker, paying special attention to the edges.
If you need to reposition the sticker, peel it off carefully and place it in the desired position. Keep in mind that removable adhesive is better suited for this purpose, as it allows for easy repositioning without leaving any residue behind.
Lastly, if you plan on using your stickers in a wet environment, such as on a water bottle or in the kitchen, make sure to choose a material and adhesive that are water-resistant and suitable for these conditions. Some stickers can even be dishwasher safe, so be sure to check the product specifications.
By following these steps and choosing the right sticker material and adhesive, you can make your stickers stick for longer and withstand various conditions. Whether you’re using them for personal or promotional purposes, the right combination of materials and adhesive will ensure that your stickers last and look great.
For more information on sticker materials and to order high-quality custom stickers, check out gs-jj.com.
Clean the product surface before applying your sticker
Before you apply your sticker, it is important to clean the surface of the product thoroughly. This will ensure that the sticker adheres properly and stays in place for a long time. Follow these five steps to clean the product surface:
Step 1: Determine the right cleaning material
Depending on the material of your product, you will need to choose the cleaning material accordingly. For example, if you are cleaning a glass surface, you may need a glass cleaner or just water to wipe away any dirt or dust. If you are unsure what cleaning material to use, check with the manufacturer for recommendations.
Step 2: Remove any dust or dirt
Before applying your sticker, make sure the area is free from any dust or dirt. Use a soft cloth or paper towel to gently remove any debris. This will prevent the sticker from peeling or bubbling due to particles underneath.
Step 3: Peel off the backing
Once the surface is clean, carefully peel off the backing from your sticker. Be sure to handle the sticker with clean hands to avoid transferring any dirt or oil onto the adhesive side.
Step 4: Apply the sticker firmly
Position the sticker on the product surface where you want it to be placed. Starting from the center, gently press the sticker down with your fingers. Work your way outwards, smoothing the sticker as you go to ensure a firm and even application.
Step 5: Take extra precautions for removable stickers
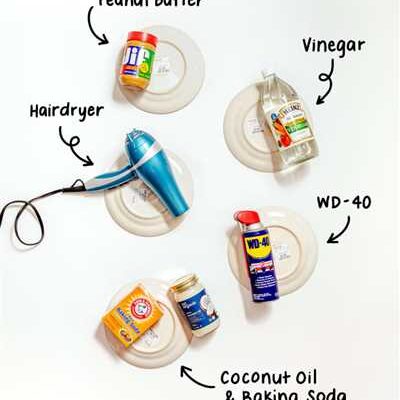
If you are applying a removable sticker, be aware that it may not adhere as strongly as permanent stickers. To ensure a longer-lasting hold, you can use a hairdryer on a low setting and gently heat the sticker after applying. This will help the adhesive bond to the surface more effectively.
By following these steps, you can clean the product surface properly before applying your sticker. This will reduce the chances of any bubbles or lifting, and help your sticker last longer. Remember to always check the manufacturer’s instructions for any specific cleaning recommendations for your sticker material.
Sources: gs-jj.com
Apply the sticker firmly
Once you have chosen the right sticker for your needs from a suitable manufacturer like gs-jj.com, the next step is to apply it firmly to the surface you want to stick it on. This step is crucial to ensure that your sticker stays in place for a long time, without peeling or falling off.
Before applying the sticker, make sure the area is clean and free of any dirt, dust, or water. Clean the surface thoroughly to reduce any contact with dirt or dust particles. This will help the adhesive on the back of the sticker to grip better and last longer.
If you are working with a removable sticker, peel off the backing paper from one side, as this will make it easier to position the sticker correctly. Just make sure not to touch the adhesive side with your fingers, as the oils from your skin can prevent proper adhesion.
After peeling off the backing paper, carefully place the sticker on the desired area. Start from the center and work your way outwards, smoothing the sticker down as you go along. This will help to eliminate any air bubbles and ensure a smooth application.
Once the sticker is in place, firmly press it down with your hand or a flat object like a credit card, ensuring that the entire sticker is in contact with the surface. Applying even pressure across the entire sticker will help to activate the adhesive and ensure a strong bond.
If you’re applying the sticker on a glass surface like a window, make sure to check the outside for any bubbles or imperfections. If you find any, gently peel up the sticker from one corner and reapply it, smoothing it out as you go along.
Keep in mind that different materials may require different application techniques. For example, vinyl stickers tend to be more durable and suitable for outdoor use, while paper stickers may be more delicate and suitable for indoor use. Make sure to choose the right sticker material for your specific needs.
By following these steps and applying your sticker firmly, you can ensure that it stays in place for a long time, adding a personal touch to your belongings or promoting your brand or message effectively.
Check for any air bubbles
Before applying your sticker, you need to make sure there are no air bubbles trapped between the sticker and the surface it will be stuck to. Air bubbles can prevent your sticker from adhering properly and may cause it to peel off over time.
To check for air bubbles, start by thoroughly cleaning the surface where the sticker will be applied. Use a clean cloth or paper towel to remove any dirt, dust, or grease. This step is crucial as any debris on the surface can create air pockets when the sticker is applied.
Next, peel off a small portion of the backing from the sticker, starting from one corner. Hold the rest of the sticker away from the surface for now. Align the exposed adhesive side of the sticker with the desired area on your chosen surface. Slowly lower the sticker down, making sure to avoid any contact with the surface until you’re ready to apply it.
Once you have the sticker in the right position, start applying it from the center and gradually work towards the edges. Use your fingers or a flat object like a credit card to firmly press down on the sticker, smoothing out any air bubbles as you go along. If you see any air bubbles forming, gently lift the sticker and reapply it, working out the bubbles as you go.
Another technique to prevent air bubbles is to apply the sticker in warm conditions. Heating the adhesive slightly can make it more pliable, allowing it to conform to the surface better and reduce the chance of air pockets. You can use a hairdryer on its lowest setting or place the sticker in a warm area before applying it.
Some sticker materials, like vinyl or removable adhesive stickers, are more forgiving when it comes to air bubbles. They can often be smoothed out more easily without causing damage to the sticker or the surface. However, it’s still important to check for any bubbles and remove them before the adhesive fully sets.
Keep in mind that depending on the size and complexity of the sticker, you may need more than two hands to ensure a bubble-free application. Enlisting the help of a friend can make the process smoother and more efficient.
By taking these steps and checking for any air bubbles, you’ll ensure that your stickers adhere firmly and look great for a longer period of time. Whether you’re putting stickers on your car, window, or any other surface, this guide will help you achieve a flawless application.
Remember, if you’re looking for high-quality custom stickers, visit gs-jj.com. They offer a wide range of sticker options and can help you choose the right material and design for your needs.
Step Five

After you have prepared your working surface and the sticker, it’s time to apply it to the desired area. Before applying the sticker, make sure to clean the surface thoroughly to remove any dirt or dust. This will prevent them from getting trapped under the sticker and reduce its adhesive contact with the surface.
Next, carefully peel off the backing paper from one side of the sticker, exposing the adhesive. Choose the area where you want to apply the sticker and place it on the surface. For larger stickers, it may be helpful to have someone assist you in aligning it correctly.
Once you have positioned the sticker, slowly and firmly press it down onto the surface. Start from the center and work your way outwards, using a firm, even pressure to ensure good contact with the surface. This will help reduce the chances of air bubbles forming underneath the sticker.
If you notice any bubbles, gently lift the sticker and smooth them out using a plastic card or your fingers. Make sure to do this before the adhesive fully sets, as it will be much harder to remove bubbles once the sticker is fully stuck.
Lastly, take a moment to check if the sticker is aligned and placed exactly where you want it. If needed, you can carefully reposition it while the adhesive is still slightly tacky.
Remember to follow the manufacturer’s instructions and recommendations for the specific type of sticker you are using. Some stickers may require additional steps, such as wet application with water or a suitable application fluid.
For removable stickers, keep in mind that they can be peeled off and repositioned multiple times, but over time, the adhesive may lose its stickiness. If you need a more permanent solution, choose a sticker made from a vinyl material with a strong adhesive.
With these steps, you will be able to make your stickers stick firmly and last longer. Check out gs-jj.com for a wide selection of high-quality stickers and other promotional products.
Sources
- Check with the manufacturer: Before applying the sticker, make sure to consult the manufacturer’s instructions provided with the product. They may recommend specific steps or materials for better adhesion.
- Clean the surface: Before applying the sticker, it is crucial to clean the surface thoroughly. Remove any dirt, dust, or oil from the area where you want to stick the sticker to ensure better adherence.
- Choose the right material: Vinyl stickers are more suitable for outdoor use, as they are weather-resistant, durable, and long-lasting. If you need a removable sticker, consider using a material like static cling.
- Take appropriate steps: Before applying the sticker, take the necessary steps like measuring the area, cutting the sticker to the desired size, or trimming excess paper or vinyl.
- Peel and stick: After preparing the surface, peel off the backing paper from the sticker slowly. Start from one side and gradually stick it to the surface, applying firm pressure to ensure proper adhesion.
- Avoid air bubbles: While applying the sticker, be careful to avoid any air bubbles. Start from one edge or corner and slowly press the sticker onto the surface, smoothing it out as you go.
- Keep out moisture: Prevent water or moisture contact with the sticker, especially for outdoor applications. Moisture can reduce the adhesive quality and cause the sticker to detach.
- Keep firm pressure: After applying the sticker, use a flat object like a credit card to press it firmly onto the surface. This will help to secure the sticker and remove any air bubbles.
- Last step: After applying the sticker, wait for at least 24 to 48 hours before cleaning or touching it. This allows the adhesive to fully bond with the surface for better longevity.
- Working with glass surfaces: If you are applying the sticker to a glass surface, make sure the glass is clean and dry. Use a mild soap and water solution to remove any dirt or grease before applying the sticker.
- Double-check: Before applying the sticker, double-check the alignment and positioning. Once the sticker is applied, it may be difficult to reposition it without damaging the adhesive.
- Reduce dust and dirt: To reduce the chances of dust or dirt settling on the sticker during application, work in a clean area away from open windows or outside elements.
- Keep a suitable environment: The temperature and humidity can affect the adhesive properties of the sticker. Make sure the working environment has suitable conditions recommended by the manufacturer.
- Get advice from experts: If you’re unsure about the process or need more specific guidance, consider contacting professionals like GS-JJ.com who specialize in custom stickers and can provide expert advice.


