

If you’re in the clothing industry, branding is everything. That’s why creating your own shirt labels is a crucial step in establishing your own line of apparel. First, you’ll need a machine or tool to make the labels. There are various options available, from tape to screenprinting. T-shirts usually come with an open neck seam, which is perfect for inserting a label.
Before you get started with the process, you’ll need a few materials. Sewing machine, thread, a sheet of labels, scissors, and a stitch ripper are some of the essentials. If you want a customized design, you may also need vinyl or Dutch-colored thread. Once you have all the materials, you can begin the labeling process.
Let’s start by creating the label itself. You can either order custom-ordered labels with your logo or simply make them at home. If you decide to make your own, using a silkscreened label is a great option. You can find templates online or design one yourself. Cut the fabric into the desired shape and size, and then sew it onto the neck of the shirt.
To make the process easier, you can fold the shirt in half and make an impression with a fabric pen for accurate placement. This is especially helpful when you have a small logo or intricate design. Then, sew along the lines you created.
When it comes to ordering custom labels, there are a few things you should keep in mind. First, consider the weight of the fabric. Different manufacturers offer different options, so choose one that suits your needs. Second, think about the design and placement of the label. You want it to be visible and nicely integrated into the overall design of the garment. Finally, make sure to order enough labels for all your products, as it’s more cost-effective to order in bulk.
Labeling your shirts adds a professional touch to your brand and helps customers identify your products. Whether you choose to sew them in or use adhesive labels, creating your own shirt labels allows you to customize your clothing and save on costs. So, get started on your shirt labeling journey and enjoy the process of branding your own apparel!
Custom Shirt Tags: Creating Your Own Neck Label
If you want to add a personalized touch to your shirts, creating your own custom neck label is a great option. Whether you’re a clothing manufacturer looking to brand your apparel or simply a shirt enthusiast who wants a unique touch, designing and printing your own neck labels can be an easy and fun process.
One of the first things you’ll need is a design for your neck label. You can create your own logo or use pre-made fonts and designs. Make sure the design matches the style and branding of your shirts. Once you have your design ready, you can move on to the printing process.
There are several options for printing your neck labels. If you’re only making a few shirts, you can use a vinyl label printer. These printers use a small surface area and are easy to use. Simply open the printer, insert your design, and let the machine do the work. However, if you’re working on a larger project or want more variety in your label designs, you should consider silkscreening or ordering custom sewn-in labels.
Screenprinting is a popular method for creating shirt labels. This process involves printing your design directly onto the fabric using a special screen and ink. The result is a durable label that stands up to wear and washing. However, screenprinting can be time-consuming and requires some equipment and supplies.
If you’re ordering custom sewn-in labels, you’ll need to find a manufacturer that offers this option. There are many online shops and clothing manufacturers that offer custom-ordered sewn-in labels. You can choose from a variety of materials, colors, and fonts to create the perfect label for your shirts.
When designing your neck label, keep in mind that the size of the label should be no larger than 3 inches by 1 inch. This ensures that it will fit comfortably on the back of your shirt without irritating the wearer’s neck. You can include your brand logo, company name, care instructions, or any other information you want to include on the label.
Creating your own custom neck label allows you to add a personal touch to your shirts and gives your brand a professional touch. Whether you choose vinyl, silkscreened, or sewn-in labels, the process is easy and enjoyable. So get started on designing and printing your own custom shirt tags and enjoy the satisfaction that comes with creating something unique!
Learn More about our Custom Labels Design Options
When it comes to creating custom labels for your shirt, there are a variety of options available that can help you achieve the look and feel you’re looking for. Whether you want a label that stands out or one that is more subtle, our design options have got you covered.
If you’re looking for a label that is lightweight and easy to sew onto your garment, then our woven labels are a great option. These labels are created with high-quality materials and can be ordered in a variety of colors and fonts. They give a professional and branded impression to your shirt.
On the other hand, if you prefer a label that is printed directly onto the fabric of your shirt, then our silkscreened labels are the way to go. These labels are created by hand and offer a more unique and personalized touch. You can choose from a variety of fonts, colors, and even add your logo or other designs.
If you’re not sure where to get started with designing your custom labels, don’t worry! Our team of experts is here to help you every step of the way. Whether you need assistance in creating a logo or choosing the right label size, we’ve got you covered.
When ordering your custom labels, you should keep in mind any special design requirements. For example, if you want a label that can be easily removed, then our vinyl option is the one for you. Or, if you’re looking for a label that is more durable and can withstand washing, then our sewn-in option is your best bet.
Whatever option you choose, our custom labels are created with high-quality materials to ensure a long-lasting and professional finished product. We understand the importance of branding and the impression it can make, so we strive to deliver labels that exceed your expectations.
So, if you’re ready to take your shirt labeling to the next level, browse through our variety of options and feel free to reach out to our team for any help or guidance you may need. Let’s create labels that not only keep your product looking great but also leave a lasting impact on your customers.
11 How to Sew On Labels by Hand
If you’re looking to add a personal touch to your clothing or apparel products, sewing on labels by hand can be a great option. Not only does it give a nice, handmade feel to your products, but it also allows you to add custom branding and logos. In this article, we’ll learn how to sew on labels by hand step by step to create a unique and professional impression.
1. Gather Your Materials: Before you get started, make sure you have all the materials you need. This includes the labels you want to sew on, thread that matches the label color or your design, a needle, scissors, and a tape measure.
2. Decide Where to Sew: Determine where you want to place the label on your clothing or shirt. This could be on the back of the neck, on the bottom hem, or any other visible surface.
3. Folded or Unfolded: Decide whether you want to sew the label on when the clothing is folded or unfolded. This will affect the placement and visibility of the label.
4. Position and Pin: Once you’ve decided where to sew the label, position it on the clothing and use pins to hold it in place. This will ensure that the label stays in the desired location while you sew.
5. Thread the Needle: Take your needle and thread it with a length of thread. Make sure the thread matches the color of your label or design.
6. Start Sewing: Begin sewing the label onto the clothing or shirt by making small stitches along the edges of the label. Use a simple stitch like a running stitch or backstitch to secure the label.
7. Be Consistent: As you sew, try to make your stitches as consistent as possible. This will create a neat and professional-looking finish.
8. Secure the Ends: When you reach the end of the label, make a few extra stitches to secure the thread. Then, cut off any excess thread.
9. Sewn-In Labels: If you prefer a more durable option, you can order sewn-in labels from a manufacturer. These labels are created with a woven fabric and are sewn directly into the clothing. They are a great choice if you’re looking for a seamless and long-lasting label.
10. Sewn-In Labels With Logo or Design: If you want to add a logo or design to your sewn-in label, you can either have it silkscreened or use vinyl printing. This will give your label a more unique and personalized look.
11. Save Time with Machine Sewing: If you have a lot of labels to sew on or if you want to save time, using a sewing machine is a great option. Machine sewing allows for quicker and more efficient label attachment.
By following these steps, you’ll be able to easily sew on labels by hand and create a professional and custom impression for your clothing or apparel products. Whether you’re creating your own brand or simply adding labels to your handmade projects, sewing on labels is an easy and effective way to add a personal touch.
Let’s Get Started
To make shirt labels, you’ll need a few materials and a design idea. First, make sure you have the following materials:
- 3 stands of thread (whatever color you prefer)
- Custom t-shirts to sew the labels onto
- A sewing machine or needle and thread
- Vinyl or other fabric for the labels
- A small sheet of paper
- A pen or pencil
- A pair of fabric scissors
- Some tape to hold things in place
Once you have all the materials, you can start the process of creating your shirt labels. The first thing you’ll need to do is design the labels. You can do this on your computer using a design tool or simply draw them by hand on the sheet of paper. You’ll want to keep the design simple and easy to read, as it will be sewn onto a small surface.
Think about the fonts and colors you want to use for your labels. Remember that light and small fonts may be difficult to read once sewn onto the shirt. You may also want to consider adding your brand’s logo or a symbol that represents your clothing line.
Next, cut out the design from the sheet of paper. This will be your template for the labels. Place the template on the vinyl or fabric and trace around it with a pen or pencil. Cut out the label shape from the vinyl, making sure to cut along the lines as accurately as possible.
Now it’s time to sew the labels onto your t-shirts. Start by positioning the label where you want it on the shirt. Secure it in place with a little bit of tape, making sure it is straight and centered. Thread your sewing machine with the desired thread color, or thread your needle with the thread.
Begin by sewing a straight line along one edge of the label, using a running stitch or a simple backstitch. Then sew another line along the opposite edge, creating a rectangle shape. Finally, sew a line down the middle of the label. This will create a sewn-in label that won’t easily come off.
Repeat this process for each shirt and label. If you have a large number of shirts to label, consider doing them in batches of 12 or so to keep things manageable.
Once the labels are sewn on, you can enjoy the satisfaction of having custom-ordered and sewn-in labels on your apparel products. They will help give your clothing a professional and branded look, and let customers know that you take care in designing and creating your products.
12 How to sew labels with a sewing machine
If you want to add a professional touch to your clothing projects, sewing labels with a sewing machine is a great option. This method allows you to attach custom labels to your garments, giving them a nice finishing touch. Whether you’re creating your own clothing line or simply want to add a personalized touch to your projects, sewing labels with a sewing machine is a simple and effective way to do it.
Before you get started, you’ll need to have your labels ready. You can either have them custom-ordered from a manufacturer or create your own by screenprinting or using vinyl. There are a variety of sources where you can order custom labels, so make sure to choose the one that suits your needs best.
Once you have your labels, you’ll need to fold them in half so that the printed or colored side is facing out. This way, the label will show on both the front and back of the garment. You can also choose to sew the labels on the inside of the garment if you prefer a more discreet look.
Next, choose the location where you want to sew the label. You can either sew it on the back of the garment, near the neck, or on the side seam. It’s best to sew it on a flat surface, such as a table, before attaching it to the garment.
Now it’s time to set up your sewing machine. Thread your machine with a color that matches the label or the garment. Select a straight stitch or a zigzag stitch, depending on the look you want to achieve. Adjust the stitch length and tension according to the thickness of the label and the fabric of the garment.
Position the label on the garment, making sure it’s straight and centered. Use a fabric tape or pins to hold it in place. Start sewing from one end of the label, sewing a straight line along the folded edge. Backstitch at the beginning and end of the line to secure the stitches.
If you’re sewing multiple labels, repeat the process for each one. Take your time and make sure each label is sewn securely and evenly.
When you’re finished sewing, check the back of the garment to make sure all loose threads are trimmed. This will give the label a neat and professional look.
By sewing labels with a sewing machine, you’ll be able to add a personalized touch to your clothing projects. It’s a simple and easy process that will give your garments a nice finishing touch. So let’s get started and make your clothing stand out!
How do I design a clothing tag that stands out
If you want to create a clothing tag that stands out on your t-shirts or any other garments, there are a few key steps to keep in mind. Here, we’ll break down the process of designing a custom clothing tag, from selecting the right materials to creating a visually appealing design.
Let’s start with the materials you will need for your clothing tag. Generally, clothing tags are made of a thin sheet of fabric or paper that can be sewn onto the garment. There are various sources where you can find these fabric or paper sheets, some of which are custom-ordered to fit your specific needs. Whatever material you choose, make sure it is lightweight and feels nice against the skin.
Now, onto the design itself. When it comes to designing your clothing tag, you have a variety of options. You can either use a design tool or simply hand-draw your design on a piece of paper. If you’re using a design tool, there are many online resources available that can help you create professional-looking designs. Play around with fonts, colors, and tags until you find a combination that feels right for your brand.
One thing to keep in mind when designing your clothing tag is that it should be easily readable. Choose fonts and colors that are legible and stand out against the background. You want to make sure that the information on your tag, such as your logo, brand name, or care instructions, can be easily seen and understood.
When it comes to ordering your clothing tags, you have a few options. You can either order them from a manufacturer who specializes in creating custom tags, or you can try creating them yourself using a screenprinting or sewing method. If you’re ordering from a manufacturer, make sure to provide them with all the necessary details such as the design, size, and quantity of tags you need.
If you decide to create your own clothing tags, there are a few techniques you can try. For example, you can sew your design onto a fabric tag using a sewing machine or by hand. Another option is to use heat transfer vinyl to create a custom-colored tag that can be ironed onto the garment. Whatever method you choose, make sure to follow instructions carefully and test your technique before applying it to your actual clothing.
In conclusion, designing a clothing tag that stands out requires careful consideration of materials, design elements, and manufacturing techniques. Take the time to research and experiment with different options to find the perfect tag for your brand. A well-designed clothing tag can leave a lasting impression on your customers and contribute to the overall branding of your products.
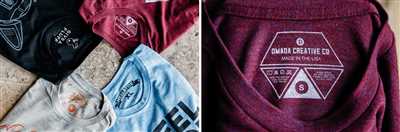
3 Silkscreened labels
When it comes to creating shirt labels, one popular option is to use silkscreened labels. Silkscreening allows you to create a custom design or logo that is printed directly onto the fabric of the shirt. This method is commonly used by clothing manufacturers and can give your shirts a professional and polished look.
First, you’ll need to have your design or logo ready. You can create your design using graphic design software or hire a professional to help you with the process. Make sure your design is in the right format and resolution for printing.
Next, you’ll want to find a silkscreening shop or manufacturer that can help you with the printing process. You can either order the silkscreened labels in bulk or custom-order each label individually. Keep in mind that ordering in bulk is generally more cost-effective than custom-ordering.
Once you have your design and chosen a printing option, it’s time to start sewing the labels onto your shirts. Before you sew the labels in, make sure the shirts are folded properly and the labels are in the right position. You can use a sewing machine or sew the labels in by hand, depending on your preference.
When sewing the labels, it’s important to use a thread that matches the color of the labels and the shirt. This will help the labels blend in and give a seamless finish. Start sewing from the back of the shirt and make sure to sew all around the edges to secure the label in place.
Another option is to use a sewn-in label. This involves sewing the label onto a separate sheet of fabric and then sewing that fabric onto the shirt. This method is often used for heavier-weight shirts or when the shirt material is not suitable for direct printing.
Once the labels are sewn on, you’ll have a professional-looking shirt with custom silkscreened labels. This type of labeling is durable and will withstand multiple washes without fading or peeling. Silkscreened labels are a popular choice among clothing manufacturers and can add value to your products.
That’s it! Now you know how to make silkscreened labels for your shirts. Whether you’re a DIY enthusiast or a clothing designer looking to create a line of custom shirts, silkscreened labels can help give your products a professional touch. So, let’s get started and make your shirts stand out with custom silkscreened labels!
Custom Ordered Labels
When it comes to adding labels to your shirts, you have the option to order custom labels that are specifically designed for your brand. These custom labels can be sewn onto the shirts or attached using adhesive tape. Ordering custom labels gives you the opportunity to create a unique and personalized design that reflects your brand identity.
If you’re looking to add a professional touch to your shirts, custom ordered labels are a nice option. Instead of using generic labels that are already available on the market, you can have labels that are specifically made for your brand. This allows you to choose the design, materials, and even the size of the label.
When ordering custom labels, you can choose from a variety of options. You can decide on the materials, colors, and even the printing method for your labels. If you’re looking for a more high-end and luxurious feel, you can opt for silkscreened labels. On the other hand, if you want a more lightweight and cost-effective option, you can go for printed labels.
Custom ordered labels are great for branding purposes. They allow you to showcase your logo, tagline, or any other information you want to display on the shirt. This not only helps in creating brand recognition but also gives your shirts a professional and polished look.
The process of ordering custom labels is simple. All you need to do is find a reliable label manufacturer or supplier who offers custom labeling services. They will guide you through the design process and help you choose the best options for your specific needs.
Once you have the design and specifications finalized, the manufacturer will create the labels for you. They will then sew or attach the labels onto the shirts, ensuring a secure and durable attachment. You can choose to have the labels stitched onto the neck or a specific part of the shirt, depending on your preference.
Whether you’re a clothing manufacturer or someone who enjoys sewing your own shirts, custom ordered labels are a great way to add a professional touch to your projects. They not only give your shirts a professional look but also help in establishing your brand identity.
Sources

When it comes to ordering shirt labels, there are several options you can choose from. Depending on your needs and resources, you can either order these labels from a manufacturer, buy them online, or create your own. Let’s explore these options:
- Manufacturer: If you’re looking for a professional and high-quality label, ordering from a manufacturer is a great choice. They have various materials, sizes, and designs to choose from, and you can customize your labels to fit your branding. This option may be more suitable for larger projects or when you want to create a cohesive look across your clothing line.
- Online shops: There are plenty of online shops where you can simply buy shirt labels. These shops offer a wide range of materials and designs to choose from, allowing you to find the perfect label for your garments. This option is generally more cost-effective than ordering from a manufacturer and is great for smaller projects or if you’re on a tight budget.
- Create your own: If you enjoy DIY projects or want to save some money, you can make your own shirt labels. This can be done using various methods, such as sewing or screenprinting. For sewing, you can either hand sew or use a sewing machine to stitch your labels onto the shirts. On the other hand, screenprinting allows you to print your own labels onto a sheet of vinyl, which can then be applied to the shirt’s surface.
No matter which option you choose, the first thing you should do is fold the label in half and either sew or use fabric tape to attach it to the shirt. This will ensure that the label stays in place and doesn’t get easily ripped off. Additionally, consider the weight of the label and the garments it will be attached to. For lightweight shirts, a small and thin label may be more appropriate, while heavier shirts may require a larger and sturdier label.
Creating your own shirt labels gives you the opportunity to have custom-ordered tags that perfectly represent your brand. This can be especially beneficial if you want to create a unique and memorable clothing line. Whether you choose to order labels from a manufacturer, buy them from an online shop, or make your own, the important thing is to keep your branding consistent and ensure that the labels reflect the quality of your products.
So, if you’re ready to get started, let’s explore the options and find the best way to make your shirt labels!


