

If you are wondering how to make a PDF PowerPoint presentation, there are several methods you can use to convert your files. One of the easiest ways is to use third-party apps and tools that offer features for exporting and saving your PowerPoint slides in PDF format.
Step 1: Save Your PowerPoint Presentation as a PDF File
To convert your PowerPoint presentation to PDF on a Mac, you can simply select the “Save As” option and choose the PDF format from the preferences. On Windows, you can go to the “File” menu, click on the “Save As” button, and then select PDF from the available formats.
Step 2: Use Online Converters for PDF PowerPoint Conversion
If you don’t have PowerPoint installed on your computer or you want to convert a scanned document, you can use online converters like Cometdocs. These converters allow you to upload your PowerPoint files and perform OCR (Optical Character Recognition) to convert them into editable PDF files.
Step 3: Export Your Presentation to OneDrive and Convert to PDF
If you have your PowerPoint presentation stored on OneDrive, you can easily convert it to PDF. Simply open the presentation in PowerPoint Online, click on the “File” menu, and choose the “Save As” option. Then select PDF as the file format and click on the “Save” button.
What’s more, when you convert your PowerPoint presentation to PDF format, you can also choose to convert it as a single page or as multiple pages per slide. This can help you save space and make the file size smaller if you don’t need to show each slide on a separate page.
Converting your PowerPoint presentations to PDF format can be a great help if you want to share them with others or publish them online. PDF files are widely supported and can be viewed on any device without the need for PowerPoint.
- How to Export Your PowerPoint Presentation as a PDF File
- Part 2: Convert Scanned PDF to PowerPoint on Mac with OCR
- Steps on how to change a scanned PDF to a PowerPoint on Mac
- Step 1 Perform OCR
- Step 2 Convert PDF to PPT on Mac
- Set the print quality of the PDF
- What’s the Difference Between Saving and Exporting as a PDF
- How to Save PowerPoint as PDF using Third-Party Apps
- Google Slides
- PowerPoint to PDF Conversion Apps
- Video:
- Pdf to PPT converter || convert pdf to ppt without software
How to Export Your PowerPoint Presentation as a PDF File
If you have a PowerPoint presentation that you want to share with others, one of the best ways to do so is by exporting it as a PDF file. PDF (Portable Document Format) is a universal file format that preserves the layout, formatting, and fonts of a document. It is also widely compatible with different software and platforms, making it an ideal choice for sharing files.
Here is a step-by-step guide to help you export your PowerPoint presentation as a PDF file:
- Open your PowerPoint presentation. If you’re using the online version of PowerPoint (Google Slides), you’ll first need to download your presentation as a PowerPoint file (PPT or PPTX).
- Click on the “File” button, which is usually located in the top-left corner of the program window.
- In the drop-down menu, select the “Save As” or “Export” option.
- Choose the location where you want to save the PDF file.
- Under the “Save as type” or “File format” section, select “PDF” from the list of available formats.
- If you want to change the settings or options for the PDF file, click on the “Options” or “Preferences” button. This will allow you to specify the page range, image quality, and other settings.
- Once you have set your preferences, click on the “Save” or “Export” button to start the conversion process.
- Depending on the size of your presentation and the speed of your computer, the conversion process may take a few moments.
- When the process is complete, you will have a PDF file of your PowerPoint presentation that is ready to be shared or printed.
It’s worth noting that some versions of PowerPoint may have slightly different steps or options for exporting as a PDF. If you can’t find the exact options mentioned above, refer to the software’s help documentation or search online for specific instructions.
In addition to the built-in PowerPoint features, there are also third-party apps and online converters that can help you convert your presentations to PDF. Some of these converters even have the ability to OCR (Optical Character Recognition) scanned documents, making them searchable and editable in the PDF format.
By exporting your PowerPoint presentation as a PDF file, you can ensure that your slides will look the same regardless of the device or software used to view them. PDF files are also compact and can be easily shared via email or uploaded to cloud storage services like OneDrive. Furthermore, PDF files can be published on websites or downloaded for offline viewing.
In summary, exporting your PowerPoint presentation as a PDF file is a simple and efficient way to share your work. Whether you’re presenting to a live audience or sending your slides to someone remotely, using the PDF format will ensure that your message is communicated effectively.
Part 2: Convert Scanned PDF to PowerPoint on Mac with OCR
If you have a scanned PDF document that you want to convert to PowerPoint slides on your Mac, you can do so using OCR (Optical Character Recognition) technology. OCR is a feature that recognizes text from scanned images and turns it into editable text. This allows you to convert a scanned PDF into a PowerPoint presentation without having to retype or manually recreate the content.
Here are the steps to convert a scanned PDF to PowerPoint on a Mac using OCR:
- First, you need to download and install a third-party OCR software. There are several options available for Mac, such as Adobe Acrobat Pro, PDFelement Pro, and ABBYY FineReader. Choose the one that suits your preferences and download it from the official website.
- Once you have downloaded and installed the OCR software, open it on your Mac and import the scanned PDF file that you want to convert to PowerPoint.
- Select the OCR feature in the software, which is usually located under the “Convert” or “OCR” tab.
- Configure the OCR settings according to your needs. You can choose the output format as PowerPoint (PPT or PPTX), set the quality of the conversion, and select the desired language for OCR recognition.
- Click on the “Convert” or “Start” button to begin the OCR process. The software will analyze the scanned PDF, recognize the text, and convert it into editable text.
- Once the OCR process is complete, you can save the converted file as a PowerPoint presentation. Choose the desired location on your Mac or save it to cloud storage services like OneDrive or Google Drive.
- Now you have a PowerPoint presentation that includes the content from your scanned PDF. You can further edit the slides, add or remove elements, and customize the presentation to fit your needs.
Using OCR to convert scanned PDFs to PowerPoint on your Mac allows you to easily transform scanned documents into presentations that are ready to be shared or presented. It eliminates the need for manual typing or recreating the content, saving you time and effort.
Keep in mind that the quality of the OCR conversion may vary depending on the accuracy of the OCR software and the clarity of the scanned document. Make sure to review the converted slides and make any necessary adjustments to ensure the accuracy of the content.
In conclusion, if you want to convert a scanned PDF to PowerPoint on your Mac, using OCR features in third-party apps can help you perform this conversion seamlessly. Follow these steps to convert your scanned PDF into PowerPoint slides and enjoy the difference it makes in your presentations.
Steps on how to change a scanned PDF to a PowerPoint on Mac
If you’re using a Mac and want to convert a scanned PDF document into a PowerPoint presentation, there are a few easy steps you can follow using built-in tools or third-party apps.
Step 1: Export the scanned PDF as an image file.
If you have scanned your document and saved it as a PDF, you first need to convert it into an image file format. One way to do this is by opening the PDF document in Preview (the default Mac PDF viewer), and then selecting the “File” menu, followed by “Export”. Choose an image format such as JPEG or PNG to save the scanned PDF as an image file.
Step 2: Use a third-party converter to change the image file to PowerPoint.
PowerPoint presentations are typically created using slides, so you’ll need to convert the image file into a format that PowerPoint can recognize. There are several third-party apps available for Mac that specialize in converting image files to PowerPoint presentations. Some popular options include Cometdocs and PDF to Powerpoint Converter, which can easily perform this conversion.
Step 3: Open the converted PowerPoint document and make any necessary adjustments.
After you have downloaded and installed the third-party converter, you can simply open the converted PowerPoint document. However, you may need to make some adjustments to ensure the slides are formatted the way you want. You can easily rearrange slides, change the layout, and edit the content using PowerPoint’s features.
Step 4: Save and publish your PowerPoint presentation.
Once you have made all the necessary changes, simply save your PowerPoint presentation to the desired location on your Mac. You can also publish your presentation online or save it to a cloud storage service, such as OneDrive or Google Drive, to easily share it with others.
By following these steps, you can convert a scanned PDF into a PowerPoint presentation on your Mac. Remember to check the image file preferences and adjust the settings if you want to optimize the quality and reduce the file size of your presentation.
Step 1 Perform OCR
If you want to convert a PowerPoint presentation to a PDF file, you may encounter some challenges, especially when dealing with scanned documents or presentations that contain images with text. This is where OCR (Optical Character Recognition) comes in handy. OCR technology can recognize text from images or scanned documents, allowing you to easily extract the text and convert it into a searchable and editable format.
Performing OCR on your PowerPoint presentation can significantly improve the quality of the exported PDF file. It can help you preserve the formatting, fonts, and other features of your presentation, making it look professional and readable.
There are several ways to perform OCR on your PowerPoint presentation. Here are some steps you can follow:
- Using Cometdocs: Cometdocs is a web-based solution that allows you to convert files between different formats, including PowerPoint to PDF conversion with OCR. Simply upload your PowerPoint presentation to the Cometdocs website, choose the PDF format with OCR option, and click the “Convert” button. Then, you can easily save the converted PDF file to your computer or online storage such as Google Drive or OneDrive.
- Using third-party converters: There are many OCR converters available online that can help you perform OCR on your PowerPoint presentation. These converters usually require you to upload your presentation, select the OCR option, and then download the converted PDF file. Some popular OCR converters include Adobe Acrobat Pro, Abbyy FineReader, and Nitro Pro.
- Using OCR apps: If you’re using a Mac, you can take advantage of built-in OCR features in apps like Preview and Adobe Acrobat Reader. Simply open your PowerPoint presentation in either of these apps, go to the “Preferences” or “Settings” section, and set your OCR preferences. Then, you can easily convert your presentation to PDF by selecting the “Print” option and choosing the “Save as PDF” feature.
Performing OCR on your PowerPoint presentation is a crucial step in the conversion process. It allows you to transform your presentation into a PDF file that is ready to be published or shared, while preserving the original layout and design. By performing OCR, you’re able to extract text from scanned documents or images and save it in a format that’s easily searchable and editable.
Step 2 Convert PDF to PPT on Mac
Once you have downloaded and installed the necessary apps to perform the conversion, you’re ready to convert your PDF document to PowerPoint presentation format on a Mac. Follow these steps to convert your PDF to PPT:
- Open the PDF document you want to convert using a PDF viewer such as Adobe Acrobat or Preview.
- Click on the “File” menu and select the “Export” option.
- In the export settings, choose PowerPoint as the file format you want to convert to.
- Select the location where you want to save the converted file.
- If you want to make any modifications or apply OCR (Optical Character Recognition) to the PDF document, you can do so in the preferences or options of the PDF viewer.
- Click the “Save” button to start the conversion process.
There may be slight differences in the steps depending on the PDF viewer you are using, but the general process remains the same. Once the conversion is complete, you will have a PPT file that you can open and edit in PowerPoint.
It’s important to note that if your PDF document contains complex formatting or intricate graphics, the conversion may not be perfect. In such cases, you may need to manually adjust the slides in PowerPoint to ensure they match the original document.
If you don’t have access to a PDF viewer with export features, you can also use third-party online converters, such as Cometdocs or Google Drive, to convert your PDF to PPT. These converters typically offer the option to convert and download the converted file directly, making the process simple and convenient.
Remember to set your preferences and options according to your desired output and quality settings. You can choose to have smaller file sizes by sacrificing some image quality, or opt for higher quality with larger file sizes. The choice is yours depending on your needs and the purpose of the presentation.
Set the print quality of the PDF
When exporting your PowerPoint presentation as a PDF file, you have the option to set the print quality. This can be useful if you want to reduce the file size or ensure that your slides display properly when printed.
There are several ways to set the print quality of a PDF, depending on the software or online service you are using. Here are two popular methods:
| Method 1: Using PowerPoint | Method 2: Using third-party converters |
|---|---|
|
|
It’s important to note that when converting scanned documents, using OCR (Optical Character Recognition) is necessary in order to maintain the text and formatting of the original PowerPoint presentation. However, this additional step can result in a larger file size.
By adjusting the print quality, you can make a difference in the file size and presentation of your PDF. Experiment with the different options to find what’s best for your needs and preferences.
Whether you’re using PowerPoint on a Mac or Windows, or prefer to save your presentations on OneDrive or other cloud storage apps, these steps will help you easily export your PowerPoint as a PDF file with your desired print quality.
Now that you have your PDF file ready, you can publish it, share it, or use it for other purposes as needed.
What’s the Difference Between Saving and Exporting as a PDF
When working with PowerPoint presentations, you have the option to save or export your file as a PDF. While both options allow you to create a PDF version of your presentation, there are a few key differences between the two.
Saving a Presentation as a PDF
If you want to save a PowerPoint presentation as a PDF, you can do so using the built-in “Save As” feature. This method is quick and easy, as it only takes a few steps. Simply click on the “File” tab, select “Save As,” choose the PDF format, and click “Save”. This will create a PDF version of your presentation using the default settings.
This method is ideal if you want to quickly save your presentation as a PDF without making any changes to the original file. The resulting PDF will have the same layout and appearance as the PowerPoint document, making it suitable for viewing or printing.
Exporting a Presentation as a PDF
On the other hand, exporting a presentation as a PDF gives you more control over the output. When you export a PowerPoint presentation as a PDF, you can customize various settings such as the page size, orientation, and image compression. This allows you to optimize the PDF file for specific purposes, such as printing or online publishing.
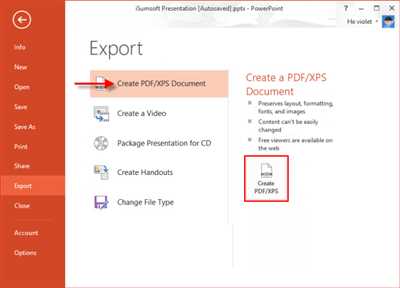
To export a PowerPoint presentation as a PDF, go to the “File” tab, choose “Export,” and select the “Create PDF/XPS Document” option. Then, click on the “Create PDF/XPS” button to open the “Publish as PDF or XPS” dialog box. From there, you can set your preferences and click “Publish” to generate the PDF file.
Another advantage of exporting as a PDF is that it supports OCR (Optical Character Recognition). This means you can convert scanned or image-based presentations into searchable and editable PDFs, making it easier to work with the content.
Third-Party Converters and Apps
If the built-in save or export features in PowerPoint don’t meet your needs, there are also third-party converters and apps available. These tools offer additional features and customization options, allowing you to perform more advanced conversions or make specific changes to the PDF file.
For example, Cometdocs is a popular online converter that allows you to convert PowerPoint presentations to PDF format. It offers a range of conversion options, including changing the layout, adding watermarks, or protecting the PDF with a password.
In conclusion, the difference between saving and exporting a PowerPoint presentation as a PDF lies in the level of customization and control you have over the output. While saving is quick and easy, exporting allows you to tailor the PDF file to your specific needs. Whether you want a smaller file size, higher image quality, or OCR capabilities, exporting as a PDF can help you achieve the desired result.
How to Save PowerPoint as PDF using Third-Party Apps
Exporting a PowerPoint presentation to PDF is a great way to save and publish your slides in a smaller file format. While PowerPoint itself has the option to save presentations as PDFs, using third-party apps can provide additional features and options to enhance the conversion process.
If you’re wondering how to save PowerPoint as PDF using third-party apps, here’s what’s you need to do:
- Step 1: Download one of the many third-party apps or online converters available. These converters can be found via a quick search using Google or any other search engine.
- Step 2: Once you have downloaded the app or accessed the online converter, open it.
- Step 3: Set your preferences. Choose if you want to convert the entire PowerPoint presentation or just specific slides. Some converters even allow you to set the quality of the PDF, such as the resolution and compression level.
- Step 4: Select the PowerPoint file you want to convert to PDF. Some converters may have a “Browse” button or allow you to drag and drop the file onto the conversion window.
- Step 5: Click on the “Convert” or “Export” button to initiate the conversion process.
- Step 6: Wait for the conversion to complete. The time it takes may vary depending on the size of the PowerPoint presentation and the capabilities of the third-party app or online converter.
- Step 7: Once the conversion is finished, you can typically choose where to save the PDF file on your device or computer. Choose a location and click “Save” to finalize the process.
- Step 8: Congratulations! You have successfully saved your PowerPoint presentation as a PDF using a third-party app or converter.
Using third-party apps or converters can provide you with additional features, such as OCR (Optical Character Recognition) for scanned presentations or even the ability to convert PowerPoint to PDF on Mac devices. These apps can also help if you don’t have PowerPoint installed on your computer, as they offer a way to easily convert PowerPoint files without the need for the program itself.
Remember that not all third-party apps or converters are created equal, so you may want to research and read reviews before downloading or using one. Consider factors such as the conversion quality, ease of use, available features, and whether the app or converter is free or requires a purchase.
Now that you know how to save PowerPoint as PDF using third-party apps, you can easily convert and publish your presentations in a convenient and widely accessible format.
Google Slides
If you’re looking to convert your PowerPoint presentations into PDF format, Google Slides can help. Google Slides is a powerful online tool that allows you to create, edit, and present your slides. It also has a feature that lets you export your presentations as PDFs.
To convert your PowerPoint presentation into a PDF using Google Slides, follow these steps:
- Open your PowerPoint presentation in Google Slides. If you don’t have a Google account, you can easily sign up for one.
- If you want to make any changes or edits to your presentation before converting it to a PDF, do so now. Google Slides has many features that allow you to customize your slides.
- Once your presentation is ready, click on the File menu at the top of the page.
- From the dropdown menu, select the “Download” option, and then choose “PDF document”.
- Google Slides will then convert your presentation into a PDF file. You can choose where to save it on your computer or device.
It’s important to note that when converting your PowerPoint presentation to PDF using Google Slides, the quality of the PDF may be slightly different from the original PowerPoint file. However, for most purposes, the difference is minimal.
If you have a scanned document or image that you want to convert to PDF, Google Slides does not have OCR (optical character recognition) capabilities. In this case, you may need to use a third-party converter or software to convert the scanned document to text, and then save it as a PDF.
In addition to Google Slides, there are other apps and software available that can help you convert PowerPoint presentations to PDF. Some popular options include Adobe Acrobat, Cometdocs, and Microsoft PowerPoint (on Mac or OneDrive).
When converting PowerPoint presentations to PDF, there are a few things to keep in mind:
- If your PowerPoint presentation contains a lot of images or embedded videos, the resulting PDF file may be larger in size. If you want to save on file size, consider compressing the images or removing any unnecessary elements.
- Some converters may have limitations on the number of slides or file size they can handle. Before using a converter, check its specifications to ensure it can handle the size of your presentation.
- Depending on your preferences, you may want to set specific options or preferences for the PDF conversion. These options can include things like the output quality, page size, or orientation.
Once your PowerPoint presentation is converted to a PDF, you can easily share or print it. PDF files can be viewed on any device and can be easily opened using free PDF reader software.
So, if you’re looking to convert your PowerPoint presentations to PDF, Google Slides is a helpful tool that can help you with the conversion process. Follow the steps mentioned above to easily save your presentations as PDF files.
PowerPoint to PDF Conversion Apps
If you need to convert your PowerPoint presentations into PDF files, there are several apps available that can help you with this task. These converters allow you to change each slide of your PowerPoint presentation into a separate page in the PDF document. Let’s take a look at some of the popular apps for PowerPoint to PDF conversion:
1. Microsoft PowerPoint (Windows and Mac)
If you are using Microsoft PowerPoint on Windows or Mac, you can easily save your presentation as a PDF file. Simply go to the “File” menu, select “Save As”, choose “PDF” from the file format options, and click the “Save” button. This will export your PowerPoint presentation into a PDF format. You can also set preferences, such as the quality of the PDF file, before saving.
2. Adobe PowerPoint to PDF Converter (Windows and Mac)
Adobe Acrobat DC offers a powerful PowerPoint to PDF conversion feature. To convert your PowerPoint presentation to PDF using Adobe Acrobat, open the presentation and go to the “Export” menu. From there, select “Create PDF” and choose the location where you want to save the PDF file. You can also perform OCR (Optical Character Recognition) if you have a scanned document or want to extract text from the slides.
3. Cometdocs
Cometdocs is a web-based service that allows you to convert PowerPoint presentations to PDF easily. Simply upload your PowerPoint file, select the conversion options, and click the “Convert” button. Once the conversion is complete, you can download the PDF file to your computer or save it to cloud storage services like OneDrive or Google Drive.
These apps provide a simple and convenient way to convert your PowerPoint presentations into PDF files. Whether you need to share your presentation with others or want to print it, converting it to PDF ensures that the formatting and layout remain intact. Try out these apps and see what’s best for your needs!


