

If you’re an avid reader or frequently browse the web, you should know just how important bookmarks can be. They save you time by allowing you to quickly access your favorite pages with just a click. But why settle for ordinary bookmarks when you can create your own unique and personalized ones? In this guide, we will show you how to make bookmarks that are not only functional but also a reflection of your personal style.
Before we delve into the step-by-step process, let’s talk about why you would want to create your own bookmarks. These DIY bookmarks make great gifts for friends and family, and are also a creative way to express yourself. Plus, making your own bookmarks allows you to explore different materials and designs, giving you the freedom to experiment and create something truly unique.
Now, let’s prepare the materials you’ll need for creating your bookmarks. You will need cardstock or thick paper, scissors or a paper cutter, glue or tape, and any decorative materials you want to use, such as stickers, ribbons, or colored pencils. You may also want to gather magazines or printouts of designs that inspire you for added creativity.
To make bookmarks, start by cutting a piece of cardstock into a rectangle shape measuring 2 inches by 6 inches. You can also experiment with different shapes, such as hearts or even the shape of a computer mouse. Once you have your desired shape, you can start decorating your bookmarks using the decorative materials you’ve gathered. Get creative and use your imagination!
To add an extra dimension to your bookmarks, you can create bookmarks with exposed magnets. Cut two identical rectangles measuring 1 inch by 2 inches, and then cut these rectangles in half lengthwise. Place the halves on the bottom of your bookmark, making sure to leave enough space for the bookmarks to hold onto the page. Glue or tape the magnets in place, and voila! You have a unique bookmark that stays securely in place.
To make browser bookmarks, you can print out thumbnails of your favorite web pages and glue them onto cardstock or thick paper. This way, you can save the address of the page and have a quick visual reference. You can also create themed bookmarks that correspond to different categories or genres, making it easy to find the perfect book for your mood.
Finally, remember to carefully assemble and design your bookmarks with care and attention to detail. Whether you’re making bookmarks as gifts or for personal use, these DIY creations are a fun and rewarding project. So grab your materials and start making your own bookmarks today!
- How to create bookmarks/favourites in your browser
- Create page thumbnails
- Make your bookmark using this quick DIY guide
- 1 Create Your Design
- 2 Print and Shape
- 3 Prepare the Magnets
- 4 Assemble the Bookmark
- 5 Ways to Create DIY Bookmarks with Zen Sangam’s Bookmark Pads
- Delete a bookmark
- Video:
- Origami Cat Bookmark | How to make paper cat
How to create bookmarks/favourites in your browser
Creating bookmarks/favourites in your browser allows you to quickly access your favorite websites or pages with just a few clicks. Instead of searching through your browsing history or typing in the web address each time, you can save time and effort by organizing and saving your frequently visited sites. Here’s a quick guide on how to make bookmarks/favourites in your browser:
- Using your browser, open the web page that you want to bookmark/favorite.
- On the top of your browser window, find the address bar that displays the web page’s URL.
- Carefully highlight the entire web address (URL), right-click, and select “Copy” from the context menu. Alternatively, you can press Ctrl+C (Command+C on a Mac) to copy the URL.
- Now, go to your browser’s bookmarks/favorites menu. This can usually be found under the “Bookmarks” or “Favorites” tab on the top or side of the browser window.
- Create a new bookmark/favorite by selecting “Add Bookmark,” “Add to Favorites,” or a similar option. This may vary depending on your browser.
- In the bookmark/favorite creation window, paste the copied web address (URL) into the appropriate field by right-clicking and selecting “Paste” or pressing Ctrl+V (Command+V on a Mac).
- Give your bookmark/favorite a name or label that will help you recognize it easily. This could be the website’s name or a brief description of its content.
- You can also choose to organize your bookmarks/favorites into folders or categories, making it easier to find them later.
- Once you have filled in the necessary information, click “Save” or “OK” to finalize the creation of your bookmark/favorite.
- Repeat these steps for any other pages you want to bookmark/favorite.
These bookmarks/favorites will now be saved in your browser, allowing you to access them quickly whenever you want. You can also rearrange, edit, or delete your bookmarks/favorites as needed.
Creating bookmarks/favorites can be a useful tool for saving and organizing frequently visited pages or resources. It can make your browsing experience more efficient and organized. Whether you’re saving pages for personal reference, research, or design inspiration, bookmarks/favorites offer a convenient way to keep track of your favorite web content. So go ahead, start making your own bookmarks/favorites in your browser and enjoy easy access to your favorite websites!
Create page thumbnails
If you want to have a visual representation of your bookmarks or favorites in your browser, you can create page thumbnails. These small images serve as a preview of the bookmarked page and make it easier for you to quickly find the desired page.
Here are 5 simple steps to create page thumbnails for your bookmarks:
- Prepare your computer: First, you should open the web pages you want to save as thumbnails in separate tabs on your browser.
- Print the pages: Using your browser’s print function, carefully print the web pages onto sheets of cardstock or thick paper. You can adjust the print dimension if needed.
- Design your bookmark: On the printed pages, carefully cut them into halves or any desired shape to design your bookmarks. You can also add additional elements such as your name or an address on the bottom.
- Assemble the bookmarks: Using glue or double-sided tape, attach the two halves of each bookmark together. You can also add magnets to the back of the bookmarks if you want to stick them on metal surfaces.
- Create thumbnail sheets: Inspired by the design of your bookmarks, create thumbnail sheets by arranging the cut-outs of the web pages in a grid-like pattern. Make sure to leave enough space between each thumbnail.
With these quick and easy steps, you can make your own DIY page thumbnails for your bookmarks or favorites. Now, you can save them in a folder or organize them in a way that suits your needs. Whenever you want to revisit a particular page, simply find the corresponding thumbnail, and it will guide you to the desired website or content.
Whether you’re a fan of zen aesthetics or enjoy a more playful design, creating page thumbnails can add a personal touch to your browsing experience. So go ahead and give it a try!
Make your bookmark using this quick DIY guide
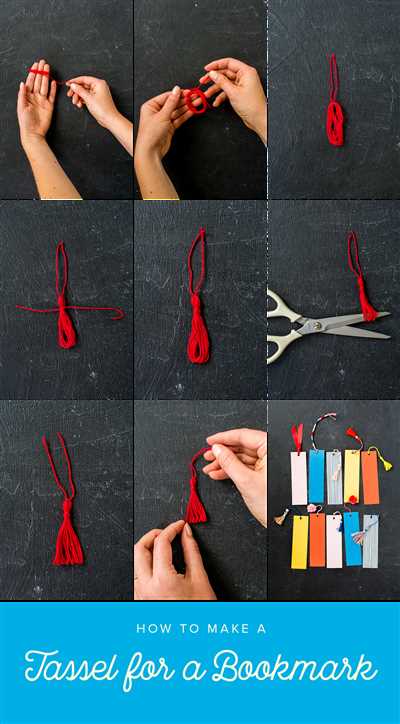
If you love reading and want to save time finding your favorite pages, making bookmarks is a great idea. With these simple and easy steps, you can create beautiful bookmarks that reflect your style and help you stay organized.
To start, you will need the following materials:
| 1. | A computer with an internet connection |
| 2. | Cardstock or thick paper sheets |
| 3. | A pair of scissors |
| 4. | A hole punch |
| 5. | A design template or your own design |
Now, follow these steps to create your bookmark:
- Prepare your computer: Open your browser and search for bookmark templates or create your own design using a graphics software or online tools.
- Print your design: Once you have chosen a design, print it on the cardstock or thick paper sheets. Make sure the dimensions match the size you want for your bookmark.
- Carefully cut the bookmark: Using a pair of scissors, cut along the outline of the bookmark design. Take your time and be careful not to tear the paper.
- Punch a hole: On one of the bottom corners of the bookmark, use a hole punch to create a hole. This will allow you to attach a string or ribbon later.
- Assemble your bookmark: If you want to add a personal touch, you can decorate your bookmark with stickers, markers, or other embellishments. Be creative!
- Delete the exposed page: If you printed your design on a sheet with thumbnails or other information you don’t want on your bookmark, carefully cut or delete that section.
Once you have completed these steps, your bookmark is ready to use! Place it in your favorite book or give it as a thoughtful gift to a fellow bookworm. You can also create multiple bookmarks for different books or use them as reminders in notebooks and journals.
Now that you know how to make bookmarks, you can let your creativity shine and add a personal touch to your reading experience. Enjoy your books and happy reading!
1 Create Your Design
When it comes to making bookmarks, you should let your creativity guide you. A bookmark can be much more than just a piece of card in a rectangular shape. You can create bookmarks in various ways, using different materials and designs to make them unique and special. Whether you want to make bookmarks as gifts or for your own use, this DIY project is a fun and creative way to showcase your personal style.
To create your own bookmarks, start by brainstorming some ideas for their design. You can draw inspiration from your favorite books, quotes, or even your favorite hobbies. Once you have an idea in mind, you can use your computer to design the bookmarks using a program like Adobe Photoshop or Canva. This will allow you to add text, images, and other elements to your design.
If you’re feeling a bit pressed for time or don’t have access to a computer, there are quick and easy ways to create bookmarks as well. You can simply cut out interesting shapes from colored card or use decorative paper to make your bookmarks stand out. Another option is to print out thumbnails of your favorite pictures or artworks and glue them onto card or thick paper.
Once you have your design ready, it’s time to prepare the materials. You will need card or thick paper, scissors, glue, and bookmarks’ dimension you would like to make. It’s best to use card or thick paper since it will make your bookmarks more durable and long-lasting.
Using a ruler and a pencil, measure and mark the dimension of your bookmarks on the card or thick paper. Then, carefully cut out the bookmarks using scissors, making sure to stay within the marked lines. You can cut them into rectangles, squares, or even heart shapes, depending on your preference.
Once you have cut out the bookmarks, it’s time to assemble them. If you want to add an address or a note to your bookmarks, now is the time to do so. You can use stickers, pens, or even print out small labels to stick onto the bookmarks. If you want to make magnetic bookmarks, you can glue small magnets to the back of the bookmarks, leaving the front exposed.
Finally, the last step is to press the two halves of each bookmark together, making sure the design is facing outwards. You can use a bone folder or the edge of a table to create a crease along the bottom of the bookmarks, which will help them stay closed when placed in a book.
Now that you know how to create bookmarks, you can start making your own unique and personalized bookmarks. Whether you want to make them for yourself or as gifts for your friends and family, these DIY bookmarks will surely be appreciated. So, get creative and enjoy the process of making something special!
2 Print and Shape
Now that you’ve created your custom bookmark design, it’s time to bring it to life! In this section, we’ll show you how to print and shape your bookmarks.
Step 1: Save and print your bookmark design
Carefully save your bookmark design on your computer. Open the file and print it on a thick cardstock or photo paper for better durability. You can print multiple bookmarks on a single page to save time and paper.
Step 2: Cut out the bookmarks
Using a pair of scissors or a paper trimmer, cut out your bookmarks along the dimension lines. This will ensure that your bookmarks are all the same size.
Step 3: Fold the bookmarks in half
With the design facing outwards, fold each bookmark in half along the centerline. Press the fold firmly to create a crease.
Step 4: Shape the bookmarks
Now, it’s time to give your bookmarks some personality! You can leave the bookmarks as they are or get creative with different shapes. For example, you can cut a heart shape at the top or use a decorative hole punch to make unique designs.
Step 5: Add any finishing touches
If you want to add some extra flair to your bookmarks, you can attach small magnets to the bottom part. This will make it easier for them to stay in place in your favorite book. Alternatively, you can use colorful ribbons or tassels to add a touch of elegance.
Step 6: Assemble and address your bookmarks
If you’re giving your bookmarks as gifts or using them as party favors, you can assemble them together with a matching card or a decorative paper band. You can also write a personal message or an inspirational quote on the back of each bookmark to make it extra special.
With these quick and easy steps, you’ve transformed your design into a tangible bookmark that can accompany you on your reading adventures. Have fun creating bookmarks that reflect your style and enjoy using them to mark your favorite pages!
3 Prepare the Magnets
Now that you have your heart-shaped bookmarks printed and cut out, it’s time to prepare the magnets that will hold them in place.
Here are 3 ways to create the magnets:
- Using magnetic sheets: Purchase magnetic sheets from a craft store or online. Cut them into small rectangles, about the same size as your bookmarks.
- Using magnetic pads: Buy adhesive magnetic pads, which are available in various sizes. Cut them into smaller pieces that will fit the back of your bookmarks.
- Using magnets from a refrigerator or other source: If you have small magnets at home, simply cut them into halves or smaller pieces to match the dimension of your bookmarks.
Whichever method you choose, make sure the magnets are strong enough to hold your bookmarks in place.
If you’re creating these bookmarks as gifts, you may want to print out a quick guide on how to use them. You can include this guide on a separate card or on the back of the bookmark itself.
Once you have your magnets ready, carefully peel off the adhesive backing and press them onto the bottom of your bookmark. Make sure the exposed part of the magnet is facing upwards, so it can attach to the page in the browser.
This completes the preparation step for making your DIY bookmarks. The next step is to assemble all the elements together and create your own set of beautiful and functional bookmarks!
4 Assemble the Bookmark
Once you have prepared all the necessary materials for creating your DIY bookmark, you can now assemble it. Here are two ways you can do it:
Method 1: Using Zen Pads
| Step 1 | Take two sheets of card stock or any thick paper of your choice. These will serve as the front and back of your bookmark. |
| Step 2 | Carefully cut the sheets into the desired shape and dimension for your bookmark. |
| Step 3 | Design or decorate the exposed sides of the sheets to create a personalized bookmark. |
| Step 4 | Using a glue stick or adhesive, press the two halves of the bookmark together. Make sure they align perfectly. |
| Step 5 | If you want to add a little extra flair to your bookmark, you can attach small magnets to the bottom to create a quick and easy way to save your page in a book. |
Method 2: Using Sangam’s Guide
| Step 1 | Prepare the bookmarks/favourites in your browser by saving the web pages or thumbnails of the pages you would like to use in creating your bookmark. |
| Step 2 | On your computer, open a blank document or a page in a word processing software. |
| Step 3 | Copy and paste the addresses of the web pages or the thumbnails into the document. |
| Step 4 | Print out the document on card stock or any thick paper of your choice. |
| Step 5 | Cut out the individual bookmarks from the printed sheets. |
With these two methods, you can create unique and personalized bookmarks that can also serve as thoughtful gifts for your loved ones. Get creative and have fun making your own DIY bookmarks!
5 Ways to Create DIY Bookmarks with Zen Sangam’s Bookmark Pads
If you’re an avid reader and love to save your place in a book, then creating your own DIY bookmarks can be a fun and personalized way to mark your favorite pages. With Zen Sangam’s bookmark pads, you can easily print and assemble unique bookmarks in just a few simple steps. Here are 5 creative ways to make your own bookmarks using Zen Sangam’s bookmark pads:
1. Quick and Easy: If you’re short on time and want a simple bookmark design, then this method is for you. Print your desired bookmark design from your computer and cut it out using scissors. You can also use a paper cutter for more precise dimensions. Then, fold the bookmark in half and press along the crease to create a clean edge. Your quick and easy DIY bookmark is ready to use!
2. Making Use of Exposed Sheets: Zen Sangam’s bookmark pads consist of sheets with exposed thumbnails of different bookmark designs. To create a unique and eye-catching bookmark, simply choose a bookmark design from one of the exposed sheets. Cut along the edges of the chosen design and fold it in half. Your one-of-a-kind bookmark is ready to keep your place!
3. Creating a Heart Shape: For those who want to add a touch of love to their bookmarks, this method is perfect. Print a heart shape from your computer, or draw one by hand. Cut out the heart shape and fold it in half. You can also add a personalized message or your favorite quote with a pen or marker. This heart-shaped bookmark will be a lovely addition to your favorite book.
4. Using Magnets: If you want a bookmark that attaches securely to your book, then using magnets is a great option. Print out your desired bookmark design and cut it out. Attach small magnets to the bottom of each half of the bookmark using glue or double-sided tape. When you place the bookmark in your book, the magnets will secure it in place, ensuring it doesn’t fall out.
5. Gift-Worthy Bookmarks: If you want to give your bookmarks as gifts to friends or loved ones, you can create personalized bookmarks by printing the recipient’s name, a special message, or their favorite quote on the bookmark design. They will appreciate the thoughtful gesture and cherish their unique and meaningful bookmark.
With Zen Sangam’s bookmark pads, you can unleash your creativity and make bookmarks that reflect your personality and style. Whether you prefer a quick and easy design or want to experiment with different shapes and materials, these 5 ways will inspire you to create beautiful and functional DIY bookmarks. So grab your favorite bookmark pad, prepare your scissors and glue, and start bookmarking your favorite pages today!
Delete a bookmark
If you want to delete a bookmark from your browser, follow this quick guide:
- Open your browser and go to the page where the bookmark is saved.
- Click on the address bar at the top of the browser window to expose the address of the page.
- Right-click on the bookmark you want to delete.
- In the context menu that appears, select “Delete” or a similar option.
- The bookmark should then be removed from your bookmarks/favourites.
If you want to delete a bookmark in your bookmarks toolbar, follow these steps:
- Open your browser and go to the page where the bookmark is saved.
- Find the bookmark in your bookmarks toolbar at the top of the browser window.
- Right-click on the bookmark and select “Delete” or a similar option.
- The bookmark should then be removed from your bookmarks toolbar.
By carefully following these steps, you can easily delete any unwanted bookmarks from your browser.


