

Welcome to our guide on how to build your own cornhole boards! Cornhole is a popular outdoor game that is enjoyed by people of all ages and skill levels. Making your own cornhole boards is a fun and rewarding DIY project that will provide you and your family with hours of fun.
Before we begin, let’s gather all the supplies and tools you’ll need. You’ll need two 2x4x48 boards for each board, a jigsaw or circular saw, a measuring tool, a pencil or marker, a drill with a 6-inch hole saw attachment, a pneumatic nail/staple gun, and some wood glue. You can find all of these supplies at your local hardware store.
Once you have all your supplies, it’s time to start building! Begin by cutting your 2x4x48 boards into four pieces each, two boards measuring 48 inches and two boards measuring 21 inches. Next, assemble the frame by using wood glue and the pneumatic nail/staple gun to attach the shorter boards to the longer boards at the corners. Make sure the frame is square by measuring the diagonals and adjusting if needed.
After the frame is built, it’s time to mark the hole for the cornhole boards. The hole should be centered 9 inches from the top of the board and 12 inches from each side. Use your measuring tool and pencil or marker to mark these measurements. Then, use the drill with the 6-inch hole saw attachment to cut the hole.
Next, it’s time to apply the paint or stain of your choice to the boards. This step is completely optional, but it will make your cornhole boards look even more custom and professional. Use a paintbrush or roller to apply the paint or stain evenly and let it dry completely before moving on to the next step.
Finally, it’s time to attach the cornhole boards to the frame. Place the board on top of the frame and make sure it is centered. Then, use the pneumatic nail/staple gun to secure the board to the frame on all four sides, making sure to keep the board flat and level.
Once you’ve built your cornhole boards, you’re ready to play! Gather your family and friends, grab your cornhole bags, and get ready for a fun-filled game. Cornhole is a great way to spend time outdoors and enjoy some friendly competition. Plus, having your own cornhole boards will save you money in the long run, as you won’t have to rent or buy them from someone else.
We hope this introduction has inspired you to start building your own cornhole boards. It’s a fun and rewarding project that will provide you with hours of entertainment. Whether you’re looking to save money, have a custom set of boards, or simply enjoy the process of building something yourself, making your own cornhole boards is a great way to do all of that and more. So gather your supplies, gather your friends, and let the games begin!
How To Make Your Own Custom Cornhole Board
If you enjoy playing the game of cornhole and want to have your own custom board, you’re in luck! Making your own cornhole board is a fun and rewarding DIY project that allows you to personalize the design and size to fit your style and needs. Plus, making your own cornhole board is much more cost-effective than buying one from a store.
To start building your cornhole board, gather the necessary materials and tools. You’ll need two 2x4x8s for the frame, a 2x4x48 for the center support, plywood for the playing surface, screws or nails/staples, a jigsaw, and a drill with a bit that matches the size of the bolts you’ll be using to attach the legs.
First, cut the 2x4s to the desired size of your cornhole board. The regulation size is 2 feet by 4 feet, but you can make it smaller if you prefer. Next, create the frame by attaching the corners using screws or nails/staples. Make sure to keep the corners square and secure for stability.
After the frame is complete, measure and mark the center of the playing surface. Then, using the jigsaw, cut a 6-inch diameter hole on each end. These holes will be where you’ll aim to toss the corn bags.
Once the holes are cut, attach the playing surface to the framed structure using screws or nails/staples. Make sure the playing surface is centered and secured tightly to prevent any wobbling during play.
Now it’s time to paint your custom design on the cornhole board. Use paint and brushes to create your desired look. You could get creative and paint your favorite sports team logo, a scenic landscape, or any design that represents your personality or interests.
When the paint is dry, apply a clear sealant to protect the design and increase the durability of the board. This step is optional but recommended, as it will help keep your custom cornhole board looking great for years to come.
Finally, attach the legs to the board using galvanized bolts. Make sure the legs are sturdy and secure to ensure the safety of players during the game. Once the legs are attached, your custom cornhole board is ready to be enjoyed by friends and family!
Making your own custom cornhole board is a rewarding DIY project that not only saves you money but also allows you to create a unique piece of gaming gear. So, gather your supplies, find some free time, and get ready to enjoy countless hours of fun playing cornhole with your own custom board.
For more detailed instructions and ideas, you can find helpful tutorials and sources online. Remember to prioritize safety when using tools and equipment, and always follow the manufacturer’s instructions.
Gather Your Tools and Materials

Before you begin building your cornhole boards, it’s important to gather all the necessary tools and materials. This will make the construction process much easier and ensure that you have everything you need to complete the project.
Tools
- Circular saw
- Drill
- Measuring tape
- Pencil
- Safety goggles
Materials
- 2x4x48 lumber (4 pieces)
- 2x4x21 lumber (4 pieces)
- 42 2 1/2-inch galvanized wood screws
- 4 3-inch galvanized wood screws
- 1/2-inch plywood (2 pieces)
- Wood glue
- Paint or stain
- Cornhole bags
Make sure to measure and mark your lumber before cutting to ensure accuracy. It’s always better to have extra wood than not enough, so don’t be afraid to buy a couple of extra pieces.
If you’re not confident in your woodworking skills, you can also find pre-built cornhole boards online. However, building your own can be a fun and rewarding DIY project that you can be proud of.
Remember to practice safety when using power tools and wear your safety goggles at all times. If you’re unsure about using any tool, it’s always a good idea to ask for help or watch some online tutorials.
Once you have gathered all your tools and materials, you’ll be ready to begin building your cornhole boards. The next step will be to frame the sides and create the hole for the cornhole bags to go through. Stay tuned!
Tools
When it comes to building your own cornhole boards, you’ll need a few essential tools to get the job done. Here’s a list of the tools you’ll want to gather before getting started:
- Pneumatic nail/staple gun – This tool will make it much easier to secure the corners of the boards together.
- Jigsaw – This tool will be used for cutting the hole in the center of the board. Make sure you have the appropriate blade for cutting through wood.
- Drill – You’ll need a drill to attach the frame to the board as well as for other tasks during the construction process.
- Circular saw – This tool will be used for cutting the lumber into the right sizes and shapes.
- Measuring tape – You’ll need this to mark the dimensions of the board and holes accurately.
- Safety goggles – Safety should always come first, so make sure you have a pair of goggles to protect your eyes while working.
- Paintbrushes – If you plan on painting your cornhole boards, make sure you have paintbrushes of various sizes to apply the paint evenly.
- Sanding block/sander – You’ll want to make sure the surfaces of the boards are smooth, so having a sanding block or sander will come in handy.
- C-clamps – These tools will help hold pieces in position while you’re assembling the boards.
- Woodworking clamps – These clamps will also come in handy to keep the corners of the boards secure while you’re building.
Having the right tools at hand will make the process of building your own cornhole boards much smoother and more efficient. Make sure to have all the necessary tools before you begin, and always keep safety in mind!
Materials
When it comes to making cornhole boards, the most crucial material you need is wood. You can apply the customization and DIY approach to the boards depending on your preference. The type of wood you choose can vary, but some popular choices include pine, plywood, or hardwood. If you’re looking to save money, you can check with your local lumberyard or hardware store for any available discounts or sales.
Here are the materials you’ll need to gather before you start building your cornhole boards:
- Two 2x4x8s for the frame
- Two 2x4x21-inch pieces for the sides
- Two 2x4x48-inch pieces for the frame sides
- Two 21×48-inch pieces of plywood or other board for the top and bottom
- A circular saw or another cutting tool to cut the wood
- A drill with a drill bit and a screwdriver tip for assembling the frame
- A couple of bolts and wing nuts for attaching the legs
- Screws or nails/staples to secure the plywood to the frame
- Paint or stain to decorate the boards
- Galvanized wood screws or nails for securing the frame
- A pneumatic nail/staple gun (optional, but it makes the process faster)
These are just the basic supplies you’ll need to get started. If you want to get more creative or add some extra flair to your cornhole boards, you can also consider using some specialty tools or materials.
Keep in mind that building your own cornhole boards can be a fun and rewarding project to undertake, especially when involving friends or family. It’s a great way to get outdoors and enjoy a game that everyone can play and enjoy.
Now that you know all the materials you’ll need, it’s time to gather them and begin building your cornhole boards.
Saving Money on Supplies
When it comes to building cornhole boards, there are several ways you can save money on supplies. Here are some tips to help you keep costs down:
- Know what materials you need: Before you start gathering supplies, make sure you know exactly what materials you will need. This will prevent you from buying unnecessary items.
- Shop local: Instead of buying lumber from a big-box store, consider checking out your local lumberyard. They may have lower prices or even free scraps that you can use for your project.
- Reuse materials: If you’re handy with a circular saw, you could save money by reusing lumber from other projects. Just be sure to check the condition of the wood and make sure it’s suitable for your cornhole boards.
- Use smaller size lumber: Instead of using 2x4x8s for the frame, you can save money by using smaller 2x4x48 pieces. They will work just as well and cost less.
- Drill your own holes: Rather than buying pre-drilled cornhole boards, consider making them yourself. This way, you can choose the exact size and placement of the holes, which is especially helpful if you want to customize the game to your preferences.
- Find free instructions online: There are plenty of DIY websites and blogs that provide step-by-step instructions on how to build cornhole boards. By following these instructions, you can save money on purchasing plans.
- Paint your own boards: If you’re artistic or just like DIY projects, consider painting your own cornhole boards. This way, you can customize the design and save money by not having to buy pre-painted boards.
- Keep safety in mind: When working with tools and woodworking materials, it’s important to prioritize safety. Make sure you have the necessary safety equipment, such as goggles and gloves, and always follow proper safety procedures.
By following these tips, you can save money on supplies while still building quality cornhole boards for your family to enjoy. So gather your tools, gather your supplies, and get ready to play the next DIY game of cornhole!
Introduction
Welcome to our guide on how to build cornhole boards! If you’re looking to add a fun outdoor game to your backyard or want to customize your own cornhole boards, you’ve come to the right place. Cornhole is a popular game that can be enjoyed by friends and family of all ages, and building your own boards can be a rewarding and cost-saving DIY project.
Before we get started, let’s go through a quick overview of what you’ll need and what you can expect during the build process. We’ll be using standard 2x4x8s and 2x4x21-inch lumber to construct the frame of the boards. Don’t worry if you’re not familiar with woodworking or don’t have a fully stocked tool arsenal – we’ll be walking you through the process step by step.
Building your own cornhole boards can be a great way to save money compared to buying them online or at a store. Plus, it allows you to customize the design, paint, and size to fit your preferences. In just a couple of days, you’ll have a set of cornhole boards that you can be proud of!
It’s important to note that safety should always be a top priority when using power tools. Be sure to follow all safety guidelines, including wearing appropriate protective gear, using proper techniques, and reading and understanding the instructions and warnings for each tool before use.
Now that you know what the project entails, let’s dive right in and start building your own cornhole boards!
What are Cornhole Boards and How are they Used
If you’re a fan of outdoor activities, you might be familiar with the game called cornhole. Cornhole is a popular local pastime which involves tossing corn-filled bags onto inclined boards with a hole in them. The objective is to score points by getting the bags through the hole or landing them on the board.
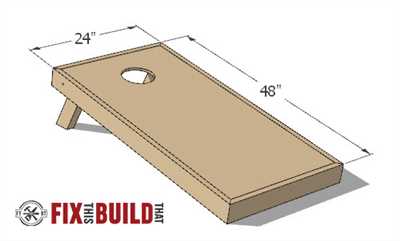
So, what exactly are cornhole boards? They are wooden structures that consist of two sides and a center hole. These boards are typically built from 2x4x48 pieces of lumber and framed with 2x4x21 pieces. The size of the boards may vary, but the standard dimensions are 2 feet by 4 feet. The hole is usually 6 inches in diameter and centered on the board.
To build your own cornhole boards, you will need a few supplies and tools. Gather the following materials:
- 2x4x48 pieces of lumber (3)
- 2x4x21 pieces of lumber (4)
- A jigsaw
- A drill with a wing nut
- Nail/staple gun
- Safety gear (goggles, gloves)
- Paint and painting supplies
Once you have all the necessary materials, the next step is to cut the lumber pieces to size. Use a jigsaw to cut out a 6-inch diameter hole in the center of one of the 2x4x48 pieces. Then, cut the other pieces of lumber into two 2x4x21 side pieces and two 2x4x48 top and bottom pieces.
With all the pieces cut, you can start assembling the cornhole boards. Nail or staple the side pieces to the inside edges of the top and bottom pieces. Make sure the center hole is facing upwards. The finished frame should resemble a rectangle with an open top.
Next, attach the 2x4x48 piece with the center hole to the back of the frame. This piece will serve as the platform for the bags to land on. Nail or staple it to the frame securely.
Once the boards are built, you can apply paint or custom designs to make them stand out. This step is optional but adds a personal touch to your cornhole boards.
Now that you have your cornhole boards, it’s time to learn how to play. Position the boards around 27 feet apart, facing each other. Stand on one side of the board and take turns tossing the corn-filled bags at the opposite board. The objective is to get the bags through the hole or land them on the board. Keep track of the points and aim to reach a certain score first.
Building your own cornhole boards can be a fun DIY project that saves you money. It’s relatively easy to do, even for beginners in woodworking. Just make sure to follow proper safety precautions when using tools and handling lumber. With a couple of hours and some basic supplies, you can have your own cornhole boards ready for endless hours of outdoor fun with family and friends.
Our New DIY Cornhole Boards
If you enjoy outdoor games and want to save some money, building your own cornhole boards is a great option. In this article, we will show you how to build your own cornhole boards using simple tools and materials that you can easily find at your local home improvement store.
Supplies:
- Two pieces of 2x4x48-inch lumber
- One piece of 2x4x8-foot lumber
- Galvanized nails or staples
- Drill
- Jigsaw
- Circular saw
- Paint or stain
Step 1: Gather Your Materials
Before you begin building, gather all your materials and tools. Make sure that you have all the necessary supplies listed above to make the process easier.
Step 2: Measure and Cut the Wood
Using a measuring tape, mark the dimensions for the cornhole board’s frame. Typically, cornhole boards are 24×48 inches in size, but you can make them smaller or larger if you prefer. Use a circular saw to cut the wood pieces according to your measurements.
Step 3: Build the Frame
Next, assemble the frame by attaching the sides to the top and bottom boards using galvanized nails or staples. Make sure to have someone hold the boards in place while you nail or staple them together to keep everything aligned and secure.
Step 4: Cut the Cornhole Hole
Using a jigsaw, cut a 6-inch diameter hole near the center of one of the boards. This will be the target hole for the game. Make sure to measure and mark the hole’s location accurately before cutting.
Step 5: Sand and Paint
Sand down the edges of the boards to ensure a smooth surface. Then, apply a coat of paint or stain to protect the wood and make the boards look more appealing. You can also get creative and paint custom designs on the boards.
Step 6: Play the Game
Once the paint is dry, your cornhole boards are ready to play with family and friends. Gather your cornhole bags and enjoy hours of fun and friendly competition.
Building your own cornhole boards not only saves money but also allows you to customize them to your liking. With a few tools and materials, you can have a set of cornhole boards that are sure to be a hit at your next outdoor gathering. So why wait? Start gathering your supplies and get ready to enjoy the game!
Sources
When it comes to building your own cornhole boards, there are a few key sources you’ll need to gather your supplies and tools from.
First, you’ll need to gather the lumber for your cornhole boards. You can find 2x4x8s at your local lumber store or online. Make sure to pick up enough to build the frames and support pieces for each board.
In addition to lumber, you’ll also need some basic tools. Most likely, you’ll want to have a circular saw, a drill, and a jigsaw on hand to make the necessary cuts for your boards.
For the cornhole playing surface, you can either buy pre-made boards or make your own from plywood. If you choose to make your own, be sure to measure and mark the proper size for the holes. A jigsaw can be used to cut these holes. Remember to keep safety in mind when operating any power tool.
Once your boards are built, you can apply a custom paint job to make them truly your own. Some people like to print out a stencil or use tape to create designs on their boards before painting. This step is optional, of course, but it can add a fun personal touch to your cornhole boards.
Finally, don’t forget the corn! You’ll need some corn-filled bags in order to play the game. These can be purchased online or made yourself if you’re feeling extra crafty.
By gathering all the necessary supplies and tools, you’ll be well on your way to building your own cornhole boards. With a little time and effort, you’ll have a fun and cost-effective game that your friends and family will enjoy for hours on end.


