

Are you a Mac user looking for a quick and easy way to showcase your photos? Well, look no further! With Mac’s built-in slideshow feature, you can view and enjoy a beautiful display of each and every one of your pictures.
Mac allows you to reorder your pictures so that they are displayed in the perfect order. Simply choose the photos you want to include in your slideshow and then rearrange them to your heart’s content. You can even add text or a song to each slide to make your slideshow even more customized.
Not sure how to make a slideshow on your Mac? Don’t worry, we’ve got you covered! Simply follow these easy steps: first, select the photos you want to use in your slideshow. Then, right-click on them and choose the “Create Slideshow” option. Mac will prompt you to choose the type of slideshow you want to create, such as a theme or a custom slideshow.
If you choose a theme, Mac will automatically apply a pre-set theme to your photos, giving you a beautiful slideshow in just a few clicks. But if you prefer to customize your own slideshow, you can easily do so by selecting the “Customize” option. This will allow you to pick and choose from different themes, durations, and more.
Once you’ve selected your preferred options, simply click “Create” and your slideshow will be saved to your photo library. From there, you can easily view, edit, or delete your slideshow as you see fit. Mac also gives you the option to export your slideshow as a video, so you can share it with others or upload it to social media.
And that’s it! Making a photo slideshow on your Mac is as easy as can be. So why wait? Start creating your own stunning slideshows today and amaze your friends and family with your photography skills!
- The Easiest Ways to Make a Photo Slideshow on a Mac
- How to make a slideshow on Mac with Photos
- To create a photo slideshow on Mac
- Update for Big Sur and possibly earlier versions of macOS
- Customize the Slideshow
- FAQ about slideshows on mac
- Can I add videos to my slideshow
- Can I add text to my slides
- How can I delete slideshows
- Sources
- Videos:
- CapCut for PC & Mac – COMPLETE CapCut Video Editing Tutorial!
The Easiest Ways to Make a Photo Slideshow on a Mac
Creating a photo slideshow on a Mac is a simple and enjoyable process. Whether you want to showcase memorable moments from a recent trip or create a special slideshow for a loved one, the Mac provides several easy ways to make stunning slideshows.
One of the easiest ways to make a photo slideshow is by using the built-in Photos app on macOS. This app allows you to collect all your photos in one place and easily create a slideshow with just a few clicks.
To make a slideshow in the Photos app on your Mac, follow these steps:
- Select the photos you want to include in the slideshow. You can select multiple photos by holding down the Command key and clicking on each photo.
- After selecting the photos, go to the Create menu at the top of the screen and choose Slideshow.
- A window will appear where you can choose a theme for your slideshow. Themes include different layouts, transitions, and music options.
- Once you’ve picked a theme, click the Options button to customize the slideshow. Here, you can add text, change the duration of each slide, and select a song to play in the background.
- After customizing the slideshow settings, click the Create Slideshow button.
Your slideshow will be created and displayed in the Photos app. You can then review the slideshow and make any additional changes, like rearranging the order of the slides or applying different themes.
The Photos app also gives you the option to delete or update your slideshow. To remove a slideshow, simply right-click on it and select Delete. To update a slideshow with new photos or settings, right-click on it and choose Update Slideshow.
In addition to the Photos app, there are several third-party applications available for making slideshows on a Mac. Some popular options include iMovie, Adobe Spark, and Movavi Slideshow Maker.
No matter which method you choose, making a photo slideshow on a Mac is a fun and creative way to share your favorite memories with others. So grab your favorite photos, select a theme, and start creating your very own slideshow today!
How to make a slideshow on Mac with Photos
Creating a slideshow on your Mac with the Photos app is the easiest way to share multiple pictures or videos with your friends and family. Whether you want to showcase your travel photos or create a memorable presentation for a special occasion, Photos gives you all the tools you need to make a stunning slideshow.
Here’s how you can make a slideshow on Mac with Photos:
- Open the Photos app on your Mac.
- In the sidebar, select the album or the specific location where your pictures are located.
- Select the pictures you want to include in your slideshow by holding down the Command key and clicking on each image.
- Click on the “+” icon at the top of the Photos window and choose “Create Slideshow” from the dropdown menu.
- In the slideshow editor that opens, you can see all the selected pictures and the order in which they will be displayed.
- At the bottom of the editor, you will find different themes to apply to your slideshow. Pick the one you like the most or select “Classic” for a simple and clean look.
- To add a song to your slideshow, click on the “Music” tab at the top of the editor and select a song from your library. You can also pick a song from Apple Music or import one from iTunes.
- Customize your slideshow by changing the duration of each slide or choosing to have a specific slide focus on a certain part of the photo.
- If you want to reorder the slides, simply click and drag them to the desired location on the timeline.
- To remove a slide from the slideshow, right-click on it and select “Delete Slide”.
- To create a big impact, you can add text to certain slides. Just click on the “Text” tab, type in your desired text, and choose the font, size, and location.
- Once you’re satisfied with your slideshow, click on the “Play” button at the top of the editor to view it.
- If you need to make any changes, click on the “Pause” button and update the slideshow accordingly.
- When you’re ready to save or share the slideshow, click on the “Done” button at the top-right corner of the editor.
That’s it! You’ve just learned how to make a slideshow on Mac with Photos. With these steps, you can create beautiful slideshows with different themes, customized durations, and songs of your choice. You can also create multiple slideshows and update them whenever you like.
For more ways to customize your slideshow or to learn about other features in the Photos app, make sure to check out the FAQ section on the macOS website. It will give you more information on how to make the most out of the Photos app on your Mac.
To create a photo slideshow on Mac
If you want to create a photo slideshow on your Mac, you’re in luck! MacOS includes a built-in feature in the Photos app that makes it easy to create beautiful slideshows with just a few clicks. Here’s how to do it:
Step 1: Select the photos
First, open the Photos app on your Mac. In the sidebar, click on the “Albums” tab. Then, click on the “All Photos” album or choose a specific album that contains the pictures you want to include in the slideshow.
Next, click on the first photo you want to include in the slideshow, then hold down the “Shift” key and click on the last photo to select them all. If you want to select multiple photos that are not adjacent to each other, hold down the “Command” key and click on each photo individually.
Step 2: Create the slideshow
Once you have selected the photos, click on the “+” button at the top of the screen, next to the “Albums” tab. From the dropdown menu, choose “Slideshow” and a new slideshow will be created with the selected photos.
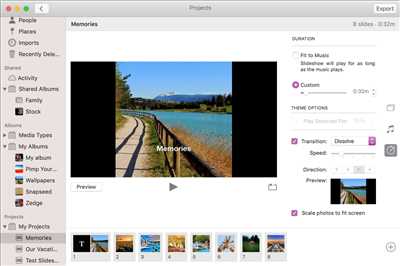
Step 3: Customize the slideshow
The slideshow will open in a new window. Here, you can customize the slideshow to your liking. At the bottom of the window, you’ll see different themes to choose from. Click on a theme to preview how it will look with your selected photos.
If you want to add a song to your slideshow, click on the music note icon at the bottom right corner of the window. You can pick a song from your iTunes library or select one of the pre-installed songs.
To change the duration of each slide, click on the clock icon at the bottom left corner of the window. You can choose a specific duration or make it automatic.
If you want to add text to your slideshow, click on the “Add Text” button at the top right corner of the window. A text box will appear where you can enter the desired text.
To remove a slide from the slideshow, click on the “X” button at the bottom right corner of the slide.
Step 4: Preview and make adjustments
Once you’ve customized the slideshow to your liking, click on the “Play” button at the bottom left corner to preview it. If you want to make any changes, simply click on the “Edit” button at the bottom right corner of the window.
If you want to reorder the slides, simply click and drag them to the desired position.
If you want to delete a slide, click on it to select it, then press the “Delete” key on your keyboard.
Step 5: Save and share the slideshow
When you’re happy with the slideshow, click on the “Done” button at the bottom right corner of the window. You’ll be prompted to give the slideshow a name and choose a location to save it.
After saving the slideshow, you can easily share it with others by clicking on the “Share” button at the top right corner of the window. From there, you can choose to share the slideshow via email, messages, or even upload it to social media.
That’s it! Now you know how to create a photo slideshow on your Mac using the built-in Photos app. Have fun making your own amazing slideshows with your favorite pictures!
FAQ:
Q: Can I add videos to the slideshow?
A: Yes, you can add videos to the slideshow. Just follow the same steps mentioned earlier to select the videos you want to include.
Q: Are there different themes available?
A: Yes, there are several themes available that give your slideshow a different look and feel. Choose the one that suits your style or the theme of your pictures.
Q: Can I customize the duration of each slide?
A: Yes, you can customize the duration of each slide. Use the clock icon at the bottom left corner of the window to adjust the duration.
Q: How can I remove a song from the slideshow?
A: To remove a song from the slideshow, simply click on the music note icon at the bottom right corner of the window and choose “None” for the song.
To view a video tutorial on how to create a photo slideshow on Mac, click .
Update for Big Sur and possibly earlier versions of macOS
If you’re using macOS Big Sur or possibly an earlier version, there have been some updates and changes to the slideshow feature. Here’s what you need to know:
To start a slideshow on your Mac, first, make sure you have the pictures you want to include in the slideshow in your Photos library or a folder on your Mac. You can also choose images from different locations, such as an external hard drive or iCloud.
To create a slideshow, select the pictures you want to include. Then, right-click on the selection and choose “Create Slideshow” from the context menu. Alternatively, you can click on the “+” button at the bottom of the Photos window and select “Create Slideshow” from the “New Slideshow” menu.
Customize your slideshow by adding a theme, text, music, and more. The theme gives your slideshow a specific style or mood, and you can pick from several different themes that are included with macOS. You can also customize the duration of each slide, reorder slides, and add or remove photos or videos.
To apply a theme to your slideshow, click on the “Themes” button at the bottom of the Photos window. In the sidebar that appears, select the theme you like, and it will be applied to your slideshow.
If you want to add text to your slides, click on the “Text” button at the bottom of the Photos window. Then, select the slide you want to add text to, and type the text in the text box that appears. You can customize the text by changing its font, size, alignment, and more.
To add music to your slideshow, click on the “Music” button at the bottom of the Photos window. Then, select the song you want to use from your music library. You can choose to have the song play throughout the slideshow or for a specific duration.
To reorder slides in your slideshow, click on the “+” button at the bottom of the Photos window and select “Reorder Slides.” Then, you can drag and drop the slides to rearrange their order.
If you want to remove a slide from your slideshow, right-click on the slide and choose “Remove Slide” from the context menu. You can also select the slide and press the “Delete” key on your keyboard to remove it.
Once you’ve customized your slideshow, you can view it by clicking on the “Play” button at the bottom of the Photos window. The slideshow will open in full screen mode, and you can navigate through the slides using the arrow keys on your keyboard or by swiping left or right on a trackpad.
If you want to make your slideshow loop continuously, click on the “Settings” button at the bottom of the Photos window, and then select the “Loop Slideshow” option.
That’s it! Now you know how to create and customize slideshows on your Mac using macOS Big Sur or possibly an earlier version. If you have any more questions, check out the FAQ section or consult other sources for more information.
Customize the Slideshow
When making a slideshow on your Mac, you’ll want to customize it to make it more personalized. Here are some ways you can customize your slideshow:
Pick the right theme: macOS includes several themes that you can choose from. Each theme displays your photos in a different way, so make sure to pick the one that you like the most.
Add text: You can add text to each slide to provide more information about the pictures. To add text, right-click on the slide and choose “Add Text”.
Reorder slides: If you want to change the order of the slides, simply click and drag the slide to the desired location.
Change the duration: By default, each slide displays for a few seconds. If you want to change the duration, select the slide and go to the bottom of the screen. There, you’ll see a menu where you can update the duration.
Remove slides: If you no longer want a slide in your slideshow, select it and press the delete key on your keyboard.
Apply a song: You can add a song to your slideshow to create a more immersive experience. To add a song, click on the “Music” tab and select the song you want to use.
Customize the loop: By default, the slideshow will loop through the pictures once it reaches the end. If you want to change this, click on the “Settings” tab and choose the loop option that you prefer.
Update the location: If you’ve copied the pictures from a different location, you can update the slideshow to reflect the new location of the pictures. To do this, click on the “File” menu and select “Update Photos”.
Make it unique: You can make your slideshow unique by adding different types of media, such as videos or other versions of your photos. This will make your slideshow more interesting and engaging.
Delete a theme: If you no longer want to use a theme, you can delete it from your library. Select the theme and click on the sign at the bottom left corner of the screen to delete it.
Hear FAQ: If you have any questions about customizing your slideshow or using any of the features mentioned earlier, you can hear our frequently asked questions by clicking on the “FAQ” button.
With these customization options, you can make your slideshow more personalized and enjoyable for your audience. So go ahead and start creating your own unique slideshow on your Mac!
FAQ about slideshows on mac
Creating a slideshow on your Mac is easy and fun. Below are some frequently asked questions about making slideshows on Mac:
- How do I create a slideshow on my Mac?
- Can I customize the theme of my slideshow?
- How do I add text to my slideshow?
- Can I add a song to my slideshow?
- How do I select and delete a photo in my slideshow?
On your Mac, you can easily create slideshows using the Photos app. Simply select the photos you want to include in your slideshow, then click on the File menu and choose Create Slideshow. You can then customize your slideshow by adding text, selecting a theme, and adding a song.
Yes, you can customize the theme of your slideshow. When creating a slideshow, you’ll have the option to pick from several different themes. Each theme includes a different type of background, text style, and transition effects. Choose the theme that best fits your photos and personal preference.
To add text to your slideshow, simply select the photo you want to add text to, then click on the Text button located at the bottom right of the Photos app. You can then type in your desired text and customize its font, size, and color.
Yes, you can add a song to your slideshow. When creating a slideshow, you’ll have the option to choose a song from your music library. Simply click on the Music button, select the song you want to use, and it will be added to your slideshow.
To select and delete a photo in your slideshow, simply click on the photo you want to delete, then right-click on it and choose Delete. The selected photo will then be removed from your slideshow.
These are just some of the frequently asked questions about slideshows on Mac. If you have any more questions or need further assistance, please refer to the official macOS documentation or contact Apple Support.
Can I add videos to my slideshow
Yes, you can add videos to your slideshow on Mac using the built-in Photos app. To do this, follow these steps:
- Open the Photos app on your Mac.
- Choose the photos you want to include in your slideshow by selecting them.
- Go to the top menu and click on the “+” button, then select “Create Slideshow” from the drop-down menu.
- A new window will appear which displays the selected photos on the left side. On the right side, you’ll see a preview of the slideshow with different themes to choose from.
- Click on the “Themes” tab to see the available themes for your slideshow. You can pick a theme that suits your style and customize it if you want.
- If you want to add videos to your slideshow, click on the “+” button located at the bottom left corner of the window.
- In the dialog box that appears, navigate to the location where your videos are stored and select the ones you want to add.
- Click on the “Choose” button to add the selected videos to your slideshow. You can reorder the photo and video slides by dragging and dropping them.
- Once you’ve added the videos, you can set the duration for each slide by clicking on the “Duration” button. This will determine how long each image or video will be displayed before moving to the next one.
- You can also apply a loop or choose a song to play in the background by clicking on the “Music” button.
- When you’re done making changes, click on the “Play” button to preview your slideshow and make sure everything looks good.
- If you’re happy with the slideshow, click on the “Export” button at the bottom right corner to save it.
That’s it! Now you can create a slideshow with both photos and videos on your Mac.
Can I add text to my slides
Yes, you can add text to your slides in a Mac slideshow. Adding text is a great way to provide context or enhance the visual experience for your audience.
To add text, follow these steps:
- Select the slide where you want to add text by clicking on it.
- Click on the “Text” button at the top of the screen to add a text box.
- Type the desired text directly into the text box.
- You can customize the font, size, color, and alignment of the text by using the formatting options in the toolbar.
- To move the text box, simply click and drag it to a different location on the slide.
- If you want to delete the text box, right-click on it and select “Delete” from the contextual menu.
There are several ways to add text to your slides. You can add text to individual slides, or you can add text to multiple slides at once. To add text to multiple slides, simply select the slides you want to add text to by holding down the Command key while clicking on each slide.
In addition to adding text directly to your slides, you can also add text to your slideshow using a song or a video. When you add a song or a video to your slideshow, you have the option to add text slides at specific points in the slideshow. This is a great way to provide captions or additional information related to the song or video.
To add text slides to your slideshow using a song or a video, follow these steps:
- Select the song or video slide where you want to add text.
- Click on the “Text” button at the top of the screen to add a text box.
- Type the desired text into the text box.
- You can customize the font, size, color, and alignment of the text using the formatting options in the toolbar.
- You can also specify the duration of the text slide, which determines how long the text will be displayed on the screen.
Adding text to your Mac slideshow gives you more control over the content and allows you to convey your message effectively. Whether you’re making a slideshow for a presentation, a photo album, or just for fun, adding text can help you create a professional and polished look.
How can I delete slideshows
If you’ve created a slideshow on your Mac using the Photos app, there are a few ways you can delete it. Here’s how:
Method 1: Using the Photos app
- Open the Photos app on your Mac.
- In the sidebar, click on the “Albums” tab.
- Locate and click on the album or slideshow you want to delete.
- At the top-right corner of the app, click the trash bin icon.
- Confirm the deletion by clicking “Delete” when prompted.
Method 2: Right-clicking on the slideshow
- Locate the slideshow you want to delete in the Photos app.
- Right-click on the slideshow.
- In the context menu that appears, select “Delete Slideshow”.
- Confirm the deletion by clicking “Delete” when prompted.
Frequently Asked Questions (FAQ)
Q: Can I delete a single slide from a slideshow?
A: No, the Photos app doesn’t offer an option to remove individual slides from a slideshow. You’ll need to delete the entire slideshow and create a new one if you want to make changes to the slides.
Q: Will deleting a slideshow also delete the photos and videos included in it?
A: No, deleting a slideshow will not delete the photos and videos in your library. It only removes the slideshow itself.
Q: Is it possible to reorder the slides in a slideshow?
A: Yes, you can reorder the slides in a slideshow by dragging and dropping them to the desired position.
Q: Can I customize the theme and duration of a slideshow?
A: Yes, you can choose from different themes and set the duration of each slide in the Photos app. This allows you to personalize your slideshow according to your preferences.
Q: How do I add music to a slideshow?
A: To add a song to your slideshow, open the slideshow in the Photos app, click on the “Music” tab at the bottom, and choose a song from your library to accompany the slideshow.
By following these steps, you can easily delete unwanted slideshows from your Mac and free up storage space for more pictures and videos.
Sources
- The macOS Photos app allows you to create slideshows with your selected photos. You can also add videos to your slideshow.
- To create a slideshow, open the Photos app on your Mac and go to the library or album where your photos are located.
- Select the photos you want to include in the slideshow. You can choose multiple photos by holding the Command key while selecting.
- Once you’ve selected the photos, click on the “File” menu, then choose “Create” and “Slideshow”.
- A new window will open, where you can customize your slideshow. You can choose a theme, set the duration for each slide, and even add text or music.
- The themes available include options like “Classic,” “Ken Burns,” and “Origami.” Pick the one that suits your preference.
- If you want to add music to your slideshow, click on the “Music” button. You can select a song from your library or choose a different audio file.
- To reorder the slides, simply drag and drop them in the desired order.
- You can also remove slides from the slideshow by right-clicking on them and selecting “Remove Slide.”
- If you want to customize the text on a slide, click on the text box and type in your desired text.
- To view your slideshow, click on the “Play” button at the bottom of the window. The slideshow will play in fullscreen mode.
- If you want the slideshow to loop, check the “Loop Slideshow” box in the slideshow options.
- Once you’re satisfied with your slideshow, click on the “Export” button to save it as a video file.
- Keep in mind that the Photos app on Mac will only let you create slideshows with photos and videos that are stored in your library.
- If you’ve made any changes to your photos or videos, make sure to update your library before creating the slideshow.
- To delete a slideshow, go to the “Albums” tab in the Photos app, find the slideshow album, right-click on it, and select “Delete Album”.
- Making slideshows on Mac is one of the easiest ways to view and share your pictures. It gives you the option to apply different themes and customize the duration and appearance of each slide.
That’s it! Now you know how to create and customize slideshows on your Mac using the Photos app.


