

Water decals, also known as waterslide decals, are a popular and easy way to decorate various surfaces. Whether you’re into crafts, model making, or even Gundam customization, using water decals can add an extra flair to your project. In this article, we’ll guide you through the process of applying water decals step by step.
Before you start applying the decals, preparation is key. Make sure the surface you’ll be working on is clean and thoroughly dried. If there are any oils, dust, or dirt particles, it may affect the adhesion of the decals. It’s also a good idea to heat the surface a bit. This can be done with a hairdryer or simply by placing it near a heater for a short while. Heat helps the decals adhere better.
Once the surface is ready, take out the water decals from its packaging. Carefully cut out the design you want to use. Using a pair of tweezers, hold the decal and dip it into a bowl of water. Let it sit for a few seconds, but make sure not to leave it for too long as it can become too soft and difficult to handle.
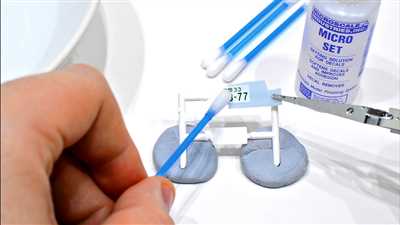
Next, remove the decal from the water using the tweezers. Place it on a tissue or paper towel to remove any excess water. With the help of the tweezers, position the decal on the surface where you want it to be. You can use a pointy tool, like a toothpick, to adjust the position and smooth out any air bubbles. Once you’re satisfied with the placement, gently press the decal onto the surface with a soft cloth or a tissue to remove any air bubbles.
At this point, it’s important to wait for the decal to dry completely before moving on. This can take anywhere from a few minutes to an hour, depending on the size and thickness of the decal. Depending on the type of decal you’re using, there may be a clear film on top of it. If there is, carefully remove it without disturbing the decal underneath.
Many water decals may come with an external seal or coating that should be removed after the decal has dried. This can be done by gently peeling off the seal, making sure to start from one corner and slowly work your way to the other side. Be careful not to damage the decal in the process. You can use a cotton swab dipped in a bit of water to help soften the seal if needed.
To protect the decal and give it a finished look, it’s advisable to apply a layer of varnish or clear coat over it. This helps seal the decal and prevents it from peeling off easily. There are different types of varnish available, such as glossy, matte, or satin. Choose the one that suits your preference and apply it following the manufacturer’s instructions.
In conclusion, water decals are a great way to add unique and intricate designs to your crafts, models, or other surfaces. By following the proper preparation and application methods, you can achieve professional-looking results. So, if you’re looking to take your project to the next level, give water decals a try!
Model Surface Preparation

Before applying water decals to your model, it is important to properly prepare the model surface. This will ensure that the decals adhere well and look good once applied.
Here are some important steps for model surface preparation:
- Thoroughly clean the model surface to remove any dust, dirt, or oils. Use a cotton tissue or pointy cotton swab dipped in isopropyl alcohol or another good surface cleaner to clean the entire surface. This will help the decals adhere strongly and avoid any potential issues later on.
- If there are any external seals on your model, remove them before applying water decals. These seals may interfere with the adhesion of the decals, so it’s best to remove them carefully using tweezers or a craft knife.
- If the model has been previously varnished, make sure to remove the varnish before applying the water decals. This can be done with a fine-grit sandpaper or by using a varnish remover. It’s important to have a smooth and clean surface for the decals to adhere properly.
- Position your water decals carefully on the model surface. You can use tweezers or your fingers to hold the decals and slide them off the transfer paper. Take your time with this step to ensure proper positioning.
- When applying the water decals, make sure to have a bowl or container with warm water nearby. Dip the decal into the water for a few seconds until it starts to slide off the backing paper. Then, carefully place it onto the model surface.
- To remove any air bubbles or wrinkles, gently press the decal with a cotton tissue or a soft cloth. Start from the center and slowly move outwards to the edges. This will help ensure a smooth and bubble-free surface.
- If you are using waterslide decals, applying some heat can help the decals adhere better. You can use a hairdryer or another source of heat to blow warm air over the decals. Be careful not to overheat the decals, as this can cause damage.
- After the water decals have been applied and dried, it’s a good idea to seal them with a clear varnish. This will protect the decals and make them last longer. Again, make sure the varnish is smooth and even.
By following these methods of model surface preparation, you can ensure that your water decals adhere well and look fantastic on your model. Good luck with your crafting!
Another opinion
When it comes to applying water decals, there are various methods and opinions out there. One popular technique is using heat to ensure that the decal adheres properly to the surface.
If you’re not sure where to start with water decals, don’t fret! There is a craft community out there that can help you. You can also find some great tutorials online that explain the process step by step.
To begin, make sure that your surfaces are clean and dry. You can use a cotton pad or tissue to wipe down the area where you will be applying the decal. This ensures that there are no external factors that may prevent proper adhesion.
Next, thoroughly prepare the water decals by removing them from their packaging and peeling off the protective cone seals. Use tweezers to hold the decal and slowly slide it into a dish of warm water. Allow the decal to sit in the water until it begins to slide easily off the backing paper.
Once the decal is ready, gently lift it out of the water using tweezers and position it onto the desired surface. Make sure that the surface has been properly coated with a layer of varnish or another protective sealant.
Using a tissue or cotton pad, carefully press down on the decal to remove any excess water and to ensure that it adheres well to the surface. This will help prevent any air bubbles or wrinkles from forming.
If you’re using waterslide decals on a model or similar craft, you may need to use a pointy tool to help position and smooth out the decal. Take your time and be sure not to rush the process.
Once the decal is in position, use a tissue or cotton pad to gently press out any remaining bubbles or wrinkles. Let the decal dry completely before applying any additional coats of varnish or sealant.
Another opinion that some buyers have is to use a different type of water decal, such as Lazertran transfers. These decals are applied in a similar way but require a different preparation process. Make sure to thoroughly read the instructions for these types of decals before attempting to use them.
In conclusion, there are multiple ways to apply water decals depending on your preferences and skill level. Regardless of the method you choose, proper preparation and care are key to achieving a good result. Take your time, follow the instructions, and don’t be afraid to seek guidance from the crafting community. Happy decorating!
Sources
When it comes to water decals, you will need a few tools and materials to properly apply them onto your wares. Here are some essential sources you should have:
| 1. | Tweezers |
| 2. | Heat source |
| 3. | External heat source (optional) |
| 4. | Decals |
| 5. | Ware to be decorated |
| 6. | Varnish |
If you are unsure where to buy these items, craft stores or online retailers specializing in model kits or craft wares are your best bet. There are various types of water decals, such as waterslide and Lazertran transfers, so make sure to choose the ones that suit your needs best.
Before applying the water decals, you should first prepare the surface of your wares. Clean them thoroughly and make sure they are dry. Hold the decal with tweezers and carefully slide it off the backing paper. If the decal has been placed on another piece of paper or tissue, remove it first.
When applying the decal onto the proper position, it is important to use a strong hold and apply it slowly. Smooth out any air bubbles or creases that may appear. Once the decal is in position, gently seal it with varnish to protect it.
In my opinion, the most effective method is to use an external heat source, such as a hairdryer or heat gun, to make the decal adhere more strongly and smoothly. Apply heat from above and slowly move it across the surface of the decal.
For Gundam model kit buyers, there is another method called the “cone technique.” This involves using a pointy cone made of tissue, cotton, or some other material to push the decal down onto the surface. The cone helps remove any excess water and ensures the decal adheres properly.
Please note that these methods are applicable to various surfaces, including ceramics, glass, and metal. Make sure to read and follow the instructions that come with your decals for the best results.


