

If you are new to blogging and want to create your first blog, WordPress is a great choice. With over 35% of websites on the internet powered by WordPress, it is a popular and widely used platform for creating websites and blogs. In this article, we will provide a complete guide on how to create a blog on WordPress, starting from the very basics.
Step 1: Set Up Your WordPress Account
The first step towards creating a WordPress blog is to set up an account on WordPress.com. You can select a domain name for your blog and create a free account. Alternatively, if you want more control and options, you can choose to set up a self-hosted WordPress website on wordpress.org. This will require you to have your own domain name and hosting plan.
Step 2: Choose a Theme
After setting up your account, you’ll need to choose a theme for your blog. A theme determines the overall look and layout of your blog. WordPress offers a wide range of free and premium themes that you can choose from. You can even customize the selected theme later to match your exact requirements.
Step 3: Customize Your Blog
Once you have selected a theme, you can further customize your blog by adding your own logo, header image, and other branding elements. You can also add functionality to your blog by installing plugins. Plugins are small software programs that add specific features and functionality to your WordPress blog.
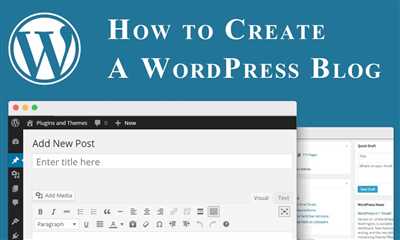
Step 4: Publish Your First Blog Post
Now that your blog is set up and customized, it’s time to start creating content. To create a new blog post, simply click on the “Add New” button in the WordPress admin area. You can then input your blog post content, add images or videos, and format your text using the WordPress editor. Once you are satisfied with your blog post, click on the “Publish” button to make it live on your website.
Step 5: Promote Your Blog
After publishing your first blog post, it’s important to promote your blog to attract more readers. You can share your blog posts on social media platforms, send out email newsletters to your subscribers, and engage with other bloggers in your niche. You can also optimize your blog for search engines by using relevant keywords in your blog posts and metadata.
Following these steps will help you create your own WordPress blog and start sharing your ideas and news with the world. Whether you’re a beginner or an experienced blogger, WordPress provides a user-friendly platform with plenty of customization options and plugins to make your blog stand out.
- How to start a Blog on WordPress
- You do you
- Setting up a WordPress blog with Bluehost recommended
- 1 Visit the Bluehost site
- 2 Select a hosting plan to start a blog
- 3 Input a domain name
- 4 Register Bluehost account
- 5 Select your hosting options
- 6 Set your password
- 7 Log in to your new account
- 8 Choose your WordPress theme
- Pros of a self-hosted blog
- Video:
- How to Make a Blog Website on WordPress | Complete Tutorial 2023
How to start a Blog on WordPress
Starting a blog on WordPress is a great way to share your ideas and connect with people who share similar interests. Whether you want to create a personal blog or a professional website, WordPress provides all the necessary tools and features to help you build and manage your site.
Step 1: Choosing a domain name
The first step in creating a blog on WordPress is to choose a domain name. Your domain name is the web address where people will find your blog. It should reflect your blog’s niche and be easy to remember. You can search for available domain names on platforms like Bluehost or GoDaddy.
Step 2: Register with WordPress
Once you have chosen a domain name, you need to sign up for a WordPress account. You can do this by visiting the WordPress website and clicking on the “Get Started” button. Fill in the required information and complete the registration process.
Step 3: Select a WordPress theme
After registering, you will be directed to the WordPress dashboard. From there, you can choose a theme for your blog. WordPress offers a wide range of free and premium themes that you can select based on your preferences and the type of content you want to showcase.
Step 4: Set up your blog
Now it’s time to set up your blog and customize its appearance. You can add pages, create a menu, and select the layout and color scheme that you like. WordPress provides various customization options, including the ability to add a logo, gallery, or a feature area.
Step 5: Add content
With the basic settings in place, it’s time to start adding content to your blog. You can create new posts or pages, upload images or videos, and write compelling articles. WordPress also allows you to add tags and categories to organize your content and make it easier for readers to navigate.
Step 6: Connect to social media and email
To reach a wider audience, you should connect your blog to social media platforms and offer options for readers to subscribe via email. This way, your blog posts will automatically be shared on your social media accounts, and readers can stay updated with your latest content.
Step 7: Take advantage of WordPress settings
WordPress provides a range of settings that allow you to control various aspects of your blog. You can customize the permalinks, set the date format, and choose whether to display the full article or just a summary on the homepage. Exploring these settings will give you better control over your blog and its appearance.
By following these steps, you can create a blog on WordPress that not only looks professional but also offers a great user experience. Don’t forget to regularly update your blog with fresh content and engage with your readers to build a strong community around your blog.
You do you
When it comes to creating a blog on WordPress, there are many options and decisions to make. One of the first steps is the registration process. You’ll need to visit the WordPress.com website and click on the “Get Started” button to create an account. This will involve choosing a username, password, and inputting your email address.
Once your account is created, you can choose a domain name for your blog. This is the web address that readers will use to access your site. You have the option to pick a free domain with a WordPress.com extension or connect a custom domain that you own. The latter option gives you more control over your site and allows you to build a brand identity.
After choosing a domain, you can start selecting a theme for your blog. WordPress offers a wide range of visually appealing themes that you can easily customize to fit your style. You can also add plugins to enhance the functionality of your blog. These plugins allow you to do things like generate powerful SEO, manage comments, and monetize your site.
Now, let’s dive into the blogging part. The WordPress dashboard lets you manage all aspects of your blog. You can create new posts and pages, edit existing ones, and visualize how your content will look before publishing. Writing blog posts is made easy with the built-in editor, which provides features like formatting options, adding images, and embedding videos.
If you’re new to blogging, there are many tutorials and tips available on WordPress.org. These resources can help you learn the ins and outs of blogging and make the most of the features available to you. You can also find tutorials on how to use specific plugins, customize your theme, and optimize your site for search engines.
While WordPress.com is a popular choice for beginners, there’s also a self-hosted version of WordPress called WordPress.org. With this version, you have even more control over your site and can easily monetize it. However, self-hosted blogs require more technical knowledge and may involve additional costs for hosting and domain registration.
Whether you choose WordPress.com or WordPress.org, the goal is the same: to build a great blog that attracts readers and helps you achieve your blogging objectives. So take some time to brainstorm ideas, choose the right platform, and dive into the world of blogging with WordPress!
Setting up a WordPress blog with Bluehost recommended
If you’re looking to start a blog, WordPress is a powerful platform that allows you to easily publish your thoughts and ideas. One of the best ways to get started with WordPress is by using Bluehost as your hosting provider. Bluehost is a highly recommended hosting service that offers great support and features for WordPress users.
Setting up a WordPress blog with Bluehost is easy and straightforward. Here’s a step-by-step guide to help you get started:
- Visit the Bluehost website and click on the “Get Started Now” button.
- Select a plan that suits your needs. Bluehost offers different hosting plans to choose from, so you can select the one that fits your budget and requirements.
- Choose a domain name for your blog. Your domain name is like the address of your website, so make sure it’s something catchy and easy to remember.
- Create an account with Bluehost. You’ll need to provide some basic information, like your name, email address, and payment details.
- Set a password for your account. Make sure it’s strong and secure to protect your blog from unauthorized access.
- Log in to your Bluehost account and go to the Control Panel. From there, you’ll be able to access the tools and settings you need to start building your WordPress blog.
- Install WordPress. Bluehost has an easy one-click WordPress installation feature that allows you to set up WordPress on your domain with just a few clicks.
- Choose a theme for your blog. WordPress offers a wide range of free and premium themes to choose from. Select a design that reflects your niche and gives your blog the look you want.
- Install plugins. WordPress plugins are like apps that add extra features and functionality to your blog. Choose the ones that will help you with tasks like SEO, social media integration, and email subscriptions.
- Write your first blog post. Once you have your blog set up, it’s time to start creating content. Share your thoughts, tips, and ideas with your readers, and keep them engaged with regular updates.
While setting up a WordPress blog with Bluehost is relatively easy, blogging itself can be hard work. It’s important to stay consistent and continually provide value to your readers. Bluehost also offers helpful tutorials and support to guide you along the way, so don’t hesitate to reach out if you need any assistance.
One of the pros of using Bluehost for your WordPress blog is that it allows you to have full control over your website. You can customize your blog’s design, choose the plugins you want to use, and have complete ownership of your content. Bluehost also offers a demo site feature, which lets you visualize how your blog will look before making it live.
If you’re starting a blog and want to build a strong online presence, WordPress is the perfect platform for you. It’s a popular and widely used blogging medium that is trusted by millions of people worldwide. With Bluehost as your hosting provider, you can be confident in the reliability and cost-effectiveness of your blog.
Registering a domain name and setting up hosting can be a bit overwhelming, especially if you’re new to blogging. But with Bluehost’s recommended services and easy-to-use interface, you’ll be up and running in no time. Whether you’re a blogger, a business owner, or an anonymous writer, starting a WordPress blog with Bluehost is a great choice.
So go ahead, visit Bluehost, and start creating your WordPress blog today.
1 Visit the Bluehost site
Before you can create a WordPress blog, you need to visit the Bluehost website. Bluehost is a popular web hosting service that offers hosting plans specifically designed for WordPress websites.
When you visit the Bluehost site, you’ll be asked to select a hosting plan. There are different plans to choose from, so pick the one that best suits your needs and budget.
Once you have selected a hosting plan, you will need to register a domain name for your blog. A domain name is the address that people will use to access your website, so choose a name that is relevant to your niche and easy to remember.
After you have registered your domain name, you can proceed to create your WordPress blog. Bluehost makes it easier for beginners to start a blog by offering a one-click WordPress installation. This means that you can install WordPress on your website without any technical knowledge or coding skills.
Once WordPress is installed, you can log in to your WordPress dashboard. The dashboard is where you will manage your blog, create and publish new content, customize the appearance of your site, and much more.
WordPress offers a wide range of themes and plugins that you can use to customize your blog. Themes allow you to change the design and layout of your site, while plugins add new functionality and features. You can also create custom themes and plugins if you have the necessary skills.
With WordPress, you can create not just a blog, but also a website, an online store, a portfolio, a podcast, and much more. The possibilities are only limited by your imagination and creativity.
Once your blog is set up, you can start publishing content. WordPress makes it easy to create and publish blog posts, pages, and other types of content. You can add images, videos, and other media to your posts, and even schedule your content to be published at a later date.
WordPress also offers powerful tools for SEO (search engine optimization), which can help your blog rank higher in search engine results and attract more readers. You can optimize your blog’s content, meta tags, and other elements to improve its visibility on search engines like Google.
If you’re new to blogging, WordPress offers tutorials and other resources to help you learn the ins and outs of the platform. You can find step-by-step guides, video tutorials, forums, and other helpful materials to get you started.
WordPress also allows you to monetize your blog by adding advertisements, affiliate links, sponsored content, and other revenue-generating methods. You can earn money from your blog by partnering with advertisers, promoting products or services, and creating premium content for your readers.
In conclusion, visiting the Bluehost site is the first step to creating a WordPress blog. Bluehost offers affordable hosting plans tailored for WordPress websites, making it easier for you to start your blogging journey. With WordPress, you can create a blog, website, or any other online medium without any coding knowledge or technical expertise.
2 Select a hosting plan to start a blog
When it comes to starting a blog, selecting the right hosting plan is crucial. Hosting is the foundation of your website, and picking the right plan can make all the difference in how your blog performs.
There are several options when it comes to WordPress hosting, but one popular choice is Bluehost. They offer a variety of hosting plans, each with its own set of features and benefits.
If you’re just starting out and want a simple and straightforward option, Bluehost offers a shared hosting plan that allows you to create a blog without the need for any advanced technical skills. This option is great for beginners, as it provides an easy-to-use interface and comes with great support that can help you with any questions or issues you may have.
On the other hand, if you’re more experienced and looking for more control and flexibility, Bluehost also offers a self-hosted plan. This plan allows you to have complete control over your blog and gives you the freedom to customize and design your website to your liking. It also comes with advanced features such as the ability to install multiple themes and plugins, which can help enhance the functionality of your blog.
Whichever hosting plan you choose, the first step is to register for an account with Bluehost. This process is simple and only takes a few minutes. Once you’ve registered, you’ll be able to choose a domain name for your blog. Your domain name is essentially the web address where people can find your blog.
After you’ve chosen a domain name, the next step is to set up your WordPress installation. Bluehost makes this process easy by offering a one-click WordPress installation button. With just a click, you’ll have WordPress installed and ready to go.
Once your WordPress installation is complete, you can start building your blog. You can create pages, publish posts, set up settings, and much more. WordPress is a flexible and user-friendly platform that makes it easy to design and manage your blog.
Whether you’re a seasoned blogger or just starting out, it’s important to consider how you want to monetize your blog. Bluehost offers several options for monetization, such as displaying ads, creating sponsored posts, and selling products or services.
Another important aspect of hosting is security. Bluehost offers SSL certificates, which encrypt the data that is transmitted between your website and your visitors. This helps ensure that your blog is secure and that any information shared on your site is kept anonymous and protected.
Bluehost also provides great support, with a team of experts available to help you with any questions or issues you may have. They offer live chat, phone, and email support, as well as a comprehensive knowledge base and frequently asked questions section.
In conclusion, selecting the right hosting plan is crucial when it comes to starting a blog. Bluehost offers a variety of options that cater to both beginners and advanced users. With their easy-to-use interface, advanced features, great support, and strong security measures, they provide a reliable and user-friendly platform for creating and managing your blog.
3 Input a domain name
Once you have decided to start a blog, it’s important to choose a domain name. A domain name is your website’s address, frequently referred to as a URL (Uniform Resource Locator). When visitors search for your site, they will type in this address to access it.
Choosing the right domain name can make a big difference in how your blog is perceived and how easily it can be remembered. Here are some tips to help you pick a better domain name:
- Make it simple and easy to remember. Avoid complicated or lengthy names that may confuse your visitors.
- Think about your blog’s focus and topic. Try to incorporate relevant keywords into your domain name to help with search engine optimization (SEO).
- Consider using your own name. If you want to create a personal blog, using your own name as the domain can give it a more professional touch.
- Use a .com extension if possible. While there are many domain extensions available, .com is the most commonly used and trusted extension.
- Check for availability. Before finalizing your domain name, make sure it is not already taken by visiting a domain registrar website, such as GoDaddy or Namecheap.
Once you have decided on a domain name, you can proceed with the registration process. Many hosting platforms, such as WordPress.com or self-hosted WordPress.org, offer domain registration as part of their package.
If you are unsure which platform to choose, WordPress.org is a more powerful and flexible option that gives you complete control over your website. However, WordPress.com is a good starting point for beginners who don’t want to deal with the technical aspects of hosting and setting up a website.
If you choose WordPress.org and self-hosting, you will need to select a web hosting provider and register your domain name separately. This allows you to have more control and flexibility in terms of customization and adding plugins to your site.
Once you have registered your domain name, you can start customizing your blog and adding content. You can choose from a variety of themes and plugins to enhance the appearance and functionality of your blog.
Remember, starting a blog is just the beginning. Having a plan, writing quality posts, and consistently updating your blog with fresh content lets you market your blog and attract visitors. Always keep an eye on the latest trends and news in your niche, and don’t hesitate to visit tutorials or ask questions in blogging forums if you need guidance.
4 Register Bluehost account
Creating a successful blog starts with choosing the right hosting provider. One popular option is Bluehost, which offers a wide range of features and tools to help you build and manage your website.
To get started, you’ll need to register for a Bluehost account. This process is simple and can be completed in a few easy steps:
- Go to the Bluehost website and click on the “Get Started” button.
- Select a plan that suits your needs. Bluehost offers different plans, so choose the one that fits your budget and requirements. If you’re just starting out, the basic plan will be sufficient.
- Choose a domain name for your blog. Your domain name is the address where your site will be located. Bluehost offers a free domain name with every hosting plan, so take some time to think of a name that reflects the content and purpose of your blog.
- Enter your personal and payment information. Bluehost accepts various payment options, making it easy for you to get started.
- Create a password for your Bluehost account. Make sure it’s strong and secure to protect your data and website.
Once you’ve completed these steps, you’ll have successfully registered for a Bluehost account. This will give you access to the Bluehost dashboard, where you can start building your blog.
Bluehost is recommended by WordPress.org, the official platform for building websites. This means that you can easily install WordPress on your Bluehost account, giving you full control over your blog’s design and content.
Bluehost also offers a one-click WordPress installation, making it even easier for beginners to set up their blog. You don’t need any technical knowledge or coding skills – simply follow the step-by-step tutorials and start creating your blog.
With Bluehost, you’ll also have access to a wide range of themes and plugins. This gives you the flexibility to customize your blog and add different types of content, such as pages, images, videos, and more.
Setting up a blog with Bluehost is a cost-effective option, especially for beginners. Bluehost offers affordable hosting plans, and you can start with a basic plan and upgrade later as your blog grows.
By choosing Bluehost as your hosting provider, you’ll also have access to their knowledgeable support team. They can help you with any questions or issues you may have, ensuring you have a smooth blogging experience.
In conclusion, registering for a Bluehost account is an important step when starting a blog. Bluehost offers a user-friendly interface, powerful features, and reliable hosting, making it the right choice for beginners and experienced bloggers alike.
5 Select your hosting options
Selecting the right hosting options is crucial when creating a new WordPress blog. Having a reliable hosting provider is important to ensure your website is secure, fast, and always available for your readers to visit. Here are some options to consider:
1. WordPress.com: If you’re new to blogging or don’t have advanced technical skills, WordPress.com is a great option. It takes care of all the hosting, security, and technical aspects for you, allowing you to focus on creating and publishing content. You can easily sign up for a free account or choose from different packages for more features and customization options.
2. WordPress.org: If you’re more tech-savvy and want more control over your website, WordPress.org is the right choice. With WordPress.org, you’ll need to find your own hosting provider and install WordPress on your own server. This gives you complete control over your site’s settings and customization options, but requires more technical knowledge.
3. Self-hosted WordPress: If you want to take your WordPress site to the next level, self-hosting is a great option. This allows you to have complete control over your site’s design and functionality. You can install a new theme, add plugins, and customize your site to fit your niche and preferences. Self-hosting gives you more flexibility and the ability to monetize your blog.
4. Managed WordPress hosting: If you don’t want to deal with the technical aspects of managing a WordPress site, managed WordPress hosting is a good option. This type of hosting provides you with a dedicated server optimized for WordPress. The hosting provider will handle tasks such as security, backups, updates, and performance optimization, allowing you to focus on creating content.
5. Shared hosting or VPS hosting: If cost is a concern, shared hosting or virtual private server (VPS) hosting are more affordable options. Shared hosting means your site will share server resources with other websites, while VPS hosting offers a virtual server with dedicated resources. Both options are suitable for smaller websites with lower traffic volumes.
Pick the hosting option that best suits your needs and budget. Consider the pros and cons of each type and think about the level of control, customization, and technical know-how you’re comfortable with. Remember that you can always upgrade or switch hosting options in the future as your blog grows and evolves.
6 Set your password
After you have completed the previous steps, you will be asked to set a password for your WordPress blog. This password will be used to access your admin dashboard, where you can create and publish new blog posts, customize your theme, manage your plugins, and much more.
Select a strong password that is hard to guess, and make sure to save it in a safe place. It’s also a good idea to choose a different password than the one you use for other online accounts for better security.
When you click on the “Set Password” button, your WordPress blog will be fully created and ready to go. You can now log in to your admin dashboard using your chosen password and start customizing your blog!
7 Log in to your new account
Once you’ve completed the registration form, it’s time to log in to your new WordPress account. This will give you access to the backend of your blog, also known as the dashboard. From here, you’ll have complete control over your blog and can start building and customizing it to your liking.
To log in, go to the WordPress login page and enter your username or email address, along with your password. If you’re having trouble remembering your password, you can use the “Forgot password” link to reset it. While choosing a password, it’s recommended to pick a strong one to ensure the security of your account.
Once you’re logged in, you’ll be taken to the dashboard, which is the central hub for managing your blog. Here, you can add new posts, pages, and media to your blog. You can also customize the appearance of your blog by choosing from a wide range of themes, or even installing your own custom themes.
One of the pros of using WordPress is its powerful plugin market. Plugins are additional pieces of software that add extra functionality to your blog. There are plugins for everything you can imagine, from adding a gallery to your blog, to connecting your blog to popular social media platforms.
While beginners may find the dashboard a bit overwhelming at first, WordPress provides a detailed and user-friendly interface, making it easy to learn and navigate. If you’re not sure how to do something, there are plenty of tutorials and tips available online to help you out.
If you’re just getting started with blogging and don’t want to invest in a self-hosted WordPress site just yet, you can also sign up for a free WordPress.com account. The process is similar, but with WordPress.com, you won’t have the same level of control and customization options as with the self-hosted version.
Having a self-hosted WordPress site gives you complete ownership and control over your content. It’s recommended for those who are serious about blogging and want to have the flexibility to fully customize and monetize their blog. However, if you’re just starting out and want to test the waters, a WordPress.com account can be a good place to begin.
Now that you know how to log in to your new WordPress account, it’s time to start adding content and giving your readers something to read. In the next stage, we’ll cover the basics of writing and publishing your first blog post, so stay tuned!
8 Choose your WordPress theme
Choosing the right WordPress theme for your blog is an essential step in creating a successful website. Your theme will determine the overall look and feel of your site, so it’s important to select one that aligns with your content and goals.
There are plenty of themes available in the market, ranging from basic to advanced, and they can be easily installed and activated from your WordPress dashboard. Some themes even come with powerful features like drag and drop builders and multiple layout options.
When selecting a theme, you should consider the niche of your blog and the type of content you’ll be creating. If you’re new to blogging and don’t have much coding skills, there are themes like Divi that allow you to easily create great-looking websites without any coding knowledge.
There’s also a wide range of free and premium themes available. Free themes are a great starting point and can be a good option if you’re on a tight budget. Premium themes, on the other hand, often come with more features and customization options, but they do come with a cost.
Before selecting a theme, it’s a good idea to try out a demo or a live preview. This will give you a better comprehension of how the theme will look and function on your site. You can also check out online tutorials and reviews to get ideas and tips from other people who have used the theme.
When you’re ready to choose a theme, you can do so by going to the “Appearance” section in your WordPress dashboard. From there, you can select “Themes” and then click on “Add New” to access the WordPress Theme Repository. Here, you can search for themes based on different criteria.
If you already have a theme file (usually named something like “theme-name.zip”) saved on your computer, you can also upload it directly to your WordPress site by selecting the “Upload Theme” option.
Once you’ve selected or uploaded a theme, you can click on “Activate” to make it the current theme for your site. Keep in mind that you can always change your theme later, so don’t be afraid to experiment with different options.
It’s also important to note that if you’re using the self-hosted version of WordPress (WordPress.org), you have even more options when it comes to choosing a theme. There are various marketplaces where you can find both free and premium themes designed specifically for WordPress.
One popular theme marketplace is ThemeForest, where you can find a vast selection of themes for different purposes and industries. Another option is Elegant Themes, which offers a powerful theme called “Divi” that comes with a drag and drop builder.
In conclusion, choosing a WordPress theme is an important decision that will directly impact the look and functionality of your blog. Take the time to research and explore different options, and don’t hesitate to ask questions if you’re unsure. A well-designed and suitable theme will give your blog a professional and attractive appearance, making it more appealing to your target audience.
Pros of a self-hosted blog
A self-hosted blog is a great option for those who want more control over their website and are willing to put in some extra effort. Here are some of the advantages of having a self-hosted blog:
- Complete control: With a self-hosted blog, you have full control over your website’s design, features, and functionality. You can customize your blog to match your unique style and brand.
- Email marketing: Running a self-hosted blog allows you to take advantage of email marketing tools to build an email list and reach your audience through newsletters or promotional emails.
- Advanced features: Self-hosted blogs offer more advanced features and plugins compared to free blogging platforms. You can add various functionalities to your blog, such as social media integration, advanced search options, and more.
- Monetization options: Self-hosted blogs give you the freedom to monetize your content in various ways, such as displaying ads, selling products or services, or partnering with other brands.
- More professional: A self-hosted blog gives a more professional impression to your readers and potential sponsors. It shows that you are serious about your blog and have invested time and effort into building your own online platform.
- SEO benefits: You have more control over SEO optimization on a self-hosted blog. You can optimize your site’s structure, meta tags, and content to improve search engine rankings and attract organic traffic.
- Data ownership: With a self-hosted blog, you own all of your data. You can easily export or back up your content, and you are not restricted by any terms or conditions set by the blogging platform.
- Flexibility in design and themes: Self-hosted blogs offer a wide range of customizable themes and templates. You can choose a theme that suits your niche and brand identity, and modify it to create a unique and visually appealing website.
- Learning opportunities: Managing a self-hosted blog allows you to learn new skills, such as basic web development, server management, and troubleshooting. This knowledge can be valuable for future projects or career opportunities.
Having a self-hosted blog does require a bit more technical knowledge and effort, but the benefits it provides make it a popular choice among bloggers who want more control and flexibility with their websites. If you’re willing to invest time and learn along the way, a self-hosted blog can be a powerful platform to share your ideas, generate income, and build your online presence.


