

If you’re ready to take your business to the next level, having a Facebook page is a must. With over 2 billion monthly active users, Facebook is one of the best sources of potential customers for your brand. Setting up a business Facebook page is easy and can be done in just a few minutes. In this step-by-step guide, we’ll show you how to create and set up your business Facebook page.
Step 1: Sign Up for a Facebook Business Account
To get started, you’ll need to open a Facebook Business account. This is different from a personal account, as it allows you to manage multiple Facebook pages and ad accounts. Simply go to the Facebook Business Manager website and sign up for an account using your business’ name. Once you have an account, you can start creating your business Facebook page.
Step 2: Create Your Business Facebook Page
To create a business Facebook page, go to the Facebook Business Manager and click on the “Create Page” button. You’ll then need to choose the category that best describes your business and provide some basic information, such as your page’s name and the category it falls under. Once you’re done, click “Create Page” and you’re ready to go!
Step 3: Customize Your Facebook Page
Now that you have your business Facebook page, it’s time to customize it and make it your own. Add your brand’s logo, cover photo, and other visual assets to make your page visually appealing. You can also add a description of your business and fill in the meta tags to help people find your page on Facebook.
Step 4: Manage Your Team and Assets
If you’re working with a team, you can add them as page managers and assign different roles and permissions. This allows you to keep track of who is responsible for what and ensure that your page is being managed effectively. You can also add external partners, such as marketing agencies, to your Facebook page to work on specific campaigns or projects.
Step 5: Start Marketing on Facebook
Once your business Facebook page is set up and ready to go, it’s time to start marketing. Use Facebook’s advertising platform to create targeted ad campaigns that reach the right people at the right time. You can also connect your Instagram account to your Facebook page and manage both platforms from one place.
Now that you know how to setup your business Facebook page, you’re ready to take advantage of the countless opportunities it offers. Follow these step-by-step instructions, and you’ll have a professional-looking business Facebook page up and running in no time!
How to Create a Facebook Business Page Step by Step
Creating a Facebook Business Page is an essential step for any business looking to establish an online presence. With millions of people using the platform every day, having a Facebook page lets you connect with potential customers and promote your products or services. In this step-by-step guide, we’ll walk you through the process of creating a Facebook Business Page.
Step 1: Create a Facebook Account
If you don’t already have a personal Facebook account, you’ll need to create one to get started. Go to facebook.com and follow the prompts to sign up for a new account. Once you’re signed in, you can proceed to create your business page.
Step 2: Set Up Your Business Page
Once you’re signed in to your Facebook account, click on the dropdown arrow at the top right corner of the page and select “Create Page” from the menu. This will open a list of page options, choose the “Business or Brand” category.
Step 3: Fill In Your Page Details
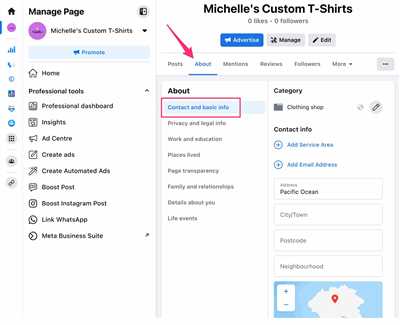
Now it’s time to fill in the details for your business page. Start by entering your business name and choosing a category that best describes your brand. You’ll also need to add some information about your business, such as your address, phone number, and website. This information will help people find and contact your business.
Step 4: Add Photos and Assets
To make your Facebook Business Page more visually appealing, you should add some photos and assets. This could include your logo, a cover photo, and any other images that represent your brand. You can upload these photos directly from your computer or choose from existing images on your Facebook account.
Step 5: Customize Your Page
Once you’ve uploaded your photos, you can customize your page further. You can add a short description of your business and provide additional details about what you offer. You can also add a call-to-action button to encourage people to visit your website or contact you directly.
Step 6: Connect Your Instagram Account
If you have an Instagram account for your business, you can connect it to your Facebook Business Page. This integration allows you to manage both accounts from one place and makes it easier to share content across platforms.
Step 7: Get Started with Facebook Marketing
Now that your Facebook Business Page is set up and ready to go, you can start leveraging its marketing potential. You can create and run ads, boost your posts to reach more people, and use audience insights to understand your customers better. Facebook offers a range of tools and features to help you get the most out of your marketing efforts.
Creating a Facebook Business Page is a simple process that only takes a few minutes. Once you have your page set up, keep it updated with fresh content and engage with your audience regularly. With the right strategies and consistent effort, your Facebook Business Page can become a valuable asset for your business.
Step 1 Sign Up

Setting up a business account on Facebook is a crucial step for any brand or business that wants to establish a strong presence on social media. By creating a business account, you’ll gain access to valuable marketing tools and features that will help you connect with your target audience and grow your business.
To sign up for a business account on Facebook, follow these step-by-step instructions:
- Go to the Facebook homepage and click on the “Create an account” button.
- Fill out the required information, including your name, email address, and password. Make sure to use a secure password that you can easily remember.
- Choose the category that best describes your business. This will help Facebook display your business page to the right people.
- Create a business name. This should be the name of your brand or business.
- Once you’re ready, click on the “Sign Up” button.
- Facebook will then prompt you to complete some additional steps to set up your business account, such as adding a profile picture and filling out your business details.
- Next, you’ll need to create a Facebook Page for your business. A Facebook Page is a dedicated space for your brand or business on Facebook. It’s what people will see when they search for your business on Facebook.
- Click on the “Create a Page” button to get started.
- Follow the step-by-step instructions to create your business Page. You’ll need to provide some basic information about your business, such as your business category, address, and contact details.
- You can also link your business Instagram account to your Facebook Page if you have one. This will allow you to manage both accounts from one place.
- Once your Page is ready, click on the “Go to Page” button to access it.
- Now that you have your business account and Page set up, it’s time to start building your audience and sharing your brand’s story. Keep in mind that having a Facebook Page is just the beginning – you’ll need to consistently create engaging content, interact with your audience, and stay active on the platform to build a strong presence.
By following these steps, you’ll be well on your way to creating a successful business presence on Facebook. It’s important to remember that this is only the first step, and there are many more strategies and techniques that you can implement to grow your business on Facebook. Make sure to stay updated with the latest marketing trends and best practices, and always be open to learning from reliable sources and sources within your marketing team.
Why should you create a Meta Business Manager account
When it comes to managing your business on Facebook, having a Meta Business Manager account is essential. This centralized hub allows you to manage all of your Facebook assets, such as pages, brands, and external sources, in one place.
If you’re wondering why you should create a Meta Business Manager account, here are some compelling reasons:
| 1. Streamline Your Work | By creating a Meta Business Manager account, you’ll be able to streamline your work. Instead of having multiple accounts and pages to manage, you can consolidate everything into one account. This makes it easier to keep track of your assets and ensures that you’re not missing any important updates or messages. |
| 2. Collaborate with Your Team | If you have a team that works on your Facebook marketing, having a Meta Business Manager account is crucial. You can invite team members to join your account and assign them different roles and permissions. This way, everyone on your team can work together efficiently and effectively. |
| 3. Access Powerful Marketing Tools | Meta Business Manager provides access to a wide range of powerful marketing tools. You can create and manage ad campaigns, track performance metrics, and target specific audiences. These tools can help you reach more people, increase brand awareness, and drive conversions. |
| 4. Ready for the Future | As Facebook continues to evolve and introduce new features, having a Meta Business Manager account ensures that you’re ready for the future. You’ll be able to seamlessly integrate new features and stay ahead of the competition. |
| 5. Keep Your Accounts Secure | With a Meta Business Manager account, you can easily manage and secure your Facebook accounts. You’ll have centralized control over user access, permissions, and security settings. This helps prevent unauthorized access and keeps your business assets safe. |
Creating a Meta Business Manager account is a straightforward process. Follow these step-by-step instructions to get started:
- Sign in to your Facebook account.
- Open the Business Manager page.
- Click on the “Create Account” button.
- Provide the necessary information, such as your business name and category.
- Follow the prompts to add your Facebook page and other assets to your account.
- Invite team members to join your account, if needed.
- Once you’re done, you’ll have a fully functional Meta Business Manager account.
By creating a Meta Business Manager account, you’ll unlock a world of possibilities for your Facebook marketing. So, don’t wait any longer – sign up for a Meta Business Manager account today and take your business to new heights!
You’re ready to go
Once you’ve created your business Facebook account, set up your page, and added all the necessary assets, you’re ready to go. Now it’s time to start managing your page and using it to connect with your audience.
Here are a few steps to get started:
- Sign in to your Facebook account. If you’re not already signed in, go to https://www.facebook.com and sign in with your account credentials.
- Open your business page. Once you’re signed in, click on the arrow in the top-right corner of the screen and select your business page from the drop-down menu.
- Work on your page settings. Go to the “Settings” tab in the top-right corner and update your page name, category, and other settings that best describe your business. You’ll also want to set a profile picture and cover photo that represent your brand.
- Create your team. If you have other people who will be managing your page, you can add them as page admins or assign them different roles based on their responsibilities.
- Set up your external assets. If you plan on running ads or using the Facebook Business Manager, you’ll need to connect your business Facebook account to any external assets, such as your website and Instagram account.
- Start creating content. Once your page is set up and your team is in place, you can start posting content, running ad campaigns, and engaging with your audience. Remember to keep your content consistent, valuable, and relevant to your target market.
By following these step-by-step instructions, you’ll be able to create a business Facebook page and start using it for marketing purposes in just a few minutes. Whether you’re a small business owner or part of a larger team, Facebook pages can be a valuable tool for connecting with your audience and growing your business.
Sources
When it comes to setting up a business Facebook page, there are several sources that can help guide you through the process. Here are some of the best sources to get you started:
1. Facebook Business Manager: Facebook Business Manager is a powerful tool that lets you manage your Facebook assets, such as pages, ad accounts, and people on your team. It is a step-by-step guide that describes how to create and set up a business Facebook page.
2. Facebook Help Center: The Facebook Help Center is a great resource for all things Facebook-related. It provides detailed instructions on how to create and open a business Facebook page, including tips on how to optimize your page for success.
3. External Marketing Websites: There are many external marketing websites that offer comprehensive guides on setting up a business Facebook page. These websites often provide additional tips and tricks to help you get the most out of your Facebook marketing efforts.
4. Online Tutorials: There are also many online tutorials available that walk you through the process of setting up a business Facebook page. These tutorials are typically easy to follow and can be completed in just a few minutes.
By utilizing these sources, you’ll be well on your way to creating and setting up a successful business Facebook page. Remember to keep these sources handy throughout the process to ensure you’re following the best practices and making the most of your Facebook page.


