

Are you looking to create an app on Facebook? It’s a great way to engage with your audience, boost sales, and showcase your products or services. In this step-by-step guide, we will show you how to create a Facebook app and set it up correctly.
To get started, you’ll need a Facebook account. If you don’t have one, go to the Facebook website and sign up. It’s a quick and easy process that you can complete in just a few minutes. Once you have your account, log in and head to the Facebook Developers portal. This is where you’ll create and manage your app.
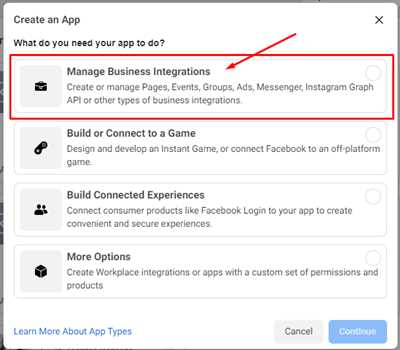
On the main screen of the Facebook Developers portal, click on the “Create App” button. You will be asked to enter a few details about your app, such as its name, URL, and category. Make sure you choose a name that reflects the purpose of your app and a URL that corresponds to your website or desired app address.
Next, you’ll need to configure some settings for your app. You may be asked to provide a privacy policy URL and terms of service URL. If you don’t have these pages set up yet, you can use a placeholder URL for now. Additionally, you must choose the category that best fits your app’s purpose.
Social Login Facebook App Setup
Creating a Facebook app for social login on your website is a great way to enhance user experience and increase user engagement. In this section, we will guide you through the process of setting up a Facebook app for social login:
| Step 1: | Go to the Facebook Developers website (https://developers.facebook.com/) and create a new app by clicking on the “Create App” button on the top right corner of the screen. |
| Step 2: | Fill in the required information for your app, such as the app name, email address, and app category. Note that you must have a verified Facebook account to create an app. |
| Step 3: | Once the app is created, you will be taken to the app’s settings page. Here, you can configure various settings for your app, such as the app ID, app secret, and permission settings. |
| Step 4: | On the left-hand side of the settings page, click on “Settings” and then “Basic”. In this section, you need to enter your website’s domain and privacy policy URL. Make sure to enter the correct URLs, as they will be used for authentication and data sharing purposes. |
| Step 5: | Next, click on “Add Platform” and choose the platform on which you wish to enable social login. You can choose from options such as website, Android, iOS, and more. Follow the instructions provided for the selected platform. |
| Step 6: | Once you have filled in all the required information and configured the necessary settings, click on the “Save Changes” button to save your changes. |
| Step 7: | Now, you need to copy the app ID and app secret from the settings page and paste them into the appropriate fields in your website’s social login feature. This step is crucial for the social login feature to work correctly. |
| Step 8: | Test the social login feature on your website by clicking on the social login buttons. Make sure that the login process is smooth and that the user’s data is fetched and displayed correctly. |
| Step 9: | After you have successfully tested the social login feature, you can go ahead and delete any test user accounts and data that were created during the testing phase. This will ensure that your app is ready for use by real users. |
By following these steps, you will be able to set up a Facebook app for social login on your website. This will allow your customers to easily log in to your website using their Facebook credentials, providing a seamless user experience and potentially increasing user engagement on your site.
Step 1 Login to Facebook and go to Developers Site
To create a Facebook app, the first step is to log in to Facebook with your account credentials. Once you have successfully logged in, you need to go to the Developers site, which is a platform specifically designed for creating and managing Facebook apps.
To access the Developers site, click on the drop-down arrow in the top-right corner of the Facebook page. This will open a menu, and you should see an option called “Manage Apps.” Click on this option to proceed to the main Developers site.
Note: If you are already on this page, simply skip this step and move on to the next one.
When you are on the Developers site, you may be asked to configure your account’s security settings. This is a required step that ensures the safety and privacy of your app’s data.
Click on the “Go to App Dashboard” button to finish the security setup. This will take you to the main dashboard of your app.
Now that you have successfully logged in and entered the Developers site, you are ready to create your Facebook app. To do this, you need to click on the “Create App” button located on the top-right corner of the screen.
Choose a name for your app and select the correct app category that best represents its purpose. This is an important step as it helps users find your app and understand its main features.
Note: You can always change these settings later if you wish to modify them.
After filling in the required fields, click on the “Create App ID” button to proceed.
Note: If you already have a verified Facebook account, the app creation process may differ slightly. However, the general steps and setup remain the same.
Once your app is successfully created, you will be taken to the app dashboard. Here, you can configure different settings and optimizethemecom to your liking. It is also the place where you can manage assets such as images, videos, and URLs that are required for your app to function correctly.
If you wish to add social sharing buttons or other features to your app, you can do so by selecting the desired features from the app dashboard. Some features may require additional permissions or settings, which you can set up within the dashboard as well.
Note: There are many online sources and websites that provide guidance on how to create Facebook apps. If you need more detailed instructions or specific information, feel free to search for these sources for further assistance.
Setting up a Facebook app for asset sharing
Creating a Facebook app and configuring it correctly is essential for enabling asset sharing and other important features on your website. In this guide, we will show you how to create a verified Facebook app for asset sharing.
Step 1: To begin, you will need a Facebook developer account. If you don’t have one, go to the Facebook Developers website and click on the “Get Started” button. Follow the prompts to sign up and login.
Step 2: Once you are logged in to the Facebook Developers portal, click on the “My Apps” link to create a new app for asset sharing. On the next screen, click on the “Create App” button and choose the platform you wish to use.
Step 3: Fill in the required information such as the Display Name, Contact Email, and select the category that best describes your app. Then click on the “Create App” button to proceed.
Step 4: After the app is created, you will be taken to the main settings page. Note the “App ID” and “App Secret” values, as you will need them later.
Step 5: Next, go to the “Settings” tab and click on the “Basic” option. Here, you will need to configure the “App Domains” and “Site URL” fields with the URLs of your website.
Step 6: In the “Advanced” section, you can enable additional features such as app deletion, permission features, and different login permissions. Configure these options according to your needs.
Step 7: The next step is to enable asset sharing by going to the “Products” tab and clicking on the “Add Product” button. Select the “Asset Sharing” option and follow the prompts to enable it for your app.
Step 8: Once asset sharing is enabled, you will see a new “Asset Sharing” element in the left menu. Click on it and go to the “Sharing Configuration” section.
Step 9: In the “Sharing Configuration” section, enter the “Optimizetheme.com” URL in the “Share Domain” field. This is the address where your assets will be shared.
Step 10: Fill in the required data for asset sharing, such as the size and message that will be shown when sharing. You can also choose whether or not to include a customer message.
Step 11: Once all the settings are filled out, click on the “Submit” button to save your changes. Your Facebook app is now set up for asset sharing.
Note: It is important to follow these steps correctly to ensure that your Facebook app is set up correctly for asset sharing. If you encounter any issues, refer to the Facebook Developers documentation for further guidance.
Create a Facebook App ID for social sharing element
In order to integrate a social sharing element into your website, you will need to create a Facebook App ID. This ID is a unique identifier for your app and it is required to correctly configure the social sharing element.
- Go to the Facebook Developers website by clicking here.
- If you don’t have a Facebook account, you must create one before proceeding. Note that Facebook requires a valid email address for account setup.
- Once you’re on the main screen of the Facebook Developers website, click on “My Apps” located in the top navigation bar.
- On the “My Apps” screen, click on the “Create App” button to create a new app.
- You will be asked to enter a display name for your app. Choose a name that is relevant and easy to remember.
- Select the purpose of your app from the available options. If you are creating the app for your own website, choose “Website”.
- Next, enter the Site URL and a new Site URL to configure the app correctly. The Site URL should be the main address of your website, and the new Site URL should be the address of the specific page where the social sharing element will be placed.
- Optimizethemecom must be entered in the “Namespace” field. This is required for the setup process.
- Enable the necessary features for your app. If you are creating the app for social sharing, make sure to enable the “Social Login” and “Sharing” features.
- For security purposes, you will need to verify your Facebook account. Follow the instructions provided on the screen to complete this step.
- Once you’ve filled in all the required information, click on the “Create App ID” button.
- A pop-up message will appear with your newly created App ID. Copy this ID and save it for later use.
- Go back to the main screen of the Facebook Developers website, and click on “Settings” located in the left sidebar.
- Within the “Settings” page, click on the “Basic” tab.
- Scroll down to the “Add Platform” section and click on the “Website” button.
- In the “Site URL” field, enter the URL of the page where the social sharing element will be placed.
- Click on the “Save Changes” button to save your settings.
- Now, you can use your Facebook App ID in your social sharing element to enable social sharing functionality on your website.
Note that the App ID is an important asset for your app, and if you wish to delete your app in the future, you will need to provide this ID. Therefore, make sure to store it in a secure location.
How to create my Facebook app

Creating a Facebook app is a process that many developers have done before, and with the right guidance, you can do it too. In this article, we will go through the steps required to create your own Facebook app.
Step 1: Login to Facebook
To create your Facebook app, you need to have a valid Facebook account. If you don’t have one, go to the Facebook website and sign up for an account. Once you have an account, log in to Facebook.
Step 2: Go to the Facebook Developers site
Once you are logged in to Facebook, go to the Facebook Developers site by clicking on the following URL: developers.facebook.com. This is the main site that you will use to create and configure your app.
Step 3: Create a new app
On the Facebook Developers site, click on the “My Apps” button at the top right corner of the screen. Then, click on the “Create App” button. You will be asked to enter some basic details about your app, such as the name and the category. Fill in the required fields and click on the “Create App” button.
Step 4: Configure your app
After creating your app, you will be taken to the app settings page. Here, you can configure various features and settings for your app. For example, you can enable features such as social sharing and Facebook login. You can also configure the different permissions that your app will ask for when users interact with it. Make sure to configure these settings correctly according to your app’s requirements.
Step 5: Get your app ID and secret
To use your app with Facebook, you need to have an app ID and secret. These are unique identifiers for your app and are used for security purposes. On the app settings page, you will see your app ID and secret. Copy and save these somewhere safe, as you will need them later.
Step 6: Enable required features
Depending on your app’s needs, you may need to enable certain features. For example, if you are creating a Facebook Shop app, you will need to enable the “Shops” feature. To do this, go to the “Features” section of the app settings page and enable the required features.
Step 7: Configure app URLs
Many Facebook apps require the configuration of certain URLs, such as the callback URL for Facebook login. Go to the “Settings” section of the app settings page and fill in the required URLs. Make sure to enter the URLs correctly to avoid any issues.
Step 8: Submit your app for verification
Some Facebook apps may require verification before they can be used by the public. If your app falls into this category, go to the “App Review” section of the app settings page and follow the instructions to submit your app for verification.
Step 9: Test and optimize your app
Once you have created and configured your app, it’s time to test it. Go to the “Test Apps” section of the app settings page to create a test version of your app. This will allow you to test its functionality without affecting your live app. Make sure to thoroughly test your app and optimize it for performance and user experience.
Step 10: Deploy your app
Once you are satisfied with the functionality and performance of your app, you can deploy it for use by the public. Go to the “App Review” section of the app settings page and click on the “Submit for Review” button. This will start the process of making your app available to the public.
Note: The steps outlined above are a general guide for creating a Facebook app. Depending on your specific requirements and the type of app you wish to create, some additional steps may be necessary. Make sure to follow the official documentation and other reliable sources for complete guidance.
Sources

When you create a Facebook app, there are different sources you need to configure and set up in order to enable various features and permissions.
1. Main app configuration: In the “Settings” tab of your Facebook Developer dashboard, you must enter the required app details such as the app name, app ID, and contact email address. This step is important for the app to be correctly identified and verified by Facebook.
2. Site URL and App Domains: You must enter the URLs of your websites or web assets that will be associated with the app. This is necessary for Facebook’s authentication process and to allow sharing and social features within your app.
3. Facebook Login: If you wish to enable Facebook Login for your app, go to the “Facebook Login” tab and configure the required settings. This will allow users to log in to your app using their Facebook credentials.
4. Permissions: In the “Permissions” tab, you can choose which permissions your app requires from users and ask for them during the login process. It is important to only request the necessary permissions to enhance the user experience and avoid unnecessary data access.
5. App Review: If your app uses some of the advanced features or requires specific permissions, such as accessing the user’s shop or posting on their behalf, you will need to submit your app for review to ensure compliance with Facebook’s platform policies.
6. Deletion URLs: If your app allows users to delete their accounts, you must configure the URLs for account deletion confirmation messages. This is important for the app’s security and proper handling of user data.
7. Pages, Messages, and Sharing: If your app interacts with Facebook Pages or allows users to share content from your app to Facebook, you need to configure the necessary settings in the corresponding tabs. This will enable features like sharing links, posting messages, and sending notifications.
Once you have filled out all the required information and correctly configured the necessary settings, your app is created and ready to be used. Remember to copy the app ID and secret keys for future reference. You can find these by clicking on the “Settings” tab again and going to the “Basic” section.
Note: The size of the source URLs you enter must not exceed the specified limit. If the URLs are too long, you can use a URL shortening service to optimize them.
For more information and step-by-step instructions, you can refer to the official Facebook for Developers documentation or visit trusted sources like optimizethemecom, where you can find tutorials, guides, and tips on how to create Facebook apps and optimize their features.


