

If you are an aspiring vlogger or just someone who wants to share their content with the world, setting up your own YouTube channel is a great way to do so. YouTube is a platform where millions of people from all over the world visit every day to watch videos, and by creating a channel, you can be a part of this thriving community. In this article, we will guide you through the steps of setting up your YouTube channel, from creating an account to optimizing your content effectively.
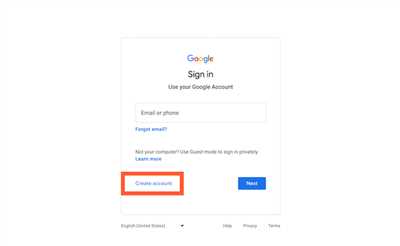
To begin, you will need a Google account. If you already have one, you can use it to sign in to YouTube. If not, you can easily create a new Google account by following the steps on Google’s website. Once you are signed in, go to the YouTube homepage and click on the profile icon in the top right corner. From the dropdown menu, choose “Create a channel” and you will be taken to a setup page.
On the setup page, you can choose the name for your channel. This can be your own name, a username, or even the name of your vlogging series. After choosing a name, you will see a summary of your channel settings. If everything looks good, click on the “Create channel” button to continue.
Now that your channel is set up, it’s time to personalize it. You can start by adding a profile picture and a channel banner. The profile picture will be displayed next to your channel name and on your videos, so choose something that represents you or your content well. The channel banner is a large image that will be displayed at the top of your channel. You can use a picture related to your content or create a custom design to make your channel stand out.
After uploading your profile picture and channel banner, it’s time to add some content. YouTube provides many options for sharing videos, such as uploading them directly from your computer or using a program like OBS to stream live. You can also choose whether to make your videos public or private. If you wish to share your videos with the world, set them as public, but if you only want specific people to see them, choose private. You can always change these settings later.
Once you have uploaded some videos, it’s important to optimize your channel for better visibility. This includes using good keywords in your video titles, descriptions, and tags, as well as adding relevant tags to your channel. By doing so, your videos will be more likely to appear in search results when people are looking for content similar to yours. Additionally, YouTube offers advanced settings where you can choose the color scheme for your channel and invite others to be a part of your channel as collaborators or moderators.
In summary, setting up your YouTube channel is easy and can be done in under 2 hours. Follow these steps to create and customize your channel, upload your videos, and optimize your content effectively. With a well-set-up channel, you can start sharing your passion with the world and even become a YouTube partner. So, what are you waiting for? Get started and see where your YouTube journey takes you!
YouTube for Beginners: How to Set up Your YouTube Channel
If you’re new to YouTube, setting up your own channel can seem like a daunting task. However, with the right steps and guidelines, you’ll be able to create and configure your channel effectively. In this article, we will provide a summary of the key steps you need to follow to set up your YouTube channel.
Step 1: Sign in to YouTube or Create a Google Account
Before you can create a YouTube channel, you’ll need to have a Google account. If you already have a Google account, you can simply sign in to YouTube using your existing credentials. If not, you can easily create a new account through the YouTube website.
Step 2: Choose a Channel Name and Profile Picture
Next, you’ll need to choose a unique name for your channel. Take some time to think about what you want your channel to be about and choose a name that reflects that. You should also upload a profile picture that is associated with your channel. This picture will be visible to other users and will help them easily identify your channel.
Step 3: Configure Your Channel Settings
Now that you have a channel, it’s important to configure the settings to optimize your channel’s appearance and functionality. You can access the settings by clicking on your profile picture in the top-right corner of the YouTube website and selecting “YouTube Studio.” From there, you can customize your channel layout, color scheme, and other options according to your preferences.
Step 4: Create and Upload Your First Video
Once your channel is set up, it’s time to start creating and uploading videos. Think about what kind of content you wish to create and plan your videos accordingly. You can use advanced programs or even just your smartphone to record and edit your videos. Keep in mind that good content is key to attracting and retaining viewers, so make sure to put effort into creating high-quality videos.
Step 5: Optimize Your Videos with Keywords
When uploading your videos, you’ll have the option to add titles, descriptions, and tags. Take advantage of these options to optimize your videos for search. Think about what keywords are relevant to your content and include them in your video’s metadata. This will help your videos appear in search results and attract more viewers.
Step 6: Invite People to Subscribe and Share Your Channel
Once you have a few videos uploaded, you can start promoting your channel to gain more subscribers. You can invite people to subscribe to your channel by adding a call-to-action in your videos, or by sharing your channel on social media or other websites. The more people that subscribe and share your content, the more effectively your channel will grow.
These are the basic steps to set up your YouTube channel as a beginner. There are many more advanced options and settings you can explore once you become more familiar with the platform. Always remember to follow YouTube’s guidelines and policies, and don’t be afraid to look for help from online tutorials and communities. Happy vlogging!
Where Is YouTube Advanced Settings
After setting up your YouTube channel, it is important to configure the advanced settings to optimize your content and make it more effective. To access the advanced settings, follow these steps:
- Login to your YouTube account.
- Click on your profile picture in the top right corner.
- In the dropdown menu, click on “YouTube Studio” to go to your channel settings.
- In YouTube Studio, click on “Settings” in the left sidebar.
- Next, click on “Channel” and then “Advanced settings”.
In the advanced settings, you have many options to configure and customize your channel. Here are some key areas to look for:
- Channel name and description: Choose a name that is catchy, relevant to your content, and easy to remember. Write a compelling description to give people a good summary of what your channel is about.
- Channel keywords: Use keywords that are relevant to your content to help people find your channel when searching on YouTube or using Google.
- Channel icon and banner: Upload a profile picture and a banner image that represent your channel. This will help your channel stand out and make it more visually appealing.
- Channel trailer: Create a short video to introduce yourself and your channel to new viewers. This can be a great way to entice people to subscribe and continue watching your videos.
- Channel sections: Organize your videos into different sections to make it easier for viewers to find the content they are interested in. You can create sections based on topics, playlists, or any other criteria you wish.
- Channel layout and color scheme: Choose a layout and color scheme that matches the branding of your channel or website. This will help create a cohesive and professional look for your channel.
- Privacy and sharing options: Set the privacy settings for your videos to either public, private, or unlisted. You can also choose whether you want others to be able to see your liked videos, subscriptions, and saved playlists.
- Content and upload defaults: Configure the default settings for your uploaded videos, such as the category, language, and whether you want to allow embedding on other websites.
- Associated website: If you have a website or blog, you can link it to your YouTube channel. This can help drive traffic to your website and increase your online presence.
- Advanced settings: In this section, you can find additional options for optimizing your channel, such as the ability to choose the matching criteria for your videos with other YouTube content and the option to enable or disable the YouTube Partner Program.
By effectively configuring the advanced settings, you can make your YouTube channel look professional, attract more viewers, and create a better experience for your audience. Take the time to explore all the options available and customize your channel to match your vlogging style and content.
How To Configure YouTube Advanced Settings

When creating a YouTube channel, beginners often overlook the advanced settings that can greatly enhance their channel’s visibility and user experience. In this guide, we will go through the steps of how to configure YouTube advanced settings effectively.
1. The first step is to set up your YouTube account. If you don’t already have a Google account, you will need to create one. You can do this by going to www.youtube.com and clicking on the “Sign In” button. Follow the instructions to create a new account or sign in with your existing Google account.
2. Once you have set up your YouTube account, click on your profile picture at the top right corner of the screen. In the drop-down menu, click on “YouTube Studio” to access the YouTube Studio dashboard.
3. In the YouTube Studio dashboard, look for the “Settings” tab on the left sidebar and click on it. Then, under the “Channel” section, click on “Advanced settings”.
4. In the advanced settings, you will see a summary of your channel’s basic information, such as your account ID, username, and associated websites. You can edit this information if needed.
5. To optimize your channel for search engines, enter relevant keywords in the “Keywords” box. These keywords should accurately reflect the content of your channel and the type of videos you upload.
6. The next step is to choose a custom URL for your channel. Click on the “Set a custom URL for your channel” link to see if your channel is eligible for a custom URL. If you are eligible, follow the instructions to set up a custom URL that matches your channel’s username or associated websites.
7. Under the “Channel recommendations” section, you can choose whether or not you want YouTube to recommend your channel to other people. You can also choose to show your channel on other channels or websites.
8. If you are a part of the YouTube Partner Program or if you wish to join it, you will need to agree to the terms and conditions by clicking on the appropriate checkboxes. The YouTube Partner Program allows you to monetize your videos and earn money from ads.
9. Under the “Sharing options” section, you can choose whether or not you want to allow other YouTube users to collaborate with you on your videos and playlists.
10. Finally, before you continue, take a look at the “Profile picture” section. Your profile picture is an important part of your channel’s branding, so make sure to upload a good-quality picture that represents your channel effectively.
By following these steps, you can configure your YouTube advanced settings and optimize your channel to reach a wider audience. Remember to regularly update these settings and make any necessary changes as your channel grows and evolves.
Channel Keywords
When setting up your YouTube channel, it’s important to choose the right keywords to effectively optimize your channel and help people find your content. Keywords are words or phrases that are associated with your channel and the type of content you create. They help YouTube and other websites like Google understand what your channel is about and make it easier for people to discover your videos.
To set keywords for your channel, follow these steps:
- First, go to your YouTube account settings by clicking on your profile picture and then selecting “YouTube Studio.”
- Next, click on the “Settings” tab in the left sidebar.
- Under the “Channel” section, click on “Channel keywords.”
- In the keyword field, enter the keywords that best represent your channel and the content you wish to create. You can enter multiple keywords, separating them with commas.
- Choose keywords that are relevant, specific, and have a good mix of high and low competition. High competition keywords are often more popular, but they may be harder to rank for. Low competition keywords may have less search volume, but they can help you target a more niche audience.
- Consider using long-tail keywords, which are longer and more specific phrases. They can help you attract a more targeted audience and stand out from the competition.
- After entering your keywords, click on the “Save” button to save your changes.
It’s always a good idea to periodically review and update your channel keywords to ensure they are still relevant and effective. Keep in mind that it may take some time for the changes to take effect and for your channel to start ranking for the chosen keywords.
Remember, choosing the right keywords for your channel is just one part of optimizing your YouTube profile. There are many other settings and features you can configure to make your channel more appealing and user-friendly. To learn more, you can explore YouTube’s advanced settings and follow the steps written in their help documentation. You can also see the screenshot below for a visual guide:
[Screenshot: YouTube Channel Keywords]
By using channel keywords effectively, you can attract more viewers and grow your YouTube channel. So take the time to research and choose the right keywords that will help your channel stand out and reach the right audience.
YouTube Associated Websites
YouTube Associated Websites is a part of YouTube’s advanced settings, where you can configure which websites to associate with your YouTube channel. This feature can be very helpful in optimizing your channel and sharing your videos effectively.
Associated websites are websites that you own or manage, and they are linked to your YouTube channel. When people visit your associated websites, they can see your YouTube channel’s profile picture and follow your channel from there. This is a great way to promote your channel and gain more subscribers.
Before you can set up associated websites, there are a few things you need to know:
- You need to have a YouTube account and a YouTube channel.
- You should have a website or blog where you wish to associate your YouTube channel.
- Make sure your website or blog is not set to private. It should be accessible to the public.
To set up associated websites, follow these steps:
- Go to YouTube and sign in to your account.
- Click on your profile picture in the top right corner, then click on “YouTube Studio”.
- In YouTube Studio, click on “Settings” in the left sidebar.
- In the settings menu, click on “Channel” and then “Advanced settings”.
- Scroll down to the “Associated website” section and click on the “+” button.
- In the dropdown menu, choose the option “Add your website”.
- Type in the URL of your website and click “Add”.
- You will need to verify that you own the website by following the instructions provided. This usually involves adding a snippet of code to your website or uploading a verification file.
- Once your website is verified, you will see a screenshot of your website next to the associated website option in the settings. You can remove or add more associated websites using the options provided.
It’s always a good idea to optimize your associated websites for SEO by using relevant keywords and having high-quality content. This will help your website rank higher in search engine results and drive more traffic to your YouTube channel.
Remember, setting up associated websites is an advanced feature, and it is not available to all YouTube channels. To see if you have access to this feature, you can check your YouTube account settings or contact YouTube support for more information.
Part 2: How to Invite People to See Content on Your Private YouTube Channel
Once you’ve set up your private YouTube channel and have uploaded the content you want to share, it’s time to invite people to view it. Here, we’ll explain how to configure your channel settings so that only the ones you invite can see your videos.
- Start by logging into your YouTube account. If you don’t have one, create a new account by following the steps outlined in Part 1.
- Next, navigate to your YouTube channel by clicking on your profile picture in the top-right corner of the screen, then selecting “Your Channel” from the dropdown menu.
- On your channel page, scroll down until you see the “Customize Channel” button. Click on it.
- In the customization options, choose the “Basic Info” tab. This is where you can configure various settings for your channel, including the visibility of your content.
- Under the “Privacy” section, you’ll see an option called “Default Upload Privacy.” This setting determines the visibility of your videos when you upload them. Click on the dropdown menu next to it and choose “Private.”
- If you want to allow others to see your content, you can invite them through their email address or YouTube username. Go to your YouTube Studio dashboard, select “Settings” from the left sidebar, then choose “Permissions” under the “Channel” section.
- In the “Permissions” settings, click on the “Invite” button and enter the email addresses or YouTube usernames of the people you wish to invite. They will receive an invitation to join your private YouTube channel and will be able to see your uploaded videos.
- Once you’ve invited someone, you can further customize their permissions by selecting their name from the list and adjusting the settings accordingly. You can choose whether they can view your content, comment on it, or even upload videos to your channel as a collaborator.
Remember to always follow YouTube’s community guidelines and copyright policies when inviting others to view or participate in your private channel. It’s a best practice to have clear terms of use and guidelines for your invited audience to ensure the effective and good use of your channel.
That’s it! You’re now ready to invite people to see the content on your private YouTube channel. Just follow the steps outlined above, and you’ll be able to share your videos with the ones you choose.
Summary
Setting up a YouTube channel is a great way to share your content with the world. In order to begin, you will need to create a Google account if you don’t already have one. Once you have a Google account, you can go to the YouTube website and click on the “Sign In” button. Next, click on your profile picture at the top right corner and then click on “Create a channel” from the dropdown menu.
Afterwards, you will be prompted to choose a name for your channel. It’s important to choose a name that is relevant to the content you will be creating. You can also choose a picture for your channel that will be associated with your videos.
Once your channel is set up, you can begin uploading videos. Before you start uploading, it’s a good idea to optimize your videos by using keywords in the title, description, and tags. This will help your videos to appear in YouTube’s search results.
You can also configure the settings for your channel to customize its look and feel. You can choose the color scheme, layout, and other options to match your brand or personal preferences.
In order to effectively promote your channel and get more views, it’s important to share your videos on other websites and social media platforms. You can also invite people to subscribe to your channel to receive updates whenever you upload new content.
As you continue to create content for your YouTube channel, you may also wish to become a YouTube partner. This program offers many benefits, including the ability to monetize your videos and access to advanced features.
In summary, setting up a YouTube channel is a relatively easy process. Follow these steps to create your own channel, optimize your videos, configure the settings, and promote your content effectively. Good luck on your YouTube journey!
How to set up a YouTube channel

Creating a YouTube channel is a great way to showcase your content to a wide audience, whether you wish to share your vlogging adventures or market your business. Follow these simple steps to effectively set up your YouTube channel and optimize it for success.
Step 1: Create a Google account or sign in
Before you can start creating your YouTube channel, you need to have a Google account. If you don’t have one, you can easily create it by going to the Google website and clicking on the “Create account” option. If you already have a Google account, simply sign in to continue.
Step 2: Set up your YouTube channel
Once you have your Google account ready, go to YouTube’s website and log in using your Google credentials. Next, click on your profile picture in the top-right corner and then click on the “Settings” option from the dropdown menu.
Screenshot: (insert screenshot of YouTube settings page)
In the settings page, go to the “See all my channels or create a new channel” section. Click on the “Create a new channel” button to begin setting up your YouTube channel.
Step 3: Choose a name and picture for your channel
Before you can start uploading videos to your YouTube channel, you need to choose a name and picture. Choose a name that is catchy and relevant to the content you wish to share. Additionally, select a picture that represents your channel well. Both the name and picture will help people recognize your channel when they see it.
Step 4: Configure your channel
After setting up the basic information for your channel, you can now configure various options to optimize it. Go to the “Customize channel” section and click on the “Settings” tab. Here, you can customize your channel’s layout, color scheme, and other advanced options.
Step 5: Optimize your channel’s keywords
To help people find your channel, it’s essential to choose and use appropriate keywords. Think about what terms people would search for to find content similar to yours and include those keywords in your channel description, titles, and tags. This will increase the chances of your channel showing up in relevant searches.
Step 6: Upload your first video
Now that your YouTube channel is set up and optimized, it’s time to start uploading videos. Click on the “Upload” button and select the video you wish to upload from your computer. You can also add a description and tags to provide more information about your video and make it easier to find.
Step 7: Share and invite people to subscribe
Once your video is uploaded, you can share it on various websites and social media platforms to attract viewers. Additionally, you can invite people to subscribe to your channel so that they can receive notifications whenever you upload new content. This will help you build a loyal audience.
With these steps, you are well on your way to creating a successful YouTube channel. Remember to always optimize your content and engage with your audience to continue growing your channel.


