

Creating a Salesforce app allows you to write custom code and define pages to meet your specific business needs. Whether you’re a developer or an admin, there are steps you can follow to create your own app in Salesforce. In this article, we will take a closer look at the process of creating a Salesforce app.
To create a Salesforce app, you need to go to the App Setup menu and select “New App” from the list of available options. Once you’ve selected “New App,” you will be taken to a page where you can choose the type of app you want to create. Salesforce provides a platform where you can always find pre-defined application templates, which can be customized according to your business requirements.
If you already have an idea for your app, you can select the “Custom app” option and proceed with building your app from scratch. Salesforce also offers a number of tools and shortcuts to assist you in the app-building process, making it easier and saving you time.
Once you’ve selected the type of app you want to create, you will be taken to the App Builder page, where you can add various components such as objects, buttons, and pages to your app. It’s important to keep in mind that there are certain minimum credentials required for building an app, so make sure to check the Salesforce documentation for a complete listing of these requirements.
In the App Builder, you can also customize the look and feel of your app by selecting a default theme, adding an app image, and defining the object and page layouts. This will ensure that your app looks good and is in line with your company’s branding.
Once you’ve completed all the necessary steps in the App Builder, you can then save and activate your app. It’s a good practice to test your app with a sample group of users before making it available to all your customers. You can also submit your app to the AppExchange, where it will be available for others to install and use.
In conclusion, creating a Salesforce app requires a good understanding of the platform and its technical documents. It’s important to have a clear objective in mind and know what you want your app to achieve. By following the steps outlined in this article, you’ll be on your way to building your own app in no time.
Create Salesforce Application
Creating a Salesforce application is a key step in building a customized sales solution for your organization. By having your own application, you can tailor it to the specific needs of your business, ensuring that you incur minimum expenses and always provide a good user experience to your customers.
Before we dive into the steps to create a Salesforce application, there are a few things you should know. First, make sure you have a developer account or access to a Salesforce instance where you can create applications. If you don’t have one, you can sign up for a free developer account on the Salesforce website. Second, if you’re new to Salesforce development, it’s recommended to go through the Trailhead modules on building applications to get a better understanding of the technical aspects involved.
Once you have your Salesforce account set up and have a good understanding of the technicalities, we can proceed with creating your Salesforce application.
- Login to your Salesforce account and navigate to the App Setup menu by clicking on the “App Launcher” button.
- In the App Setup menu, select “App Manager” under the “Platform Tools” section.
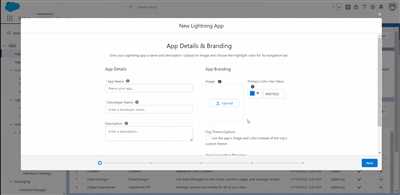
- On the App Manager page, click on the “New Lightning App” button.
- In the “App Details” section, give your application a name, which will be displayed to the users. You can also add an optional description for better clarity.
- Next, select an image for your application. This can be an image file stored in your Salesforce org or an image URL from a different source.
- Now, select the objects that will be available in your application. These can be standard Salesforce objects like Contacts and Accounts, or custom objects that you have defined earlier.
- In the “Home Page” section, choose the type of home page your application will have. You can either select a default home page or customize it further.
- In the “Navigation Items” section, specify what components should be added to the navigation menu of your application. This can include standard and custom components.
- Once you have completed all these steps, click on the “Next” button to proceed.
- In the next step, you have the option to add a custom logo, splash page, and other branding elements to your application. You can skip this step if you don’t have any particular branding requirements.
- After that, you can review the summary of your application and make any necessary changes.
- Finally, click on the “Create” button to create your Salesforce application.
Once your application is created, you can test it by navigating to the App Launcher and selecting your application. Check if everything works correctly, and if there are any validation errors or queries, you can go back to the setup and make the necessary changes.
Now that you know how to create a Salesforce application, you can start building your own customized solution to meet your organization’s needs. Remember to follow the best practices and use the available tools and resources, such as the Salesforce AppExchange, for additional components and features.
Happy coding and building your Salesforce application!
What is an Application in Salesforce
In Salesforce, an application refers to a collection of components that are consolidated and organized in a specific way to achieve a particular objective. These components can include objects, pages, tabs, and even custom code. Applications are used to provide a customized and streamlined user experience within the Salesforce platform.
When you write an application in Salesforce, you have to go through a minimum setup process. First, you need to select the type of application you want to create. Salesforce provides several options, such as a standard or custom app. Once you choose an option, you can then select the components that will be included in your application.
Before you start building your application, it’s always a good idea to check if there are any additional costs incurred for using certain components or features. This can be done by referring to the documentation or checking the listing in the Salesforce AppExchange. By doing this, you can ensure that you are using the right tools and features within your application.
Once you have selected the components for your application, you can proceed with the setup process. Salesforce provides a user-friendly interface for creating and configuring applications, making it easy for both technical and non-technical users to build their own applications.
When creating an application, you can also define an app image, which will be displayed in the Salesforce menu and other places where the application is listed or referenced. This image can be a custom logo or an image that represents the purpose of the application.
After the initial setup is complete, you can then test your application to ensure that it functions as expected. This can be done by navigating through the various pages and performing actions that are defined within the application.
Overall, applications in Salesforce provide a platform for building customized solutions that cater to the specific needs of customers and businesses. Whether you are an admin or a developer, the application creation process is made easy by Salesforce’s intuitive interface and wide range of available components.
Version 1: The Objective is Idea Validation
In this version of the Salesforce app, the main objective is idea validation. The idea behind this version is to test and validate the concept of the app before investing more time and resources into its development.
Before you start building the app, there are a few steps you need to follow:
- Setup your Salesforce AppExchange account if you haven’t already done so.
- Create a new app in the Salesforce AppExchange.
- Choose a name for your app and provide a brief description.
- Select the objects and pages you want your app to work with.
- Write down any technical requirements or queries you may have.
- Click the “Next” button to proceed to the next step.
Once you have completed the initial setup, you can now start building your application. It’s important to keep in mind that in this version, the focus is on minimum viable product (MVP) development, meaning you should aim to create a basic version of the app with only the essential features.
To build the app, you will need to create the necessary objects, pages, and actions. You can use the Salesforce AppExchange’s built-in tools and features to do this. For example, you can create a new custom object by selecting the “New” button and following the steps provided.
When building your app, make sure to test it regularly to check if everything is working correctly. You can use the Salesforce AppExchange’s testing tools to simulate different scenarios and user actions.
Once you have the app set up and tested, it’s time to validate your idea. Share the app with a selected group of users or customers and gather their feedback. This feedback will help you determine if your app is meeting the needs and expectations of your target audience.
During this validation phase, it’s essential to keep an open mind and be prepared to make adjustments and improvements based on the feedback you receive.
By following these steps and focusing on validating your app idea in this version, you will gain valuable insights into your app’s potential success and identify any necessary changes or additions.
What are the tools you need to build a Salesforce Custom app
When it comes to building a custom app on the Salesforce platform, there are a few key tools that you will need. These tools will help you create, test, and deploy your app so that it is ready for use by your customers. In this article, we will explore some of the essential tools for building a Salesforce Custom app.
- Salesforce Platform: The Salesforce Platform is the foundation for building applications on the Salesforce ecosystem. It provides the infrastructure and development tools necessary to create custom apps.
- App Builder: The App Builder is a visual development tool that allows you to create custom pages, components, and applications without writing any code. It provides a drag-and-drop interface and allows you to customize the look and feel of your app.
- Apex: Apex is a programming language used to extend the functionality of Salesforce. It allows you to write custom business logic and create complex queries to manipulate and retrieve data from the Salesforce database.
- Visualforce: Visualforce is a component-based framework that allows you to create custom user interfaces for your app. It uses a markup language similar to HTML and allows you to customize the layout, styling, and behavior of your app.
- Trailhead: Trailhead is an interactive online learning platform provided by Salesforce. It offers a wide range of modules and trails that teach you how to use Salesforce tools and build custom apps. It is a great resource for learning the skills and techniques required for app development.
- AppExchange: AppExchange is an online marketplace where you can find and install pre-built apps and components for your Salesforce org. It provides a repository of ready-to-use solutions that can be customized to meet your specific business requirements.
- Documentation: Salesforce provides detailed documentation for all its tools and features. It is always a good idea to refer to the official documentation when you have questions or need guidance on how to use a particular tool or feature.
By using these tools, you can create a custom app that meets your customers’ needs and provides them with a better user experience. Whether you are a Salesforce admin with no technical background or an experienced developer, these tools will help you create a powerful and user-friendly app.
Test Your App Page in the Salesforce Mobile App
Once you have set up your app in Salesforce, it is important to test how it looks and functions on the Salesforce Mobile App. Testing your app page on the mobile app will allow you to ensure that everything is working correctly and that your app is optimized for mobile use.
To test your app page in the Salesforce Mobile App, follow these steps:
- Make sure you have the Salesforce Mobile App installed on your device. If you don’t have it, go to the App Store or Google Play Store and download it.
- Open the Salesforce Mobile App and log in using your credentials.
- Navigate to the app you want to test. If you have multiple apps, select the one you want to test from the app list.
- In the app, go to the App Launcher and click on the app you want to test.
- On the app page, check if all the components, pages, and actions you have defined are displayed correctly. Make sure all the buttons, links, and functionality are working as expected.
- Test any custom components or pages you have created to ensure they are functioning properly.
- If your app relies on any data, such as records or objects, make sure that the data is available and displayed correctly in the app.
- If you have any validation rules or other technical requirements, such as minimum field length or required fields, check if they are enforced correctly in the mobile app.
- Test any queries or actions that you have defined in your app to ensure they are working as intended.
- Check the navigation and usability of your app. Make sure it is easy to use and intuitive for your customers or end users.
- Take screenshots or record videos of your app in action to document its functionality and appearance.
Testing your app page in the Salesforce Mobile App is an essential step in building a successful app. By testing your app, you can identify any issues or bugs and make necessary adjustments to provide the best user experience.
Remember to always test your app on different devices and operating systems to ensure compatibility. It is also a good idea to test your app on earlier versions of the Salesforce Mobile App to check for any compatibility issues.


