

If you’re looking for a user-friendly tool to collect information or feedback, then Google Forms might be the right choice for you. With its variety of features and customizable options, creating a form has never been easier. Whether you want to make a survey, a quiz, or just a simple form, this step-by-step guide will help you through the process.
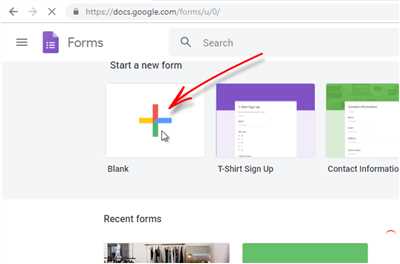
Step 1: Start by visiting forms.google.com on your mobile or desktop. You will be prompted to sign in with your Google account or create a new one if you don’t have it yet. Once you’re signed in, click on the “+ Blank” button to create a new form.
Step 2: Give your form a title and a general description by filling in the “Untitled form” header and the information text box below it. This will help your respondents understand the purpose of the form and guide them in answering the questions.
Step 3: Now it’s time to start adding questions to your form. You can choose from a variety of question types, such as multiple choice, checkboxes, dropdowns, short answer, or grid. Each question field can be customized according to your needs by clicking on the three dots next to it.
Step 4: As you go along, you can add more questions and change the order by using the “+ Add question” button and dragging the questions around. You can also choose whether a question is required or not by clicking on the three dots and selecting the “Required” option.
Step 5: If you want to make your form more visually appealing, you can choose a theme from the available options or customize the colors and style by clicking on the “Theme” button. You can even add your own image as a header or choose one from the library provided by Google.
Step 6: Once you’re done with the design and settings, you can make your form public by clicking on the “Send” button in the top-right corner. Here, you have the option to share the form via email, link, or get an embed code to add it to your website or Facebook page.
Step 7: All responses to your form will be collected in a Google Sheets spreadsheet, making it easy to analyze the data and keep track of the answers. You can access the spreadsheet by clicking on the “Responses” tab at the top of the form.
That’s it! You have successfully created a custom Google form. Now you can share it with others and start gathering the information or feedback you need. Remember, Google Forms is a powerful tool that can be used for a wide range of purposes, from conducting research to creating a quiz or collecting email addresses for a newsletter. Feel free to explore the many features and options available to make your form even more functional and engaging!
For more step-by-step guides, helpful tips, and tutorials, visit the Google Forms website or check out their YouTube channel for videos and images that will assist you along the way.
- The easiest way How to make a Google Form public
- General Google Form features
- Settings
- General Settings
- Question Settings
- Sharing Settings
- Response Settings
- Customize Theme
- How to Create and Customize Google Forms
- How to create Feedback form on Google Forms
- Step-by-Step Guide to Creating Google Forms on Mobile
- Video:
- How to Create Google Form (2022) | Google Forms Complete Tutorial
The easiest way How to make a Google Form public
Making a Google Form public is a simple and straightforward process that allows you to easily share your form with others. Here is a step-by-step guide on how to make a Google Form public:
- First, go to forms.google.com and click on the “+” sign to create a new form. If you’ve already created a form, you can select it from the list or create a new one.
- Once you’re in the form editor, you can start customizing your form by adding questions, changing the theme, adding images, and more.
- Next, you need to click on the “Settings” button located in the top right corner of the form editor. This will open a settings menu where you can choose various options for your form.
- Under the “General” tab, you’ll find the option to make your form public. Simply tick the box that says “Allow users to submit a response more than once” to enable public access.
- If you want to further customize the public access settings, you can click on the “Response” tab. Here, you can choose to collect email addresses, limit the number of responses, or allow respondents to edit their responses after submitting.
- After you’ve made the necessary changes to your form, you can share it with others by clicking on the “Send” button located in the top right corner of the form editor. You’ll be presented with a variety of options for sharing your form, including sending it via email, sharing it on social media platforms like Facebook, or embedding it on a website using the provided HTML embed code.
- Once you’ve shared your form, anyone with the link will be able to fill it out and submit their responses. The responses will be recorded and stored separately for each submission.
By following these steps, you can easily make your Google Form public and start collecting feedback, conducting surveys, or creating quizzes. The customizable features and functionalities offered by Google Forms make it a powerful tool for gathering information and engaging with your audience.
General Google Form features
Google Forms is a powerful tool for creating surveys and collecting information. It offers a variety of features that make it easy to customize and share your forms.
When creating a form, you can start by choosing from a range of templates or creating a blank form. You can then add different question types, such as multiple choice, short answer, grid, and more. To customize the form, you can pick a theme, change the colors, add images, and even add a custom header.
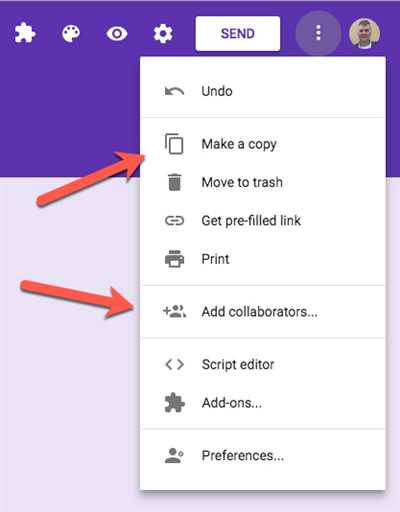
Google Forms also offers various options for sharing your form. You can embed it on a website or blog, share it via a link, email it to a list of addresses, or even post it on social media platforms like Facebook. There’s also an option to collaborate with others in real-time on the same form.
One of the most helpful features of Google Forms is the ability to view and analyze responses. You can see a summary of answers as well as individual responses. The tool also allows you to create charts and graphs to visualize the data. You can also set up notifications to receive an email whenever someone fills out the form.
To make the form functional, you can add logic to show or hide questions based on previous answers. This is helpful for creating more dynamic and personalized surveys. You can also enable the option to require sign-in, which ensures that only specific individuals can fill out the form.
To make the form more engaging, you can add videos from YouTube or images. You can also include helpful text and instructions to guide respondents through the form. Additionally, there are settings that allow you to randomize question order, set a time limit, and even turn the form into a quiz.
Creating a Google Form is a step-by-step process that allows you to customize and tailor it to your specific needs. Whether you’re conducting research, gathering feedback, or simply collecting information, Google Forms offers a range of features that make it the easiest and most versatile tool available.
For more information and a detailed guide on how to create and customize Google Forms, visit formsgoogle.com.
Settings
When creating a Google Form, the settings play a crucial role in customizing the form to suit your needs and collecting the desired information. Below is a step-by-step guide on how to set up the form’s functionalities, design, and other options.
General Settings
1. To access the settings, go to forms.google.com and click on the untitled form you have created.
2. On the top right corner, click on the “Settings” icon (gear-like symbol).
3. In the “General” tab, you can fill in the form’s name, add a short description, and select a theme that best suits your brand or website.
4. You can choose between a variety of pre-made templates or start with a blank form.
5. If you’re creating a survey or quiz, you might want to tick the “Make this a quiz” option. This will enable you to score and provide feedback based on the answers.
6. For a more customized look and feel, you can change the header image by clicking on the camera icon. You can either upload an image or select from the provided options.
Question Settings
1. To access the question settings, click on a specific question in your form.
2. You can change the question type, add options, and select the required response by ticking the appropriate boxes.
3. For a more organized form, you can separate questions into different sections and add a description or explanation for each section.
4. You can also enable or disable the option for respondents to edit their answers after submission.
Sharing Settings
1. To share your form, click on the “Send” button on the top right corner of the form editor.
2. You have the option to share the form via a link, email, social media platforms such as Facebook or Twitter, or by embedding it on a website.
3. You can also choose whether to collect email addresses from respondents.
Response Settings
1. To access the response settings, click on the “Responses” tab at the top of the form editor.
2. You can select how responses are displayed, whether to show a summary or individual responses. You can also choose to collect the respondent’s email address.
3. Moreover, you can create a custom message for respondents after they submit the form.
By making use of the various settings available, you can create a Google Form that is tailored to your specific needs. The options to customize the design, layout, and functionality of the form offer a variety of features that make the process of creating and collecting information easier and more efficient.
Customize Theme
When creating a Google Form, you might want to customize the theme to match your brand or style. Luckily, Google Forms provides an easy step-by-step process to do just that.
Here is a step-by-step guide on how to customize the theme of your Google Form:
- Login to your Google account and visit forms.google.com.
- Create a new form by clicking on the “+” button or selecting a previously created form from the list.
- In the upper right corner, click on the “Untitled form” text to give your form a title.
- Below the form’s title, you’ll find a variety of features to customize your form. The first option is to choose a theme. Click on the palette icon to open the theme picker tool.
- In the theme picker tool, you can choose from a variety of pre-created themes or create a custom theme. You can also pick colors, add images, or select a header image.
- If you want to add your own image, click on the “Custom” tab in the theme picker tool and then click on the “+” button to upload an image from your computer or select an image from your Google Drive.
- Once you’ve created or chosen a theme, click on the “Done” button to apply it to your form.
- Now, click on the “Send” button in the upper right corner to fill out other settings of your form, such as adding a description or selecting a response destination.
- If you want to embed your form on a website or share it on social media, click on the “Send via” tab and choose the appropriate option (e.g. Facebook, Twitter).
- When you’re ready to make your form public, click on the “Send” button again and select the “Public” option.
By following these steps, you can easily customize the theme of your Google Form to make it more personalized and on-brand. Remember to choose a theme that best addresses the information you’re looking to gather and the type of response you’re expecting (e.g. survey, feedback, quiz).
Creating a customized theme for your Google Form is a great way to make it visually appealing and engaging for your audience. So, take advantage of the various functionalities and options available to you, and make your form stand out!
How to Create and Customize Google Forms
Google Forms is a powerful tool that allows you to create and customize forms for various purposes. Whether you’re conducting research, collecting feedback, or making a quiz, Google Forms has all the functionalities you need.
To create a Google Form, start by visiting forms.google.com and clicking on the “+ Blank” button in the top right corner. This will create a new, untitled form for you to start customizing.
The first step in creating your form is choosing a theme. Google Forms offers a variety of pre-designed templates to make the form creation process easier. You can also customize the colors and header image to match your brand or theme. You can do this by clicking on the “Theme” button in the toolbar and selecting the options that best suit your needs.
Next, start adding questions to your form. You can choose from a variety of question types, including multiple-choice, short answer, and dropdown. Simply click on the “+ Add question” button below the form and select the question type you want to add. You can then fill in the question and answer options, and customize them further by changing the layout, adding images, or organizing them in a grid format.
If you want to add more fields to your form, such as a name or email field, you can do so by clicking on the “+ Add field” button on the right side of the form. This will allow you to gather additional information from your respondents.
Once you’ve finished creating your form, you can preview it by clicking on the eye icon in the top right corner. This will show you how your form will look to the public. If you’re satisfied with the design, you can go ahead and share the form by clicking on the “Send” button. This will give you options to send the form via email, embed it on a website, or share it on social media platforms like Facebook.
Google Forms also offers a step-by-step guide on how to create and customize forms. You can access this guide by clicking on the “?” icon in the top right corner of the form editor.
Overall, creating and customizing Google Forms is an easy and straightforward process. With the wide range of features and options available, you can tailor your form to fit your specific needs. Whether you’re conducting a survey, collecting feedback, or making a quiz, Google Forms has everything you need to gather and analyze data.
How to create Feedback form on Google Forms
Creating a feedback form on Google Forms is a simple and efficient way to gather valuable information from your audience. Whether you need feedback on a product, service, or event, Google Forms provides a user-friendly platform to collect responses.
To get started, follow these step-by-step instructions:
-
Log in to your Google account and go to forms.google.com to access Google Forms.
-
Click on the “+ Blank” button to create a new form.
-
Give your form a title. You can choose any title that reflects the purpose of your feedback form.
-
Add questions to your form. Google Forms provides a variety of question types such as multiple-choice, checkbox, short answer, and more. You can also include a header or add images to make your form more visually appealing and engaging.
-
Customize the design of your form. Google Forms offers a range of templates and themes to choose from. You can further customize the colors and style by changing the background, font, or adding a logo. This will help create a customized and branded look for your feedback form.
-
Configure settings and options for your form. Google Forms allows you to adjust various functionalities, such as allowing respondents to edit their responses or limiting the number of responses. You can also choose whether to collect respondents’ email addresses or make the form public.
-
Make sure all necessary fields are filled out and then click on the “Send” button to share your form with others. You can share it via email, social media platforms like Facebook, or by embedding the form on your website using the provided code.
-
Once responses start coming in, you can view them either within Google Forms or by exporting the data to a spreadsheet for further analysis or research.
Creating a feedback form on Google Forms is a user-friendly and effective tool that can be tailored to suit your specific needs. By following the step-by-step guide outlined above, you can easily make a feedback form that is both functional and aesthetically pleasing.
Step-by-Step Guide to Creating Google Forms on Mobile
Creating a Google Form on your mobile device is a simple and efficient way to collect data, conduct surveys, or gather feedback. Follow this step-by-step guide to easily create your own Google Form using the Google Forms app.
Step 1: Download the Google Forms App
First, you will need to download the Google Forms app from the App Store or Google Play Store, depending on your mobile device.
Step 2: Sign In
After downloading the app, open it and sign in with your Google account. If you don’t have a Google account, you can create one for free.
Step 3: Create a New Form
To create a new form, tap the “+” button on the bottom right corner of the app screen. This will open a new untitled form.
Step 4: Add Questions
To add a question, tap on the “+” button in the bottom right corner of the app screen. You can choose from various question types, including short answer, multiple choice, checkboxes, and more. There are also options to add images or create a grid for rating scales.
Step 5: Customize the Form
After adding questions, you can further customize the form by changing the theme, adding a header image, or separating questions into different sections. Go to the settings menu (gear icon) to access these options.
Step 6: Design and Style
Google Forms provides several templates and themes that can be applied to your form, making it look more appealing and professional. You can also customize the form’s colors and font style to match your brand or personal style.
Step 7: Fill in Form Details
Fill in the form details, such as the form title and any additional information or instructions for respondents.
Step 8: Preview and Test
Before sharing your form with others, make sure to preview and test it to ensure that all questions and answer options are correct and functional.
Step 9: Share the Form
After you have tested your form, you can share it by generating a unique link to send via email or post on social media platforms like YouTube or Facebook. Another option is to embed the form code on your website. Simply choose the sharing option that best suits your needs.
Step 10: Gather Responses
Once you have shared the form, you can start gathering responses. As respondents fill out the form, the answers will be collected and easily viewable in the Google Forms app.
Following these steps, you can quickly create a Google Form on your mobile device to collect valuable information, conduct surveys, or create quizzes. The Google Forms app provides a user-friendly interface with a variety of helpful features, making the process of creating and sharing forms efficient and easy.


