

Do you have a shelf full of books that always seem to fall over? Are you tired of constantly rearranging them and trying to find a solution to keep them in place? Well, look no further! With these simple instructions, you can easily make your own bookends that will not only help organize your books but also add a touch of style to your bookshelf.
To make these bookends, you will need some wooden scraps and a few other materials that you may already have at home. Begin by measuring the height and width of your books. These measurements will help you determine the size of the bookends you need to make.
Next, cut the wooden scraps into two equal pieces, with each piece measuring the same height as your book. Then, using sandpaper, smooth the edges of the wood to ensure a clean finish. Once the wood is sanded, clean off any excess dust.
Now comes the fun part – you can paint the wooden bookends to match your personal style. Whether you prefer a solid color or a striped pattern, the choice is yours. Simply use some acrylic paint and a brush to paint the bookends in your desired design. You can also get creative and let your kids help with the painting process!
Once the paint has dried, you can further spruce up your bookends by adding some decorative paper. Cut the paper into strips and adhere them to the front of the bookends using a strong adhesive. This will give your bookends a unique and personalized touch.
Now that your bookends are complete, it’s time to put them to use. Place one bookend at each end of the row of books, making sure they are positioned securely to hold the books in place. You can also use these bookends to store other things, such as magazines or even a telephone post!
So, don’t let those never-ending book-ending problems bring you down. With a little bit of time and some basic materials, you can easily make your own bookends that are not only functional but also stylish. Happy DIY-ing!
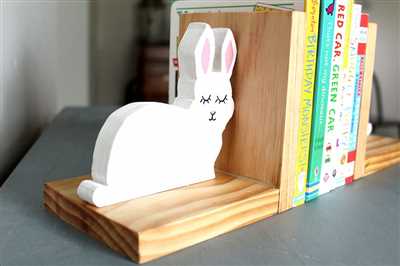
Easy DIY Bookends from Wood Scraps
If you have a passion for books and love to spruce up your bookshelf, then these simple DIY bookends are perfect for you. With just a few wooden scraps and some basic tools, you can create unique bookends that will not only help keep your books organized but also add a touch of style to your home.
To make these easy DIY bookends, you will need the following materials:
- Wood scraps
- Saw
- Sandpaper
- Spray paint
- Masking tape
Start by measuring the desired length of your bookends. Cut two wooden scraps to that length, making sure they are of equal size. Sand the edges to get rid of any roughness or splinters.
Next, choose a color of spray paint that will complement your bookshelf or room decor. Place the wooden scraps on a sheet of newspaper or cardboard outside and spray paint them evenly. Let them dry according to the instructions on the paint can.
Once the bookends are dry, it’s time to add some personality to them. You can use masking tape to create striped patterns, or paint them with your favorite designs. Let your creativity be your guide!
If you want to give your bookends a more polished look, you can adhere a strip of decorative paper to the inside of each bookend. Cut the paper to the size of the bookend, apply glue, and carefully press the paper onto the wood. This will create a nice contrast against the painted exterior.
Now your DIY bookends are ready to use! Place them on your bookshelf and arrange your books between them. These bookends will not only keep your books in order but also make a great conversation piece. Plus, they are so easy to make that even kids can help with the project, making it a fun family activity.
Always remember to measure and cut with caution, and follow the safety instructions mentioned in your tools and paint cans. Happy bookending!
Simple Wooden Bookends
If you’re looking for an easy DIY project to spruce up your bookshelf, then these simple wooden bookends are perfect for you. Made from scraps of wood, they can easily be painted or stained to match your personal style.
To make these bookends, you’ll need the following materials:
- Scrap wood pieces
- Saw
- Sandpaper
- Paper and pencil
- Measuring tape or ruler
- Wood glue or strong adhesive
- Paint or stain (optional)
Start by measuring and cutting your scrap wood into two equal-sized pieces. These will be the main parts of your bookends. Make sure to measure the height and width of your books so you can create bookends that will hold them securely.
Next, sand the edges and surfaces of the wood pieces to remove any roughness or splinters. Then, use a pencil and paper to sketch out a design or shape that you’d like for your bookends. This could be anything from simple geometric shapes to more intricate patterns. Once you’re happy with your design, use a saw to carefully cut along the outlines.
After you’ve cut out your desired shape, sand the edges again to smooth them out. Be sure to wipe away any excess dust before moving on to the next step.
Now it’s time to adhere the two wooden pieces together to create the bookend. Apply a generous amount of wood glue or strong adhesive to the inside edges of one piece, then press the other piece against it firmly. Wipe away any excess glue that may seep out. Allow the bookend to dry completely before handling.
Once the glue has dried, your bookend is ready to be painted or stained. You can choose to leave it natural for a rustic look, or paint it a bold color to make a statement. If painting, be sure to apply thin, even coats and allow each coat to dry before applying the next. If staining, follow the instructions on the stain can and wipe away any excess to achieve the desired finish.
Now you have a set of simple wooden bookends that will help keep your books organized and add a touch of style to your bookshelf. These bookends are also a great project to make with kids, as they are easy to assemble and can be customized to their liking. So gather your materials and get creative!
Striped Bookends
Bookends are a great way to keep your books organized and add a decorative touch to your bookshelf. If you’re looking for a simple DIY project that will also spruce up your bookshelf, then these striped bookends are perfect for you!
To make these striped bookends, you will need:
- Wooden bookends (you can easily find them at a craft store or make your own)
- Scrap paper
- Paint (in the colors of your choice)
- Paintbrushes
- Masking tape
- Spray adhesive
Start by measuring the width and height of your bookends. Cut strips of scrap paper that are slightly wider and longer than the measurements you took. These strips will act as your stencil for creating the stripes.
Next, decide on the pattern and colors you want for your bookends. You can go with simple horizontal stripes or get creative with diagonal or zigzag patterns. Use masking tape to secure the strips of scrap paper onto the wooden bookends, making sure they are straight and evenly spaced.
Once you have taped down your stencil, use spray adhesive to lightly tack down the edges and prevent any excess paint from seeping under the paper. This will help keep your stripes clean and crisp.
Now it’s time to paint! Use a paintbrush to apply a thin, even coat of paint over the entire surface of the bookends, including the areas with the scrap paper stencils. Allow the first coat to dry completely before applying additional coats, if needed. Once the paint is dry, carefully remove the masking tape and scrap paper stencils.
After removing the stencils, you will have clean, crisp stripes on your bookends. If you want to give your bookends a glossy finish, you can also apply a coat of clear varnish or lacquer.
Finally, place your striped bookends on your bookshelf and arrange your books between them. Not only will they keep your books upright and organized, but they will also add a pop of color and style to your bookshelf.
Now that you have the instructions for making these striped bookends, it’s time to get started! Gather your materials, follow the steps outlined above, and soon you’ll have beautiful and unique bookends that will make you happy every time you glance at your bookshelf.
Instructions
Follow these simple instructions to make your own DIY bookends:
- Measure and cut two pieces of wood to the desired size for your bookends. These can be easily found at a local store or you can use scraps of wood that you have at home.
- Sand the wood to get rid of any rough edges or splinters.
- Paint the wooden pieces in your desired color. You can also use stripes or patterns to make them more visually appealing. Let the paint dry completely.
- Next, measure and cut some paper to fit inside the bookends. This will help protect your books from any excess paint or wood.
- Adhere the paper to the inside of the bookends using glue or double-sided tape.
- Then, spray some adhesive on the back of the paper and adhere it to the inside of the bookends.
- Now it’s time to give your bookends a personal touch! Decorate them with stickers, washi tape, or any other craft materials you have on hand.
- Once the bookends are fully decorated and dry, place them on your bookshelf and arrange your books between them. They will not only keep your books in place but also add a great finishing touch to your bookshelf.
These homemade bookends are a simple and easy way to spruce up your bookshelf. They can also be a fun craft project to do with kids. The measures and materials used in this post are just suggestions, so feel free to get creative and make bookends that suit your own style. Happy crafting!
Measure and Cut the Paper
Once you have gathered all the materials needed for your DIY bookend, it’s time to measure and cut the paper. Start by measuring the height and width of your bookend. Then, add an extra inch to each of these measurements to ensure that the paper will cover the entire bookend.
Next, lay the bookend on a flat surface and place the paper on top. Use a pencil to mark the measurements on the paper. You can use a ruler or a straight edge to create straight lines.
After marking the measurements, it’s time to cut the paper. Use a pair of scissors to cut along the marked lines. Take your time and make sure to cut in a straight line.
Once the paper is cut, you can adhere it to the bookend. There are several ways to do this. You can use a glue stick, double-sided tape, or even spray adhesive. Follow the instructions on the adhesive product you choose to ensure proper adhesion.
If you want to spruce up your DIY bookend, you can use patterned or colored paper. Striped or floral patterns can add a pop of color to your bookshelf. Get creative with your paper choices and make your bookends unique!
Remember, making bookends is an easy and simple DIY project that you can do with your kids. They can help you measure, cut, and adhere the paper. This is a great way to spend quality time together and create something useful for your bookshelf.
Now that the paper is measured and cut, the next step is to paint the bookends. You can use spray paint or acrylic paint to give them a new look. If you have wooden bookends, you can also sand them and stain or paint them for a more rustic or polished finish.
Always make sure to follow the instructions on any paint or adhesive product you use. Allow the bookends to fully dry before placing them on your bookshelf. This will prevent any excess paint or adhesive from sticking to your books.
With these easy steps, you can make your own bookends that are perfect for sprucing up your bookshelf. Whether you choose to use scraps of paper or purchase patterned paper from a store, the end result will be a set of unique bookends that will make you and your books happy!
Sources:
- “DIY Bookends for Kids” by Dana Duchala, www.housefullofduchess.com
- “How to Make Bookends” by The Spruce Crafts, www.thesprucecrafts.com
Adhere the Paper
To make your bookends more visually appealing, you can adhere paper to the wooden surface. This step is optional, but it can add a nice touch to your DIY bookends. Here’s how you can do it:
- Measure the dimensions of your wooden bookends and cut the paper accordingly. You can use any type of paper you like, such as scrapbook paper, wrapping paper, or even patterned wallpaper.
- If you want a striped design, use a ruler and a pencil to draw parallel lines on the backside of the paper. Make sure the lines are evenly spaced.
- Once you have your design, cut the paper along the lines and make sure it fits the wooden surface of your bookends.
- Before adhering the paper, make sure the wooden surface is clean and dust-free. You can use a damp cloth to wipe it down.
- Next, apply adhesive to the backside of the paper. You can use glue, double-sided tape, or a spray adhesive depending on your preference.
- Carefully place the paper onto the wooden surface, making sure it is aligned properly. Press down firmly to adhere the paper to the wood.
- If there are any excess paper or scraps, you can trim them with scissors or a craft knife for a neater finish.
- Allow the adhesive to dry completely before handling the bookends.
Once the paper is adhered, you will have beautifully decorated bookends that will add a pop of color and texture to your bookshelf. These DIY bookends are simple to make, and with the help of adhesive paper, they can easily be customized to match any decor style or theme. Whether you make them for yourself or for your kids, they will always be a great addition to any book collection. Happy crafting!
Telephone Bookends
If you have some old telephone endings lying around, you can easily turn them into fun and unique bookends. Not only will these bookends spruce up your bookshelf, but they’ll also add a touch of nostalgia to your home decor. With just a few simple steps, you can create your very own telephone bookends that will always help keep your books in place.
To start, gather your materials. You will need two telephone endings, a wooden bookend post, some scrap wood, sandpaper, a saw, wood glue, paint, a paintbrush, and a few other basic tools.
First, measure the length of your telephone endings and cut the wooden bookend post to match. Then, sand down any rough edges until the wood is smooth to the touch.
Next, it’s time to assemble the bookends. Apply a small amount of wood glue to one end of each telephone ending and adhere them to the wooden post. Press firmly and hold them together for a few minutes to ensure a strong bond.
Once the glue has dried, you can paint your bookends any color you like. If you want a fun and vibrant look, try using striped patterns or bold colors. Alternatively, you can opt for a more subtle and elegant design with a single color or a distressed finish.
After the paint has dried, you can add some extra flair to your bookends. Cut out paper decorations, such as flowers or shapes, and adhere them to the bookends using glue or double-sided tape. This will give your bookends a personalized touch.
Finally, to protect your bookshelf from any excess paint or scratches, place felt or rubber pads on the bottom of each bookend. This will also help keep the bookends stable and prevent them from slipping.
Now you have your very own DIY telephone bookends! They are not only functional but also a great way to repurpose old telephone parts. Kids will be happy to use them, and it’s a perfect gift idea. So, give it a try and enjoy the satisfaction of creating something unique and useful from items that would have ended up in the store or thrown away.
Sources: Duchala
Happy Endings
If you’re looking for a great DIY project that’s easy to make and will add a pop of color to your bookshelf, then these happy endings bookends are perfect for you! With just a few simple instructions, you can make these fun and unique bookends that will bring a smile to your face every time you see them.
To make these happy endings bookends, you’ll need some wooden scraps, a saw to measure and cut them, sandpaper to smooth any rough edges, and paint to give them a bright and cheerful look.
First, measure the height and width of your books. This will help you determine how tall and wide your bookends should be to properly support your books. Once you have the measurements, cut the wooden scraps into the desired size and shape.
Next, sand the wooden pieces to remove any rough edges or splinters. This will ensure that your bookends are smooth and safe to use.
Before you start painting, make sure to clean the wooden pieces to remove any dust or dirt. You can use a soft cloth or a damp sponge to do this.
Now, it’s time to get creative! Choose a color or pattern that you love and start painting your bookends. You can use a brush or even spray paint to easily cover the wooden surface. Let the paint dry completely before moving on to the next step.
Once the paint is dry, you can add some extra flair to your bookends. For example, you can adhere strips of scrapbook paper, or add some stickers or decals. Be creative and make them unique!
When everything is dry and your bookends look perfect, you can place them on your bookshelf. Make sure to test them out by putting some books against them to ensure they hold up and keep your books in place.
These happy endings bookends are not only functional, but they also add a touch of whimsy and joy to any room. They will bring a smile to your face every time you see them and will be a great conversation starter when you have guests over.
So why wait? Get out your tools and materials and start making your own happy endings bookends today! Your books will thank you, and you’ll have a fun and unique project to show off. Enjoy!
Sources
Want to make your own bookend? Here are some simple instructions to spruce up your bookshelf:
1. Start by measuring the height and width of your books. This will give you the dimensions for your bookend.
2. Next, cut two wooden scraps into the desired measurements. These will be the ends of your bookends.
3. You can easily paint the wooden ends to give them a personalized touch. Just spray some paint onto them and let them dry.
4. If you want to add some decorative elements, glue some paper or fabric onto the wooden ends. You can also paint them with stripes or other designs.
5. Once everything is dry, use strong adhesive to glue the wooden ends together, forming an L-shape. Make sure they adhere firmly to each other.
6. Now your bookends are ready to use! Simply place them on either side of your books to help keep them in place on your bookshelf.
These DIY bookends are not only functional, but they also add a touch of personality to your book collection. With these simple instructions, you can easily make your own bookends and organize your books in style.
With the help of the sources above, you will always have the perfect bookends to store and display your favorite reads.
Happy crafting!


