

Creating an offline website is an important event in any web developer’s life. These days, you’ll want to have the ability to enhance and manage websites even during moments when you aren’t connected to the internet. Once you clone a website, you can begin making changes and updates offline, without the need for a continuous Wi-Fi connection.
If you’re a web developer looking to create an offline website, you’ll want to know about DevKinsta. This powerful tool connects with Kinsta, the WordPress hosting provider, and empowers you to develop and manage websites even without an internet connection. With DevKinsta, you’ll have access to a user-friendly dashboard and a host of features that allow you to easily create, view, and manage your websites in an offline environment.
DevKinsta supports the basics, but it goes even further by offering additional features to enhance your website development experience. You can choose from three different plans depending on your needs: Free, Pro, and Business. Each plan supports the creation and management of offline websites, with options to add custom domains, create staging sites, and even use the Kinsta AI to optimize your website’s performance.
- The Basics to Making your Web Application Work Offline
- Why You Might Consider Creating an Offline Website
- Step 1: Install DevKinsta
- Step 2 Add a New Site
- Step 3: Manage Your Local Website
- Disable Offline Viewing for a Web Page
- Empower Your Digital Presence with Our AI Offline Website Builder
- Design an Offline Website That Connects and Captivates
- Why Opt for Our AI Offline Website Creator
- Additional Features to Enhance Your Offline Website
- Using a Raspberry Pi to track the progress of your homebrew
- Video:
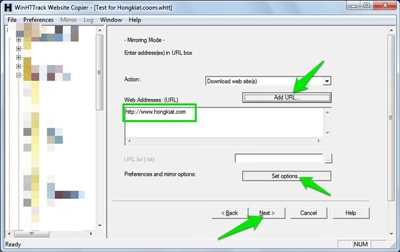
- Download and Copy any Website for Offline Use
The Basics to Making your Web Application Work Offline
In today’s world, where internet connectivity is not always guaranteed, it is essential for web applications to have offline capabilities. Being able to use your web application even without an internet connection can significantly enhance the user experience and empower your users to continue using your site no matter where they are.
Here are the basic steps to make your web application work offline:
1. Choose the right hosting: Select a hosting provider that supports offline capabilities. Kinsta, for example, offers an offline viewing option that allows your website to be temporarily available even without an internet connection.
2. Enable offline mode: Configure your web application to support offline usage. This may involve coding and custom settings depending on the software you are using.
3. Create an offline version: Clone your web application and create an offline version that users can access without an internet connection. This offline version should have all the necessary functionality and data.
4. Manage data synchronization: Implement a process that ensures data synchronization between the online and offline versions of your web application. This will allow users to seamlessly switch between the two modes without losing any data.
5. Provide authentication support: Allow users to login and access their data even when they are offline. This requires storing user credentials securely and enabling login functionality without an internet connection.
6. Optimize performance: Make sure your website loads quickly even in offline mode. Minimize the use of external resources and optimize the code to provide a smooth user experience.
7. Track offline progress: Implement a mechanism to track user activities and progress made while using the web application offline. This will ensure that users can continue from where they left off once they regain internet connectivity.
8. Disable online-only features: If your web application has features that require an internet connection, disable them when in offline mode. This will prevent users from getting stuck or frustrated by features that won’t work without internet connectivity.
9. Test and debug: Test your web application extensively in offline mode to identify any issues or bugs that may arise. Debug and resolve these issues to ensure a seamless offline experience for your users.
10. Educate users: Provide user documentation or instructions on how to use your web application offline. Explain the limitations and benefits of offline usage to help users make the most of the offline capabilities.
By following these steps, you can create a web application that works offline and offers a continuous and engaging user experience, even when an internet connection is not available.
Why You Might Consider Creating an Offline Website
In today’s online world, having a web presence is crucial for any business or individual. However, there are certain situations where creating an offline website can be beneficial. Let’s explore some reasons why you might consider taking your website offline.
1. Continuous accessibility: By creating an offline website, you can ensure that your content is accessible even without an internet connection. This means that users can still find and interact with your website without relying on Wi-Fi or mobile data.
2. Enhanced user experience: Offline websites can provide a more focused and seamless user experience. Without distractions like ads or slow internet connections, users can fully engage with your content and explore it at their own pace.
3. Efficient content management: When working on an offline website, you have complete control over the design and content. You can make changes and update your website without the need for continuous coding or relying on a live server.
4. Testing and development: An offline website allows you to test and develop new features or configurations without affecting your live site. You can clone your website to a local environment and experiment with different plugins, themes, or coding techniques.
5. Data protection: By having an offline website, you reduce the risk of data loss or security breaches. Since the website is not accessible online, it becomes less vulnerable to attacks or unauthorized access.
6. Private administration: With an offline website, only authorized individuals can access the admin dashboard. This provides an extra layer of security and privacy, ensuring that sensitive information or settings are not exposed to the public.
7. Multisite management: Offline websites can be particularly useful for managing multiple websites. Using a website builder like WordPress, you can create and configure multiple sites on the same local environment, making it easier to organize and track your web projects.
8. Freedom in design: An offline website allows you to be more creative and experimental with your design choices. You can add custom themes, plugins, or functionalities without any limitations or restrictions.
9. Gain lost time: In situations where internet connectivity is limited or unreliable, an offline website ensures that you don’t miss out on productivity. You can continue working on your website without interruption or waiting for connectivity to resume.
10. Information gathering: Before launching an online version of your website, having an offline version can help you gather feedback and make improvements. You can share the offline version with others and collect valuable insights about its usability and performance.
In conclusion, creating an offline website can offer several advantages, such as continuous accessibility, enhanced user experience, efficient content management, and data protection. Whether you’re looking to develop a new website or enhance an existing one, considering an offline website might be a step worth taking.
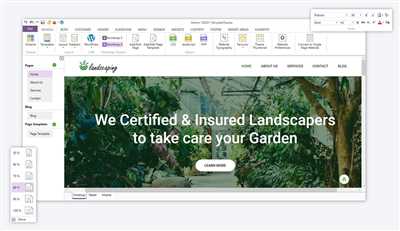
Step 1: Install DevKinsta
To begin creating your offline website, the first step is to install DevKinsta, a powerful software that allows you to develop and manage your WordPress sites locally without an internet connection. By using DevKinsta, you can implement and test your website design, coding, and content before going live.
DevKinsta is designed to make the website creation process as smooth as possible. It offers a user-friendly interface where you can track and manage all your sites. Whether you are a beginner or an experienced developer, DevKinsta can help you work with multiple sites and plan your web engagement effortlessly.
Here is how you can install DevKinsta:
- Go to the official DevKinsta website and download the latest version of the software.
- Once the download is complete, open the installer and follow the on-screen instructions to complete the installation process.
- During the installation, you will be prompted to choose a username and password for your DevKinsta admin account. Make sure to choose a strong password to secure your local development environment.
- After a few seconds, the installation will be completed, and you can click the “Open” button to launch DevKinsta.
Now that you have DevKinsta installed, you can start creating your offline website without worrying about an internet connection. DevKinsta acts as a local server, allowing you to design, develop, and test your website using popular tools like WordPress.
With DevKinsta, you can clone your existing WordPress sites, create new ones, and manage all of them from a centralized dashboard. It gives you full control over the website’s settings, domain names, content, and more. You can even work on a staging version of your site to make changes without affecting the live website.
DevKinsta also offers additional features like AI-assisted content creation, website builder integration, and seamless integration with other tools and platforms. This software is designed to empower you in every step of the website management process.
Please note: DevKinsta is an offline website development tool and does not provide online hosting. If you want to make your website live, you’ll need to consider our online hosting offerings or choose a different hosting provider.
Now that you know how to install DevKinsta, you’re ready to move on to the next steps in creating your offline website.
Step 2 Add a New Site
Once you have developed the content you need for your website and have it ready to go, the next step is to add a new site with hosting. Hosting gives your website a place to live on the internet and allows others to view it. In this step, we will guide you through the process of adding a new site to your hosting provider.
1. Log in to your hosting provider’s admin dashboard. If you are using WordPress, you can access the admin dashboard by appending “/wp-admin” to the end of your website’s URL.
2. Consider why you are creating a new site and what features you want it to have. This will help you plan the installation process and choose the right settings.
3. Fill in the necessary information, such as the site name, username, and password. These details will empower you to manage your website and its applications.
4. If you want to clone an existing site, there may be an option to clone it during the setup process. This can save you time and effort in recreating the design and content.
5. Once you have filled in all the required information and selected your desired features, click the “Install” button. This will initiate the installation process, which may take a few seconds.
6. After the installation is complete, you can view your new site by clicking on the provided link. This will open the site in your web browser, allowing you to see how it looks and make any necessary adjustments.
By following these steps, you can create a new site offline and then bring it online when it is ready. Utilizing software like Kinsta or DevKinsta can enhance your website creation experience by offering continuous support and an easy-to-use interface. It’s essential to have a Wi-Fi connection to access the internet while making these steps.
Remember that managing multiple websites can be overwhelming, so be sure to disable or opt-out of any features or domains that you don’t need. This will make the website management process more efficient.
In the next step, we will learn about how to fill your new website with custom content.
Step 3: Manage Your Local Website
Once you have set up your offline website, it’s important to have a proper management plan in place. This will allow you to easily access and update your site whenever needed without being online.
In order to manage your local website offline, you will need to use a website builder or a content management system (CMS) that supports offline development. Some popular options include Homebrew, DevKinsta, and WordPress. These tools empower you to create and customize your site without any coding or continuous internet connection.
One important tool you might want to consider using is Adminer. With Adminer, you can easily view and edit your site’s database, making it an essential part of your offline website management process.
During the management process, it’s essential to keep track of any changes and updates to your site. This will ensure a seamless and continuous user experience once you make your site live.
To enhance your offline management experience, you can also implement features such as a custom admin panel or event tracking. These features allow you to have more control over your site’s development and user interaction.
Here are the steps to manage your local website offline:
- Open your website builder or CMS software.
- Connect to the local Wi-Fi network.
- Access your website’s admin panel using the provided URL or file.
- Use the admin panel to manage your site’s content, configuration, and user access.
- Click on the “Save” or “Publish” button to apply any changes made to your site.
Remember to keep your admin panel password-protected to ensure the security of your offline website.
In summary, managing your offline website involves using a website builder or CMS software that supports offline development. You can use tools like Adminer to view and edit your site’s database. Additionally, implementing custom features and keeping track of changes will enhance your management process. Follow these steps to manage your local website offline and create an impressive online presence when you’re ready.
Disable Offline Viewing for a Web Page
If you’re offering an offline website or want to disable offline viewing for a specific web page on your site, there are a few steps you can take to accomplish this.
To begin, you’ll need to login to your website’s admin dashboard. If you’re using a content management system (CMS) like WordPress, you can login to the admin dashboard with your username and password.
Once you’re logged in, you might need to go into the settings or plugin section of your dashboard, depending on the CMS or software you’re using. In today’s article, we’ll focus on disabling offline viewing on a WordPress website.
If you’re using WordPress, you can disable offline viewing by installing a plugin called “Disable Offline”. This plugin empowers you to disable the offline viewing feature for your website.
Here’s the step-by-step process to disable offline viewing on a WordPress website:
- Open your WordPress dashboard.
- Go to “Plugins” and click on “Add New”.
- In the search field, type “Disable Offline” and click “Enter”.
- Locate the “Disable Offline” plugin and click on “Install Now”.
- Once the installation is complete, click on “Activate”.
After you’ve followed these steps, the plugin will disable the offline viewing feature for your website. Users will no longer be able to view your website in offline mode.
By disabling offline viewing, you enhance the user experience on your website. Without the ability to access your site offline, users are more likely to stay connected and visit your site more frequently.
In addition to disabling offline viewing, there are other features you can implement to make your website even better. For example, you can use a staging environment to develop and test new features before implementing them on your live site. This allows you to track the progress of your web design and make any necessary changes before they go live.
If you’re a developer, you might want to know that Kinsta offers a local development tool called DevKinsta. DevKinsta supports a Raspberry Pi and connects to your database queries through adminer. Using this software, you can work on your website without the need for an internet connection.
So, whether you’re looking to disable offline viewing or enhance your site’s functionality, there are plenty of tools and techniques available to help you achieve your goals.
Empower Your Digital Presence with Our AI Offline Website Builder
When it comes to creating a website, there are numerous applications and software available that can help you implement your ideas. But what if you want to develop a website without the need for an internet connection?
Our AI offline website builder is the solution you’ve been looking for! With our unique software, you can develop websites even without Wi-Fi or an internet connection. Whether you’re on the go or just want to work offline, our builder connects you to a local web server that allows you to access and track your website’s progress.
Gone are the days when you might find yourself lost in the basics of coding or the management of an online website. Our AI builder takes care of these queries for you, so you can focus on creating captivating content. You’ll gain access to a user-friendly interface where you can manage your site’s settings, customize the design, and even fill in the content.
One of the key features of our AI offline website builder is the ability to clone and manage multiple websites. Perhaps you have an event coming up and want to create a special website for it. Our builder allows you to clone an existing site and make custom changes to create a new version in seconds.
To get started, simply install our AI offline website builder and open it once. You’ll be prompted to create an admin login and password, which will give you continuous access to your site’s settings and management. This login will also allow you to disable public access to your site if needed.
Even though you’re offline, our AI builder supports a staging environment where you can preview your changes before making them live. This ensures that your site remains error-free and well-designed.
With our AI offline website builder, you’re not limited to just creating and managing websites. You can also use it as a platform to connect with other users and share your progress. The builder integrates with other tools like Adminer, which is a database management software that enables you to easily track and manage your site’s data.
So why wait? Empower your digital presence today with our AI offline website builder. Start creating websites without the need for an internet connection, and enjoy the freedom and flexibility it offers.
Design an Offline Website That Connects and Captivates
Creating a website that can be accessed offline is a great way to empower users with continuous access to your content, even when they don’t have Wi-Fi. In this article, we’ll explore the steps you need to take to design an offline website that connects and captivates.
Step 1: Clone your live website
Once you’ve planned the offline version of your website, you’ll need to clone your live website using a staging environment. This will allow you to make changes and test them without affecting your live site.
Step 2: Disable online features
To ensure your offline website functions properly, you’ll need to disable any online features that rely on an internet connection. This might include forms, interactive maps, or live chat functionality.
Step 3: Optimize content for offline use
Consider the content you want to offer offline users and make sure it’s available on your offline website. You may need to customize your website to provide a seamless offline experience, depending on your user’s needs.
Step 4: Choose a local hosting solution
To host your offline website, you’ll need to choose a local hosting solution. Kinsta’s DevKinsta or MyKinsta are popular choices for local WordPress hosting. These tools allow you to manage your website and its database without an internet connection.
Step 5: Configure the offline website
During the configuration process, you’ll need to set up a multisite configuration for your offline website. This will allow you to use a domain name similar to your live site, such as “offline.yoursite.com”.
Step 6: Access the offline website dashboard
Once your offline website is set up, you can access its dashboard by logging in as an admin. Here, you can manage your content, track engagement, and make any necessary updates.
Step 7: Gain offline user engagement
Offering offline users a unique and engaging experience is essential. Consider using artificial intelligence or other software to create interactive elements that users can interact with even without an internet connection.
Step 8: Track offline user behavior
Using tools like Google Analytics, you can track user behavior even offline by capturing data when the user has an internet connection and syncing it once they reconnect.
Step 9: Consider offline website limitations
Keep in mind that offline websites have some limitations. For instance, you might not be able to access certain features that rely on external services, such as social media sharing buttons or real-time updates.
Step 10: Backup and update your offline website
Just like your live site, it’s important to regularly backup and update your offline website. This will ensure that you don’t lose any data and that your offline website remains secure.
In conclusion, by following these steps, you can design an offline website that connects and captivates users, offering them continuous access to your content, even without an internet connection.
Why Opt for Our AI Offline Website Creator
Gaining the ability to clone and open websites without any coding or live internet connection is a powerful tool that empowers website developers and designers. With our AI offline website creator, you can create, edit, and manage your websites with just a click of a button. Once you install our application, you can start working on your website offline.
These are some of the features and benefits our offline website creator provides:
- Enhance User Engagement: Implement advanced settings and configurations to enhance user engagement.
- Prevent Lost Work: Create and manage multiple websites without the fear of losing your progress.
- Multisite Management: Easily manage multiple websites from one dashboard.
- Password Protection: Protect your websites with password authentication.
- Staging Sites: Create staging sites to test new features and changes before implementing them on your live site.
- Local Hosting: Work on your websites locally without needing internet access.
- Offline Website Builder: Use our website builder to create custom web pages and designs.
- Flexible Configuration: Easily modify and adjust website settings to fit your needs.
- Adminer Integration: Connect to your database and manage it directly from the admin dashboard.
With our AI offline website creator, you can work on your websites anytime and anywhere, even without an internet connection. Whether you’re a beginner or an experienced web developer, our offline website creator will allow you to create stunning websites that captivate your users.
Begin your journey of creating amazing websites with our offline website creator. Choose our application and find out why it’s the ultimate tool for web development.
Want to manage your websites easily? Check out our DevKinsta tool that allows you to manage your WordPress sites effortlessly.
Experience the convenience and power of our offline website creator today!
Additional Features to Enhance Your Offline Website
Once you have completed the basics of creating your offline website, there are several additional features you can implement to enhance its functionality and user engagement.
1. Dashboard: To make it easier for users to navigate your site, consider adding a dashboard. This will provide them with a centralized location to access all the different sections and features of your website.
2. Admin Panel: Offering an admin panel allows you as the website creator to have full control over your site. You can manage users, track user engagement, and make updates to the site all from one convenient location.
3. Multisite Support: If you want to go beyond creating a single website and offer a platform for users to create their own sites, consider adding multisite support. This will enable users to create and manage their own websites within your application.
4. Live Chat: To enhance user experience and support, consider adding a live chat feature. This allows users to connect with you or your support team in real time to get immediate assistance or ask questions.
5. AI Features: Implementing artificial intelligence (AI) features can add a touch of automation and ease to your website. You can use AI to fill in forms, offer personalized recommendations, and even disable certain features based on user preferences.
6. Digital Marketing Tools: To gain more visibility online and make your website even more captivating, consider integrating digital marketing tools. These can help you track website traffic, optimize your site for search engines, and create targeted campaigns.
7. Staging Environment: Having a staging environment allows you to make changes and test new features without affecting the live version of your website. This ensures a smooth and error-free deployment of new updates.
8. Event Tracking: By implementing event tracking, you can gather valuable data about how users interact with your website. This data can help you make informed decisions about website design, user experience, and content strategy.
By adding these additional features to your offline website, you can empower your users and enhance their experience without the need for an online presence. Whether you’re using a Raspberry Pi or a web builder like DevKinsta or MyKinsta, these features will take your website to the next level and make it even more engaging and user-friendly.
Using a Raspberry Pi to track the progress of your homebrew
If you’re a homebrew enthusiast, you know how important it is to track the progress of your brews. With a Raspberry Pi, you can easily create a website that connects to your brewing equipment and allows you to monitor and document each step of the brewing process.
To begin, you’ll need to install a web server on your Raspberry Pi. There are various options available, but one popular choice is Apache. Once you have Apache installed, you can start developing your website. You can choose to create a custom design from scratch, or use a website builder like WordPress, which supports coding-free website creation.
After setting up your web server and designing your website, you’ll need to configure your Raspberry Pi’s Wi-Fi settings to ensure it can connect to your home network. Once connected, you can assign a domain name to your website for easy viewing. You can choose to use a free domain name service, or purchase a custom domain name for a more professional online presence.
With your website up and running, you can now use your Raspberry Pi to track the progress of your homebrew. By creating a login system, you can restrict access to your brewing information and allow only authorized users to view the content. This can be done using a content management system or by implementing user management with a tool like Adminer.
Now that you have a secure login system in place, you can track the progress of your brewing process. You can create pages for each brew and fill them with information on the ingredients, brewing steps, and even upload photos or videos of the process. By tracking the progress in this digital format, you’ll have an enhanced and engaging brewing experience.
Using a Raspberry Pi to track the progress of your homebrew can also empower your brewing community. You can create an application where fellow homebrewers can share their own brewing experiences, exchange tips and techniques, and even rate and comment on each other’s brews. This level of engagement can greatly enhance the overall brewing experience.
So, why choose a Raspberry Pi for this task? Raspberry Pi offers a low-cost and versatile platform for creating websites. Its small form factor makes it easy to integrate into your brewing setup, and its support for various programming languages and web technologies gives you the flexibility to build the website exactly how you want it.
In conclusion, creating a website using a Raspberry Pi to track the progress of your homebrew is a great way to document and share your brewing journey. With the right setup and configuration, you can have a user-friendly and engaging website that captivates your audience and allows you to fully enjoy the brewing process.


