

Watermarking your photos is an essential step to protect your creative work from unauthorized use. By adding a watermark, you can make it clear that the image belongs to you and discourage others from stealing or misusing it. Adobe Photoshop offers a range of tools and options to help you create a watermark that suits your style and needs.
The process of making a watermark in Photoshop involves a few simple steps. First, you need to decide on the design and style of your watermark. It could be your signature, a small logo, or any other pattern that represents your creative identity. Once you have your design ready, you can proceed with the following steps to create an effective watermark.
To start, open the image you want to add a watermark to in Photoshop. Then, select the “Text” tool from the toolbar on the left. Choose the font, size, and color for your watermark text. You can also add a drop shadow or other text styles to make it stand out. Type your desired text and position it on the image using the Move tool.
Next, create a new layer for your watermark by clicking on the “New Layer” icon in the Layers panel. This will ensure that your watermark remains separate from the original image and can be easily adjusted or removed if needed. With the new layer selected, go to the “Edit” menu and choose “Transform” and then “Scale” to resize the watermark if necessary. You can also rotate or move it around as per your preference.
To make your watermark more visually appealing, you can apply a texture or a pattern to it. Photoshop offers a wide range of options to choose from. Go to the “Window” menu and select “Libraries” to access various libraries with pre-designed patterns and textures. Select the one you like, and it will be added as a background behind your watermark.
Finally, adjust the opacity of the watermark layer to make it more subtle. Lowering the opacity will make the watermark appear translucent and blend with the image. You can find the opacity option in the Layers panel. Once you’re satisfied with the look of your watermark, save the image in a format that supports transparency, such as PNG.
Now, you’re ready to use your newly created watermark to protect your photos. Simply place it on any image you want to share or publish online, and it will serve as a reminder to others that the image is copyrighted and should not be used without permission. By taking these steps to add a watermark, you can safeguard your creative work and prevent unauthorized use.
- News
- 1 Create a New Layer Add Text
- 2 Turn the Watermark Into an Action
- STEP 8 Making a reusable Photoshop brush – Creative Cloud Libraries
- How to Create a Tiled Watermark in Photoshop
- Create an Image Watermark in Photoshop
- Reusing Your Watermark
- Video:
- [ Photoshop Tutorial ] How to Remove WATERMARK in Photoshop CC 2022
News
- 2 new ways to create a watermark in Photoshop
- Now with the selection tool, you can easily create a watermark by selecting an area and applying a shadow effect
- The new “Turn into Watermark” option in Photoshop allows you to instantly turn any white circle icon or image into a watermark
- Steps to making a watermark even smaller: choose the “Path Selection” tool, create a signature path, then select the first window in the menu and press the “Make Selection” button
- New image styles for watermark making: adding a drop shadow, choosing the lightroom preset, or using a textured pattern in the background
- Photoshop now shares your watermark libraries across cloud libraries
- Canceling a watermark action is now easier with the new “Post Cancellation” option
- Reusable watermarks: Save your watermark as a single layer and reuse it whenever you need without going through the whole process again
1 Create a New Layer Add Text
In order to create a watermark in Photoshop, you’ll first need to create a new layer to work on. This will allow you to add and manipulate your watermark without affecting the original image.
To create a new layer, go to the Layers panel and click on the “New Layer” button. Alternatively, you can use the keyboard shortcut Command + Shift + N (Mac) or Control + Shift + N (Windows). This will open a dialog box where you can name your new layer.
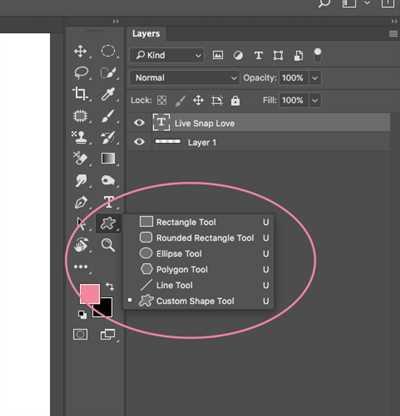
Once you’ve created your new layer, you can proceed to add text to create your watermark. Select the Text Tool from the toolbar, which looks like a capital “T”. With the Text Tool selected, click anywhere on your image to create a text box.
Now you can start typing in the text that you want to use for your watermark. This could be your brand name, website URL, or any other text that you desire. You can also use this opportunity to customize the font, size, and color of your text using the options available in the Character panel.
Before you continue, it’s a good idea to position your text in an area of the image that won’t distract from the main subject. You can click and drag the text box to move it around, or use the alignment options in the Options bar to align it to a specific point. You can also adjust the opacity of the text layer to make it more subtle if you prefer.
If you want to further customize your watermark, you can add an effect or style to it. This can be done by right-clicking on the text layer in the Layers panel, selecting “Layer Styles,” and choosing from options such as Drop Shadow, Outer Glow, or Bevel and Emboss. These effects can help make your watermark stand out or give it a more creative look.
Once you’re satisfied with how your watermark looks, you can save it as a reusable pattern or an overlay. To do this, simply select your text layer in the Layers panel, and go to Edit > Define Pattern or Edit > Define Brush Preset. This will save your watermark as a pattern or brush that you can use on other images in the future.
Now that you know how to create a watermark in Photoshop, it’s important to remember that adding a watermark to your images won’t guarantee their protection from unauthorized use. However, it can serve as a deterrent and a way to easily identify your work. It’s always a good idea to consult with legal professionals or use digital rights management tools for added security and protection of your intellectual property.
2 Turn the Watermark Into an Action
Creating a reusable watermark action in Photoshop is a great idea, especially if you often need to add watermarks to your photos. By turning the watermark creation process into an action, you can save time and ensure consistency in adding watermarks.
Here are the steps to turn your watermark into an action in Photoshop:
- Open Photoshop and select the photo you want to watermark.
- Choose the “Image” menu, then go to “Transform” and select “Scale”.
- In the Scale dialog window, make sure the “Constrain Proportions” checkbox is checked. Reduce the width and height of the image by around 8-10% to create a smaller version for the watermark.
- Click the “Create a New Layer” button in the Layers panel to create a new layer for the watermark.
- Select the “Brush” tool from the toolbar and choose a white color for the text.
- Click on the canvas where you want to place the watermark. Type in the text you want to use as your watermark (e.g., your brand name or signature).
- Adjust the size, font, and position of the text as desired.
- Go to “Layer” -> “Layer Style” -> “Drop Shadow” to add a shadow effect to the watermark. Adjust the settings to your preference.
- Click on the “Paths” tab in the Layers panel and select the path you created for the watermark.
- Click on the “Window” menu and choose “Actions” to open the Actions panel.
- Press the “Create New Action” button at the bottom of the Actions panel to create a new action.
- In the New Action dialog box, give your action a name (e.g., “Watermark”) and choose the desired action set and an icon for the action.
- Make sure the “Begin recording” button is selected, then press the “Record” button to start recording the actions.
- Perform the necessary steps to create your watermark (choosing the brush, adding the text, applying the drop shadow, etc.)
- Once you’re done, press the “Stop” button in the Actions panel to stop recording the actions.
- Your watermark creation process is now saved as an action.
- Whenever you want to add the watermark to a new image, simply select the image, choose the “Watermark” action from the Actions panel, and press the “Play” button.
- The watermark will be applied to the image automatically, following the steps you recorded in the action.
By turning your watermark into an action, you can easily apply it to multiple images in a single click, saving you time and effort. This creative solution is also helpful for reusing the watermarks in different projects, ensuring consistency in your brand’s visual identity. Now you can efficiently protect your images with a professional watermark using the power of Photoshop actions.
STEP 8 Making a reusable Photoshop brush – Creative Cloud Libraries
To add an extra touch to your watermark, you may want to create a reusable Photoshop brush. This can be done using the Creative Cloud Libraries feature in Photoshop.
- To begin, select the image or pattern that you want to turn into a brush.
- Then, go to the “Window” menu and select “Creative Cloud Libraries”. This will open the Creative Cloud Libraries dialog window.
- In the Libraries panel, click on the “Create New Library” icon.
- Name your new library, for example, “Watermark Brush”.
- Now, go back to your image or pattern and use the selection tools to make a precise selection. You can use any selection tool, such as the Marquee tool or the Lasso tool, depending on your needs.
- Once you have made your selection, press the “Edit” command and choose “Define Brush Preset” from the list of options.
- A dialog box will appear, where you can name your brush and make any further adjustments or edits if needed.
- After naming your brush, it will be added to your Creative Cloud Libraries and can be accessed at any time.
- To use your new brush, simply select the Brush tool from the toolbar and choose your brush from the Creative Cloud Libraries panel.
Creating a reusable Photoshop brush allows you to quickly and easily add your watermark to any image or photo. It saves you time and effort in the long run, as you won’t need to repeat the process for each watermark you want to add. The brush can be resized, rotated, and have its opacity adjusted to achieve the desired effect. You can even combine your brush with other Photoshop tools, such as layer styles or drop shadows, to further enhance your watermark.
How to Create a Tiled Watermark in Photoshop
Creating a watermark in Photoshop is an essential step for photographers and designers who want to protect their work. In this tutorial, we will guide you through the process of creating a tiled watermark using Photoshop.
Step 1: Open Photoshop and go to the “File” menu, then select “Open” to choose the photo you want to add a watermark to. Alternatively, you can also drag and drop the photo directly into the Photoshop workspace.
Step 2: Once the photo is open, click on the “T” icon in the toolbar on the left to select the Type tool. Then, click anywhere on the photo to create a new text layer.
Step 3: In the options bar at the top of the screen, you can choose the font, size, and color for your watermark. Additionally, you can also set the opacity to make the watermark more or less visible.
Step 4: Before typing your watermark, you need to select the tile pattern. To do this, go to the “Window” menu and select “Layer Styles” to open the Layer Styles dialog. In the dialog box, click on the “Pattern Overlay” option in the list on the left.
Step 5: In the Pattern Overlay dialog box, you can choose from a variety of pre-installed patterns or even create your own custom pattern by clicking the arrow next to the pattern list and selecting “New Pattern”.
Step 6: Once you have chosen the pattern, you can adjust the scale and blending options to further customize your watermark. Click “OK” to close the dialog box when you are done.
Step 7: Now that you have selected your pattern, go back to the text layer and type your watermark. You can also add additional effects or styles to the watermark by using the various options in the Layer Styles dialog.
Step 8: After you have finished creating your watermark, select the Move tool from the toolbar on the left. Click on the watermark layer and drag it to the desired position on the photo.
Step 9: If you want to make the watermark even more visible, you can reduce the opacity of the photo layer slightly by adjusting the opacity slider in the Layers panel.
Step 10: Finally, save your edited photo by going to the “File” menu and selecting “Save” or “Save As”. Choose the desired file format and location, then press “Save” to apply the changes to the photo.
Creating a tiled watermark in Photoshop offers a great way to protect your photos while adding a professional touch. By following these simple steps, you can create a unique and reusable watermark that can be easily applied to any future photos.
Create an Image Watermark in Photoshop

Adding a watermark to your images can help protect them from unauthorized use and give them a professional look. In this tutorial, we will show you how to make a text-based watermark in Photoshop.
To start, open your image in Photoshop. You can do this by going to File > Open or by dragging and dropping the image onto the Photoshop workspace.
Next, go to the Layers panel on the right side of the window. If you don’t see the Layers panel, you can open it by going to Window > Layers. Then, click on the New Layer button at the bottom of the panel to create a new layer for your watermark.
Now, select the Type Tool from the toolbar on the left side of the window. Then, click on the image where you want to add your watermark and start typing your text. You can choose the font, size, and color of your text in the options panel at the top of the window.
Once you have entered your text, you can further customize it by selecting it with the Type Tool and using the options in the Character panel. You can adjust the spacing, alignment, and other text properties to make your watermark look exactly how you want it.
If you have a signature or logo that you want to use as your watermark, you can import it into Photoshop by going to File > Place Embedded. Then, click and drag the imported image to position it on your watermark layer.
To make your watermark less obtrusive, you can lower the opacity of the watermark layer. You can do this by selecting the watermark layer in the Layers panel and using the opacity slider at the top of the panel.
If you want to create a reusable watermark that you can easily apply to multiple images, you can save your watermark as a Photoshop action. To do this, go to Window > Actions to open the Actions panel. Then, click on the New Action button at the bottom of the panel. Give your action a name and press the Record button. Then, perform all the steps you just did to create your watermark. When you’re done, press the Stop button in the Actions panel.
Now, whenever you need to apply your watermark to a new image, simply open the image in Photoshop, go to the Actions panel, select your watermark action, and click the Play button. The action will automatically apply your watermark to the selected image.
With these steps, you can easily create an image watermark in Photoshop that adds a personalized touch to your photos and protects them from unauthorized use.
Reusing Your Watermark
Once you have created your watermark in Photoshop, you might want to reuse it for multiple images or in different projects. Luckily, Photoshop offers several options for reusing your watermark quickly and easily.
One option is to save your watermark as a Photoshop action. Actions are pre-recorded steps that Photoshop can apply to a single image or a group of images. To save your watermark as an action, follow these steps:
- Select the layer that contains your watermark.
- Open the Actions panel by going to Window > Actions.
- In the Actions panel, click on the New Action button (icon with a folded corner).
- In the New Action dialog box, give your action a name and choose a location to save it.
- Click Record to start recording your action.
- Go to Layer > New Adjustment Layer > Levels. In the Levels dialog box, adjust the settings to make your watermark lighter or darker if needed. Click OK.
- Stop recording the action by clicking the Stop button (square icon) at the bottom of the Actions panel.
Once you have saved your watermark as an action, you can apply it to any image by selecting the image and clicking on the action name in the Actions panel. This will apply your watermark with the same settings and positioning as before.
Another option is to save your watermark as a pattern. Patterns allow you to apply a repeating design or texture to an image. To save your watermark as a pattern, follow these steps:
- Select the layer that contains your watermark.
- Go to Edit > Define Pattern.
- Give your pattern a name and click OK.
Once you have saved your watermark as a pattern, you can apply it to any image by creating a new layer, selecting the Paint Bucket tool, choosing the pattern option in the tool options bar, and filling the layer with your watermark pattern.
By reusing your watermark using these methods, you can save time and ensure consistency in your branding or post-processing workflow.


