

Are you looking to add an extra layer of security to your online communications and transactions? Configuring a digital id can provide just the solution you need. A digital id, also known as a digital signature, allows you to sign documents and authenticate your identity in the digital world. In this guide, we will walk you through the process of creating and using a digital id, step-by-step.
First, let’s understand what a digital id is. A digital id is a unique electronic identifier that is used to verify the authenticity and integrity of digital documents. With a digital id, you can sign electronic documents, such as PDF files, and add a digital signature that is legally binding. This ensures that the document has not been tampered with after it was signed and that the signer’s identity is verified.
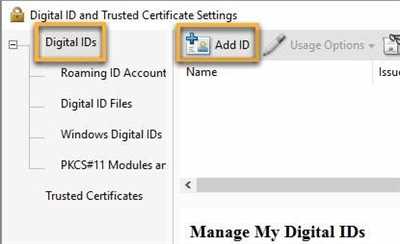
So, how do you create a digital id? The process is quite simple. If you are using Adobe Acrobat DC, start by opening the application and selecting “Edit PDF” from the Tools panel. Then, click on “Add ID” in the right-hand panel, and choose “Create Self-Signed ID” from the drop-down menu. Next, fill in the required information, such as your name, email address, and country. Once you have filled in all the necessary details, click on “Create” to create your digital id.
Now that you have created your digital id, let’s see how you can use it to sign a document. Open the document you want to sign in Adobe Acrobat DC. Then, click on the “Sign” tool in the right-hand panel, and choose “Place Signature”. A dialog box will appear, asking you to select a signature creation method. Choose the option “Use a certificate”, and then click on “Browse” to locate and select your digital id. Click on “Continue” to proceed.
In the next step, you will be prompted to place your signature in the document. Simply click on the location where you want to place your signature using your mouse or touchpad. You can resize and reposition the signature as needed. Once you are satisfied with the placement, click on “Apply” to digitally sign the document. Congratulations! You have successfully signed a document using your digital id.
Configuring a digital id is a simple yet powerful way to ensure the security and integrity of your digital communications. Now, you can confidently send and receive signed documents knowing that they cannot be altered without detection. Take the time to explore the various tools and options available in Adobe Acrobat DC to further enhance your digital id and signature. And remember, with a digitally signed document, you can trust that the sender is authentic and the content is unaltered.
- Creating Self Signed Signatures in Adobe Acrobat Reader DC
- How to Create Self-Signed Digital ID
- How to Use the Digital Signature Once It Is Created
- Load courses and get educated wherever you are
- Start Learning Today
- Explore Business-related Topics
- Explore Topics Related to Creativity
- Explore topics related to technology
- Sources
Creating Self Signed Signatures in Adobe Acrobat Reader DC

Adobe Acrobat Reader DC is a software application that allows you to view, fill, and digitally sign PDF files. If you have Adobe Acrobat Reader DC installed on your Windows operating system, you can create self-signed signatures to use when applying for various business or creative purposes. This article will guide you through the process of creating a self-signed signature in Adobe Acrobat Reader DC.
To begin, launch Adobe Acrobat Reader DC on your computer. If you don’t have it installed, you can download it from Adobe’s official website.
Once you have Adobe Acrobat Reader DC up and running, follow the steps below to create your self-signed signature:
| Step | Action |
|---|---|
| 1 | Click on the “Tools” tab located at the top of the Adobe Acrobat Reader DC window. |
| 2 | In the Tools pane, expand the “Fill & Sign” section. |
| 3 | Click on “Sign” to open the Sign tool. |
| 4 | In the Sign tool, click on the “Add Signature” option. |
| 5 | Select “Create a New Signature” from the drop-down menu. |
| 6 | A dialog box will appear, where you can choose the type of signature you want to create. Select “Self-signed” and click on “Next”. |
| 7 | In the Self-signed Signature dialog box, enter the necessary information such as your name, address, country, state, and email address. Once you have filled in the required fields, click on “Create”. |
| 8 | Your self-signed signature is now created. You can use your mouse or a stylus to sign the signature field in the PDF file. |
| 9 | After applying the signature, you can save the document by clicking on “Save” in the top-right corner of the Adobe Acrobat Reader DC window. |
Now you have successfully created a self-signed signature in Adobe Acrobat Reader DC. You can use this signature to digitally sign PDF files, ensuring the authenticity and integrity of your documents.
It’s important to note that self-signed signatures are not as secure as digital signatures issued by trusted certificate authorities. Self-signed signatures are only valid to the user who created them and can be easily forged or tampered with by anyone who has access to the signer’s computer.
Before using self-signed signatures for professional or legal matters, it’s recommended to familiarize yourself with the laws and policies regarding digital signatures in your country or state. Also, consider taking courses or training on digital signature and document security to ensure you are well-informed in this area.
How to Create Self-Signed Digital ID
To create a self-signed digital ID, you can use Adobe Acrobat software. Follow the steps below to create a self-signed digital ID on a Windows operating system.
- Open Adobe Acrobat DC.
- Click on “Fill & Sign” in the right-hand pane.
- Select “Place Signature” from the toolbar at the top.
- Choose “Use A Digital ID” from the drop-down menu.
- Click on “More Tools” in the dialog box that appears.
- Select “Create a Self-Signed ID” from the options.
- Fill in the necessary information, such as your name, address, and country.
- Click on “Choose Image” to add a signature image if desired.
- Once all the information is filled in, click on “Save” to create the self-signed digital ID.
After creating the self-signed digital ID, you can use it to digitally sign documents in Adobe Acrobat. This self-signed digital ID can be applied to various documents to authenticate your identity.
It’s important to note that self-signed digital IDs are not trusted by default in many applications. They are suitable for personal use or within a closed network where the recipients trust the self-signed certificate. For more secure digital signatures, it is recommended to acquire a digital ID from a trusted third party.
How to Use the Digital Signature Once It Is Created
Once you have created your digital signature, you can start using it to sign files and documents. Here’s a step-by-step guide on how to use your digital signature:
|
|

Once the file is signed, others can verify the authenticity and integrity of the file by checking the digital signature. To verify the signature, the recipient needs to have a compatible software or digital ID reader.
If there are any changes made to the file after it has been signed, the digital signature will become invalid, and a warning message will be displayed to the user.
It is important to note that the use of digital signatures may be subject to local laws and regulations. Before using digital signatures for business or personal purposes, familiarize yourself with the laws and policies in your country or operating state.
Now that you know how to use your digital signature, start applying it to your files and enjoy the benefits of secure and authenticated digital communication.
Load courses and get educated wherever you are
Today, with the advancement of technology, it has become easier than ever to access educational resources and learn new skills. With just a few clicks, you can download courses and start your journey of self-improvement, no matter where you are located.
One of the trusted sources for online courses is Adobe. By creating an Adobe ID and installing Adobe Acrobat software on your Windows or Mac operating system, you can have access to a wide range of courses that cover various topics such as design, business, technology, and even creative endeavors like painting or cooking.
To begin, you will need to have Adobe Acrobat Reader installed on your computer. If you don’t have it yet, you can download it for free from the Adobe website. Once installed, open the software, and choose “File” from the menu on the top left corner of the screen. Then select “Open” and browse for the location where you have saved the digital course file.
After opening the course file, you can start exploring its contents. The courses usually contain interactive elements, videos, exercises, and quizzes to enhance your learning experience. You can fill in forms, click on interactive elements, or simply read through the course materials.
The Adobe Acrobat software also allows you to engage with the course content by applying digital signatures. Digital signatures are the electronic equivalent of a physical signature and can be used to sign documents, contracts, or even course completion certificates. To create a digital signature, go to the “Sign” tab and select “Create Signature”. There, you will have several options to choose from, such as creating a signature with your mouse or using an image file.
If you want to create a self-signed digital ID, go to the “Certificates” section and click on “Digital IDs”. Then choose “Create a self-signed digital ID” and follow the dialog prompts. Once created, your digital ID will be stored securely on your computer and can be used to sign documents without the need for a physical signature.
By having a digital ID, you can sign course completion certificates or any other documents related to your online education. It ensures the authenticity of your signature and provides a higher level of security.
So, don’t let your location be a barrier to your education. Take advantage of the digital world and start downloading courses to enhance your knowledge and skills. Explore new topics, broaden your horizons, and embrace lifelong learning.
Start Learning Today

Are you interested in learning how to configure digital IDs? Whether you are a business owner, designer, or simply curious about the topic, there are plenty of resources available to help you get started.
One of the first things you will need to do is choose the right software for your needs. Adobe Acrobat Reader is a popular choice for creating and applying digital signatures. It is compatible with both Windows and Mac operating systems. If you don’t already have Adobe Acrobat Reader installed, you can download it for free from the Adobe website.
Once you have Adobe Acrobat Reader installed, you can begin creating your own digital ID. In the Acrobat Reader app, go to the “Edit” menu and select “Preferences”. From there, choose “Signatures” and then “Identities & Trusted Certificates”. Click “More” under the “Digital IDs” section and then “File” to create a new digital ID.
In the “Create Self-Signed Digital ID” dialog box, you will need to fill in your personal information, such as your name, country, and email address. You can also choose the location where your digital ID file will be saved. Once you have filled in all the required information, click “OK” to create your digital ID.
Now that you have your digital ID created, you can start using it to digitally sign documents. When you open a document in Adobe Acrobat Reader, go to the “Tools” menu and select “Certificates”. From there, choose “Digitally Sign” and then select your digital ID from the list of available signatures.
With your digital ID selected, you can now apply your signature to the document. Use your mouse or trackpad to click and drag to create a signature field. Once you have created the signature field, click “Sign” to apply your digital signature. Your signed document is now ready to be saved and shared.
If you want to learn more about digital IDs and other topics related to digital technology and design, there are many online courses and resources available. Websites like Udemy and Coursera offer a variety of courses on topics ranging from digital design to business software tools. Take the time to explore these sources and find the courses that interest you.
Start your learning journey today and discover the exciting world of digital IDs and the endless possibilities they offer.
Explore Business-related Topics
If you want to configure your digital ID for business purposes, it’s crucial to familiarize yourself with key topics and concepts. By understanding these subjects, you can leverage the digital signing technology to streamline your operations and enhance your workflow. Here are some areas you should explore:
1. Digital Signatures: Learn about the significance of digital signatures and how they can provide authenticity and integrity to your electronic documents. Understand the process of creating and applying digital signatures using tools like Adobe Acrobat DC or Adobe Reader.
2. Self-Signed Certificates: Discover self-signed certificates and their use in digital identity verification. Gain insights into the advantages and limitations of self-signed certificates, and learn how to create them using different software.
3. Certificate Authorities: Explore the concept of Certificate Authorities (CAs) and their role in validating the identity of individuals or organizations. Understand how CAs issue digital certificates and ensure trust in the digital environment.
4. Digital ID Policies: Familiarize yourself with the policies and regulations related to digital IDs. Learn about the legal implications and compliance requirements associated with using digital signatures in different countries or regions.
5. Business Applications: Identify the various areas where digital IDs find extensive use in business settings. Recognize the benefits of using digital signatures for contracts, agreements, invoices, and other essential business documents.
6. Training and Courses: Consider enrolling in training programs or courses that provide in-depth knowledge of digital signature technologies. These resources can help you enhance your understanding of digital IDs and their effective implementation in your business.
By delving into these topics, you will gain a deeper understanding of how to configure and use your digital ID for business purposes. Stay updated with the latest trends and advancements in digital signature technologies to stay ahead in today’s digitalized world!
Explore Topics Related to Creativity
When it comes to creativity, there are a variety of topics that you can delve into and learn more about. Whether you are a designer, artist, or someone who simply appreciates the arts, familiarizing yourself with these subjects can enhance your understanding and appreciation of various forms of artistic expression.
One of the key topics related to creativity is digital signatures. Digital signatures have become increasingly popular in the digital age, allowing individuals to sign documents and authenticate their identity online. You can use tools such as Adobe Acrobat Reader DC to create and apply digital signatures. With this software, you can choose a self-signed digital ID or select one from a certificate that is issued by a trusted third-party.
Understanding the process of creating and applying digital signatures is essential for anyone who deals with online documentation or operates a business in this digital era. Once you have created your digital ID, you can digitally sign documents such as contracts, agreements, and invoices with ease. Digital signatures provide an added layer of security, as they are tamper-evident and can help protect the integrity of your documents.
In addition to digital signatures, another topic related to creativity is designing and creating using Adobe Creative Cloud tools. Adobe Creative Cloud offers a wide range of software, including Photoshop, Illustrator, InDesign, and Premiere Pro, among others. These tools are widely used by professionals in the fields of graphic design, web design, video editing, and more. Familiarizing yourself with Adobe Creative Cloud can open up new possibilities for your creative projects.
Furthermore, exploring different artistic styles and techniques can also enhance your creativity. Whether you are interested in traditional art forms like painting and sculpture, or contemporary mediums such as digital art and mixed media, expanding your knowledge in these areas can inspire you and help you develop your own unique artistic voice.
Finally, it is important to be aware of the legal and ethical considerations surrounding creativity. This includes topics such as intellectual property rights, copyright laws, and licensing agreements. Familiarize yourself with the laws and regulations of your country or state to ensure that you are abiding by them and protecting your own creative work.
By familiarizing yourself with these topics and continually learning and exploring new areas of creativity, you can expand your horizons, improve your skills, and find new sources of inspiration. Whether you are a professional artist, an aspiring creative, or simply someone who appreciates the arts, there is always something new to discover and learn.
Explore topics related to technology
When it comes to configuring a digital ID, it’s important to familiarize yourself with various topics related to technology. By understanding these concepts, you will be better equipped to create and apply digital signatures. Whether you are a business user, a creative designer, or someone interested in self-paced learning, there are tools and resources available for everyone.
One of the essential technologies you need to learn about is digital signatures. Digital signatures are created using software tools that apply a unique identifier to a document, verifying the authenticity and integrity of the content. By digitally signing a file, you can ensure that it hasn’t been tampered with since it was signed, providing a level of assurance in the digital world.
Adobe Acrobat Reader DC is an excellent software for creating digital signatures. Once you have your digital ID, select the “Sign” tool and choose “Place Signature.” You can then use your mouse or the touchpad to create your signature, and Acrobat will save it for future use.
Before creating a digital signature, it’s crucial to understand the policies surrounding them. Each country and operating system may have different rules and guidelines for digital signatures. So, it’s essential to familiarize yourself with the policy in your country or state.
By exploring topics related to technology and digital signatures, you will gain a better understanding of how to configure a digital ID. Start today by taking online courses or reading up on various sources. Familiarize yourself with the tools and techniques, and you will be on your way to becoming a digital signer!
Sources
When it comes to configuring a digital ID, there are several sources you can choose from. Here are a few options:
1. Adobe Acrobat Reader: If you have Adobe Acrobat Reader installed on your Windows operating system, then you already have the tools necessary to create a digital ID. Simply open the program and click on “Edit” in the menu bar. From there, select “Preferences” and go to the “Signatures” category. You can then choose to create a new digital ID or use an existing one.
2. Self-signed digital ID: If you don’t have Adobe Acrobat Reader or prefer not to use it, you can create a self-signed digital ID. This is a digital ID that you create yourself, without the need for a third-party certificate authority. To do this, you can use various software tools that are available online. Simply search for “self-signed digital ID” and select the software that suits your needs.
3. Digital ID from a trusted provider: If you want a digital ID that is recognized and trusted by others, you can obtain one from a trusted provider. There are several companies that offer digital IDs for personal and business use. Some well-known providers include Adobe, Entrust, and GlobalSign. These providers offer different types of digital IDs, so you can choose the one that best fits your needs.
Once you have chosen the source for your digital ID, you can then proceed with the configuration process. This may involve creating or uploading your digital ID, filling out the necessary information, and selecting the appropriate settings.
It is important to note that the process of configuring a digital ID may vary depending on the software or provider you choose. Therefore, it is recommended to familiarize yourself with the specific instructions provided by the source you have selected. You can do this by clicking on the “Help” or “Support” sections of the software or provider’s website, or by searching for tutorials or courses related to digital ID configuration.


