

Adding a watermark to your photos is a great way to protect your images and assert your ownership. Whether you are a professional photographer, graphic designer, or just a hobbyist, it is important to have a watermark for your digital assets. In this tutorial, we will show you how to create and add a watermark to your pictures using popular software such as Adobe Photoshop or CorelDRAW. Follow these easy steps to give your images a professional touch!
To start, you need to prepare your logo or watermark image. This can be a simple text or a graphic logo that represents your brand or identity. It is important to choose a watermark that is easy to read and does not distract from the main image. You can create your watermark in software such as Adobe Photoshop, CorelDRAW, or even PowerPoint. Just make sure that it is saved as a transparent image with a .png or .gif extension.
Now, open your desired photo editing software, such as Adobe Photoshop, and open the photo you want to add a watermark to. Drag and drop your watermark image onto the photo. It will appear as a new layer on top of your photo. This allows you to easily adjust the position, size, and transparency of your watermark.
In Photoshop, you can use the Move Tool (shortcut: V) to position your watermark where you want it on the photo. You can also use the Free Transform option (shortcut: Ctrl+T) to resize and rotate the watermark. To adjust the transparency of the watermark, simply lower the opacity of the layer. You can do this by clicking on the Opacity slider in the Layers panel and dragging it to the desired level.
Adding a watermark in CorelDRAW is just as simple. After opening your photo in CorelDRAW, import your watermark image by going to File -> Import. Once imported, you can also use the Pick Tool (shortcut: P) to position and resize the watermark. To adjust the transparency, click on the Adjustments menu, then choose Brightness/Contrast. From here, you can lower the transparency of the watermark by adjusting the Brightness slider or the Alpha channel.
By following these steps, you can easily create and add watermarks to your photos. Remember, a watermark is not only a protection for your work, but also a way to showcase your brand and add a professional touch to your images. So take your time to choose the right watermark and experiment with different placements and effects. Soon, others will recognize your work just by seeing your watermark!
How to Create a Watermark in PowerPoint
Adding a watermark to your PowerPoint presentation can be a great way to protect your work and add a professional touch to your slides. With PowerPoint’s suite of graphics and adjustment tools, creating a watermark is as easy as can be.
If you’re looking to create a watermark in PowerPoint, follow these simple steps:
| 1. | Prepare the image or logo you want to use as a watermark. This could be a company logo, a design element, or even a photo. Make sure the image is in a format that PowerPoint can handle, such as .jpg or .png. |
| 2. | Open your PowerPoint presentation and go to the slide where you want to add the watermark. |
| 3. | Click on the “Insert” tab in the PowerPoint ribbon and select “Picture”. Browse for the image you want to use as the watermark and click “Insert”. The image will be inserted into your slide. |
| 4. | Click on the image to select it. You will see a set of options appear in the PowerPoint ribbon. |
| 5. | Click on the “Format” tab in the PowerPoint ribbon. From here, you can make adjustments to the image to create the desired watermark effect. |
| 6. | If you want to make the watermark more subtle, you can adjust the transparency of the image. Click on the “Transparency” option and slide the bar to the desired level. |
| 7. | If you want the watermark to appear only on certain slides, you can add it to the slide master. Go to the “View” tab in the PowerPoint ribbon and click on “Slide Master”. This will bring up the slide master view, where you can make changes that will apply to all slides. |
| 8. | In the slide master view, click on the slide master thumbnail at the top of the left-hand pane. This will apply any changes you make to all slides in the presentation. |
| 9. | Drag the image of the watermark from the slide to the desired location in the slide master. You can adjust the size and position of the watermark as needed. |
| 10. | Exit the slide master view by clicking on the “Close Master View” button in the PowerPoint ribbon. |
| 11. | If you want to add the watermark to specific slides instead of all slides, go to each individual slide and repeat steps 3-5. |
| 12. | Save your PowerPoint presentation with the watermark applied. |
Now you know how to create a watermark in PowerPoint. Whether you’re working on a business presentation, a photo slideshow, or any other type of publication, adding watermarks can enhance the professionalism and protect the integrity of your work.
Add a Picture to the Publication as a Watermark
If you want to add a picture to your publication as a watermark, there are several programs you can use to achieve this effect. In this guide, we will focus on using CorelDRAW, PowerPoint, and Photoshop to create and add watermarks to your photos or designs.
1. CorelDRAW
CorelDRAW is a powerful graphic design suite that offers a variety of tools for creating and editing images. To add a picture as a watermark in CorelDRAW:
- Open the image you want to add a watermark to in CorelDRAW.
- Click on the “Bitmaps” tab and select “Add Watermark” from the dropdown menu.
- Drag the watermark image onto the main canvas and place it over your desired area.
- Adjust the size, position, and transparency of the watermark using the transformation handles.
- Click on the “Effects” tab and select the “PowerClip” option.
- Drag the main image into the PowerClip container that appears around the watermark.
- Click on the “Layers” tab to access the layers panel.
- Right-click on the watermark layer and select “Convert to Editable Objects” to enable further adjustments if needed.
2. PowerPoint
PowerPoint is an easy-to-use presentation software that also allows you to add watermarks to your images or slides:
- Insert the image you want to use as a watermark onto the slide.
- Right-click on the image and select “Format Picture” from the context menu.
- In the “Picture Format” tab, click on the “Artistic Effects” button.
- Choose the desired effect for your watermark, such as “Pencil Sketch” or “Watercolor Brush”.
- Adjust the parameters of the selected effect, such as the intensity or color.
- Click on the “Picture Tools” tab and select “Send to Back” to place the watermark behind the main image.
- Resize and reposition the watermark as needed.
3. Photoshop
Photoshop is a popular photo editing software that offers extensive tools for creating and customizing watermarks:
- Open the image you want to add a watermark to in Photoshop.
- Create a new layer by clicking on the “Layer” menu and selecting “New” -> “Layer”.
- Place your watermark image onto the new layer by dragging and dropping it.
- Adjust the size, position, and opacity of the watermark using the transform and opacity tools.
- To change the color of the watermark, select the layer with your watermark image and click on the “Image” menu. Then, choose “Adjustments” -> “Hue/Saturation” and adjust the color values.
- Once you are satisfied with the watermark, save the image and use it in your publication.
Adding a picture as a watermark is an easy and effective way to protect your images or designs. It ensures that others do not use your work without permission, while still allowing them to view and appreciate it. Whether you are using CorelDRAW, PowerPoint, or Photoshop, these steps will help you create and add a watermark to your publication.
Adding a Logo Watermark
If you want to add a professional touch to your photography or graphic design creations, adding a logo watermark is a great option. A watermark can protect your images from being used without permission and also enhance your brand recognition.
There are several ways to add a logo watermark, depending on the software you are using. Here, we will explore two popular graphic design suites: Adobe Photoshop and CorelDRAW.
Using Adobe Photoshop
- Open your desired image in Adobe Photoshop.
- Create a new layer by clicking on the “New Layer” button at the bottom of the Layers panel.
- Import your logo into the new layer by dragging and dropping the image into the Photoshop workspace.
- Resize and position the logo to your desired location on the image.
- Adjust the opacity of the logo layer to achieve the desired transparency effect. You can do this by modifying the opacity value in the Layers panel.
- If needed, you can make additional adjustments to the logo layer, such as changing the color or applying special effects.
- Save your image with the logo watermark as a separate file to preserve the original image without the watermark.
Using CorelDRAW

- Open the image you want to add a logo watermark to in CorelDRAW.
- Prepare your logo by importing it into a separate CorelDRAW file or creating it within the software.
- Copy the logo from the source file and paste it into the image file as a new layer.
- Position and resize the logo layer as desired.
- Adjust the color, transparency, and other graphic properties of the logo layer using the tools provided in CorelDRAW.
- Save the image with the logo watermark as a separate file to keep the original image untouched.
Both Adobe Photoshop and CorelDRAW offer additional features and options for creating watermarks, such as adding text overlays or using predefined watermark templates. Explore these tools to create unique watermarks that suit your design style and publication needs.
Remember, a well-designed logo watermark will not only protect your images but also add a professional touch to your photography or graphic design work. Take your time to experiment with different designs and placements to find the watermark that best represents your brand.
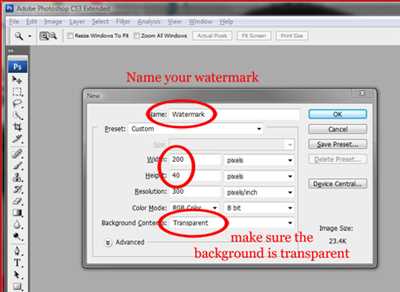
1 Prepare Your Image
To add a watermark to your images in Photoshop, CorelDRAW, or PowerPoint, you first need to prepare your image. This step is crucial as it sets the foundation for creating a professional-looking watermark.
Click to open your preferred image-editing software. If you don’t have one already, you can choose from a suite of options like Adobe Photoshop, CorelDRAW, or even PowerPoint.
Open the image you want to add a watermark to. If you have multiple images, make sure to choose the one you want to work with.
Prepare the image by making any necessary adjustments, such as changing the colour, adding effects, or adjusting the light. You can also invert or layer the image according to your design preferences.
Create a new layer by clicking on the “Layers” option. This will allow you to add your watermark without affecting the original image.
Drag and drop your watermark logo into the image. You can adjust the size and position of the logo as needed.
Arrange the layers so that your watermark is on top of the image. If you have multiple layers, make sure the watermark layer is placed above the image layers.
Save the image with the watermark as a new file. This ensures that you always have a copy of the original image without the watermark.
That’s it! You’ve successfully prepared your image for adding a watermark. Now you can move on to the next step of adding the watermark itself, which will be covered in the next section.
Note: The process of preparing your image may vary depending on the software you are using. The steps mentioned above are applicable to popular image editing software like Photoshop, CorelDRAW, and PowerPoint. Make sure to consult the software’s official documentation for more specific instructions.
2 Add It to the Photo
Once you have prepared your watermark design, you can now add it to your photo. There are several ways to do this, depending on the software or tools you are using. Here are some common methods:
| Software/Tool | Steps |
|---|---|
| Adobe Photoshop |
|
| CorelDRAW |
|
| Microsoft PowerPoint |
|
These are just a few examples of how you can add a watermark to your photo. The specific steps may vary depending on the software or tools you are using. However, the general process involves creating a new layer or adding a shape to your photo and then adjusting its size, position, and transparency to create the desired watermark effect.
Remember to save your photo with the added watermark as a separate file to preserve the original image without any modifications. This way, you can use the watermarked version for online publication or sharing while keeping the original photo intact.
CorelDRAW Graphics Suite does more than just watermarks to images
CorelDRAW Graphics Suite is a powerful software that offers a wide range of tools and features for graphic design and image manipulation. While it is commonly known for its capabilities in creating watermarks, it can do so much more than just that.
With CorelDRAW Graphics Suite, you can not only add watermarks to your images, but also create stunning logos, graphics, and designs for your publication needs. Whether you’re working with photos, illustrations, or even PowerPoint presentations, this suite has the power and versatility to handle any task.
When it comes to adding watermarks, CorelDRAW Graphics Suite makes it incredibly easy. You can simply drag and drop your picture into the program, click on the Watermark tool, and choose from various options to customize the watermark to your liking. You can adjust its size, position, and transparency, as well as change its color and effect to create the perfect watermark for your image.
What’s more, CorelDRAW Graphics Suite allows you to work with layers, which gives you the flexibility to add multiple watermarks or other graphics to your images. You can create separate layers for your logos or text, and easily manage them with the layer panel. This way, you can easily edit or remove specific elements without affecting the rest of your design.
In addition to creating watermarks, CorelDRAW Graphics Suite also provides a range of other tools and effects to enhance your images. You can use the suite’s extensive collection of filters and adjustment options to apply various effects, such as light and color adjustments, to your photos. This allows you to create professional-looking images without the need for expensive photo-editing software like Photoshop.
Overall, CorelDRAW Graphics Suite offers a comprehensive solution for all your graphic design needs. Whether you’re looking to add a watermark to your photo or create a stunning logo for your publication, this suite has the tools and features to help you achieve your goals. Give it a try and see how it can take your designs to the next level.
Sources
There are several sources you can use to create watermarks for your images:
1. Adobe Photoshop: This powerful graphics suite allows you to add watermarks to your photos with just a few clicks. You can adjust the size, position, and opacity of the watermark, as well as add effects and layers.
2. CorelDRAW: This design software also offers easy-to-use tools for adding watermarks to your pictures. You can choose from a variety of pre-designed watermarks or create your own custom watermark using text, graphics, or a combination of both.
3. Light Image Resizer: This photo adjustment software not only allows you to resize images, but also to add watermarks. You can choose from a range of watermark options, including text, logo, or a combination of both, and adjust the color, size, and opacity to suit your needs.
4. PowerPoint: While primarily a presentation software, PowerPoint can also be used to add watermarks to your images. Simply insert your picture into a slide, customize it as desired, and save it as an image file with the watermark.
These sources will provide you with the tools and features you need to create professional-looking watermarks for your images. Whether you want a simple text watermark or a more complex logo watermark, these software suites will help you master the art of watermarking.


