

Are you a fan of dollhouse miniatures or just looking for a fun DIY project? Making miniature books is a great way to add a unique touch to your dollhouse or create adorable decorations for various crafts. Plus, it’s a great way to showcase your creativity! In this tutorial, we will show you how to make your own mini books using simple materials and easy-to-follow instructions.
To start, you will need some basic materials such as thick paper or cardstock, scissors, glue, and a needle with thread. You can also use templates and free PSD files, which you can find from different sources online, to make your mini books even more realistic. Keep in mind that these mini books will be very small, so you will need a steady hand!
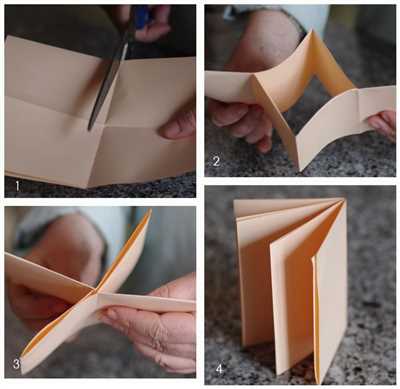
First, cut out the templates for your mini books. You can choose from a variety of styles, such as hardcover or paperback. If using thick paper, make sure to score along the fold lines to create a clean-looking spine. Next, glue the cover and spine together using a strong adhesive, such as craft glue or Mod Podge.
After gluing, you can paint the cover of your mini book to give it a more realistic look. Use acrylic or watercolor paints to create your desired design, whether it’s a plain brown cover or an intricate pattern. Once the paint is dry, you can add any additional details, such as titles or author names, using a fine-tip brush or a marker.
Then, carefully fold the thick paper in half and use a needle and thread to bind the pages together. Start from the center and work your way outward, making sure to secure the thread tightly. This will ensure that your mini book stays intact and the pages don’t come loose. You can also use a thin strip of fabric or ribbon to create a bookmark.
Voila! Your mini book is complete! Now you can create as many mini books as you like, using different materials and designs. Whether you want to create a mini library for your dollhouse or simply add a touch of charm to your arts and crafts projects, making miniature books is a fun and rewarding hobby. We hope you enjoy creating your own mini books and watching your dollhouse or crafts come to life!
MINIBOKS How to create them

Miniature books, or minibooks, are a charming addition to any dollhouse or miniature collection. They can also be used as unique decorations or gifts. In this tutorial, we will guide you through the process of making your own mini-books without the need for expensive materials or binding techniques.
First, gather your materials. You will need some thick paper or cardstock for the pages of your minibooks. You can use regular printer paper, or for a more authentic look, use old book pages. Additionally, you’ll need a glue stick or Mod Podge to adhere the pages together, and a needle and thread for the binding.
Next, choose a template for your mini-books. You can find free printable templates online, or you can create your own using design software like Photoshop or Illustrator. Make sure that the template is the right size for your intended mini-book.
Once you have your template, print it out and cut along the dotted lines to create the individual pages of your mini-book. Then, using a glue stick or Mod Podge, apply a thin layer of adhesive to one side of each page and stack them together, pressing firmly to ensure they stick together. Repeat this process until all the pages are glued together.
After you have glued all the pages together, it’s time to create the cover of your mini-book. Cut a piece of cardstock or thick paper to the size of your mini-book and fold it in half. This will be the spine of your book. Glue the spine to the glued edge of the pages, making sure it is aligned properly. Press firmly to secure the spine to the pages.
Once the glue has dried, your mini-book is almost complete. You can leave it as is, or you can add some decorative touches. You can paint the cover with acrylic paint, add stickers or embellishments, or even create your own book title using cut-out letters. Get creative and have fun!
If you want to make a hardcover mini-book, you can follow similar steps, but instead of gluing the pages together, you will need to sew them together using a needle and thread. This will create a more durable and professional-looking binding.
Now that you know how to make your own mini-books, the possibilities are endless. You can create a whole library of mini-books for your dollhouse or use them as adorable decorations. Plus, mini-books also make great gifts for book lovers or dollhouse enthusiasts.
We hope this mini-book tutorial has inspired you to start making your own. Give it a try and let your thoughts get lost in the world of miniatures!
Mini Book Making Tutorial – DIY Mini Hardcover Book with Binding
If you love miniatures and are looking for a fun DIY project, making your own mini books is a great choice. In this tutorial, we will guide you through the process of creating a mini hardcover book with binding. These adorable books can be used as dollhouse accessories, for crafting, or as unique home decor.
Materials You Will Need:
- Thick cardboard or chipboard for the cover
- Plain paper or cardstock for the pages
- Scissors
- Needle and thread
- Paint or markers
- Mod Podge or white glue
- Templates (free PSD files can be found online)
Instructions:
- Start by printing out the templates for the cover and pages. You can find free templates online or create your own.
- Cut out the cover template on the cardboard or chipboard. This will be the front and back cover of your mini book.
- Using the needle and thread, sew the pages onto the cover along the spine. Make sure to secure the thread tightly so that the pages stay in place.
- Once the binding is done, trim any excess thread and glue down the loose ends with Mod Podge or white glue.
- Paint or decorate the cover of your mini book with your desired design. You can use markers, paint, or even add miniature embellishments.
- Allow the book to dry completely before using or displaying it.
Tips and Thoughts:
- When gluing the pages to the cover, apply the glue or Mod Podge evenly to avoid any wrinkling or warping.
- If you want to create a more authentic look, consider distressing the edges of the pages with brown paint or ink.
- For a more professional finish, you can add a thin strip of paper or fabric to cover the spine of the book.
- Mini books can be made in various sizes, so feel free to experiment and create your own unique designs.
- Consider using different colored or patterned paper for the pages to add visual interest.
- If you’re making mini books for a dollhouse, keep in mind the scale and size of the dolls when determining the dimensions of your books.
Now that you know how to make your own mini books with binding, it’s time to get creative and start crafting! Have fun and enjoy the satisfaction of creating miniature masterpieces.
Source: Maria’s Minis
Maria’s Minis
If you’re looking to make your own miniature books, Maria’s Minis has all the instructions and materials you need. Maria’s Minis offers free templates for creating mini-books and provides step-by-step tutorials on how to make them using materials such as cardboard, needles, thread, and glue.
One of the key techniques Maria’s Minis teaches is needle binding, which involves using a needle and thread to create a sturdy spine for your mini-books. This ensures that your books will be durable and able to withstand the test of time.
When it comes to the covers of your mini-books, Maria’s Minis suggests using a hardcover material, such as cardboard or thick cardstock. This will give your mini-books a professional and realistic look. Maria’s Minis also provides brown paint and Mod Podge for those who want to add their own personal touch to the covers.
One of the best things about Maria’s Minis is the variety of mini-book templates available. Whether you’re making mini-books for a dollhouse or simply for display, Maria’s Minis has templates to suit every style and theme.
In addition to the templates and instructions, Maria’s Minis offers a collection of pre-made mini-books for those who might want to skip the DIY process. These mini-books are expertly crafted and ready to be used in your miniature scenes or dollhouse.
So, if you’re ready to start making your own mini-books, head over to Maria’s Minis and get started on this fun and creative project. With their helpful instructions and free templates, you’ll be well on your way to creating beautiful mini-books of your own!
We hope Maria’s Minis can inspire you to create and share your own thoughts and stories through the art of miniature books.
4 thoughts on “Instructions for Free Miniature Books for Dollhouse Use Plus PSD Templates for making your own”
1. Getting Started
To make your own miniature books, you’ll need a few basic materials. First, grab some thick paper or cardstock for the pages of your books. You can use brown craft paper for a vintage look or opt for colorful scrapbook paper for a more modern feel. Next, gather some bookbinding materials such as glue or Mod Podge, a needle and thread, and a small paintbrush for applying adhesive.
2. Creating the Spine
Take your mini-book pages and fold them in half to create the spine. Use a bone folder or the back of a spoon to create a crisp fold. Then, apply a thin layer of glue or Mod Podge to the spine and let it dry completely.
3. Making the Hardcover
Once the spine is dry, you can create the hardcover of your mini book. Cut out two pieces of cardstock slightly larger than your folded pages. These will be the front and back covers. Apply glue or Mod Podge to the spine and carefully attach the covers, pressing down firmly to ensure they adhere well.
4. Adding the Details
Now that the basic structure of your mini book is complete, it’s time to add some details. Use the free PSD templates provided by Maria’s Miniature Books to print out miniature book covers in various styles. Cut out the covers and glue them to the front and back of your mini books.
Once you’ve attached the covers, you can use a small paintbrush to apply Mod Podge over the entire book, creating a protective layer and giving it a glossy finish. Let it dry completely before handling.
4 Thoughts on Making Miniature Books
1. Keep Them Small
When making miniature books for a dollhouse, it’s important to keep them small and proportional to the dollhouse scale. Aim for dimensions that will fit comfortably in the hands of your dollhouse dolls.
2. Think Outside the Box
While the PSD templates provided can help you create traditional-looking mini books, don’t be afraid to get creative. Experiment with different covers, colors, and textures. You can even add your own designs or illustrations to make each mini book unique.
3. Use Needle and Thread Binding
If you want to achieve a more authentic look, consider using a needle and thread to bind your mini books. This will create visible stitching along the spine and give the books a realistic touch.
4. Minis Without the Hardcovers
If you’re looking for an even quicker and easier way to make mini books, you can also create booklets without the hardcovers. Simply fold your pages in half and use a stapler to secure them in the center. This method works well for creating stacks of mini books for display purposes.
We hope these instructions and tips have inspired you to start making your own miniature books for your dollhouse. Whether you choose to use the free PSD templates or create your own designs, the possibilities are endless. Get creative, have fun, and enjoy adding these charming little books to your dollhouse!
Sources
If you’re looking for some inspiration or materials to create your own miniature books, here are a few sources that might help:
| 1. | Dollhouse Miniature Books by Maria’s Minis | – Maria’s Minis offers a variety of miniature books, including templates and tutorials for creating your own. They have a wide range of options, from blank books to books with printed covers. |
| 2. | DIY Miniature Book Tutorial | – This tutorial by MiniBoks provides step-by-step instructions on how to make your own miniature books. It includes information on materials needed, such as needle and thread for binding, brown paint for the spine, and thick paper for the pages. |
| 3. | Free Miniature Book Templates | – If you’re looking for templates to use for your mini books, there are several websites that offer free downloadable templates. One such website is PSD Graphics, which has a wide selection of templates in various sizes and styles. |
| 4. | Getting Creative with Mini Books | – This article on How to Make Minis provides tips and techniques for making your own miniature books. It covers topics such as gluing the pages together, creating a hardcover, and adding finishing touches like paint or Mod Podge. |
With these sources, you’ll have everything you need to start making your own mini books. Whether you’re a dollhouse enthusiast or just looking for a fun craft project, mini books are a great way to get creative and bring your thoughts to life in a small but meaningful way.


