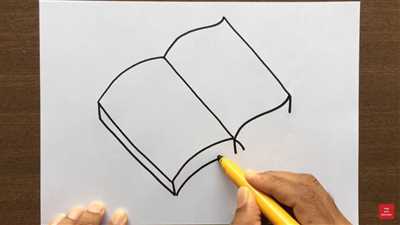
One of the most attractive and beautiful forms of art is book drawing. It not only creates a visually appealing illusion but also brings the pages to life with its colorful details and decorative elements. In this tutorial, we will guide you through the steps of making a book drawing that will leave everyone in awe.
Step 1: Start by drawing a rectangle for the cover of the book. Make it slightly taller than wide to give it a more inclined look. This will be the front of the book.
Step 2: Add two vertical lines parallel to the sides of the rectangle, creating an illusion of thickness. These lines will form the spine of the book.
Step 3: On the top part of the spine, draw two curved lines that meet at the center of the cover. This creates an arch-like shape and adds a touch of elegance to the drawing.
Step 4: Now, draw an open rectangle inside the cover to show the pages and the content of the book. You can add more details by drawing small lines to indicate the book’s pages.
Step 5: To make the drawing more realistic, add shading and highlighting to give depth and dimension to the book. Start by adding shadow to the lower part of the cover and the pages, and then use a faint pencil to add some subtle shading to the rest of the drawing.
Step 6: To make the book drawing even more appealing, you can add decorative elements such as a pen or a bookmark on top of the pages. This will add a touch of detail and make the drawing more interesting.
By following these steps, you can easily create a beautiful and captivating book drawing. Whether you’re making it for yourself or your childrens, this tutorial is a great way to unleash your creativity and make stunning artwork. So grab your pencils and get ready to bring your favorite books to life!
- How to Draw a Book – An Easy Tutorial for an Open Book
- Drawing an opened book
- Starting with a vertical line
- Adding two more lines
- Drawing the basic shape of the book
- Add thickness to the book
- Detailing the outline
- Drawing the cover
- Shading the cover
- Even more shading
- Final touches
- How to Draw a Book in 6 Simple Steps
- Step 1: Draw the Outline of the Book
- Step 2: Draw Lines on the Lower Side to Form a Cuboid
- Step 3: Add Small Curved Lines on the Side Edges
- Step 4: Create the Spine
- Step 5: Add Small Details
- Step 6 Shade Your Drawing Using a Pen
- Frequently Asked Questions on How to Draw an Open Book
- How to draw an open book
- What are the benefits of learning how to draw an open book
- 6 Guide to draw two books
- Video:
- DIY Sketchbook (Easy) //🌸blah_rie🌸
How to Draw a Book – An Easy Tutorial for an Open Book
Drawing books can be a fun and creative way to express your artistic skills. Whether you are a beginner or an experienced artist, learning how to draw a book can help improve your knowledge of perspective, shading, and adding detail to your drawings. In this step-by-step guide, we will show you how to draw an open book with an easy tutorial.
-
Start by drawing a vertical rectangle for the basic shape of the book. This will be the main outline of the book.
-
Next, draw two straight lines from the bottom of the vertical rectangle to create the spine of the book. This will give the book a more realistic look.
-
Now, add some details to the book by drawing a faint line across the center of the book. This will represent the pages of the book.
-
To make the book look more open, draw two arches at the top and bottom of the vertical rectangle. These arches will represent the open pages of the book.
-
Next, draw another straight line parallel to the spine of the book to represent the bottom edge of the pages.
-
Now, you can add some decorative elements to the book by drawing small lines or curves along the spine and the edges of the pages.
-
To give the book more depth, you can add shading to the cover and the pages. Use a pencil or a pen to add some shadow on one side of the book and the bottom of the pages.
-
Finally, you can add a title or some content on the front cover of the book. You can also use colors to make your drawing more colorful and lifelike.
-
Remember to use light, faint lines when making the initial sketches and then go over them with darker, more defined lines once you are satisfied with the overall shape and details.
By following these step-by-step instructions, you can easily draw an open book. Feel free to experiment with different shapes, sizes, and details to create unique book drawings. So grab your pencil or pen, and start drawing!
Drawing an opened book
Drawing an opened book can be a fun and creative way to express your artistic skills. It allows you to showcase the details and content that books hold and represents the knowledge and wisdom they contain. Follow these step-by-step instructions to create a beautiful drawing of an opened book.
- Start by drawing a vertical rectangle. This will be the shape of the book.
- Add two curved lines on the bottom of the rectangle to create the spine of the book.
- Draw two more rectangles on top of the original one, slightly taller and narrower. These will represent the pages of the book.
- To give the book a more three-dimensional shape, add detail lines along the edges of the pages to indicate thickness.
- Next, add arches on the top and bottom of the pages to show that the book is open.
- On the left side of the book, draw another vertical rectangle. This will be the shadow of the book.
- Add shading to the shadow and the inside of the book to create a more realistic look.
- Using darker colors, add shading and shadow on the pages and spine of the book.
- Add the title or any text you like on the front cover of the book.
- To make the drawing more interesting, you can also add some details like a pen or other elements that are frequently associated with books.
- Finally, add some final touches, such as shading and detailing, to give the drawing more depth and realism.
Drawing an opened book may seem complicated at first, but following these step-by-step instructions will make it easy and enjoyable. It’s a great way to show your love for books and the benefits of knowledge they bring into our lives. So grab your pencil or pen, and start creating your own beautiful book drawing!
Starting with a vertical line

The vertical line serves as the spine of the book, forming the foundation for the rest of the drawing. It could be a faint pencil line or a darker one depending on your preference. This line will serve as a guide to ensure that your book drawing is well-proportioned.
Next, you can add more details to the book by drawing a rectangle on top of the vertical line. This rectangle represents the front cover of the book. You can also add a curved line at the bottom to show the illusion of an open book. These touches will make your drawing more realistic.
Now, you can start adding the pages of the book. To do this, draw a series of vertical lines within the rectangle. These lines represent the individual pages of the book. You can choose to add as many pages as you like, but a typical book drawing may have around 6 to 8 pages.
After adding the pages, you can move on to the next step, which is drawing the back cover of the book. This can be done by drawing another rectangle on the opposite side of the vertical line. Make sure to align it with the front cover to maintain symmetry. You can also add decorative elements such as arches or colorful designs to make the book cover more appealing.
In order to give the book drawing a three-dimensional look, you can add shading and shadows. Start by shading the edges and lower part of the book, using darker pencil strokes to create the illusion of depth. Pay attention to the light source and shade accordingly. This will make your book drawing look more realistic and detailed.
Finally, you can add more details such as the title, author’s name, and any other content on the book cover. You can also make the pages look more realistic by adding faint lines to represent text or illustrations.
The benefits of learning how to make book drawings are numerous. It allows you to express your creativity, improve your drawing skills, and create beautiful illustrations. Book drawings are also a great way to engage children in learning and spark their imagination.
By following these step-by-step instructions, you can easily create your own book drawing. Remember to start with a vertical line and build from there, adding shapes, details, shading, and decorative elements to make your drawing come to life.
| Step 1: Start with a vertical line | Step 2: Add a rectangle for the front cover |
| Step 3: Add vertical lines for the pages | Step 4: Draw the back cover |
| Step 5: Add shading and shadow | Step 6: Add details and content |
Adding two more lines
In this step-by-step tutorial, we will learn how to add two more lines to our book drawing, which will make it look even more realistic and attractive.
To start, take a pencil and draw a vertical line on the left side of the book. This line will serve as the spine of the book. Next, draw another vertical line on the right side of the book, slightly inclined towards the lower part. These lines will give the illusion of depth and perspective to the book.
Now, let’s add some decorative touches to the book. On the cover, draw two lines on each side, starting from the top and ending at the spine. These lines create an open book effect. You can also add a faint shadow on the edges of the covers, using a slightly darker pencil or pen.
Next, we will add some detailing and life to the book. Draw a line on the left side of the open book, from the top to the bottom. This line represents the content inside the book. You can also add more details such as a title or colorful shapes on the cover.
After adding these lines and details, your book drawing should look more realistic and three-dimensional. The shading, perspective, and thickness of the lines create the illusion of a beautiful and attractive book.
In conclusion, adding two more lines to your book drawing not only gives it a touch of realism but also makes it more visually appealing. These simple steps can be followed by anyone, including children, learning to draw. So grab your pencil and paper, and start making your own colorful and eye-catching book covers!
Drawing the basic shape of the book
When it comes to drawing a book, getting the basic shape right is essential. For this tutorial, we will be drawing a simple rectangular book, but keep in mind that books come in various shapes and sizes.
To start, draw a rectangle that is slightly inclined to the right. This slight inclination gives the book a more dynamic look. You can use a ruler or freehand to draw this shape.
Next, add two curved lines on the top and bottom of the rectangle to create the illusion of pages. These lines should be darker and slightly thicker than the outline of the book.
On the left side of the book, draw another rectangle to represent the open pages. This rectangle should be thinner than the first one and should touch the edge of the book.
To give the book more details, add a vertical line in the middle of the cover. This line represents the spine of the book.
Now, let’s add some elements to make the book look more realistic. Draw arches on the top and bottom of the cover to represent the guide lines where the cover will bend.
Next, draw two straight lines on the cover, starting from the top and bottom of the spine. These lines will show the thickness of the cover.
For the finishing touches, add some shading to the cover and pages of the book. Use a darker shade to create the illusion of depth and a lighter shade to show the highlights.
You can also add a title to the book by writing some text on the cover or spine. This will add more detail and make your drawing more attractive.
Remember, the key to making a beautiful book drawing is to pay attention to the details and use colors that complement each other. Following these simple steps will help you create realistic book drawings in no time.
Add thickness to the book
Adding thickness to a book drawing is an important step in creating a realistic and attractive three-dimensional illusion. By giving the covers depth, you can make your book drawing look more lifelike and engaging. Follow these step-by-step instructions to add thickness to your book:
| Step 1: Start by drawing the basic shape of the book, which is a rectangle. You can either draw a straight line for the bottom edge and add two vertical lines for the side edges, or you can create a slightly curved line for a more artistic touch. Step 2: Add a faint outline of the cover’s thickness. Draw two parallel lines slightly inside the edges of the book. These lines will represent the thickness of the covers. Step 3: Draw the top and bottom edges of the book. These lines should continue from the side edges at a slight angle, creating a three-dimensional effect. Step 4: Add detail to the covers by drawing decorative shapes or lines that show the content of the book. You can also add a title or the author’s name. Step 5: Use shading to create shadows and give the book a more realistic appearance. Add darker tones on the sides where the covers meet the pages, creating the illusion of depth. Step 6: Finally, add colors to make the book drawing more vibrant and attractive. You can use colored pencils or pens to add a human touch to the drawing. By following these steps, you can add thickness to your book drawing and make it stand out. Don’t be afraid to ask questions or experiment with different techniques along the way. This step-by-step guide is a great starting point for learning how to make book drawings that are visually appealing. |
Detailing the outline
When it comes to book drawing, adding details to the outline is what makes it come to life. In this tutorial, we will go through the step-by-step process of detailing the outline of a book drawing. Follow these 5 easy steps to create a more realistic and three-dimensional look for your book.
Step 1: Start by drawing the basic shape of the book. Draw two vertical lines that are slightly inclined towards each other to form the spine of the book. Then, add two more lines to create the edges of the covers. Make sure the lines are parallel and equal in length.
Step 2: Add a little touch to the cover by drawing a line in the middle. This line represents the spine of the book. Make it slightly curved to give it a more realistic look.
Step 3: Now, add the title of the book on the cover. You can use a pen or pencil to do this. Make sure to leave some space at the top for the author’s name or any other details you want to include.
Step 4: To make the book look more vibrant and colorful, you can add some elements to the cover. This can be anything from a small illustration or a decorative pattern. Use your imagination and creativity to make it stand out.
Step 5: Lastly, add shading to the book to give it depth and dimension. Use a darker shade of the color you used for the cover and lightly shade the edges and corners of the book. This will create the illusion of light and shadow, making the drawing more realistic.
Following these steps will help you create a beautiful and detailed book drawing. Don’t be afraid to experiment with different colors, styles, and textures. The more you practice, the better you will become at book drawing. So, open up your sketchbook and start illustrating those captivating book covers.
Drawing the cover
When it comes to drawing the cover of a book, there are several steps you can follow to create a three-dimensional illusion. These steps will give your drawing a more realistic and eye-catching look.
Step 1: Start by drawing a basic shape for the book. You can make it look like a cuboid or a small square with curved edges. This will be the basic form of your book.
Step 2: Add the details of the book cover such as the title, decorative elements, and any other content you want to include. Use different colors to make it more colorful and attractive, especially if it’s a children’s book.
Step 3: Draw the spine of the book on the left side of the cover. Make it slightly inclined to create a realistic look.
Step 4: Add shading and detailing to your drawing to give it depth and texture. Use darker colors to create shadows and lighter colors to highlight the edges of the book.
Step 5: To make the book look more realistic, add a touch of thickness to the cover by adding a shadow along the lower edge of the book. This will help to create the illusion of an opened book.
Step 6: Finally, add some decorative touches to the front cover such as colorful shapes or small illustrations that represent the content of the book. This will make your drawing more engaging and appealing.
By following these step-by-step instructions, you can create a book cover that looks realistic and visually appealing. Don’t forget to practice and experiment with different techniques and elements to make your drawing unique and personal.
If you have any questions or want to learn more about drawing and creating art, Osmo provides educational resources and tools for children’s learning. These tools can help you enhance your artistic skills and knowledge.
Shading the cover
Shading the cover of a book drawing is an important step in creating a realistic and attractive image. By adding shading, you can give the cover depth and make it look more three-dimensional.
Here is a step-by-step guide on how to shade the cover of your book drawing:
- Start by drawing the basic form of the book cover. This is a simple rectangle or cuboid shape.
- Next, add the spine to the left side of the cover. The spine is the part that holds the pages together. It should be a straight vertical line.
- On the right side of the cover, draw a slightly curved shape to represent the pages of the book.
- To make the cover look more realistic, add some details such as the title, author’s name, or a colorful sign.
- Using a darker pen or pencil, shade the areas where the cover and the pages meet. This creates an illusion of depth and makes the book look more three-dimensional.
- With a lighter pen or pencil, lightly shade the areas on the cover that are farther away from the light source. This creates a sense of volume and makes the cover look more realistic.
- Next, add some shading to the spine of the book. Start with a faint shading at the bottom and make it darker as it reaches the top.
- To give the cover a more lifelike appearance, add some touches of shading on the front and back covers using curved lines or arches.
- Finally, add some shading to the bottom of the book cover to give it a grounded look.
By following these step-by-step instructions, you can create a book cover drawing that is not only visually appealing but also realistic. Shading is one of the key elements in making your drawings come to life, and learning this basic technique can help you create more attractive and detailed artwork. So grab your pen and paper, and start shading!
Even more shading
Shading is a basic technique in drawing that creates depth and form. In the previous section, we learned how to shade a simple shape, like a cube or a rectangular box. Now, let’s take shading a step further and learn how to shade more complex forms like books.
When drawing a book, start by creating the basic shape of the book using straight lines. The front and back covers will be two rectangles, and the spine will be a vertical rectangle that connects them. If you like, you can also add some decorative arches on the edges of the covers to make the book more attractive.
Once you have the basic shape of the book, you can start adding more details. One important detail is the content of the book. You can create some small rectangles to represent the pages and add some decorative lines to show that the book is opened. You can also add some shading to the pages to make them look more realistic.
To shade the book, you can use a pencil or a pen. Start by creating a faint outline of the book, then gradually make the shading darker as you go closer to the edges. This creates the illusion of depth and makes the book look more three-dimensional. You can also add some shading to the shadow cast by the book to make it look more realistic.
One important tip when shading is to consider the direction of the light source. Shadows will appear on the opposite side of the light source, so make sure to shade the areas on the book that are inclined away from the light source. This will give your drawing a more realistic and lifelike look.
Shading is a skill that can take some time to master, but it has many benefits. It adds depth and form to your drawings and makes them more visually appealing. It also helps in creating a sense of perspective and gives your drawings a more realistic look. By learning the step-by-step process of shading, you can create more detailed and attractive drawings.
So, next time you draw a book, remember to incorporate shading. Follow the steps mentioned earlier, and don’t be afraid to experiment with different shading techniques and colors. Shading can transform a simple drawing into a work of art!
Final touches
To make your book drawing look even more attractive, you can add some final touches. These can range from decorative details on the cover to shading and shadows that give the illusion of depth.
One of the first things you can do is add some color to your book cover. Using colorful markers or colored pencils, you can fill in the title, the front and back covers, and even the spine if you’d like. This will make your book drawing look more vibrant and eye-catching.
Next, you can add some basic shading to give your book drawing a more three-dimensional look. Start by adding a light touch of shading to the edges of the pages, making them slightly darker to create the illusion of depth. You can also add shading to the bottom of the book, especially if it is open, to show a little bit of shadow.
After you have added some shading, you can add some decorative details to your book cover. For example, you can draw some small lines or shapes along the edges of the cover to make it look more like a real book. You can also use an ink pen to create a faint outline around the title or any other elements on the cover.
If you’d like, you can also add some perspective to your book drawing. For example, you can draw a rectangle on the left side of the book cover and then draw two lines from the top and bottom of the rectangle to the right side of the cover. This will create the illusion of a book that is slightly open. You can then add some details to the open pages, such as lines or even a small illustration.
Adding these final touches to your book drawing will not only make it look more beautiful, but it will also show off your creativity and attention to detail. Children’s book drawings frequently include these elements, as they make the drawings come to life and look more inviting.
So, go ahead and make the final touches to your book drawing. Follow the guide lines and tips mentioned above to create a colorful and attractive book cover. With a little bit of knowledge and practice, you’ll be able to create drawings that will impress anyone who sees them.
How to Draw a Book in 6 Simple Steps
Drawing a book can be a fun and easy activity for children. It allows them to explore their creativity and improve their artistic skills. In this step-by-step guide, we will show you how to draw a book in six simple steps. So grab your pencil and let’s get started!
Step 1: Starting with Basic Shapes
Begin by drawing a rectangle for the front cover of the book. This will be the main shape of the book. Next, draw a straight line along the left side of the rectangle, creating the spine of the book. Finally, draw another rectangle on the right side of the spine to represent the back cover.
Step 2: Creating the Book’s Form
Now, add some thickness to the front cover by drawing a smaller rectangle inside the original one. This will give the book a more three-dimensional look. You can also add a little detail by drawing a small line across the top and bottom of the cover.
Step 3: Adding the Details
Next, draw two curved lines on the left side of the book to create the illusion of pages. You can also add some decorative touches, like an arch shape on top of the spine or a title on the front cover.
Step 4: Coloring your Book
Now that your book is outlined, it’s time to add some color! You can use two or more colors to make your book more vibrant and attractive. Be creative and experiment with different shades.
Step 5: Adding the Final Details
To make your book look even more realistic, add some shading to create the illusion of depth. You can do this by using a darker shade of the color you used for the front cover. Add some small details, such as lines on the spine, to complete the drawing.
Step 6: Have Fun!
Now that your book drawing is complete, take a step back and admire your work! You have successfully created a colorful and attractive book. Feel free to add more details or personalize it even further. Drawing books is a great way to engage children in learning and stimulate their imagination.
So, go ahead and grab your pencil or Osmo and start drawing. Remember, the most important thing is to have fun and enjoy the creative process. Happy drawing!
Step 1: Draw the Outline of the Book
Before starting any drawing, it’s important to have a clear plan in mind. In this step, we will draw the outline of the book, which will serve as the foundation for the rest of our drawing. Follow these step-by-step instructions to create a simple but beautiful book:
1. Start by drawing a vertical line in the center of your paper. This line will represent the spine of the book. The height of the line will depend on how tall you want your book to be. For example, if you want to draw a children’s book, you can make it shorter, while a novel may require a taller line.
2. Next, draw two lines on either side of the vertical line, forming a shape that resembles a cuboid. These lines will represent the front and back covers of the book.
3. To make the book look more realistic and three-dimensional, add some details to the outline. Draw two curved lines at the top and bottom of the front cover, creating an illusion of pages. You can also draw some arches on the spine to represent the stacked pages.
4. Now, let’s add some color to our drawing. Choose colors that you like for the book cover, spine, and pages. You can use simple shading or even make the book cover look like a little piece of art by using more elaborate colors and patterns.
5. Finally, add a title or any other details you’d like on the front cover. You can also add some small lines on the side and bottom edges to show the thickness of the book.
By following these steps, you will have created the outline of a basic book drawing. This step-by-step tutorial is a great starting point for beginners and can be a fun learning experience for children as well. Remember to experiment with different colors, shapes, and shading techniques to make your book drawing even more beautiful and lifelike.
Step 2: Draw Lines on the Lower Side to Form a Cuboid
Once you have the basic outline of the book cover, you can start adding some details to make it more attractive and realistic. In this step, we will draw lines on the lower side of the cover to create a cuboid shape.
Using a pencil, start by drawing two straight lines parallel to each other on the bottom part of the cover. These lines will serve as the bottom edges of the cuboid. Make sure the lines are straight and evenly spaced.
Next, connect the ends of the lines with two vertical lines, creating the side edges of the cuboid. These lines should be slightly curved to give a three-dimensional look to the shape.
On the left side of the cuboid, draw a curved line connecting the top and bottom edges. This will represent the spine of the book. Make sure the curve is smooth and symmetrical.
To add more depth to the cuboid, draw two diagonal lines from the top left corner of the cover to the top edges of the cuboid. These lines will create the perspective of an opened book.
Finally, add some shading to the cuboid by lightly sketching curved lines along the front and bottom edges. This will create a shadow effect and make the shape look more three-dimensional.
Remember to draw lightly and make any necessary adjustments as you go. The steps may seem a little overwhelming at first, but with practice and patience, you will be able to create beautiful book drawings that children will love.
Now that you have completed the second step in this drawing tutorial, you are one step closer to creating a realistic book drawing. In the next step, we will add more details to the book cover, such as the book title and decorative elements. Follow along with the step-by-step instructions to continue learning and improving your drawing skills!
Step 3: Add Small Curved Lines on the Side Edges
In this step-by-step tutorial, we will learn how to add small curved lines on the side edges of our book drawing.
Now that we have the basic outline of our book, let’s add some three-dimensional details to make it look more realistic. To create the illusion of an opened book, we will add small curved lines on the side edges.
Start by drawing two small inclined lines on the left and right sides of the spine. These lines will serve as the edges of the book covers. Make sure they are slightly curved to give a more natural look.
Next, add two arches on the top and bottom of the spine. These arches will represent the pages of the book. Make them slightly shorter than the covers to create the illusion of depth.
Now, let’s add some detailing to the book cover. Draw a rectangle on the front cover, slightly wider than the spine. This rectangle will represent the title of the book. You can also add smaller rectangles or shapes to represent additional details like images or patterns.
To add more depth and dimension to the book, we will add shading to the edges. Use a darker shade of the color you are using for the book covers. Start by lightly shading the areas where the covers meet the pages. Then, gradually darken the shading towards the edges to create a three-dimensional effect.
Lastly, add some small lines along the edges of the pages to represent the pages’ contents. These lines should be vertical and faint, giving the impression of text or images on the pages.
By following these steps, you can create beautiful book drawings with realistic details. Don’t be afraid to experiment with different colors and shading techniques to make your drawings even more colorful and lifelike.
Creating book drawings not only makes for a fun and easy art project, but it also has several benefits. It helps improve your hand-eye coordination, teaches you about form and perspective, and allows you to express your creativity. So grab a pencil and let’s get started!
Step 4: Create the Spine
Once you have completed the front and back covers of your book drawing, it’s time to move on to creating the spine. The spine is the edge of the book that connects the front and back covers and allows the book to open and close.
To create the spine, start by drawing two straight lines parallel to each other, aligned with the bottom edge of the book cover. The thickness of the spine will depend on the number of pages you want your book to have. For a children’s book drawing, a thin spine is usually suitable, while for a novel or a thicker book, a thicker spine would be more appropriate.
You can also add some decorative elements to the spine, like a title or the name of the book. This will make your book drawing look more professional and eye-catching.
If you want to create the illusion of depth, you can add some shading to the spine. Use a pen or a pencil to create three-dimensional shapes along the spine, starting from the top edge and gradually getting darker towards the bottom. This technique will give your drawing a more realistic look.
Another way to add depth to the spine is by creating a shadow. Draw a faint line along the edge of the spine, on the side that is opposite to the light source. This will give the impression that the spine is casting a shadow.
When making the spine, make sure to align it properly with the front and back covers. The spine should be centered between the two covers and should have the same height as the book pages.
Finally, to make your book drawing even more realistic, you can add some details to the spine, like arches or lines that mimic the look of a real book spine.
Now that you have completed all the steps in this tutorial, you should have a beautiful book drawing, with colorful and detailed front and back covers, as well as a realistic-looking spine. Opened or closed, your book drawing will look like the real deal!
Step 5: Add Small Details
Now that you have the basic foundation of your book drawing, it’s time to add some small details that will really bring it to life. Follow these steps to add those finishing touches:
- Using a pencil, draw faint vertical lines along the edges of the pages to create the illusion of depth.
- To make your book look even more three-dimensional, add darker shading to the bottom of the pages and the spine. This will give the impression that the book is open and the front cover is slightly raised.
- Draw a curved line on the left side of the book to indicate the arches of the pages. You can make this line darker than the other lines to make it stand out.
- Add small decorative details to the spine and cover of the book, such as a title or colorful patterns. This will give your drawing a more personal and creative touch.
- You can also add some lines and shadows to the book’s edges to make it look more realistic.
Remember to use a pen or a darker pencil for the final touches to make them stand out. Pay attention to the details like the thickness of the lines and the placement of the shadows. These little elements will make a big difference in the final look of your drawing.
If you have any questions about any of the steps in this tutorial, feel free to ask. Adding these small details is a crucial part of making your book drawing look more lifelike and beautiful.
Step 6 Shade Your Drawing Using a Pen
Now that you have outlined and added detail to your book drawing, it’s time to add shading using a pen. Shading adds depth and dimension to your drawing, making it look more realistic and three-dimensional. Follow these steps to shade your book drawing:
1. Start by adding small lines or dots along the edges of your book cover, spine, and pages. These lines will create an illusion of shadows and give your drawing a more realistic look.
2. Use a pen of your choice, such as a decorative or colorful pen, to shade the different shapes and forms of your book. You can use vertical lines, cross-hatch technique, or even stippling to add shading to your drawing. Experiment with different techniques to achieve the desired effect.
3. Pay attention to the direction of your shading lines. For example, if the light source is coming from the upper left side, shade the right side of the book cover and pages more heavily to create a sense of depth and shadow.
4. Add shading to the areas where the pages are opened. The lower part of the pages should have darker shading since it is in the shadow of the upper pages.
5. Don’t forget to add shading to the inside of the book cover. This will make your drawing look more realistic and complete.
6. To make your book drawing even more attractive, consider adding some decorative elements such as floral patterns or small illustrations on the cover or spine. This will give your drawing a unique touch and make it stand out.
Remember, shading is an important technique in drawing, as it helps create a sense of depth and realism. By following these steps, you can make your book drawing look more three-dimensional and visually appealing.
Frequently Asked Questions on How to Draw an Open Book
Q: What are the basic steps for making an open book drawing?
A: To draw an open book, follow the following steps:
Step 1: Start by drawing a basic outline of the book’s shape using a pencil. Make sure to include the spine, cover, and pages.
Step 2: Add more details to the outline, such as the edge of the pages and any decorative elements on the cover.
Step 3: Create the illusion of depth by adding shading and highlights to the book. Use a pen or pencil to add some faint lines to represent the pages.
Step 4: Draw the title or content of the book on the front cover if desired. You can also add some colorful drawings or images to make the cover more attractive, especially for children’s books.
Step 5: Add some shading to the pages to show the thickness of the book. Use vertical lines to create the illusion of pages.
Step 6: Finally, add some shadows underneath the book to give it a more three-dimensional look.
Q: How can I draw an open book from different angles or perspectives?
A: To draw an open book from different angles or perspectives, you will need to have a basic knowledge of human anatomy and how objects look in space. Start by drawing a basic cuboid shape for the book and then follow the steps mentioned above to add the details and shading. For a front view, make the edges of the book straight and parallel. For a side view, draw the book with some arches to show the open pages. For a lower view, draw the book with the pages facing upwards, and for a higher view, draw the book with the pages facing downwards.
Q: What should be the height and thickness of an open book?
A: The height and thickness of an open book can vary depending on the type of book you are drawing. Generally, the height of the book can be around 1.5 to 2 times the width of the spine. The thickness of the book can be determined based on the number of pages it has. Keep in mind that these proportions can vary depending on the perspective you are drawing the book from.
Q: How can I make the covers of the open book more beautiful and decorative?
A: You can make the covers of the open book more beautiful and decorative by adding colorful drawings, images, or patterns. Use different shapes and lines to create attractive designs. You can also add some shade or highlights to make the covers more visually appealing. Additionally, you can draw the title or content of the book on the front cover to make it more informative and engaging.
Q: Can you provide a step-by-step tutorial on how to draw an open book?
A: Unfortunately, we cannot provide a step-by-step tutorial in this text format. However, there are many online resources, books, and video tutorials available that provide detailed instructions on how to draw an open book. You can search for “how to draw an open book tutorial” on the internet to find various resources that can guide you through the process.
Q: Are there any tips for making open book drawings more attractive?
A: Yes, here are a few tips to make open book drawings more attractive:
– Use colors to make the drawings more vibrant and eye-catching.
– Add shadows and highlights to create depth and dimension.
– Pay attention to small details, such as adding texture to the cover or drawing individual lines on the pages.
– Experiment with different perspectives and angles to create visually interesting compositions.
– Practice regularly to improve your drawing skills and develop your own unique style.
How to draw an open book
Drawing an open book can be a beautiful and creative way to showcase your artistic skills. By following a simple step-by-step tutorial, you can create a three-dimensional illusion that makes the book come to life.
To start, use a pencil to draw a rectangle shape for the basic outline of the open book. The rectangle should have two vertical lines on the left and right side to represent the covers. The width of the rectangle will determine the thickness of the book.
Next, draw a line that divides the rectangle in the middle. This line represents the spine of the book. You can add arches at the top and bottom of the spine to give it a more attractive look.
Now, add more details to the cover of the book. You can draw the title of the book or any other elements that you like. Use different colors to make the cover more colorful and eye-catching.
Once the front cover is complete, draw the pages of the book. Start by drawing a stack of pages on the left side of the book. Be sure to give them a slightly inclined perspective to create a realistic look.
Now, draw the pages that are opened on the right side of the book. Use simple lines to represent the pages and add some shading to create depth. The pages should look like they are overlapping each other.
To add more realism to your drawing, you can add shadows and highlights. Shade the areas where the pages touch the spine to create a sense of depth. Use a pen or a darker pencil to add these shading details.
Finally, add any additional details or touches that you like to complete the drawing. You can add more shading, highlights, or even some decorative elements.
By following these steps, you can create a beautiful and realistic drawing of an open book. This tutorial is great for both children and adults who are learning how to draw. The open book is a symbol of knowledge and can be frequently used in artworks, so it’s a good skill to have in your artistic repertoire.
So, grab your pencil and paper and start creating your own unique open book drawing!
What are the benefits of learning how to draw an open book
Learning how to draw an open book can be a fun and rewarding artistic skill to develop. It not only allows you to create beautiful and attractive illustrations, but it also offers several benefits:
| Enhances creativity: | Learning how to draw an open book encourages creativity as it challenges you to think about different elements and details that make the drawing more realistic and captivating. |
| Improves hand-eye coordination: | The process of drawing an open book requires close observation and hand-eye coordination in order to accurately replicate the shapes and details. |
| Develops observation skills: | While drawing an open book, you need to closely observe its structure, textures, and details, which helps develop your ability to observe and capture even the smallest aspects. |
| Boosts focus and concentration: | Drawing an open book requires focus and concentration in order to accurately reproduce the various elements and details of the book. |
| Expresses ideas and emotions: | Through drawing an open book, you can convey your ideas, thoughts, and emotions. It provides a platform for self-expression and storytelling. |
| Enhances artistic skills: | Learning how to draw an open book introduces you to fundamental artistic concepts such as shading, perspective, proportions, and composition. |
| Offers a sense of achievement: | Completing a drawing of an open book can give you a sense of accomplishment and satisfaction, boosting your self-confidence as an artist. |
In conclusion, learning how to draw an open book is not just about creating a visually appealing image, but it also helps develop important skills such as creativity, observation, focus, and expression. So grab a pencil and start exploring the wonderful world of book drawing!
6 Guide to draw two books
Drawing two books can be a fun and creative way to showcase your artistic skills. In this guide, we will show you how to draw two books in a simple and easy-to-follow way. By following these steps, you will be able to create a three-dimensional illusion that makes the books look more lifelike.
Step 1: Outline the shape
Start by drawing a vertical rectangle for the first book. Make sure to add some curved arches on the top to show that it is open. For the second book, draw a smaller rectangle below the first one.
Step 2: Add details
Next, add details such as the covers and the edges of the books. Draw lines to show the thickness of the covers and add little touches like the sign on the side of the first book.
Step 3: Draw the contents
Now, draw the contents of the books. You can make them as simple or as detailed as you like. Use different colors to make them look more colorful and eye-catching.
Step 4: Shade and add shadows
To make the books look more three-dimensional, add shading and shadows. Use a darker shade of the same color to create shadows on the sides and bottom of the books.
Step 5: Add more details
Now, add more details such as the titles and any text that you want to include on the covers. You can also add shading and detailing to the covers to make them look more realistic.
Step 6: Final touches
Finally, add some final touches such as faint lines to show the page edges and a bit of shading to give the books more depth and dimension. Make sure to pay attention to the small details that will make your drawing stand out.
By following this simple guide, you can create a beautiful drawing of two books. It’s a great way to show off your artistic skills and impress your friends. So grab your pencil and paper, and start drawing!