

Welcome to this tutorial on how to create your own Android SDK! If you’re interested in customizing your Android applications or even creating your own custom Android system, this guide will walk you through the process step by step. Creating your own Android SDK gives you access to a wide range of tools, libraries, and features that can enhance the functionality and performance of your applications.
Before we dive into the details, let’s clarify what an Android SDK means. SDK stands for Software Development Kit, which is a collection of tools, libraries, and documentation that developers use to create software applications. In the case of Android, the SDK provides everything you need to develop, test, and debug Android applications.
When it comes to creating your own Android SDK, there are several steps you need to follow. First, you must install Android Studio, the official integrated development environment (IDE) for Android development. Android Studio supports different versions of the Android SDK, so you should choose the one that best suits your needs.
Once you have Android Studio installed, you can start customizing your Android SDK. This involves adding or changing libraries, modules, and dependencies to tailor the SDK to your specific requirements. The SDK Editor provides an intuitive interface where you can manage and modify your SDK components.
In addition to customizing the SDK itself, you can also create your own custom modules. Modules are self-contained units that add specific functionalities to your SDK. You can create modules for common tasks such as accessing device features, using location services, or even integrating social media platforms like Facebook.
To create a custom module, you need to define its structure, add the required code, and configure any dependencies. Once the module is created, you can include it in your SDK and make it available for developers to use in their applications. This way, you can provide a more comprehensive and tailored SDK that meets the specific needs of your users.
Creating your own Android SDK can be a complex and time-consuming process, but it can also be highly rewarding. By customizing the SDK, you can ensure that your applications have all the tools and features they need to succeed. Whether you’re creating a mobile game, a social networking app, or a productivity tool, having your own Android SDK can give you a competitive edge and open up new possibilities for innovation and creativity.
Getting Started with Facebook SDK for Android
To enhance the functionality of your Android applications, you may want to integrate Facebook features. The Facebook SDK for Android provides a set of tools and libraries that support accessing various Facebook features and functionalities.
Before you start integrating the Facebook SDK into your Android project, make sure you have the required tools and dependencies. For your Android development, you will need Android Studio, which is the recommended integrated development environment (IDE) for Android development. Also, ensure that you have the latest version of the Android SDK installed on your system.
To begin with, you must download the Facebook SDK for Android. You can download it from the Facebook developer website. Once you have downloaded the SDK, you can add it to your project as a dependency through Gradle, which is the recommended build system for Android projects.
In your Android Studio project, open the build.gradle file for your app module. Look for the dependencies section and add the Facebook SDK’s dependency. The dependency should be of the form:
| implementation | ‘com.facebook.android:facebook-android-sdk:[version]’ |
Replace ‘[version]’ with the version of the Facebook SDK you downloaded.
After adding the dependency, sync your project with Gradle to make sure the SDK is successfully added to your project.
Once you have added the Facebook SDK to your project, you can start using its features. To access Facebook functionalities, you will need to initialize the SDK with your Facebook app ID. You can obtain an app ID by creating an app on the Facebook developer website.
In your project’s Application subclass, add the following code to initialize the Facebook SDK:
FacebookSdk.sdkInitialize(getApplicationContext());
Make sure you call this code before accessing any Facebook functionalities in your app.
With the Facebook SDK integrated and initialized, you can now start customizing the integration based on your application’s requirements. You can use the Facebook SDK to implement various features like sharing content, logging in with Facebook, accessing user information, and more.
As you explore the Facebook SDK, you will find several useful classes and methods for implementing Facebook features. The Facebook developer documentation provides detailed information on how to use these classes and methods.
In conclusion, integrating the Facebook SDK into your Android application is a great way to enhance its functionality and provide a seamless experience for users who are interested in using Facebook features. With the right tools and proper setup, you can easily access and utilize the various Facebook functionalities in your Android app.
Installing dependencies
Before you can start creating an Android SDK, you need to make sure you have all the necessary dependencies installed on your system. These dependencies are required for the proper functioning of the SDK and to support different versions of Android devices.
One of the most important dependencies you will need is Android Studio. Android Studio is an integrated development environment (IDE) that provides a complete set of tools for building Android applications. If you don’t already have it installed, you can download and install it from the official Android Studio website.
Once you have Android Studio installed, you can open it and it will prompt you to install the Android SDK. The Android SDK contains all the necessary tools and libraries for developing Android applications. You can choose to install the SDK in the default location or specify a custom location. It’s recommended to use the default location unless you have a specific reason to choose a different one.
In addition to Android Studio and the Android SDK, there are several other dependencies that you may find useful depending on your specific needs. For example, if you are developing a game, you may want to add a dependency that supports game development. If you are developing a mobile application that needs to access images or social media platforms like Facebook, you may want to add dependencies for those functionalities.
To manage dependencies in your Android SDK project, you can use Gradle. Gradle is a build automation tool that allows you to define and customize the build process of your project. It also makes it easy to add and manage external libraries and dependencies. You can add dependencies to your project by editing the build.gradle file. Gradle will automatically download and include the required libraries in your project.
It’s worth mentioning that some dependencies may have their own dependencies that you must also install independently. The build.gradle file provides a straightforward way to declare and manage these dependencies. Gradle will handle the downloading and installation of these dependencies for you.
Once you have installed all the necessary dependencies, you are ready to start creating your Android SDK. The next step is to customize the SDK according to your requirements and add any additional modules or features you want to include. This will involve modifying the SDK’s source code and building it again using Gradle.
It’s also important to keep in mind that the SDK should support the most common Android versions and devices. This means you need to ensure that your SDK detects and supports different Android versions and devices. You can achieve this by adding specific libraries and code for each supported version or device.
Customizing dependencies
When creating an Android SDK, it is important to provide developers with the ability to customize the dependencies used in their applications. This allows them to use the SDK in different versions and with different libraries, depending on their specific needs.
In case you are interested in customizing the dependencies of your Android SDK, there are several ways to do it. One option is to add the required libraries to the SDK installation package itself, so that they are directly included and can be used by developers. Another option is to prompt developers to install the required dependencies when they install the SDK itself.
If you want to support different versions of the Android SDK or even different common libraries, it might be a good idea to create a table listing the supported versions and the corresponding dependencies. This way, developers can easily find the information they need.
One example of customizing dependencies is the Facebook SDK. The Facebook SDK supports different versions of the Android SDK, so depending on the version of the Android SDK that developers have installed, they can download the corresponding Facebook SDK library.
When adding custom dependencies to your Android SDK, you can use the Gradle build system. Gradle is a popular build system used for Android projects, and it allows you to manage and configure dependencies in a flexible way.
To add a custom dependency to your Android SDK, you can open the build.gradle file in Android Studio, which is the IDE commonly used for Android development. In this file, you can add the necessary dependencies under the “dependencies” section.
For example, if you want to add a dependency on a mobile game library called “GameLibrary”, you can add the following line of code:
implementation 'com.example.gamelibrary:1.0.0'
In this example, “com.example.gamelibrary” is the Maven repository where the library is hosted, and “1.0.0” is the version of the library you want to use.
By customizing the dependencies in your Android SDK, you allow developers to use the SDK in a way that fits their specific needs. This can be especially useful when developers want to use the SDK in combination with other libraries or tools.
It is worth noting that when customizing dependencies, you need to consider the Android SDK versions and the Android system versions that your SDK supports. Some libraries may only support specific SDK or system versions, so it is important to provide clear documentation and instructions for developers to avoid compatibility issues.
In conclusion, customizing dependencies in your Android SDK can provide developers with more flexibility and control over their development process. By allowing them to add or change dependencies as needed, you create a more welcoming and versatile environment for developers to work in.
Install Required Android SDK Versions
To create an Android SDK for your project and start customizing it to your needs, one of the first steps is to install the required Android SDK versions. The Android SDK provides a set of tools and libraries that are essential for developing Android applications.
Before you can install the Android SDK, make sure you have the necessary tools and software installed on your system. Here are the steps to install the required Android SDK versions:
- Download and install the Java Development Kit (JDK) – Android Studio requires the Java Development Kit (JDK) to be installed on your system. You can download the JDK from the official Oracle website.
- Download and install Android Studio – Android Studio is the official integrated development environment (IDE) for Android app development. You can download Android Studio from the official Android website.
- Open Android Studio and select “Custom” installation option – When you run Android Studio for the first time, you will be prompted to choose the type of installation you want. Select the “Custom” option to have more control over the installation process.
- Change the installation locations – Android Studio detects the default installation locations for the Android SDK and Android Studio. If you want to change these locations, you can do so by selecting the “Change” button next to the respective field. You can also choose whether to install the Android virtual device (AVD) system images, which are useful for testing your app on different device configurations.
- Select the Android SDK versions you wish to install – In the next step, you can select the Android SDK versions you want to install. Android Studio supports several different versions of the Android SDK, so you can choose the ones that are relevant to your project.
- Add support for additional features and libraries – Android Studio provides support for adding additional features and libraries to your project. You can do this through the SDK Manager, which allows you to download and install additional modules and dependencies.
- Complete the installation – Once you have selected the Android SDK versions and any additional features or libraries you wish to add, you can proceed with the installation. Android Studio will download the required files and install them on your system.
By following these steps, you will be able to install the required Android SDK versions for your Android project. This will allow you to access all the necessary tools and libraries for developing mobile applications on the Android platform.
Adding an Android SDK
To start developing Android applications, you must have the Android SDK installed on your system. This SDK includes several tools and libraries that are required for developing and testing Android applications. Android SDK supports different versions of Android, so you can build applications targeting specific versions of the operating system.
When you open your Android project in Android Studio, you will be prompted to download and install the required SDK if it is not already installed on your machine. The SDK installation wizard will guide you through the installation process and allow you to customize the installation based on your needs.
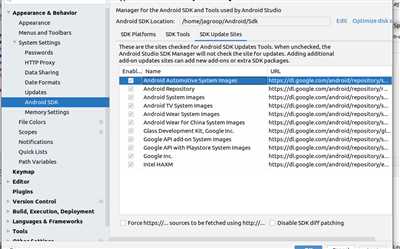
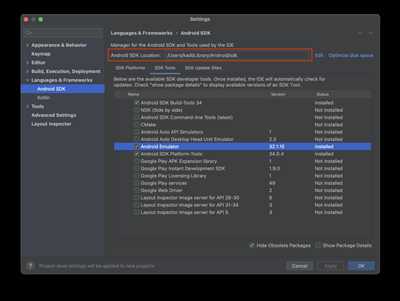
If you have already installed the Android SDK, you can check if it is set up correctly by opening Android Studio and navigating to the “SDK Manager” from the “Welcome to Android Studio” window. From there, you can check the locations of the Android SDK and the JDK (Java Development Kit) used by Android Studio.
If you wish to install additional SDK modules, such as support libraries or Google Play services, you can do so by using the SDK Manager. This tool allows you to download and install various components that can be used in your Android projects, such as tools, system images, and documentation.
Android Studio also provides a Gradle build system that allows you to easily manage dependencies in your project. You can specify the required dependencies in the build.gradle file of your project. Gradle will automatically download and add the required libraries to your project.
To add an Android SDK to your project, follow these steps:
- Open your project in Android Studio.
- Navigate to the “Project” pane on the left side of the screen.
- Expand the “Gradle Scripts” folder and open the build.gradle file for the module you want to add the SDK to.
- Scroll down to the “dependencies” field and add the required SDKs using the following syntax:
implementation 'com.example:sdk:1.0.0'. - Sync your project with the Gradle files by clicking on the “Sync Now” button that appears in the toolbar.
Once the SDK is added to your project, you can start using its features and APIs in your code. For example, if you added the Facebook SDK, you can use it to integrate Facebook login or share functionality in your app. If you added the Google Play services SDK, you can access various Google services, such as Maps, Firebase, and more.
Adding an Android SDK to your project is a common task in Android development, and it allows you to extend the capabilities of your application by using third-party libraries and services. It’s important to keep your SDKs up to date to ensure compatibility with the latest Android versions and to take advantage of new features and enhancements.
Using the SDK independently
If you wish to create Android applications or customize the SDK for your own projects, you can use the Android SDK independently without relying on Android Studio or other integrated development environments. This means you have more freedom and control over your development environment, and can use the SDK in different systems or even on your own custom installation.
To start using the SDK independently, you must first download and install the Android SDK. You can download it from the official Android website. Once installed, you can access the SDK through the command line, where you can use several tools and commands to perform various tasks.
One of the most useful tools is the Android SDK Manager, which allows you to manage and install required dependencies and different versions of the SDK. You can open the SDK Manager by running the “sdkmanager” command in the command line.
Another important tool is the “gradle” build system, which is commonly used to build and customize Android applications. Gradle supports modules and libraries, which means you can add dependencies and customize your project according to your needs.
If you are interested in customizing the SDK, you can access the source code and make changes to fit your requirements. This allows you to add new features, fix bugs, or even create your own custom SDK.
When using the SDK independently, it’s important to note that some features and functionalities that are available in Android Studio may not be available. However, you can still develop and test your applications using the SDK.
| Android SDK | Facebook SDK | Mobile Games SDK |
|---|---|---|
| – Install the Android SDK | – Install the Facebook SDK | – Install the Mobile Games SDK |
| – Use the Android SDK Manager to manage dependencies and versions | – Access the Facebook SDK and customize it for your projects | – Integrate the Mobile Games SDK into your game applications |
| – Customize the SDK by accessing the source code | – Use the Facebook SDK Editor to make changes to the SDK | – Add custom features and functionalities to your games using the SDK |
In case you want to use the SDK independently and also use some features or libraries from Android Studio, you can do so by adding the required dependencies to your project’s build.gradle file. This way, you can still have access to the functionalities that Android Studio provides, while using the SDK independently.
If you are using a different system or want to change the default locations where the SDK is installed, you can do so by modifying the “local.properties” file in the root directory of your SDK installation. Simply open the file in a text editor and change the values of the relevant properties.
Overall, using the Android SDK independently can be a great option for developers who want more control over their development environment and want to customize the SDK according to their own needs. Whether you are creating Android applications, customizing the SDK, or developing mobile games, the SDK provides a solid foundation for your projects.


