

If you want to create your own website, it’s important to understand how to make a website address. A website address, also known as a URL (Uniform Resource Locator), is the unique identifier that directs users to your website. It not only represents your online presence but also helps users find and access your site. In this article, we will guide you through the process of creating and customizing a website address.
First, you need to think of a suitable name for your website. This name should be relevant to the content or purpose of your site. It’s best to choose a name that is easy to remember and related to what your website is about. Once you have decided on a name, you can check if it is available as a domain name. There are many domain name providers available online where you can search for and purchase your desired domain name.
Once you have your domain name, you need to set up a hosting provider. A hosting provider is a service that allows your website to be accessible on the internet. It provides the necessary storage space and server resources for your website to function properly. You can find many hosting providers that offer different plans and features. Choose one that suits your needs and budget.
After you have registered your domain name and set up a hosting provider, you can start building your website. There are different platforms you can use to create a website, such as WordPress, Wix, or Weebly. These platforms provide a user-friendly interface and offer various templates and customization options. You can create and edit your website using a visual editor, without any coding knowledge.
To create a website address, you need to create pages for your website. Each page represents a different section or topic on your site. For example, you can have a Home page, About page, Services page, Portfolio page, and so on. You can organize your pages in a hierarchical structure, such as having sub-pages under main pages. This helps users navigate your website easily and find the information they are looking for.
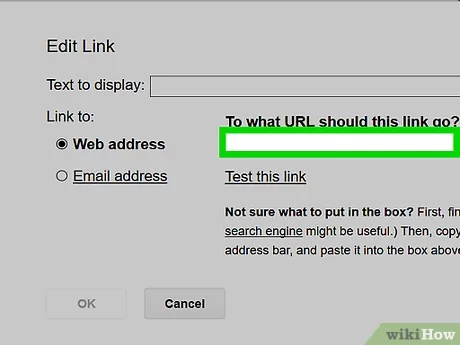
When creating or editing a page, you can add text, images, links, and other media to make your content more engaging. For example, you can highlight important words or phrases using bold or italic formatting. You can also add hyperlinks to other pages or external websites. To create a hyperlink, you can select the text or image that you want to turn into a link, right-click, and choose the “Hyperlink” option. Then, you can enter the URL of the target page or website.
In addition to creating hyperlinks, you can customize the appearance of your website address. You can select different colors, fonts, and styles to match your design preferences. You can also add a custom logo or picture to make your website more visually appealing. These customization options are usually available in the settings or preferences menu of your website platform.
Finally, it’s important to consider copyright and legal issues when creating a website address. Make sure you have the necessary permissions and rights to use any images, text, or other content on your site. You should also include a copyright notice at the bottom of your pages. This indicates that the content on your website is protected and cannot be used without your permission.
In conclusion, creating a website address involves choosing a domain name, setting up a hosting provider, and creating and customizing your website. Although there are different platforms and tools available, the basic steps are similar. By following these steps, you can create a website address that represents your online presence and helps users find and access your site.
Create or edit a hyperlink
If you want to create a hyperlink on your website, there are a few different ways you can do it, depending on the platform or design of your website. One of the simplest ways to create a hyperlink is by using HTML code. Most website building platforms and content management systems, such as WordPress, provide options for creating hyperlinks in their text editors.
To create a hyperlink, you will first need to have the URL or web address of the page you want to link to. This can typically be found in the address bar of your web browser when you are on the page you want to link to. For example, if you want to link to your home page, the URL might be something like “https://www.mywebsite.com”.
Once you have the URL, you can create a hyperlink by selecting the text or image that you want to turn into a link. Then, right-click on the selected text or image and choose the “Hyperlink” option from the menu that appears. In some platforms, you may also find this option in the ribbon at the top of the document or page.
When you click on the “Hyperlink” option, a dialog box will appear where you can enter the URL or web address of the page you want to link to. You can also choose to enter alternate text for the link, which is the text that will be displayed if the link cannot be followed or if someone is using a screen reader to navigate your website.
Additionally, you may have options to customize the look and style of your hyperlink. This could include changing the color, underlining the text, or adding a screentip that will show a message when someone hovers over the link.
Although creating hyperlinks in HTML is relatively straightforward, there may be other options available depending on the platform or website builder you are using. Some platforms, like SharePoint or Microsoft Infopath, have built-in features for creating hyperlinks. Additionally, some online services or providers may offer their own ways to create hyperlinks within their platforms.
Creating hyperlinks is an important part of website design, as it allows users to navigate between different pages or sections of your website easily. Whether you are creating a simple portfolio website or a full e-commerce site, understanding how to create and edit hyperlinks is a valuable skill to have.
In conclusion, learning how to create or edit a hyperlink is a fundamental task when building a website. Regardless of the platform or services you are using, it is essential to know how to create hyperlinks to connect your web pages and make your website more user-friendly and accessible.
Creating Links to Email Addresses

If you want to create a clickable link to an email address on your website, you can use the element and the mailto attribute.
| Type | Copyright | Although | Addresses |
|---|---|---|---|
| Page | Hyperlink | Find | Full |
| List | Platforms | Message | Automatically |
| With | Under | Style | Think |
| Other | About | Website | Color |
| Picture | Over | Provider | Different |
| Pages | Click | Services | Creating |
| When | Menu | Create | Example |
| Custom | That | Document | |
| Portfolio | InfoPath | Learn | |
| Features | WordPress | Right-click | Install |
| Using | Links | Screentip | Or |
| Home | Activities | Online | Select |
| Project | Hyperlinks | Domain | Either |
| Location | Which | Design | Look |
| – | Way | Name | Minutes |
| Enter | Ribbon | Platform | An |
| Edit | Alternate | To | Text |
| Styles | Microsoft | Their | Sources |
| Show | A |
To create a link to an email address, you need to use the “mailto:” prefix followed by the email address you want the link to point to. Here’s an example:
When someone clicks on the link, it will open their default email client with a new message already addressed to the specified email address. Note that this will only work if the user has a default email client set up on their device.
By default, the email address will be displayed as a regular hyperlink with an underline and in the default link color, but you can style it just like any other hyperlink on your webpage. You can change the color, add a background color, or apply any other CSS styles you want.
It’s also common to include a descriptive text for the email link, like “Email us” in the example above, to make it clear what action the link will perform.
Remember to test the link to make sure it’s working properly. You can right-click on the link and select “Copy email address” or “Copy link address” to quickly get the email address or the entire link for testing purposes.
Creating links to email addresses can be a convenient way for visitors to contact you directly from your website. It provides an alternate method for communication and can be useful for various projects or activities, such as portfolios, online services, or e-commerce websites.
Activities
When creating a website, there are various activities that you can perform to make your website more functional and interactive. Here are some activities that you can learn to do:
1. Create hyperlinks: Hyperlinks are clickable links that connect one page of your website to another. You can either use the tag or the ribbon menu to create hyperlinks.
2. Design custom pages: Using different platforms such as WordPress or Microsoft SharePoint, you can create custom pages for your website. These pages can have a unique design and layout to showcase your portfolio, projects, or other activities.
3. Enter website addresses: To access a specific page on your website, you need to enter its URL or domain name in the browser’s address bar. For example, “www.example.com/home” will take you to the home page of the website.
4. Use alternate text: When using pictures or images on your website, it is important to provide alternate text. This text will be displayed when the picture cannot be loaded and will also help with accessibility.
5. Edit hyperlink styles: You can edit the style of your hyperlinks to change their color, font, or other visual features. This can be done using CSS or through the platform’s editing tools.
6. Create email addresses: If you want to have a professional email address, you can create one that matches your domain name. For example, “[email protected]” can be used as a contact email for your website.
7. Find copyright-free images: When creating a website, it is important to use images that you have the rights to or that are copyright-free. There are many online sources where you can find such images to enhance the look of your website.
8. List activities in a document: You can create a document that lists all the activities and features of your website. This document can serve as a reference for yourself or for others who may need to edit or manage your website.
9. Learn about different platform features: Depending on the platform you are using to create your website, there will be various features and services available. Take the time to learn about these features and how to use them effectively.
10. Install services and plugins: Many platforms offer additional services or plugins that you can install to enhance the functionality of your website. These can include features such as e-commerce, social media integration, or contact forms.
11. Create an online portfolio: If you are a designer or an artist, you can create an online portfolio to showcase your work. This can be done by creating a dedicated page on your website and uploading pictures or samples of your projects.
12. Use right-click menus: Some platforms allow you to add custom right-click menus to your website. These menus can provide quick access to frequently used actions or functions.
13. Show/hide specific content: You can use CSS or platform-specific tools to show or hide specific content on your website. This can be useful when you want to display different information based on user preferences or actions.
14. Automatically update pages: Some platforms offer the ability to automatically update certain pages on your website. For example, you can use Microsoft InfoPath to create a form that users can fill out, and the information will be automatically displayed on a designated page.
15. Create screentip for hyperlinks: Screentips are small pop-up boxes that appear when you hover over a hyperlink. They can provide additional information or a preview of the linked page. You can create custom screentips using CSS or platform-specific settings.
By engaging in these activities, you can enhance the functionality and design of your website and provide a better user experience for your visitors.
An alternate way to create a website
If you want to create a website but don’t want to build it from scratch or use a platform like WordPress, there is another option available to you. Instead of starting with a blank page, you can use a website provider that offers pre-built templates and services to help you get started quickly.
With this alternate method, you don’t have to worry about coding or designing the website yourself. The provider will take care of all the technical aspects, such as hosting, domain registration, and the necessary integrations. This way, you can focus on the content and design of your website without getting overwhelmed.
When using a website provider, you usually start by selecting a template from a list of available options. You can choose a template that suits your needs, whether it’s for a personal blog, an online store, or a portfolio website. Once you select a template, you can customize it by adding your own text, images, and colors to give it a unique look.
One of the benefits of using a website provider is that they often have built-in features and tools that make managing your website easy. For example, you can create hyperlinks to other pages or external websites, add a contact form or an email subscription form, or even integrate with social media platforms.
If you’re concerned about copyright issues or want more control over your website, some providers allow you to host your website on your own domain and even have a custom email address. This way, your website and email will have a professional look, and you’ll have more control over your online identity.
An example of a website provider is Microsoft SharePoint, which allows you to create and edit websites directly from Microsoft Office applications, such as Word or InfoPath. You can create hyperlinks within your documents or create a list of hyperlinks to other websites or pages. SharePoint also offers different page layouts and styles to choose from, giving you flexibility in the design of your website.
To create a website using SharePoint, you can follow these steps:
- Open the document or project where you want to create the hyperlink.
- Select the text or picture that you want to turn into a hyperlink.
- Go to the Insert tab in the ribbon.
- In the Links group, click on the Hyperlink button.
- In the Insert Hyperlink dialog box, enter the address of the website or page you want to link to.
- Optionally, you can also enter a description for the hyperlink or choose a different target frame.
- Click OK to insert the hyperlink.
Once the hyperlink is inserted, you can right-click on it to edit its properties or modify its style. For example, you can change the color, add a screentip message, or even remove the hyperlink altogether.
Although this alternate way of creating a website may not give you as much control over the design and features as building it from scratch or using a platform like WordPress, it can be a quick and convenient solution for those who want to get their website up and running in a matter of minutes without any technical knowledge.


