

Building an APK file is the final step in the development process of an Android application. Whether you are working on a personal project or a professional one, knowing how to build an APK file is crucial. In this article, we will guide you through the necessary steps to build an APK file for your application.
The first step is to convert your source code into a format that can be understood by the Android operating system. To do this, you will need to install the JDK (Java Development Kit) on your computer. The JDK includes the necessary tools and utilities to compile and run Java programs, which is the native language of Android applications.
Once you have successfully installed the JDK, you can proceed to download and install Android Studio. Android Studio is the preferred IDE (Integrated Development Environment) for Android app development. It provides a user-friendly interface and various tools that simplify the development process.
After installing Android Studio, you can start a new project or import an existing one. The project will contain all the source code, resources, and libraries needed for your application. You can specify the package name, version number, and other details during the project setup. It’s important to make sure that the package name is unique, as it will be used to identify your application on the Play Store and other sources.
Once you have created or imported your project, you can write and debug your code using the code editor provided by Android Studio. You can also add new files and libraries, as well as link your project with external dependencies. Android Studio makes it easy to manage all the necessary files and resources for your application.
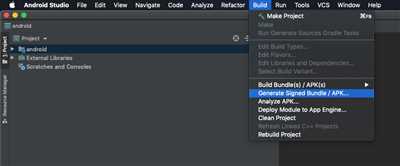
When your application is ready for testing or release, you can generate a signed APK file. The signed APK file ensures the integrity and authenticity of your application. It also allows you to distribute your application outside of the development environment and install it on other devices.
To generate a signed APK file, you need to provide your own signing key and keystore. Android Studio will guide you through the process of creating a keystore and signing your application. You can also specify the build type, target devices, and other parameters to further customize the build process.
Once the APK file is generated, you can install it on your device or distribute it to other users. It’s important to test your application on different devices and Android versions to ensure compatibility and smooth working. You can also upload your APK file to the Play Store or other app stores to reach a wider audience.
In conclusion, knowing how to build an APK file is essential for any Android developer. By following the steps mentioned in this article, you can easily convert your source code into a functioning APK file and distribute your application to millions of Android users.
How to Generate Debug APK of Android Project in React Native
When working with React Native, you may need to generate a debug APK of your Android project for testing and debugging purposes. In this guide, we will walk through the steps to generate a debug APK for your React Native project.
- First, make sure you have the necessary tools and utilities installed on your system. You will need to have the Android SDK and JDK installed. You can download the Android SDK from the official Android website, and the JDK from the Oracle website.
- Once you have the Android SDK and JDK installed, open a command prompt or terminal and navigate to the root directory of your React Native project.
- In the root directory of your project, create a file named “mydemo.keystore” to serve as your debug keystore. You can use any name you prefer, just make sure to remember it for future reference.
- In the command prompt or terminal, run the following command to generate a debug keystore:
keytool -genkey -v -keystore mydemo.keystore -alias mydemokey -keyalg RSA -keysize 2048 -validity 10000This command will generate a new debug keystore file named “mydemo.keystore” in the root directory of your project.
- Next, open the “android/app/build.gradle” file in your project directory. Add the following lines to the android section:
android {
...
signingConfigs {
debug {
storeFile file('mydemo.keystore')
storePassword 'mypassword'
keyAlias 'mydemokey'
keyPassword 'mypassword'
}
}
...
}
Make sure to replace ‘mypassword’ with the password you used to generate the keystore in step 4.
- Now, open a command prompt or terminal and navigate to the root directory of your project. Run the following command:
./gradlew assembleDebugThis command will generate the debug APK file for your project. The APK file will be located in the “android/app/build/outputs/apk/debug” directory.
And that’s it! You have successfully generated a debug APK of your React Native Android project. You can use this APK for testing and debugging your application.
It is important to note that the debug APK should not be used for releasing your application to the public. It is intended for development and debugging purposes only. To generate a release APK for your app, you will need to follow a different set of steps.
Further, with React Native you can generate debug APKs for different architectures and languages. The steps mentioned above are specific to generating a debug APK for an Android project.
For further information and source code examples, you can refer to the official documentation and other reliable sources.
Why convert source code to APK files
When developing applications for the Android platform, you typically start with the source code written in a programming language such as Java or Kotlin. However, in order to run the application on an Android device, it needs to be converted into a format called APK (Android Package). This conversion process is crucial as it prepares the application for distribution and installation on Android devices.
The main reason why source code is converted to APK files is that Android devices do not natively understand programming languages like Java or Kotlin. Instead, they require a compiled binary file that can be executed on the device’s hardware. The APK file is essentially an assembly of all the necessary resources, assets, and code required for the application to function.
Converting the source code to an APK file involves a series of steps. First, the code needs to be compiled using the Java Development Kit (JDK) and a specified class-path. This step ensures that the code is translated into a format that Android devices can understand.
Next, the compiled code is bundled together with the necessary resources and assets, such as images, sounds, and layout files. This is done using a build tool like Gradle or Maven, which handles the project configuration and dependencies.
Once the APK file is generated, it needs to be signed with a digital certificate to ensure its authenticity and integrity. This step is necessary for applications that are intended to be published on the Google Play Store or other app distribution platforms.
After signing, the APK file is ready to be installed on an Android device. This can be done by transferring the file to the device and opening it using a file manager or by installing it directly from the Google Play Store.
In summary, converting source code to APK files is necessary to make an Android application compatible with Android devices. It involves compiling the code, adding necessary resources, signing the final APK file, and then distributing it to the target devices. By following this process, developers can ensure that their application works correctly and meets the requirements of the Android platform.
Assembly
Assembly refers to the process of creating an APK file, which is the final output of an Android application project. It involves several steps and the use of various tools and utilities to convert the source code into a runnable application.
The first step in the assembly process is to generate the debug APK. This allows developers to test and debug their application during the development phase. In order to do this, the JDK (Java Development Kit) and Android SDK must be installed and properly configured on the development machine.
Once the debug APK is generated, developers can test the application on an Android device or emulator. This is done by adding the generated APK file to the device using utilities like ADB (Android Debug Bridge) or through the command line in Termux. The APK can then be run, and any issues or bugs can be identified and fixed.
After the testing phase is complete and the application is ready for release, the next step is to sign the APK. This is done by adding a digital signature to the application, which verifies its authenticity and ensures its integrity. In order to sign the APK, a keystore file is needed, which contains a private key used for signing. The key can be generated using the keytool utility provided with the JDK.
Once the keystore file is generated, it can be specified in the build.gradle file of the project. This file contains various configurations and settings for the application build process. By specifying the path to the keystore file and providing the required information, the signing process can be automated.
It is important to note that the final APK file generated after the assembly process is usually optimized for compatibility across different devices. This includes support for various screen sizes, resolutions, and CPU architectures. The APK also includes native libraries and resources specific to the target Android version.
The assembly process can be done manually or through automated tools like Gradle or Maven. These build systems provide a high level of flexibility and customization options, allowing developers to define the exact steps and tasks needed for the assembly process. They also handle dependencies, resources, and code linking, making the assembly process more efficient and reliable.
In summary, assembly is an essential step in the development of an Android application. It involves converting the source code into a runnable APK file, testing and debugging the application, signing the APK for release, and optimizing it for compatibility. By following the necessary steps and utilizing the right tools, developers can ensure a smooth and successful assembly process.
Sources

- “Android Developer” – The official website of Android providing documentation, tutorials, and other resources for building APK files.
- “Termux” – A Linux terminal emulator for Android that can be used to run command-line programs on the Android device.
- “Android.jar” – A file containing the compiled Java code for the Android platform, which is needed for building APK files.
- “JDK” – The Java Development Kit, which is required to compile and run Java programs.
- “Keystore” – A file that contains a set of cryptographic keys, which is used to sign the APK file.
- “Debug” – A mode of operation for an Android application, which allows for easier testing and debugging.
- “Assembly” – The process of combining all the necessary files and resources into a single APK file.
- “React Native” – A framework for building native mobile apps using JavaScript and React.


