

Creating a DocuSign signature is an essential part of the process when using the DocuSign platform for signing documents electronically. DocuSign is an electronic signature solution that allows you to send, sign, and process documents with ease. In this article, we will guide you through the steps you need to follow to create a signature using DocuSign.
To start, you will need to have an account with DocuSign. If you don’t have one yet, you can sign up for a free account on their website. Once you have an account, log in to access the DocuSign dashboard.
Next, select the document you need to sign. You can either upload a PDF file or select one from your DocuSign documents. If you need to add more documents, you can do so by clicking on the “Add Documents” button. Once you have selected the document(s), click on “Next” to proceed to the next step.
In the next step, you will need to select the workflow for signing the document. DocuSign provides different options for selecting the signing order and defining the roles for each signer. You can choose to have a sequential order or parallel signing. Once you have made your selections, click on “Next” to proceed.
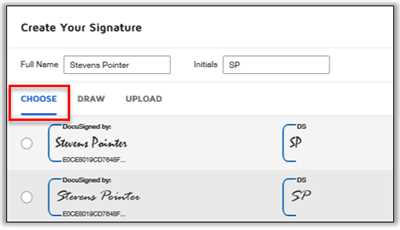
Now it’s time to create your electronic signature. DocuSign offers multiple options for creating signatures, including drawing, uploading an image, or selecting from pre-made signature styles. Choose the option that suits you the best and follow the instructions to create your signature. Once you are satisfied with your signature, click on “Next” to proceed.
After creating your signature, you can set your preferences for the signing process. This includes options such as enabling reminders, specifying authentication methods, and adding text tags to the document. Once you have set your preferences, click on “Next” to proceed.
Finally, review the document and make sure everything is in order. If everything looks good, click on “Send” to send the document for signing. Your recipients will receive an email notification with a link to sign the document electronically using DocuSign. Once the signing process is completed, you will receive a notification confirming the completion of the signature process.
That’s it! You have successfully created a DocuSign signature and sent a document for signing. With DocuSign’s easy-to-use platform, you can streamline your signature process and save time and effort. Start using DocuSign today and experience the convenience of electronic signatures.
How to add an electronic signature to a PDF
To create a digital signature on a PDF using DocuSign, follow these steps:
- First, go to the DocuSign website by clicking here.
- If you don’t have an account, you’ll need to create one by completing the sign-up process.
- Log in to your DocuSign account and select “Sign a document” from the menu.
- Choose the PDF file that you need to sign by selecting “Upload a document”.
- After selecting the document, you can add your electronic signature to it by selecting the “Add a signature” option.
- DocuSign provides different options for creating your signature. You can draw, type, or upload an image of your signature.
- Select the option that works best for you and follow the instructions to create your signature.
- Once you have created your signature, you can place it in the document by clicking on the desired location.
- After placing your signature, you can customize its appearance by selecting the “Change signature” option.
- DocuSign also allows you to add additional information, such as the date, by selecting the “Add fields” option.
- When you are satisfied with the signature and any additional information, select “Finish” to complete the signing process.
- You can then send the signed PDF to others by entering their email addresses or by selecting them from your contacts.
By following these steps, you can easily add an electronic signature to a PDF using DocuSign. This allows you to sign documents digitally and eliminates the need for printing, scanning, and faxing. DocuSign’s easy-to-use interface and customizable signing preferences make it a popular choice for creating and sending electronic signatures.
Create and send documents for DocuSign signatures
DocuSign allows you to easily and securely send documents for electronic signatures. With the process of creating and completing documents made simple, you can efficiently manage your workflow and ensure seamless signing.
To get started with DocuSign, you need to select the documents you want to send for signing. Whether you have a PDF or any other type of document, you can easily add it to the DocuSign interface.
Once you have added your documents, you can proceed to select the recipients who need to sign the documents. Simply enter their names and email addresses, and DocuSign will handle the rest. You can also add a personalized message to provide additional instructions or context.
After selecting the recipients, you can customize the signing workflow according to your preferences. You can choose the order in which the recipients will sign, and even set specific signing steps for each recipient. This ensures that the signing process is efficient and tailored to your needs.
Once you have set up the signing workflow, you can proceed to send the documents for signature by clicking the “Send” button. DocuSign will generate an email notification to each recipient, inviting them to access the documents and complete the signing process.
When the recipients receive the email, they can click on the provided link to access the documents and begin signing. DocuSign provides a user-friendly interface that allows recipients to sign documents electronically with ease. They can sign by typing their name, drawing their signature, or even uploading an image of their signature.
Throughout the signing process, DocuSign ensures that the documents are securely stored and protected. You will receive notifications as each recipient completes their signature, and you can access the completed documents at any time.
In summary, creating and sending documents for DocuSign signatures is a straightforward process. By selecting the documents, setting up the signing workflow, and clicking “Send”, you can efficiently manage the signing process and ensure the completion of important documents. DocuSign simplifies the signing experience for both senders and recipients, making it the ideal solution for electronic signatures.
DocuSign – Creating a Signature

With DocuSign, you can easily sign electronic documents using the signature feature. This allows you to sign important documents without the need for printing and scanning. Here’s how you can create a signature using DocuSign:
- Select the document you need to sign. DocuSign supports various file formats, including PDF.
- Next, click on the “Sign” button, which will open up the signature creation process.
- If you have already created a signature in DocuSign, you can select it from your signature preferences. If not, you can create a new one by selecting the “Create Signature” option.
- When creating a signature, you can either draw it using your mouse or upload an image of your handwritten signature.
- After selecting or creating your signature, you can position it in the document by clicking on the desired location.
- Once you have placed your signature, you can proceed to complete the signing process by clicking on the “Finish” button.
- If there are any additional documents that require your signature, you can add them to the workflow by selecting the “Add Documents” option.
- Finally, review all the information and documents before sending them out. You can make any necessary edits by clicking on the respective options.
DocuSign’s signature feature simplifies the process of signing important documents. It offers a user-friendly interface and provides various options for creating and adding your signature. With DocuSign, you can securely sign documents online, eliminating the need for traditional paper-based signing methods.
Sources:
- https://www.docusign.com
- https://www.docusign.com/how-it-works/electronic-signature
- https://www.docusign.com/how-to/how-to-sign-documents-electronically-for-free
Kevin, for more information on how to create a signature using DocuSign, please refer to the official DocuSign website.
Completing the Signing Process
Completing the signing process with DocuSign is a simple and straightforward process. Once you have selected the documents that need to be signed and have created your electronic signature, you can proceed to the next step.
To get started, click on the “Sign” button next to the document you want to sign. This will open the signing workflow where you can select your preferred signing method.
DocuSign offers various options to sign the document, such as drawing your signature with your mouse or finger, typing your name, or uploading an image of your signature. Choose the method that suits you best and click on the corresponding option.
If you need to sign multiple pages or sections of the document, you can easily navigate through the pages using the document viewer. Once you have reviewed the document and are ready to sign, place your signature in the designated area by clicking on it.
If the document requires additional information, such as initials or dates, you can add them by clicking on the respective fields. This will allow you to complete the signing process more accurately.
After you have placed your signature and any other required information, you can review the document once again to ensure everything is correct. If you need to make any changes, you can click on the respective fields and update the information.
Once you are satisfied with the document, click on the “Finish” button. This will complete the signing process, and the document will be automatically saved and sent to the designated recipients.
In conclusion, completing the signing process with DocuSign is a straightforward task that can be done with just a few clicks. By following the steps outlined above, you can create and send electronic signatures with ease, saving time and effort in the process.
Sources

- Selecting an electronic signature source is the first step in the process of creating a signature with DocuSign.
- Next, you will need to select the type of document you want to sign, such as a PDF.
- Creating a signature with DocuSign involves selecting a source for the signature, adding the signature to the document, and clicking “Next” to send the signed document.
- DocuSign offers various sources for creating electronic signatures, including signing with your finger or mouse, uploading an image of your signature, or selecting a saved signature from your preferences.
- Kevin, a user of DocuSign, can select the source that best fits his workflow and requirements.
- Completing the process of creating a signature with DocuSign involves selecting an electronic signature source, adding the signature to the document, and sending the completed document.


