

If you’re looking to monetize your app and show ads, AdMob is a great option. AdMob, a Google-owned platform, allows you to earn revenue through advertisements displayed in your app. In this article, we’ll guide you through the process of creating an AdMob app by joining the appnext.com group and earning revenue from ads.
First, you need to create an account on appnext.com. Once you’ve signed up and logged in, go to the panel and click on “Admob settings” to access the AdMob settings page.
In the AdMob settings page, you’ll find different fields and options to select. For example, you can choose the type of ads you want to show in your app – banner, interstitial, rewarded, or native ads. Select the ones that best fit your app and game, and then click on “Save” to save your settings.
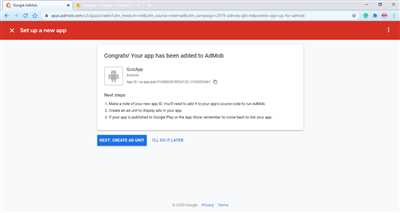
After saving the settings, you’ll be able to see your AdMob app ID. Make note of this ID, as you’ll need it later in the process. It will look like this: ca-app-pub-xxxxxxxxxxxxxxxxxxxxxxxxxx. Once you have the app ID, you can move on to the next steps.
In the next step, you need to join the appnext.com group on AdMob. To do this, go back to the appnext.com panel and click on “Join Group” below the AdMob section. Once you’ve joined the group, you’ll be able to access the placement IDs for different types of ads.
Now that you have the placement IDs, you can integrate the AdMob advertisement units into your app. You can do this by following the steps listed on the AdMob website. Once you’ve integrated the ads, you’ll start seeing them show up in your app and earn revenue from the clicks.
It’s important to note that you’ll only start earning revenue once your app has been approved by AdMob. So make sure your app follows all the guidelines and policies set by AdMob to ensure a smooth monetization process.
If you have any questions or need further assistance, don’t hesitate to comment below. Join the appnext.com group on AdMob and start monetizing your app today! Don’t miss out on this opportunity to earn revenue and grow your app.
So, follow these steps and start monetizing your app with AdMob. Show different types of ads to people and earn revenue from their clicks. Enjoy the pie!
Remember, AdMob is a great way to monetize your app and increase your revenue. So don’t miss out on this opportunity. Create an AdMob app today and start earning!
Boost your app revenue
Monetizing your mobile apps is an essential step that every app developer needs to take in order to generate revenue. By integrating advertisements into your app, you can earn money for every click and view on these ads. One popular advertising platform that you can use to monetize your app is Google AdMob.
AdMob is a Google-owned platform that allows you to display various types of advertisements such as banners, interstitials, and rewarded videos in your app. By joining the AdMob program, you can take advantage of Google’s extensive ad network and increase your app revenue. In this section, we will guide you through the process of integrating AdMob into your app.
Before you can start monetizing your app with AdMob, you need to have a published app listed on the Google Play Store or Apple App Store. Once you have an app, follow these steps to create an AdMob account:
- Step 1: Sign in to AdMob – Go to the AdMob website and sign in with your Google account.
- Step 2: Create an app – Click on the “+ App” button and fill in the required fields. Select the platform (Android or iOS) and provide the necessary app details.
- Step 3: Add Ad Unit – After creating an app, click on the app name to go to the app settings. Then, click on the “+ Ad Unit” button to create an ad unit. You can choose from different types of ad units, such as banner, interstitial, or rewarded video.
- Step 4: Get Ad Unit ID – Once you create an ad unit, you will receive a unique Ad Unit ID. Note down this ID as you will need it to integrate ads into your app.
Now that you have created an AdMob account and obtained your Ad Unit ID, you can start integrating ads into your app. Below are the steps to follow:
- Step 1: Download Google Mobile Ads SDK – Go to the AdMob website and download the Google Mobile Ads SDK for Android or iOS, depending on your app’s platform.
- Step 2: Integrate the SDK into your app – Follow the instructions provided by Google to integrate the SDK into your app’s codebase. This usually involves adding the necessary dependencies and modifying your app’s manifest or AppDelegate files.
- Step 3: Implement ad placements – Once the SDK is integrated into your app, you can start showing ads by adding ad placement code in your app’s relevant sections. For example, you can display a banner ad at the bottom of your app’s main screen.
- Step 4: Test the ads – After implementing ad placements, you can test the ads by running your app on a device or emulator. Make sure that the ads are displayed correctly and functioning as expected.
Once you have completed these steps, your app is ready to generate revenue through AdMob advertisements. When users interact with the ads in your app, you will earn money based on the ad type and user engagement.
Note: Apart from Google AdMob, there are other advertising platforms such as Appnext.com that you can also explore to monetize your apps. By adding multiple ad networks to your app, you can maximize your revenue potential.
Don’t limit your app’s revenue potential. Start monetizing your mobile apps today and boost your app revenue!
Appnextcom
Appnextcom is a popular advertising platform that allows developers to monetize their mobile applications. It works in conjunction with AdMob, a mobile advertising platform created by Google. By integrating Appnextcom with AdMob, you can increase your app revenue and reach a larger audience.
To start the process, you need to follow these steps:
1. Create an account on appnext.com.
2. Join the Appnextcom AdMob group by clicking on the “Join Us!” button on the main page.
3. Once you have joined the group, go to the “Settings” panel and select the “AdMob” tab.
4. In the “AdMob” section, you will find different fields that you need to fill in. For example, you will need to enter your AdMob app ID (ca-app-pub-xxxxxxxxxxxxxxxxxxxxxxxxxx) and select the types of advertisements you want to show in your app.
5. After filling in the necessary fields, click on the “Save” button to save your settings.
6. Next, go to the “Apps” section and click on the “Add App” button.
7. In the “Add App” section, enter the details of your app, such as the name and category.
8. Once your app is listed, select it and go to the “Monetize” tab.
9. In the “Monetize” tab, you will find different ad units that you can use to monetize your app, such as banners and interstitial ads. Select the ad units that you want to use and follow the instructions to integrate them into your app.
10. Once the integration process is complete, your app will start showing Appnextcom advertisements.
Note that it may take some time for the advertisements to appear in your app, so don’t worry if you don’t see them right away. Also, keep in mind that the revenue you earn from these advertisements will depend on factors like the number of people clicking on the ads.
Appnextcom provides a great opportunity to monetize your app and increase your revenue. By following the steps mentioned above, you can easily integrate Appnextcom with AdMob and start earning money from your app.
So, don’t wait any longer. Join Appnextcom and start monetizing your app today!
If you have any questions or need further assistance, feel free to comment below. We’re here to help you!
Appy Pie How to Monetize your App with AdMob
If you have listed AdMob as one of the ways to monetize your app, then you may need to follow these steps to integrate it into your Appy Pie app. AdMob allows you to earn revenue by displaying ads in your app.
Here is how to monetize your app with AdMob:
Step 1: Sign up for AdMob
To get started, you need to have a Google account. Sign up for AdMob using your Google account credentials.
Step 2: Create an ad unit
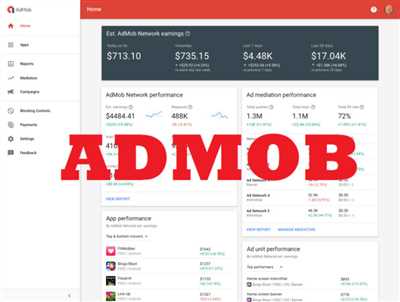
After signing up, go to the AdMob dashboard and click on the “Apps” tab. Select the app for which you want to monetize with AdMob. In the “App Settings” section, click on the “+ Add ad unit” button. Then you can select the ad format that you want to display in your app, such as banner ads or interstitial ads.
Step 3: Get your AdMob ID
Once you have created an ad unit, you will be given an AdMob ID. This ID is a unique identifier for your ad unit. You will need this ID to integrate AdMob into your Appy Pie app.
Step 4: Integrate AdMob into your Appy Pie app
In your Appy Pie app, go to the “Settings” section and click on the “Monetize” tab. Then, select the “AdMob” option and enter your AdMob ID in the appropriate fields. Save the settings.
Step 5: Join an ad network
If you are not a member of an ad network, Appy Pie allows you to join the AppNext ad network. You can sign up for an AppNext account and get your placement ID.
Step 6: Integrate AppNext ads
Once you have the placement ID, go back to the “Monetize” tab in your Appy Pie app settings and click on the “AppNext” option. Enter your AppNext placement ID in the designated field.
After following these steps, your app will start showing ads from AdMob and AppNext. Note that it may take some time for the ads to show up in your app after the integration process.
With these steps, you can monetize your app and increase your revenue by displaying advertisements from different ad networks like AdMob and AppNext. Take advantage of these monetization options and start earning revenue from your app today!


