

If you want to create a new Facebook page, you’ll need to have a Facebook account. This is the official way to create a page on the popular social media platform. Don’t worry if you’re not an internet whiz, because the process is actually quite simple. In this guide, we’ll walk you through the four-step process of creating a new Facebook page.
The first step is to choose a name for your page. This is the name that will appear on your page and in search results. It’s important to choose a name that reflects what your page is about. For example, if you’re creating a page for your business, you might want to use the name of your shop or the word “business” in the name.
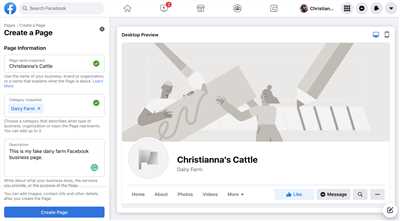
Once you have chosen a name, you can click the “Create Page” button to get started. You’ll then be taken to a window where you can add some basic information about your page. You can also choose a profile picture for your page. It’s important to choose a picture that will catch people’s attention and make them want to learn more about your page.
Next, you’ll need to define the category that your page falls into. This is important because it helps Facebook determine how to place your page within its categories. There are different categories to choose from, such as “Business,” “Community,” and “Entertainment.” Simply select the category that best describes your page.
After you’ve defined your page’s category, you’ll have the opportunity to add some more details about your page. This is where you can customize the look and feel of your page. You can add a description, links to your website or social media accounts, and even a call-to-action button. This is your chance to let people know what your page is all about and how they can get in touch with you.
Finally, it’s important to add some engaging content to your page. You can add photos, videos, and text posts to keep your audience interested. It’s important to keep your page updated with fresh and relevant content to keep people coming back for more. The more engaging and interesting your content is, the more likely it is to be shared and spread across the platform.
Once you have added some content, you’re ready to launch your page. This means that your page will appear on Facebook and be visible to the public. People can now like, comment on, and share your page’s contents. It’s important to keep an eye on your page and respond to any messages or comments that you receive. This will help you build a strong and engaged community around your page.
In conclusion, creating a new Facebook page is a simple and straightforward process. By following these seven steps, you can create a page that will help you connect with your audience and promote your business or organization. So what are you waiting for? Get started and create your own Facebook page today!
- How to Create a Facebook Page: A Four-Step Guide
- Table of Contents
- How to Create a Facebook Business Account
- 1 Launch the Process
- 2 Name Your Page
- 3 Define Your Page
- 4 Add Imagery
- 5 Spread the Word
- 6 Add Some Meat to the Bones
- 7 Add a CTA
- How to create a page in Facebook
- Video:
- The BEST Facebook Ads Tutorial For Beginners in 2024
How to Create a Facebook Page: A Four-Step Guide
Creating a Facebook Page for your business or personal use is a great way to connect with others online. Whether you want to spread the word about your shop or interact with your closest friends, having a Facebook Page can be a valuable tool. In this four-step guide, we’ll walk you through the process of creating your own Facebook Page.
- Step 1: Getting Started
- Step 2: Choosing a Name and Category
- Step 3: Setting Up the Page
- Step 4: Adding Content
First, you’ll need to have a Facebook account. If you don’t already have one, go to www.facebook.com and sign up. Once you’re logged in, click on the “Create” button located at the top right of your Facebook home page.
Next, a window will appear where you’ll need to choose a name for your Facebook Page. Think carefully about what you want to name it, as this will be the official name of your Page. You’ll also need to select a category that best matches the purpose of your Page, such as “Business” or “Personal.”
Once you’ve chosen a name and category, you’ll be taken to the setup process. Here, you can add a profile photo and cover photo for your Page. It’s important to choose images that represent your brand or purpose accurately. You can also add a brief description and contact information, such as your website or phone number.
Now that your Facebook Page is created, it’s time to start adding content. You can post photos, videos, and status updates to engage with your audience. You’ll also have the option to create different sections or tabs within your Page, such as a “Shop” tab if you have an online store. Make sure to keep the content fresh and interactive to encourage people to like, comment, and share your posts.
By following these four steps, you’ll be well on your way to creating a successful Facebook Page. Remember to regularly update your Page with new and engaging content, and don’t be afraid to explore the various features and options Facebook provides. Good luck!
Table of Contents
- A Four-Step Guide to Creating a New Facebook Page
- Step 1: Open Facebook and Log into Your Account
- Step 2: Click on the “Create” Button
- Step 3: Choose a Page Name and Category
- Step 4: Add a Profile Picture and Cover Photo
- Defining Your Page’s Content and Imagery
- What is Your Page About?
- What Message do You Want to Spread?
- Choosing Images for Your Page
- How to Interact with Your Audience
- Setting Up Your Page’s Details and Appearance
- Customizing Your Page’s Categories and Options
- Adding Links and Contact Information
- Setting Up a Call-To-Action Button
- Matching Your Page’s Theme to Your Business
- Making Your Page Public and Having Others Like and Follow It
- Choosing the Privacy Settings for Your Page
- Inviting People to Like and Follow Your Page
- Spreading the Word About Your Page
- Engaging with Your Audience
- Managing Your Page and Keeping It Official
- Editing and Updating Your Page Contents
- Responding to Messages and Comments
- Managing Your Page’s Settings
- Keeping Your Page Secure and Verified
How to Create a Facebook Business Account
If you have an online business or want to promote your brand, creating a Facebook Business Account is an important step. With over 2.7 billion monthly active users, Facebook provides a massive platform to reach and interact with your target audience. Follow these four steps to create your own Facebook Business Account and get started.
Step 1: Open the Create a Page Window
To create a Facebook Business Account, you’ll need to first open the Create a Page window. To do this, click the “Pages” option in the left-hand menu of your Facebook account. Then, click the “Create a Page” button.
Step 2: Define Your Business
In the Create a Page window, you’ll need to define your business by choosing one of the available categories. Facebook offers several categories to choose from, such as “Local Business or Place,” “Company, Organization, or Institution,” and “Brand or Product.” Select the category that best matches your business or brand.
Step 3: Add Your Business Details
In the next window, you’ll need to add your business details. This includes providing a name for your business, selecting a profile picture, and adding a short description. Your profile picture is an important visual representation of your brand, so make sure it is high-quality and eye-catching. You can also add additional images to further showcase your products or services.
Step 4: Launch Your Page
Once you have defined your business and added your business details, you’re ready to launch your Facebook Business Account. Click the “Create Page” button to finalize the process. Your page will be created, and you’ll be taken to the page’s admin dashboard.
Now that your Facebook Business Account is created, there are several important things to keep in mind. First, you’ll want to add content to your page to make it attractive and engaging. This can include posting updates, sharing links to your website or blog, and uploading photos and videos.
Interact with your audience by responding to comments and messages, and use the Call-to-Action (CTA) button to direct visitors to take specific actions, such as contacting you or making a purchase. Additionally, you can explore Facebook’s advertising options to spread the word about your business and reach a wider audience.
Remember, having an official Facebook Business Account provides you with a chance to reach and interact with your target audience in meaningful ways. Take advantage of the platform’s features, explore the different options available within your account, and continuously improve your page to make it more effective in achieving your business goals.
1 Launch the Process
Once you’re ready to create a new Facebook page, it’s time to launch the process. Here’s a four-step guide on how to do it:
| Step 1: Define Your Page Before you begin, it’s important to know what your page is all about. Are you creating a personal page or a business page? What category does it fall under? Take some time to interact with the options and choose the one that best matches your needs. | Step 2: Create Your Page Click on the “Create” button located on the top right corner of your Facebook account window. A dropdown menu will appear with different options. Select the “Page” option to get started. |
| Step 3: Add Basic Information In this step, you’ll need to fill out important fields such as the name, category, and description of your page. Make sure to provide an accurate and compelling description that will grab the attention of anyone who visits your page. | Step 4: Customize Your Page Now it’s time to make your page look visually appealing and unique. You can add photos, videos, and other media contents to showcase your business or personal branding. Also, you have the option to choose a CTA (Call-To-Action) button that will guide visitors to the next steps you want them to take. For example, if you have an online store, you can add a “Shop Now” button to direct people to your shop. If you own a restaurant, you can have a “Contact Us” button to allow people to easily reach out and make reservations. |
| Step 5: Spread the Word Once you have your page set up, it’s time to spread the word and let people know about it. Share the link on your personal Facebook account, interact with other pages by leaving comments or liking their posts, and use the power of word-of-mouth to get the message out. | Step 6: Keep the Contents Coming Now that you have a page, it’s important to keep it active with fresh and engaging contents. Post regular updates, share relevant pictures and videos, and stay connected with your audience. The more active and valuable your page is, the more chances people will have to interact with it. |
| Step 7: Be Official Once all the bones of your page are in place, it’s time to make it official. Click on the “Publish” button and your page will become public. From this point on, anyone can find your page and interact with its contents. | |
Remember, creating a Facebook page is just the first step. It’s important to actively manage and update your page to keep it relevant and engaging for your audience.
2 Name Your Page
Once you click “Create a Page” and choose the type of page you want to create, the next step is to name your page. This is an important step in the process because it defines the identity of your page and is the first thing people will see when they visit your page.
When naming your page, there are a few things to keep in mind. First, you want to choose a name that accurately reflects the purpose of your page. For example, if you are creating a page for your online shop that sells meat products, you might want to name it something like “Meat Market” or “The Meat Store”.
Next, you’ll need to choose a category that best matches the type of page you are creating. Facebook provides a list of categories to choose from, such as “Local Business”, “Public Figure”, or “Community Organization”. Selecting the right category will help people find your page more easily.
After you’ve defined the name and category for your page, you can add a profile picture and cover photo to make your page visually appealing. This imagery will appear at the top of your page and will be the first thing people see when they visit. You can choose to use your own photos or select from the options provided by Facebook.
Keep in mind that the name and imagery you choose should be in line with the type of page you’re creating. For example, if you’re creating a page for a dental office named “Toothless Dental”, it wouldn’t make sense to have a picture of a steak as your profile picture. Make sure the name, category, and imagery all align to create a cohesive and professional look for your page.
Once you have everything ready, click the “Create” button to launch your page. It’s important to note that at this stage, your page will only be visible to you. You can add content, spread the word, and interact with others before making your page public. This gives you a chance to make sure everything looks and works the way you want before sharing it with others.
Having a Facebook page for your business, organization, or personal use is a great way to connect with others, share information, and promote your brand. Following these steps will get you started on creating your page and setting it up for success.
3 Define Your Page
Once your Facebook page is created, you’ll want to define its purpose and content. This is an important step in the process of launching your page and spreading your business or personal message online. Here’s how you can define your page in 3 easy steps:
Step 1: Choose a Name
In order to get started, you’ll need to give your page a name. This can be the name of your business, personal brand, or any other word or phrase that best represents what your page is about. Choose a name that is catchy, easy to remember, and relevant to the contents of your page.
Step 2: Select a Category
Facebook offers different categories to choose from in order to match your page with the closest possible option. For example, if you have a shop or a store, you can select the “Shop” category. This will also help people find and interact with your page more easily. You can always change the category later if needed.
Step 3: Add a Profile Picture and Cover Photo
Having a profile picture and a cover photo is crucial for your Facebook page. These images will appear at the top of your page and will serve as the visual representation of your page. Choose high-quality and attention-grabbing photos that reflect the essence of your page. For example, if you have a business page, you can use your logo as the profile picture and an image showcasing your products or services as the cover photo.
There are a few other important options you can add in order to define your page further:
– Add a Call-to-Action (CTA) button: This button will appear at the top of your page and will prompt visitors to take a specific action, such as “Shop Now” or “Contact Us”.
– Fill in the “About” field: Use this space to provide a brief description of your page and what people can expect to find there.
– Add contact information: You can add your business hours, phone number, email address, or other ways to get in touch with you.
– Define your page’s contents: Think about what type of posts, articles, images, and videos you want to share on your page. This will help you create a cohesive and engaging feed for your followers.
Once you’ve defined your page, you’re ready to click the “Create Page” button and launch your Facebook page to the public. Within a short time, you’ll have the chance to start posting and interacting with your audience.
Now that you know how to define your page, you can move on to the next steps in the four-step process of creating a new Facebook page.
4 Add Imagery
Once you’ve created your business page, it’s important to add imagery to make it more visually appealing. In this step, you’ll need to upload some photos or pictures that represent your business. These images will appear in various places on your page, such as the profile picture or cover photo. Here are the four steps to add imagery to your Facebook page:
- Click on the “Add Photos” button located in the cover photo area.
- In the pop-up window, click on the “Upload Photos/Video” button and select the photos or images you want to add.
- In the next window, you’ll have the option to define the order of the photos and add captions or tag people. You can also choose to add a CTA (Call-to-Action) button to your photos, such as “Shop Now” or “Contact Us”.
- Once you’re ready, click the “Done” button to add the photos to your page. You can always go back and edit the contents of the photos in the future.
Having high-quality and visually appealing imagery is important because it will help you create a strong online presence and attract more people to your page. This is your chance to showcase the unique aspects of your business and make a lasting impression on your audience.
For example, if you have a meat shop, you might want to add photos of your meat products or a picture of your store’s interior. If you’re a personal trainer, you can add photos of yourself working with clients or before and after pictures of your clients’ transformations.
Images are a powerful way to communicate your message and engage with your audience. They can help bring your business to life and show people what you have to offer. So, make sure to take the time to add imagery to your Facebook page in order to get started on the right foot.
5 Spread the Word

Once you have created your Facebook page and filled it with the necessary information, it’s time to spread the word and let people know about your new online presence. Here are some ways you can do that:
- Update your personal profile: In order to let your friends and contacts know about your new Facebook page, you can add a link to it in your personal profile bio or under your contact information.
- Use other social media platforms: If you have accounts on other social media platforms like Instagram or Twitter, you can post about your new Facebook page and provide a link for people to easily find and follow it.
- Reach out to your closest contacts: Message those who are most important to you personally and let them know about your new Facebook page. This can include friends, family, or business connections.
- Ask for help: If you have friends or family members who are willing to lend a hand, ask them to share your Facebook page on their own profiles or to spread the word in their own networks.
- Use the “invite” feature: Once your page has a few likes, there will be an option to invite people to like your Facebook page. This button will appear under the “community” section on the left-hand side of your page. You can click on it and choose the friends or contacts you want to invite.
By following these steps and spreading the word about your new Facebook page, you’ll increase your chances of attracting more followers, likes, and engagement. Remember to keep your page active by regularly posting updates, engaging with your audience, and sharing relevant and interesting content.
6 Add Some Meat to the Bones
Once you have created your Facebook page, it’s time to add some meat to the bones. This step is crucial in order to make your page appear more professional and attractive to your audience. Here are some important things you’ll need to do:
- Add photos: Having some imagery on your page is important because it helps to define your business and make it more relatable. You can add images of your products, your store or shop, or even some personal photos that show the behind-the-scenes of your business.
- Create engaging content: What you write in your posts is important. You need to keep the message clear and interesting to your audience. Use relevant keywords and include a call-to-action (CTA) that tells people what you want them to do next.
- Define your categories: In order for people to find your page, you need to specify the categories that it belongs to. This will also help Facebook match your page with other similar pages.
- Add contact information: Make sure you include your contact details so that people have a way to get in touch with you if they need to. You can add your phone number, email address, website, and any other relevant information.
- Add links to your online presence: If you have other online platforms, such as a website or a blog, you can add the links to your Facebook page. This will help people discover your other channels and spread the word about your business.
- Interact with your audience: Once your page is up and running, it’s important to interact with your audience. Reply to comments, answer their questions, and engage in conversations. This will help build a loyal community around your page.
By following these six steps, you’ll be on your way to creating an official Facebook page that is ready to launch. Remember, it’s not enough to just create the page – in order to make it successful, you need to add some meat to the bones.
7 Add a CTA
Once you have created your Facebook page and defined its name, categories, and other important details, it’s time to add a Call-to-Action (CTA) button. This button will appear at the top of your page and will guide your audience to take a specific action that you want them to do.
There are several options for CTAs that you can choose from, depending on the nature of your business and the message you want to spread. Here are some of the most popular options:
| Option | Description |
|---|---|
| Shop Now | If you have an online store, this option will launch a window where people can browse and buy your products. |
| Contact Us | If you want people to get in touch with you, this CTA will open a field where they can enter their contact information to reach out to your business. |
| Learn More | If you have valuable content or a guide to offer, this CTA will direct people to a page where they can find more information. |
| Sign Up | If you want people to subscribe to your newsletter or get updates, this CTA will take them to a form where they can fill in their details. |
Choose the CTA that best matches your business needs and goals. Keep in mind that having a clear and compelling CTA is crucial to getting your audience to interact with your page and take the next step.
For example, if you have a food business and want to promote your online shop, you could add a CTA button that says “Shop Now” and redirects users to your store. On the other hand, if you’re a restaurant and want to increase reservations, you could use the “Contact Us” CTA to let people easily reach out and book a table.
Remember, the CTA is your chance to give a strong message and guide your audience towards the actions you want them to take. So make sure to choose wisely and make it eye-catching and compelling!
How to create a page in Facebook
If you want to interact with your audience and spread your message, having a Facebook page is important. Creating a page is a four-step process that will only take a few minutes of your time.
Step 1: Account Setup
In order to create a page, you’ll need a Facebook account. If you don’t have one, go to Facebook.com and sign up. If you already have an account, log in and get ready to create your page.
Step 2: Name your page
Click on the “Create” button at the top right of your Facebook account, then select the “Page” option. Next, choose a name for your page. This is the word that will appear on your page and in Facebook search results. Make sure to choose a name that defines your business or personal brand.
Step 3: Choose a category and fill in the details
Choose a category that best matches what your page is about. For example, if you are creating a page for a restaurant or cafe, you can choose the “Food & Drink” category. Fill in other important details such as the address, phone number, and website. You can also add a profile picture and cover photo to make your page more visually appealing. Make sure these images match your brand’s imagery.
Step 4: Add a call-to-action (CTA) button
A CTA button is a way to guide your audience and encourage them to take action, such as contacting you, visiting your website, or making a purchase. Choose the most appropriate CTA option for your page, such as “Contact Us”, “Shop Now”, or “Sign Up”.
Once you’ve completed these four steps, click on the “Create Page” button. Your page will then be created and ready to go. You’ll have the chance to add more content and customize your page later on.
Having a Facebook page is a great way to keep your audience updated and engaged. It allows you to share important information, post photos and videos, and interact with your followers. Whether you’re creating a page for your business or personal brand, follow these steps and you’ll be on your way to a successful Facebook presence.


