
Adding a signature to your emails can give them a professional touch and save you time when sending out multiple messages. If you’re a Mac user, you might be wondering how to add a signature on your MacBook. Well, worry no more, because we’ve got you covered!
Apple’s default Mail app provides an easy way to create and insert an electronic signature into your messages. Whether you want to add a digital signature for personal or company use, follow these simple steps to get started:
- Open the Mail app on your MacBook. If you don’t have the Mail app, you can download it from the App Store.
- Click on “Mail” in the menu bar, located at the top of the screen.
- Select “Preferences” from the dropdown menu. A new window will open.
- In the window that appears, click on the “Signatures” icon, which looks like a column with a pen icon on the left side.
- On the left column, you’ll see a list of your email accounts. Select the account for which you want to create a signature.
- In the middle column, click on the “+” button to add a new signature. Give your signature a name that will help you identify it later.
- In the right column, you’ll see a text box where you can enter your signature details.
- If you want to include an image or logo in your signature, you can drag and drop it into the text box. You can also use the “Markup” option to make edits to the image.
- When you’re done creating your signature, close the Preferences window.
Now that you’ve created your signature, let’s see how to use it when sending out emails:
- Compose a new message in the Mail app.
- In the new message window, click on the “Signature” icon, which looks like a pen over a dotted line.
- A dropdown menu will appear with a list of your signatures. Select the one you want to use.
- Your selected signature will be inserted at the bottom of the email body. You can always change or remove it before sending if needed.
That’s it! You now know how to add a signature on your MacBook using the default Mail app. Whether you’re a business professional or just want to add a personal touch to your emails, having a signature can make a difference in how your messages are received. So go ahead and start adding that professional touch to your outgoing emails!
Create and insert a signature in Outlook for Mac
If you use Outlook for Mac as your email client, you have the option to create and insert a signature in your email messages. A signature is a unique digital representation of your name, title, company, and contact information that is automatically added to the end of each email you send.
Here is a step-by-step guide on how to create and insert a signature in Outlook for Mac:
- Open Outlook on your Mac.
- Click on “Outlook” in the top-left corner of the menu bar, then select “Preferences” from the drop-down menu.
- In the Preferences window, click on the “Signatures” icon, which is represented by a pen icon.
- In the left column of the Signatures window, click on the plus sign (+) to add a new signature.
- Give your signature a name that will help you identify it, such as “Work” or “Personal”.
- In the right column, enter the text that you want to appear as your signature.
- You can use the formatting options in the toolbar above the signature field to add markup, such as bold or italic text, to your signature.
- If you want to add an image or logo to your signature, click on the picture icon in the toolbar and select the image file from your Mac.
- When you’re finished creating your signature, click “OK” to save it.
- Now, whenever you compose a new email message in Outlook for Mac, your signature will be automatically added to the end of the message.
It’s worth mentioning that Outlook for Mac doesn’t allow you to use multiple signatures for different email accounts. However, you can create multiple signatures and select the desired one manually before sending each email.
Adding a signature to your emails can provide a professional touch and make it easier for recipients to identify and contact you. So, follow these steps and start sending emails with your customized signature!
How to do an electronic signature on Mac
If you need to add an electronic signature to your documents on a Mac, don’t worry! Apple provides a convenient and easy-to-use feature that allows you to create and add a digital signature quickly and effortlessly. Follow this step-by-step guide to learn how.
- Open the document or message you want to insert your signature into.
- Click on the “Markup” icon in the top-right corner of the window. This will open a column on the right-hand side of the window with several options.
- Scroll down to the “Signatures” section in the column and click on the “Create Signature” button.
- A window will appear, asking you how you want to create your signature. You have three options: “Trackpad”, “Camera”, and “iPhone/iPad”.
- If you choose to use your Mac’s trackpad, simply click on the trackpad with your finger and drag to create your signature. You may need to try this a few times to get it right.
- If you choose to use a camera, a message will appear with instructions on how to sign a piece of white paper and hold it up to the camera. Follow the instructions to capture your signature.
- If you choose to use an iPhone or iPad, a message will appear with instructions on how to sign a piece of white paper using the Apple Pencil. Follow the instructions to capture your signature.
- After creating your signature, it will be inserted into the document or message you were working on. You can resize and position it as needed.
- Click “Done” when you’re finished making any edits to your signature.
- Now, whenever you want to insert your signature, simply right-click on the document or message and select the “Insert Signature” option from the menu. Your default signature will be added.
- If you want to use a different signature, click on the “Markup” icon again and select the signature you want from the “Signatures” section.
- Even if you’re working with multiple accounts or email addresses, you can create and use different signatures for each one, customizing your messages accordingly.
With these easy steps, adding an electronic signature on your Mac becomes a breeze. Whether you need it for personal or business purposes, Apple’s built-in signature feature in Mail, Outlook, and other applications has got you covered.
Источники:
How to Use Multiple Email Signatures on a Mac

When it comes to sending emails on a Mac, having a professional and consistent signature is important. However, sometimes you may need to use multiple email signatures depending on the context or the recipient. Luckily, Apple’s Mail app allows you to easily create and manage multiple signatures. Here’s a step-by-step guide on how to use multiple email signatures on a Mac.
Step 1: Open the Mail app on your Mac. On the menu bar, click on “Mail” and then select “Preferences”.
Step 2: In the Preferences window, click on the “Signatures” tab.
Step 3: On the left column, you will see a list of email accounts that you have set up on your Mac. Select the email account for which you want to create multiple email signatures.
Step 4: On the right column, you will see a list of signatures that you have already created for the selected email account. To add a new signature, click on the “+” button.
Step 5: Give your new signature a name, which will help you identify it later. For example, you could name it “Work” or “Personal”.
Step 6: With the new signature selected, you can now make edits to it. You can use the formatting options available to customize the look of your signature, including adding icons or inserting HTML markup.
Step 7: Close the Preferences window when you’re done making changes to your signature.
Step 8: Now, when you compose a new email message, you can select one of your multiple signatures by clicking on the “Signature” option in the message window, which looks like a pen icon. A drop-down menu will appear, and you can choose the signature you want to use for that specific email.
Step 9: If you have the Trackpad option enabled on your Mac, you can even create a digital signature by signing your name with your finger on the trackpad. To do this, click on the Trackpad icon in the Signature menu and follow the instructions.
By following these steps, you can easily add multiple email signatures on your Mac. Whether you need different signatures for work and personal emails or if you want to have different signatures for each email account, Apple’s Mail app provides a convenient way to manage them all.
Sources:
How to add an email signature in Apple Mail
Apple Mail is a popular email client for Mac users. It allows you to send and receive emails, manage your inbox, and customize your email signature. Adding a signature to your email messages can give them a professional touch and provide essential information about you or your company. Here is a step-by-step guide on how to add an email signature in Apple Mail.
Step 1: Open Apple Mail
First, launch the Apple Mail application on your Mac. You can find it in your applications folder or use Spotlight search to locate it quickly.
Step 2: Go to Preferences
Next, click on the “Mail” option in the top menu bar and select “Preferences” from the drop-down menu.
Step 3: Select Signatures
Once you’re in the Preferences window, click on the “Signatures” tab. This will bring up the list of your current signatures or an empty column if you haven’t created any yet.
Step 4: Create a New Signature
To add a new signature, click on the “+” button in the bottom left corner of the window. A new signature will appear in the column on the right.
Step 5: Customize Your Signature
You can now edit your signature. Enter your name, email address, phone number, and any other contact information you want to include. You can also use markup options to format the text or add links and images.
Step 6: Assign a Signature to an Email Account
If you have multiple email accounts set up in Apple Mail, you can assign a signature to each one. Click on the email account in the left column and then select the signature you want to use from the drop-down menu on the right.
Step 7: Insert Your Signature
When composing a new email message, your signature will be automatically inserted at the bottom. If you want to add the signature to an email that you have already started, simply right-click in the body of the message and select “Insert Signature” from the menu.
With these steps, you can create and use multiple signatures for different email accounts or even drag and drop them into your emails as needed. Apple Mail gives you the option to set a default signature that will be used for all outgoing email messages if you don’t assign a specific signature to an account.
So, if you want to add a professional and personalized touch to your email communication, don’t worry – Apple Mail has got you covered with easy signature customization options.
Sources
If you want to add a signature on your MacBook, there are quite a few options you can use. Before you even start, make sure your MacBook is updated to the latest version of macOS. Apple has a built-in feature called Markup that allows you to insert signatures in multiple formats. You can use this feature to create a signature and then insert it into an email message when you want to send an electronic document.
To add a signature using Markup, follow these steps:
- Open the document or email you want to add a signature to
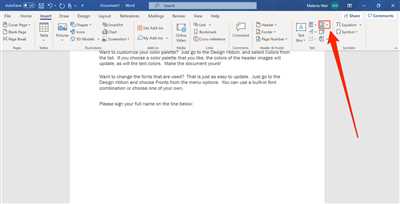
- Click on the “Edit” option in the top-right corner of the window
- In the Markup toolbar, click on the icon that looks like a signature
- If you haven’t already created a signature, select the “Manage Signatures” option
- A window will appear showing all your signatures. Click on the “+” icon to create a new signature
- Name your signature and choose the option that suits your needs
- For digital signings, you can use your trackpad to draw your signature or use an attached pen-like device
- After you’ve created the signature, you can drag and drop it into the document or email
- If you need to make any edits, right-click on the signature and select “Edit” from the dropdown menu
Another option is to use third-party email clients like Outlook or Spark. These email clients have their own signature feature, which allows you to create and insert signatures without using the Markup tool. You can find guides on how to add signatures in these email clients on their respective website or support columns.
By default, the process of adding a signature on a Mac doesn’t involve copying and pasting a signature image. Instead, you create a new signature within the email client or by using the Markup feature. This ensures that the signature remains intact and doesn’t get removed or altered when you send the email.
Using Markup or third-party email clients on a Mac is a convenient way to add signatures. So, don’t worry if your MacBook doesn’t come with a built-in signature feature right out of the box.