

With the number of privacy concerns and online threats on the rise, it’s important to look into the privacy settings of your Facebook account. By taking a few simple steps, you can ensure that your personal information and online activity are completely protected. In this article, we will guide you through the process of making your Facebook account private.
Step 1: Accessing the Privacy Settings
When you login to your Facebook account, click on the drop-down menu located at the top-right corner of the screen. From there, select the “Settings & Privacy” option. This will open a horizontal menu with several choices. Click on the “Settings” option.
Step 2: Editing Your Privacy Settings
In the left-hand menu, click on the “Privacy” option. You will be presented with several privacy settings and options.
Step 3: Controlling Your Profile Privacy
Within the “Privacy” section, click on the “Edit” option next to the “Your Activity” setting. Here, you can control who can see your future posts and activity on Facebook. You can select from options such as “Friends,” “Friends of Friends,” or “Only Me” to limit the visibility of your posts.
Step 4: Adjusting Timeline and Tagging Settings
In the “Privacy” section, click on the “Edit” option next to the “Timeline and Tagging” setting. Here, you can control who can post on your timeline and who can see posts you’re tagged in. You can also review tags before they appear on your timeline.
Step 5: Limiting Facebook Search Visibility
In the “Privacy” section, click on the “Edit” option next to the “Do you want search engines outside of Facebook to link to your profile?” setting. By turning this off, you can prevent your Facebook profile from appearing in search engine results.
Step 6: Customizing Your Privacy Settings
In the “Privacy” section, click on the “Edit” option next to the “How people can find and contact you” setting. Here, you can customize who can send you friend requests, who can see your friends list, and who can contact you on Facebook.
By following these steps, you can ensure that your Facebook account is private and that only those you want to see your information and activity are able to do so. Remember to regularly review and update your privacy settings to stay in control of your online presence.
- How to Make Facebook Private
- How to make your Facebook profile private on the desktop
- Mobile
- 1 Login into Facebook Account
- 2 Click on the three horizontal lines
- 3 Open “Privacy shortcuts” option
- 4 Click on the See more privacy setting
- 5 Tap on the relevant option
- 6 Repeat Step 5
- How To Make Your Profile Private
- 3 Answers 3
- Video:
- How to Private Account on Facebook – Full Guide
How to Make Facebook Private
Facebook allows you to control the privacy settings of your account, so you can choose who sees your posts, pictures, and other personal information. By making your Facebook account private, you can ensure that only your friends and family can see your activity on the platform. Here is a step-by-step process on how to make your Facebook account private:
- Log in to your Facebook account on your desktop or mobile device.
- On the top-right corner of the screen, click on the drop-down arrow.
- From the drop-down menu, select “Settings & Privacy” and then click on “Settings”.
- In the left-hand menu, click on “Privacy”.
- Under the “Privacy” section, you will see several options. To make your account more private, you can click on each option to review and change the settings.
- One important setting is “Who can see your future posts?”. Click on “Edit” to select who can see your posts, such as “Friends” or a specific list of people.
- To limit who can see your past posts, click on “Limit past posts”. This will change the privacy settings of all your previous posts to the selection you have made.
- To control who can find you on Facebook using your email address and phone number, go to the “How People Find and Contact You” section and click on “Edit”.
- Within this section, you can choose whether to allow search engines outside of Facebook to link to your profile.
- Also, you can control who can send you friend requests and messages through the “Who can send you friend requests?” and “Who can send you messages?” options.
- Under the “Apps and Websites” section, you can review and control the privacy settings of the apps and websites you have connected with your Facebook account.
- On the mobile app, you can access the privacy settings by tapping on the three horizontal lines at the top-right corner of the screen, then scrolling down and tapping on “Settings & Privacy.”
- From there, tap on “Privacy Shortcuts” and select the relevant privacy options as mentioned above.
By following these steps, you can make your Facebook account private and control the privacy of your posts, pictures, and other personal information. It is important to regularly review your privacy settings to ensure that your account remains secure and private.
How to make your Facebook profile private on the desktop
If you want to ensure your privacy on Facebook, it’s important to make your profile private. By doing so, you can control who sees your personal information, posts, and photos. Follow these steps to make your Facebook profile private on the desktop:
Step 1: Login to your Facebook account from your desktop.
Step 2: Click on the arrow in the top-right corner of the Facebook menu.
Step 3: Select “Settings & Privacy” from the drop-down menu.
Step 4: In the left-hand menu, click on “Privacy”.
Step 5: Under the “Your Activity” section, click on “Who can see your future posts?”.
Step 6: From the drop-down menu, select “Friends” to limit the visibility of your future posts only to your friends.
Step 7: Scroll down to the “How people find and contact you” section.
Step 8: Click on “Edit” next to “Who can see your friends list?” to change the visibility of your friends list.
Step 9: Select the audience you want to limit the visibility of your friends list to, such as “Friends” or “Only Me”.
Step 10: Repeat step 8 and step 9 for the other options available under the “How people find and contact you” section.
Step 11: Under the “Your Profile” section, click on “Edit” next to “Who can see your future posts?”.
Step 12: From the drop-down menu, select “Friends” to limit the visibility of your future posts only to your friends.
Step 13: Scroll down to the “Timeline and Tagging” section.
Step 14: Click on “Edit” next to “Who can see what others post on your timeline?” to change the visibility of posts made by others on your timeline.
Step 15: Select the audience you want to limit the visibility of posts made by others on your timeline to, such as “Friends” or “Only Me”.
Step 16: Repeat step 14 and step 15 for the other options available under the “Timeline and Tagging” section.
Step 17: Scroll up to the top of the page.
Step 18: Click on your profile picture to open your profile.
Step 19: On your profile page, click on the three horizontal lines beneath your profile picture.
Step 20: Select “Privacy Shortcuts” from the menu that appears.
Step 21: Under the “Privacy” section, click on “See more privacy settings”.
Step 22: Click on “Edit” next to “Who can see your future posts?” to change the visibility of your future posts.
Step 23: From the drop-down menu, select “Friends” to limit the visibility of your future posts only to your friends.
Step 24: Scroll down to the “Timeline and Tagging” section.
Step 25: Click on “Edit” next to “Review tags people add to your posts before the tags appear on Facebook?” to enable the review process for tags.
Step 26: From the drop-down menu, select “Enabled” to review tags before they appear on your profile.
Step 27: Repeat step 25 and step 26 for the other options available under the “Timeline and Tagging” section.
Step 28: Scroll down to the “Apps and Websites” section.
Step 29: Click on “Edit” next to “Who can see the apps and websites you use?” to change the visibility of the apps and websites you use.
Step 30: From the drop-down menu, select the audience you want to limit the visibility of your apps and websites to.
Step 31: Repeat step 29 and step 30 for the other options available under the “Apps and Websites” section.
By following these steps, you can make your Facebook profile private on the desktop. Remember to review your privacy settings regularly to ensure your profile is as private as you want it to be.
Mobile
If you prefer to use Facebook on your mobile device, you can also make your account private. Follow these steps to adjust your privacy settings on the Facebook mobile app.
1. Open the Facebook app on your mobile device and login to your account.
2. Tap on the menu icon (three horizontal lines) located at the top-right corner of the screen.
3. Scroll down and tap on “Settings & Privacy” section.
4. Select “Privacy Shortcuts” from the menu options.
5. Tap on “See More Privacy Settings” to access additional privacy options.
6. Here, you will be able to review and change the privacy settings for your profile, timeline, and other activities on Facebook.
7. To make your profile private, go to the “Privacy” section and tap on “Edit” next to “Who can see your future posts?”. Choose the option that suits your preferences, such as “Friends” to limit who can see your posts.
8. To limit who can see your past posts, tap on “Limit Past Posts” and follow the instructions to apply this setting.
9. You can also change the privacy settings for your profile picture, friends list, and more by selecting the relevant options under the “Privacy” section.
10. To control who can see your personal information on Facebook, tap on “Manage Your Information” and select the relevant options.
11. Additionally, you can control the privacy settings for apps and websites you’ve logged into with Facebook by tapping on “Apps and Websites” and adjusting the options as desired.
12. If you want to limit who can find you on Facebook through search engines, go to the “Privacy” section and tap on “Edit” next to “Who can see your future posts?”. Select the option “Only Me” or customize your settings accordingly.
13. To review your privacy settings, tap on the back arrow on the top-left corner of the screen and select “Privacy Checkup”. This will guide you through a series of questions and make sure you have answered everything correctly.
By following these steps, you can make sure that your Facebook account is set to the level of privacy you’re comfortable with. Remember to regularly review your settings and make any necessary changes to keep your account private.
1 Login into Facebook Account
Before you can make your Facebook account private, you’ll need to log in to your account. Follow these steps to log in:
- Open the Facebook website on your desktop or mobile device.
- On the login screen, enter your email address or mobile number associated with your Facebook account.
- Enter your password in the password field.
- Click on the “Log In” button to proceed.
Once you have successfully logged in, you will be able to access your Facebook account and begin the process of making it private.
2 Click on the three horizontal lines
After logging in to your Facebook account, look for the three horizontal lines, also known as the “hamburger menu,” in the top-right section of the screen. This icon typically appears in the silver or bronze color, depending on the version of Facebook you are using.
Clicking on these lines will open a drop-down menu with several options. Look for the “Settings & Privacy” option and click on it to continue the process.
Within the “Settings & Privacy” section, there are several choices available to you. To make your Facebook account more private, select the “Privacy” option. This will take you to a new screen where you can edit your privacy settings.
On the “Privacy” screen, you will see a list of relevant options to control your account’s privacy. You can review and edit settings for your activity, timeline, and tags, as well as who can see your profile picture and friends list.
If you want to make your account completely private, you can limit the visibility of your posts and information to only your friends. To do this, click on the “Edit” button next to the “Who can see your future posts?” option. From there, you can select “Friends” to ensure that only those you have added as friends can see your posts.
Additionally, you can also create custom lists to further control who can see your posts and information. This can be useful if you want to share certain content with specific groups, such as family or close friends.
Repeat the same steps for other relevant options within the privacy settings to ensure your account is as private as you desire.
It is important to note that these settings can be adjusted on both the desktop and mobile versions of Facebook. The process may slightly vary, but the overall steps and options will remain similar.
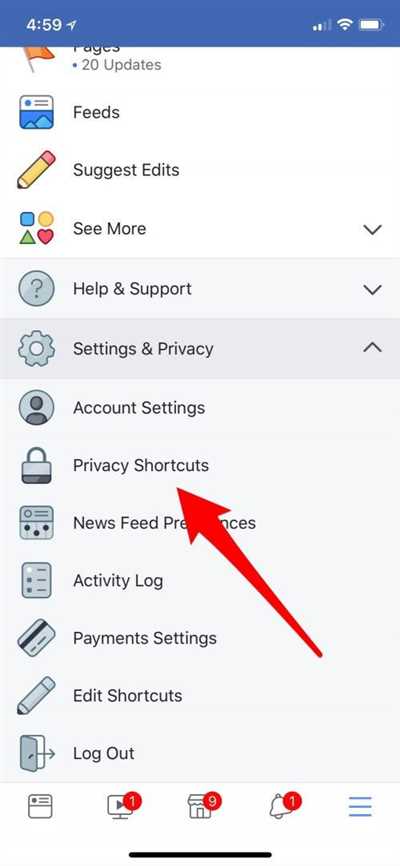
3 Open “Privacy shortcuts” option
To make your Facebook account more private, you can access the “Privacy shortcuts” option. Here’s a step-by-step guide on how to do it:
- Select the downward-pointing arrow in the top right-hand corner of the Facebook screen. This will open a drop-down menu.
- Look for the “Privacy” section on the menu. It is represented by a silver lock symbol.
- Click on the “Privacy shortcuts” option. This will open a new screen with several lines of choices.
- On the “Privacy shortcuts” screen, you will see a list of options related to your Facebook privacy settings.
- Select the “Privacy checkup” option. This will allow you to review and edit your privacy settings.
- Within the privacy checkup section, you’ll be able to turn on or off several privacy settings, including who can see your future posts, who can send you friend requests, and who can see your friends list.
- Click on each option to review and make changes to your desired privacy levels.
- As you go through each step, Facebook will provide more information to help you understand the choices and their implications.
- Repeat the process for each relevant section, such as “Who can see my stuff?”, “Who can contact me?”, and “How do I stop someone from bothering me?”.
- Make sure to review all the settings and adjust them according to your preferences to ensure your Facebook account is as private as you want it to be.
By following these steps, you can make your Facebook account more private and limit the visibility of your personal information and activity to only those you choose to share it with.
4 Click on the See more privacy setting
Once you have successfully created your Facebook account and have customized your privacy settings to your liking, you may want to explore the additional privacy options available within the platform. For a more comprehensive control over your account’s privacy, you can access the “See more” privacy settings. Here’s how you can do it:
- Login to your Facebook account on your desktop or mobile device.
- Click on the menu icon. On desktop, it’s a small downward-facing arrow located in the top-right corner of the screen. On mobile, it’s three horizontal lines, usually found in the bottom-right corner of the screen.
- From the drop-down or the horizontal menu, select “Settings & Privacy”.
- Within the “Settings & Privacy” section, you’ll see a list of several options. Look for and click on the “Privacy” option.
- On the “Privacy” page, you’ll see a list of choices available to you. Scroll down until you find the “See more privacy settings” link and click on it.
- This will take you to a new page where you can make changes to your privacy settings. You’ll see different sections such as “Who can see your future posts?” and “How people can find and contact you?”. Each section comes with its own set of options that you can select based on your preferences.
- Take your time to review each option and make the necessary changes. Remember, you can always revert to the default settings if needed.
- Once you have made the desired changes, remember to click on the “Save Changes” button to apply them to your account.
By following these steps, you’ll be able to delve deeper into your Facebook account’s privacy settings and have better control over who can see your posts, access your profile, and more. It’s important to regularly review and adjust your privacy settings to ensure that your personal information and content are only shared with those you choose.
5 Tap on the relevant option
Once you’re logged into your Facebook account, you want to navigate to the appropriate settings page to make your account private. Follow these steps:
- From your Facebook homepage, look for the three horizontal lines in the top right corner of your screen. Click on this icon to open the drop-down menu.
- In the drop-down menu, look for the “Settings & Privacy” option. Click on this option to open the Settings page.
- On the Settings page, you will see several options. Tap on the “Privacy” option to review and edit your privacy settings.
- Within the Privacy section, there are different choices available. Tap on the “Privacy Settings” option to see all the available options related to privacy.
- In the Privacy Settings page, you can now review and change the privacy settings for your Facebook account. There are several lists and options you can modify according to your preferences. For example, you can control who can see your posts, who can find you through search, who can send you friend requests, and much more.
By tapping on each option, you will be able to select from a number of choices and customize your privacy settings to make your Facebook account more private. For those who want to limit their account’s visibility to family and friends only, there is an option to change the privacy setting to “Friends” or “Friends except…” to control who can see your posts and activity.
Remember to review these settings periodically, as Facebook may update its platform and introduce new options or settings. By managing your privacy settings effectively, you can ensure that your Facebook account remains private and that only the people you choose have access to your personal information and posts.
6 Repeat Step 5
Once you have set the privacy settings for your Facebook account, you will need to repeat the process for each relevant section in order to ensure complete privacy.
- To begin, click on the arrow located at the top-right corner of the Facebook screen. This will open a drop-down menu.
- Select the “Settings & Privacy” option from the menu.
- Within the “Settings & Privacy” section, select “Privacy Shortcuts”.
- On the “Privacy Shortcuts” screen, you will see several options. Click on the “See more privacy settings” link.
- Now you will be taken to a new screen with a list of privacy choices. Look for the “Your activity” section and click on the “Edit” button next to it.
- In the “Your activity” section, you will see a number of settings that you can adjust. Review each one and change them according to how much privacy you want on your Facebook account.
- Repeat steps 1 to 6 for each relevant section, such as “Who can see what you share” and “How people can find and contact you”.
By repeating step 5 for each section, you will be able to limit who can see your profile, timeline, and everything else on your Facebook account. This process can be done on both desktop and mobile versions of Facebook.
Remember, the options available within each section may vary, depending on the type of account you have (e.g., personal account, business account) and the privacy settings you have already answered before.
By being diligent in reviewing and adjusting your privacy settings, you can make your Facebook account more private and ensure that only your friends and family can see the relevant information on your profile. This helps to keep your personal information safe and secure.
How To Make Your Profile Private
If you want to protect your privacy on Facebook, you have the option to make your profile private. By doing so, you can control who can see your posts, photos, and other personal information. Here is a step-by-step guide on how to make your Facebook profile private:
- Login to your Facebook account and click on the three horizontal lines in the top-right corner of the screen.
- From the drop-down menu, select “Settings & Privacy”.
- In the “Privacy” section, click on “Privacy Settings”.
- Under the “Your Activity” section, click on “Edit” next to “Who can see your future posts?”.
- Select the audience you want to make your posts visible to. You can choose from options like “Friends”, “Friends except…”, “Specific friends”, or “Only me”.
- If you want to limit the visibility of your past posts as well, click on “Limit Past Posts” and confirm the action.
- Back on the “Privacy Settings” page, you can also adjust other privacy options. For example, you can control who can see your email address, phone number, and who can send you friend requests.
- Similarly, under the “Timeline and Tagging” section, you can change the settings for who can post on your timeline or tag you in photos.
- From the “Privacy” section, you can also manage your profile’s visibility in search results. Click on “Edit” next to “Do you want search engines outside of Facebook to link to your profile?”.
- Select whether you want your profile to be visible in search engine results or not. Keep in mind that even if your profile is private, your profile picture and cover photo may still be public.
- Finally, click on “Settings & Privacy” in the top-right corner of the screen, and select “Settings”.
- From there, you can explore more privacy options such as managing your privacy settings for apps and websites, controlling who can see your friend list, and much more.
By following these steps, you can make your Facebook profile private and ensure that your personal information is only available to the people you choose. Remember to regularly review your privacy settings and adjust them as needed to maintain your desired level of privacy.
3 Answers 3
If you want to make your Facebook account private, there are several options and settings that you can enable. Here are three answers to help you with the process:
Answer 1: Adjusting your Privacy Settings
To make your Facebook account more private, start by clicking on the menu icon (three horizontal lines) on the top-right corner of the screen. Then, select “Settings & Privacy” and click on “Settings”. From there, go to the “Privacy” section. Here, you can edit the audience for your future posts, control who can see your email address and phone number, make your friends list private, and more. Take your time to review each option and make the suitable choices to enhance your privacy.
Answer 2: Customizing Your Timeline and Tagging Settings
Another step you can take is to customize your timeline and tagging settings. Under the “Privacy” section, click on “Timeline and Tagging”. Here, you can change the settings for who can post on your timeline, who can see what others post on your timeline, who can tag you in posts, and more. Review these options and adjust them according to your preferences.
Answer 3: Limiting Your Audience for Past Posts
If you want to make sure that everything you’ve shared on Facebook in the past is private, you can click on “Limit Past Posts” within the “Privacy” section. This will change the audience for all your past posts to “Friends”.
By following these three answers, you will be able to make your Facebook account more private. Remember to review your privacy settings regularly and make sure they align with your preferences.


