

If you are someone who likes organizing your ideas, documents, or any other type of content, then creating an outline is a must! An outline is a great way to track and organize your thoughts and make it easier for you to write any paper or document. In this article, we will guide you on how to create an outline using different methods and tools.
One of the easiest ways to create an outline is by using the toolbar in your word processor. Most word processors, like Microsoft Word or Google Docs, have an option to show or collapse the outline menu. By using this feature, you can easily navigate through different levels and paragraphs of your document.
Another method of creating an outline is by using graphic elements like circles or tables. This can be helpful if you prefer visual organization. You can insert circles or tables on your page and use them to represent different levels or ideas. This way, you can easily move the circles or tables around and rearrange your outline as needed.
If you prefer a more traditional method, you can also create an outline on paper. Start by writing the main topic or reason for your outline at the top of the page. Then, using headings and subheadings, break down your main topic into different levels. This method can be helpful if you like to see your outline in a more tangible form and track your progress as you write.
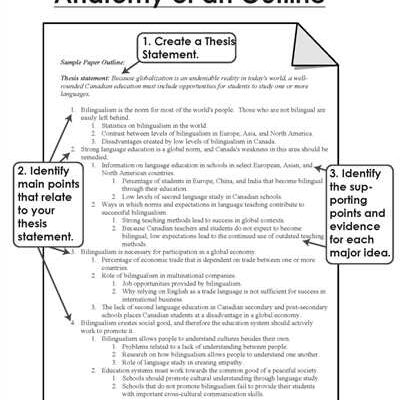
The Purdue University Online Writing Lab (OWL) provides excellent guidelines on how to create an outline. They suggest starting with a strong thesis statement and then supporting it with topic sentences and evidence. This way, your outline will be organized and easy to follow. So, if you need help in creating an outline, be sure to check out their website for more detailed instructions.
Welcome to the Purdue OWL

When it comes to organizing your ideas and creating documents, creating an outline is a crucial step. An outline is a way to visually map out the main points, subpoints, and supporting details of your paper or document. It helps to structure your thoughts and guide the writing process.
At the Purdue OWL, we provide you with guidelines and resources to help you create effective outlines. One of the ways you can create an outline is by using a graphic organizer. You can use circles, tables, or other visual elements to organize your ideas.
To create an outline using the Purdue OWL, first, navigate to the OWL homepage. Then, click on the “Writing Process” menu on the left-hand side of the page. From there, click on “Organizing Your Ideas” and then on “Outlines.” This will bring you to a page with information on how to create an outline.
In addition to graphic organizers, there are other methods for creating an outline. You can also create a traditional outline using Roman numerals, letters, and indentations to show different levels of information. This method is commonly used for academic papers and essays.
Another approach is the collapsed outline. This involves starting with a general overview and then gradually expanding and adding more specific details as you go. This can be helpful if you prefer to have a high-level view of your paper before going into the specifics.
Remember that the purpose of an outline is to help you organize your thoughts and structure your writing. It’s a tool to guide you throughout the writing process. Whether you prefer a graphic organizer, a traditional outline, or a collapsed outline, having a clear plan will make the writing process smoother and more efficient.
So, welcome to the Purdue OWL! Explore the different resources and tools we have available, and find the approach to outlining that works best for you. Happy writing!
Graphic Outlines
Creating an outline is a helpful way to organize your thoughts and track your progress when working on a document or a web page. While traditional outlines use paragraphs and bullet points, graphic outlines take a different approach by using images and circles to visually represent the content structure. These outlines can be especially useful for those who are more visually-oriented or like to see a visual representation of their ideas.
There are different ways to create graphic outlines, but one popular method is to use tables. In the table, each row represents a different level of the outline. The first column can be used to show the main topic, while the subsequent columns can represent the sub-topics or sub-points. By using different colors or symbols in the table, you can quickly identify the different levels of the outline.
Another way to create a graphic outline is by using software or online tools that provide specific features for creating visual outlines. Some word processors or note-taking applications have built-in outline templates that allow you to add images, shapes, and colors to your outlines. Additionally, there are dedicated online tools that specialize in creating graphic outlines, such as Owl Purdue’s “OWL Outliner”. These tools provide a user-friendly interface where you can easily create and customize your graphic outlines.
One of the main reasons to use graphic outlines is to make the information more visually appealing and engaging. By incorporating images and other visual elements into your outline, you can make it more interesting and easier to understand. Additionally, graphic outlines can help you present complex information in a more digestible format, allowing your audience to grasp the main points more easily.
When creating a graphic outline, it’s important to follow some guidelines to ensure it’s effective and clear. First, make sure to keep the structure of the outline hierarchical, with main topics at the highest level and sub-topics or sub-points underneath. Use consistent formatting for each level, such as font size or color, to create coherence. Additionally, pay attention to the placement and alignment of the images and circles to maintain a visually balanced and organized outline.
In conclusion, graphic outlines offer a unique and visually appealing way to organize and present information. Whether you use tables, software, or online tools, graphic outlines can enhance your content and make it more engaging for your audience. So, if you’re looking to create an outline that stands out and captures attention, consider giving graphic outlines a try.
Sources: OWL Purdue
Collapse an outline
Creating an outline is a helpful way to organize your thoughts and track the flow of your paper or document. However, if your outline starts to become too long or cluttered, it can be difficult to navigate through the different levels and ideas. That’s where the Collapse feature comes in handy.
By collapsing your outline, you can hide certain levels or sections of your outline, making it easier to focus on specific ideas or topics. This is especially useful when working with complex documents or when you want to quickly jump between different sections of your outline.
To collapse an outline, follow these simple steps:
- Open the outline in your preferred word processing software, like Microsoft Word or Google Docs.
- Click on the toolbar menu that contains the outline, usually located at the top of the page.
- Look for an icon or option that resembles an owl or circles, often used to represent the different levels of an outline.
- Select the specific level or section of the outline that you want to collapse.
- Your outline will now be collapsed, with only the main headings or top-level ideas visible.
There are several reasons why you might want to collapse an outline. For example, if you are presenting your outline to a group or audience, collapsing certain levels can help you focus on specific points without overwhelming your listeners with all the details at once. Similarly, if you are creating an outline for a graphic or visual presentation, collapsing levels can help you create a clean and organized layout without cluttering the page with too much text or images.
Remember, an outline is meant to be a tool to help you organize your thoughts and present information in a logical and coherent manner. By using the collapse feature, you can easily navigate through your outline and focus on the ideas that matter most. So, next time you’re working on an outline, give collapsing a try and see how it can help streamline your writing process.
Sources:
– Purdue Owl
– Guidelines for Creating Outlines
– https://www.writethatessay.org/how-to-write-an-essay-introduction-structure-tips/examples-of-good-introductory-paragraphs-for-essays
Sources
There are various ways to create an outline, and different sources can provide helpful guidelines and tools to get started. Here are some sources that can assist you in creating an outline:
- The Purdue OWL website: Purdue University’s Online Writing Lab offers comprehensive resources on organizing and structuring documents, including instructions for creating outlines.
- Graphic organizers: These visual tools use circles, tables, and other graphic elements to help you track ideas and organize information.
- Outline templates: You can find pre-designed outline templates that you can fill in with your own content.
- Formatting tools: Many word processors have built-in outline features, such as collapsible levels or a dedicated outline toolbar or menu.
- Paragraph and page formatting: You can use paragraph and page formatting options like headings, subheadings, and bullet points to organize your ideas.
- Images and tables: Incorporating images and tables into your outline can provide additional visual cues and help structure your ideas.
Depending on your preferences and the reasons for creating an outline, you can choose a combination of these sources to best suit your needs. Remember, creating an outline will help you stay organized and focused throughout your writing process.


