

In today’s fast-paced business environment, it is crucial for organizations to have a clear understanding of their processes in order to identify areas of improvement and optimize efficiency. One effective way to achieve this is by creating a process chart, also known as a flowchart.
A process chart is a visual representation of a sequence of steps or tasks required to complete a specific process. It allows teams to map out their processes, identify bottlenecks, and determine responsibilities of each team member. Creating a process chart helps organize information, share it with other team members, and refine the process for maximum efficiency.
Whether you want to learn how to create a basic process chart or implement more advanced 3D models, this article will guide you through the necessary steps and syntax to help you create a clear and useful process chart. We will also dive into some examples and troubleshooting sources to help you refine your process chart.
- How to Use a Process Flow Chart to Improve Efficiency
- When is a flowchart necessary
- Creating STL 3D models
- The process flowchart template helps teams
- 1 Identify a process to map
- 2 Add each step of the process
- 3 Arrange and organize
- 4 Take into account other actors and responsibilities
- 5 Review and refine
- 6 Share and Implement
- Sources
How to Use a Process Flow Chart to Improve Efficiency
A process flow chart is a visual representation of the steps and responsibilities involved in a specific task or process. It helps to organize and arrange the steps in a clear and logical order, allowing teams to identify areas for improvement and troubleshoot any delays or inefficiencies.
Creating a process flow chart involves several steps, and the use of flowchart templates can help to speed up the process. Here’s a step-by-step guide on how to use a process flow chart to improve efficiency:
1. Identify the Task or Process: The first step is to clearly define the task or process you want to map. This could be anything from a simple task like file organization to a complex process like implementing a new software system.
2. Define the Actors and Responsibilities: Next, identify the actors or team members involved in the process. List their roles and responsibilities to ensure everyone is clear on their tasks and expectations.
3. Map the Steps: Start by listing the steps involved in the process. Use shapes and arrows to connect the steps and show the flow of information or tasks from one step to another. This helps to visualize the sequence and dependencies of each step.
4. Add Delays and Cycle Time: To identify any potential bottlenecks or areas for improvement, add information about delays and cycle time to your process flow chart. This will help you understand where time is being wasted and where efficiencies can be gained.
5. Review and Refine: Once the initial process flow chart is created, review it with the team members or other stakeholders. Their input can help refine the chart and ensure it accurately represents the process.
6. Implement and Improve: After the process flow chart is finalized, use it as a reference to implement the necessary changes and improvements. Monitor the process and track the results to measure the impact of the changes made.
By using a process flow chart, you can improve efficiency in your organization by clearly mapping out all the necessary steps and responsibilities. It allows teams to visually understand how the process works, identify areas for improvement, and troubleshoot any issues that may arise. Learning how to create and use a process flow chart is a valuable skill for anyone working in process improvement or project management.
Here are a few examples of how a process flow chart can help:
1. Organize and Arrange: A process flow chart helps to organize and arrange the steps in a clear and logical order. This makes it easier for team members to understand their tasks and responsibilities, reducing confusion and improving efficiency.
2. Identify Delays and Inefficiencies: By mapping out the process flow, you can quickly identify any delays or inefficiencies that may be occurring. This allows you to take action and make the necessary changes to improve efficiency.
3. Share Information: A process flow chart is a great tool for sharing information with team members and other stakeholders. It provides a visual representation of the process, making it easier for others to understand and follow.
4. Troubleshooting: When a problem arises in a process, referring to the process flow chart can help troubleshoot the issue. By visually seeing the steps and dependencies, you can pinpoint where the problem may be occurring and take appropriate action.
5. Learning and Training: Process flow charts are also helpful for learning and training purposes. New team members can refer to the chart to understand how the process works and what their responsibilities are.
Remember, a process flow chart is a dynamic tool that can be updated and refined as needed. Regularly reviewing and updating your process flow chart will help to continually improve efficiency in your organization.
When is a flowchart necessary
Flowcharts are a valuable tool in visualizing and documenting processes. They are often used to map out the steps, tasks, responsibilities, and actors involved in a process. Flowcharts help to organize and improve the efficiency of working procedures by identifying delays, bottlenecks, and troubleshooting areas.
A flowchart is necessary when you want to:
- Learn how a process works: Flowcharts provide a clear and concise overview of the entire process, allowing you to understand the flow of information and tasks.
- Refine and improve processes: By creating a flowchart, you can review and analyze each step in the process, identify areas for improvement, and implement changes to enhance efficiency.
- Share and communicate processes: Flowcharts help teams and other members of an organization to understand and follow a particular process. They can be used as a template for creating standard operating procedures.
- Identify responsibilities and actors: Flowcharts allow you to define the roles and responsibilities of individuals or teams involved in the process. This helps in clarifying accountability and improving coordination.
- Organize and arrange steps: A flowchart helps you to arrange the steps of a process in a logical sequence, ensuring that nothing is missed or overlooked.
- Take into account delays and loop cycles: Flowcharts can represent delays, loops, and iterations in a process, helping to understand the cycle and potential causes for inefficiency.
Whether you are a beginner or an experienced process analyst, creating a flowchart can help you model and understand complex processes. It allows you to add clarity and structure to your process maps, making them easier to share, review, and implement.
Creating STL 3D models
Creating STL 3D models is the process of converting a digital design into a file format that can be used for 3D printing. The STL (Standard Tessellation Language) format is widely used in the 3D printing industry as it represents the surface geometry of a 3D object using a triangular mesh.
When creating STL 3D models, it is important to use reliable sources of information and follow a structured process to ensure accuracy and efficiency. The following steps can help in creating STL 3D models:
- Identify the task: Determine what you want to create in a 3D model and define the specific requirements and goals.
- Gather relevant information: Collect all the necessary data, specifications, and design details that will be used in the creation of the 3D model.
- Create a process flowchart: Visualize the steps involved in creating the 3D model using a flowchart. This allows you to map out the flow of information, members, responsibilities, and other actors involved in the process.
- Add loops and review processes: Implement loops in the flowchart to signify points where a step may need to be repeated or reviewed. This helps to refine and improve the model creation process.
- Organize the flow: Arrange the steps in a logical order to ensure a clear and efficient flow of work. This helps to avoid delays and streamline the overall process.
- Create STL files: Follow the syntax and template for creating STL files. These files contain the necessary 3D geometry data that can be read by 3D printers.
- Take into account troubleshooting: Identify potential issues or challenges that may arise during the creation of the 3D model. Develop solutions or alternative approaches to address these problems.
- Share and collaborate: Share the STL files with other team members or stakeholders for feedback and collaboration. This helps to ensure that the final 3D model meets all requirements.
- Implement feedback and refine: Take feedback into account to refine the 3D model and make necessary improvements. Iterate this process as needed.
In conclusion, creating STL 3D models involves a systematic approach to take a design from concept to a printable file format. Following a clear process chart and organizing the steps effectively can help improve efficiency and ensure accurate and high-quality 3D models.
The process flowchart template helps teams
The use of a process flowchart template can greatly aid teams in their efforts to improve efficiency and organize their work. By using flowcharts, teams can visually map out the steps and actors involved in a process, allowing them to identify any delays or inefficiencies that may be present. A clear and well-structured flowchart can also help team members understand their responsibilities and the sequence of tasks they need to take to complete a process.
There are several benefits to using a process flowchart template:
- Arranging information: A flowchart template allows teams to arrange information in a logical and meaningful way. By organizing the steps of a process, teams can better understand how each step flows into the next, which in turn helps them identify areas for improvement or troubleshooting.
- Improving collaboration: Flowcharts help teams share and communicate information effectively. By creating a visual representation of a process, teams can easily share the flowchart with others, making it easier for everyone to understand the process and their respective roles.
- Refining processes: The use of a flowchart template encourages teams to review and refine their processes. By visually mapping out a process, teams can identify areas where tasks could be streamlined or where unnecessary steps could be eliminated.
- Learning from examples: Flowchart templates often come with pre-designed models and examples, making it easier for teams to get started. These examples can serve as a starting point for teams to create their own flowcharts, helping them understand how to structure the information and identify the necessary steps.
So how can teams use a process flowchart template?
- Start with the process: Teams should first identify the specific process they want to map. What are the end goals and desired outcomes? By clearly defining the process, teams can ensure that their flowchart accurately represents the steps necessary for success.
- Add the steps: Once the process is defined, teams can begin adding the individual steps to the flowchart. Each step should be clearly labeled and include any necessary information or instructions.
- Identify actors and responsibilities: Teams should also identify the actors involved in the process and their respective responsibilities. This helps clarify who is responsible for each step and ensures that everyone is aware of their role in the process.
- Review and refine: After creating the initial flowchart, teams should take the time to review and refine it. Are there any steps that could be simplified or eliminated? Are there any potential bottlenecks or delays that should be addressed? By reviewing the flowchart, teams can identify areas for improvement and make necessary adjustments.
- Implement and share: Once the flowchart is complete and refined, teams can implement it into their working processes. By sharing the flowchart with team members, everyone can be on the same page and understand the process and their responsibilities.
- Use feedback loop: After implementing the flowchart, teams should continuously review and update it based on feedback and new information. This allows for ongoing improvement and refinement to ensure the process is as efficient and effective as possible.
In conclusion, the use of a process flowchart template is a valuable tool for teams to improve their efficiency, organize their work, and identify areas for improvement. By clearly mapping out the steps and actors involved in a process, teams can streamline operations and achieve better results.
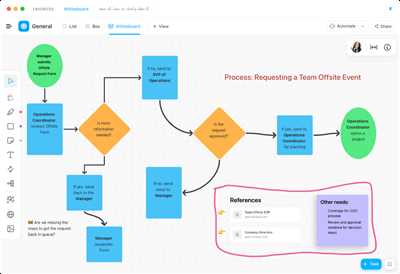
1 Identify a process to map
When creating a process chart, the first step is to identify a specific process that you want to map. This could be any task, procedure, or workflow that you want to visualize and understand better. By mapping out a process, you can easily identify areas of improvement and find opportunities to increase efficiency.
To identify a process to map, start by gathering information from various sources such as team members, actors responsible for the task, and other relevant stakeholders. This will help you understand the responsibilities, dependencies, and steps involved in the process.
Once you have gathered the necessary information, organize it in a clear and structured manner. You can use a flowchart or other process modeling techniques to arrange the steps in a logical order. This allows you to identify any delays or bottlenecks that may be present in the process.
For example, let’s say you want to map the process of troubleshooting software issues. You would gather information from team members and actors involved in the troubleshooting task. You can then create a flowchart to visually represent the steps involved in the troubleshooting process.
By mapping out the process, you can easily learn how each step connects and flows into each other. This helps you refine and improve the process, identify any necessary changes or adjustments, and share the process with other team members for review and feedback.
Identifying a specific process to map is often the first step in creating a process chart. It is important to be clear on what process you want to map and why. This will help ensure that the process chart is focused and accurate, allowing you to effectively analyze and improve the process.
2 Add each step of the process
To create a process chart, you need to implement each step of the process. This involves identifying the responsibilities and tasks of each member involved in the process and organizing them in a clear and logical flow. The process chart helps to map out the flow of information, identify any delays or inefficiencies, and improve the overall efficiency of the process.
When adding each step to the process chart, you can use a variety of tools and templates. One commonly used tool is a flowchart, which allows you to visually represent the steps and their dependencies. You can also use 3D models or STL files to help visualize the process. Additionally, you may want to include examples or other sources of information to support each step.
As you add each step to the process chart, take into account the actors involved and their responsibilities. This will help you to refine the process and ensure that all tasks are accounted for. It is often helpful to create a loop or endloop syntax to represent repetitive steps in the process. Similarly, you can use the endfacet syntax to represent the end of a cycle.
By adding each step of the process to the chart, you can easily identify areas for improvement and clarify the flow of information. This will help the teams involved in the process to better understand their roles and responsibilities, and ensure that the process runs smoothly.
3 Arrange and organize
After you have identified the processes and steps involved in your task, it is important to arrange and organize them in a clear and efficient manner. This helps to improve the flow of the process and allows teams to take into account their responsibilities and dependencies.
One way to organize the information is by using a process chart or flowchart. This allows you to map out the steps and identify any delays or troubleshooting points. You can use a template or create your own chart from scratch.
When arranging the steps, it is often helpful to add actors or team members who are responsible for each task. This helps to clearly define roles and responsibilities. You can also add in any necessary resources or sources of information that are needed for each step.
When organizing the steps, you can use different models or examples to help refine and improve the process. This can include 3D models, STL files, or other visual representations of the task. By working through the steps and identifying any potential issues or areas for improvement, you can implement changes to the process to increase efficiency.
Arranging and organizing the steps also allows you to loop back and review the process. This is often necessary when troubleshooting or when there are delays or issues that need to be addressed. By having a clear process chart, it is easier to identify where problems may arise and how to handle them.
In conclusion, arranging and organizing the steps in a process chart helps to improve the flow and efficiency of the task. It allows teams to take into account their responsibilities and dependencies, as well as identify areas for improvement. By using examples and models, it is easier to learn and implement changes to the process. Overall, a clear and organized process chart is a valuable tool for any team or individual looking to optimize their processes.
4 Take into account other actors and responsibilities
When creating a process chart, it’s important to consider the roles and responsibilities of other team members or actors involved in the process. This step can help improve efficiency and clear any potential bottlenecks or delays.
One way to take into account other actors and responsibilities is to map out the flow of information between team members. This can be done using a flowchart or a process chart template. By identifying the steps and files that need to be shared between team members, you can organize and refine the process to ensure all necessary information is shared at the right time.
Each team member may have their own tasks and responsibilities within the process. It is important to identify these roles and clearly outline them in the process chart. This helps avoid any confusion or overlap in responsibilities, allowing each team member to focus on their specific tasks.
When reviewing the process chart, it’s also helpful to get input and feedback from other team members. They may have additional insights or suggestions that can further improve the process. This collaborative effort allows for troubleshooting and refinement of the process, ensuring it is efficient and effective.
If you want to go even further, you can use 3D modeling software to create visual representations of the process or use STL files to create physical models. This can help visualize the process and identify any potential areas for improvement or optimization.
By taking into account other actors and their responsibilities, you can create a clear and effective process chart that helps streamline the workflow and improve overall efficiency. This step is often overlooked, but it is crucial for creating a well-structured and successful process.
5 Review and refine
After you have created your process chart, it is important to review and refine it to ensure its accuracy and efficiency. This step allows you to identify any mistakes or delays in the flow of information and learn how to improve the process.
First, review each step in the flowchart and arrange them in the most logical order. This helps to clearly map out the process and account for any potential delays or obstacles.
Next, take into account the responsibilities of each actor or team involved in the process. Assign tasks and roles to ensure a smooth flow of work.
During the review stage, it is often necessary to refine the process chart. This may involve adding or removing steps, creating new templates or models, or reorganizing files and information.
Once you have refined the process chart, it is important to implement it and share it with team members. This allows everyone involved to understand their roles and responsibilities and ensures that the process is followed consistently.
Implementing the refined process chart can help improve efficiency and reduce delays. It also helps teams troubleshoot any issues that may arise during the process.
In summary, the review and refine step is crucial in creating a clear and efficient process chart. It allows you to identify and refine the necessary steps, arrange them in a logical flow, and implement the chart to improve the overall process.
6 Share and Implement

Once you have created a clear and concise process chart using flowcharts and diagrams, it is important to share and implement it with your teams. This step helps to ensure that everyone involved in the process understands their responsibilities and the steps they need to take to improve efficiency.
Sharing the process chart with your teams allows them to see the big picture and identify any areas that may need refinement or troubleshooting. It also helps to organize and map out the flow of information, tasks, and actors involved in the process.
In addition to sharing the process chart, it is also necessary to implement the identified improvements. This may involve creating templates or other tools to help members of your teams in their tasks. It may also include implementing new systems or technologies to automate certain processes and reduce delays.
Implementing the process chart helps to make sure that everyone is on the same page and understands their roles and responsibilities. It also allows you to monitor and review the progress of the implemented changes and make adjustments as necessary.
By sharing and implementing the process chart, you can improve the efficiency and effectiveness of your team’s processes. It helps to identify and place accountability for each step of the process, and also helps to refine and improve the process over time.
Sources
When working on creating a process chart, it is helpful to consult various sources for information and examples. Here are some sources that can help you learn how to make a process chart:
| Source | Description |
| 1 | Start with a clear understanding of the steps involved in the process. |
| 2 | Identify the actors and their responsibilities in the process. |
| 3 | Map out the flow of the process, placing each step in the right order. |
| 4 | Organize the steps into a clear and logical flowchart. |
| 5 | Use the chart to review and refine the process, identifying any necessary changes. |
| 6 | Implement the improved process and monitor its efficiency. |
| STL files | When creating 3D models, use STL files to implement the necessary steps. |
| Endfacet | When troubleshooting, the “endfacet” command helps identify and account for any delays or issues. |
| Loop | The loop feature allows you to repeat a certain task or cycle within the process. |
| Working with teams of 4 | When working in teams, it is important to divide responsibilities and share the process chart with all members. |
By using these sources and following the steps outlined, you can create an effective process chart that helps improve efficiency and optimize your workflows.


