

A digital signature is a cryptographic technique used to ensure the integrity, authentication, and non-repudiation of electronic documents. It is often used in online transactions or when signing important legal documents. By creating a unique digital signature, you can easily sign documents without the need for any physical paperwork or direct interaction.
There are several steps you need to follow in order to take a digital signature. Firstly, you need to create an account on a digital signature software platform like SigningHub. Once you have created your account, you can start the signing process by uploading the document that needs to be signed. This can be done by clicking on the “Create New Document” button and selecting the file from your computer’s folder.
Next, you will be prompted to add the signer’s details, such as their name, role, and identification. You can also set a password for the document to ensure its security. After filling in the necessary information, you can click on the “Next” button to proceed. At this point, you will be asked to select the signer from your account or enter their email address if they are not a registered user.
Once the signer has been selected, you can proceed to the final step of signing the document. By clicking on the “Sign” button, the document will be opened in a secure environment where the signer can create their digital signature. This can be done by using the software’s signature field, which is often a box with a line to draw the signature. After the signature has been created, the signer can click on the “Finish” button to complete the process.
By following these simple steps, you can easily take a digital signature and ensure the authenticity and integrity of your documents. Digital signatures are widely used in various fields and provide a secure and efficient way to sign important documents without the need for physical paperwork or face-to-face meetings. So, start using digital signatures today and enjoy the benefits they offer!
What is a digital signature
A digital signature is a cryptographic signature that is used to electronically sign a document or message. It is created using a combination of a signer’s private key and the document or message being signed. The digital signature ensures the integrity and authenticity of the document, as well as verifies the identity of the signer.
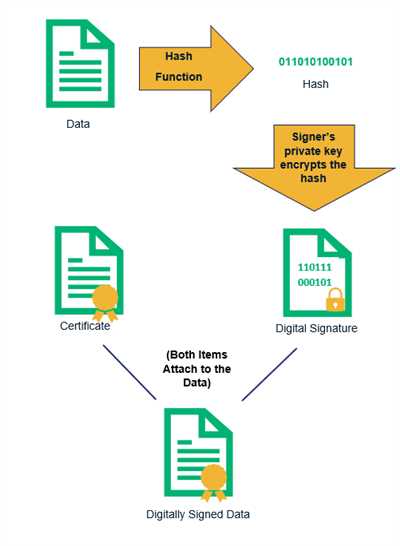
When a digital signature is created, it goes through 4 steps:
- The signer starts by opening the document or message that they want to sign.
- The signer then uses digital signing software, like SigningHub, to sign the document. This can be done by clicking directly on the signature field, often marked with a pen icon.
- The software then prompts the signer to verify their identity. This can be done through various methods, such as entering a password or using an authentication method like a fingerprint or smartcard.
- Once the signer’s identity has been verified, the software digitally signs the document using their private key. This cryptographic process generates a unique signature that is specific to the signer and the document.
After the digital signature has been created, it can be easily verified by anyone who has the signed document, using the signer’s public key. The verification process ensures that the document has not been tampered with since it was signed and that it was indeed signed by the intended signer.
Digital signatures are often used in various fields, such as legal, financial, or government, where the integrity and authenticity of documents are crucial. They provide a secure and reliable way to ensure that the information within a document has not been altered and that it has been signed by an authorized person.
Authentication
Authentication is a key step in the process of creating and verifying digital signatures. It ensures the integrity and identification of the signer as well as their role in signing the document. When signing a document using digital signature software, a cryptographic digital signature is created. This signature is unique to the signer and verifies that the signer’s identity has been verified and that the document has not been tampered with.
To authenticate yourself and start signing documents, you need to create an account with a trusted digital signature provider like SigningHub. Once you have created your account and logged in, you can easily sign any document by opening it in the software and clicking on the “Sign” button.
The authentication process typically involves a few steps:
| Step 1 | Create an account – Start by creating an account on the SigningHub platform. |
| Step 2 | Verify your identity – Provide the necessary identification and verification details to ensure your account’s authenticity. |
| Step 3 | Set up your digital signature – Create a unique digital signature that will be used to sign your documents. |
| Step 4 | Sign documents – Once your account and signature have been set up, you can easily sign any document by simply clicking on the signature field. |
Authentication is a crucial step in the digital signing process as it ensures the integrity and authenticity of the signed data. By using digital signatures, you can be confident that your documents are secure and cannot be forged. The same digital signature can also be used to verify the authenticity of a signed document, providing assurance to the recipient that the document has not been tampered with.
Data integrity
Data integrity is a crucial aspect of digital signatures. When signing a document, the signer’s account data is used to create a cryptographic hash, which is a short representation of the document’s content. This hash is then combined with the signer’s private key to create a digital signature.
Verification of a digital signature ensures data integrity by confirming that the document has not been tampered with since it was signed. When someone verifies a signature by clicking on it, the software calculates a new hash of the document and compares it to the original hash stored within the signature. If the two hashes match, it indicates that the document is the same as when it was signed, and the data integrity has been maintained.
Forgery is unlikely because it would require not only breaking the cryptographic algorithms used to create the signature, but also having access to the signer’s private key. The signer’s private key is typically stored in a secure folder and protected by a strong password.
Creating a digital signature involves a few steps:
- Start the signing software, like SigningHub
- Open the document you want to sign
- Select the signature field
- Click on the “sign” button
- Enter your password for identification and authentication
- Review the document and make any necessary changes
- Click on the “sign” button again to finalize the signature
By following these steps, a digital signature is created that ensures the integrity of the data in the signed document. It also verifies the authenticity of the signer, as the private key is unique to the individual.
Overall, data integrity is a critical aspect of digital signatures and provides confidence that the signed documents have not been altered. It allows for secure and trustworthy transactions in various fields where digital signatures are commonly used.
The role of digital signatures
Digital signatures play a crucial role in ensuring the authenticity, integrity, and non-repudiation of digital documents. With the increasing use of electronic data and the need for secure identification and authentication, digital signatures have become an essential tool in various industries.
Unlike traditional signatures, which can be forged or easily tampered with, digital signatures provide a high level of security. They are created using cryptographic algorithms that ensure the integrity of the signed data. When a digital signature is applied to a document, it links the signer’s identity to the document, ensuring that any modifications made to the document can be detected.
The process of creating a digital signature is often done using specialized software like SigningHub. The signer starts by opening the document that needs to be signed, then follows a few simple steps to create the signature. The software verifies the signer’s identification and ensures that the signature cannot be tampered with or forged.
Once the digital signature has been created, it can easily be shared with others. The signature is typically embedded within the document or stored in a separate file, ensuring that it remains with the document wherever it goes. This allows for easy verification of the signature and ensures that the document can be trusted even if it is transferred between different users or stored in different folders.
Verification of a digital signature can be done by clicking on the signature field or using specialized software. The software verifies the signature and ensures that it matches the signer’s identity. It also checks the integrity of the document to ensure that it hasn’t been modified since the signature was applied.
Overall, the role of digital signatures is to provide a secure and reliable means of authentication and verification. They ensure the integrity of data and protect against unauthorized access or tampering. By using digital signatures, individuals and organizations can have confidence in the authenticity of their digital documents and transactions.
Creating a digital signature in just a few steps – a guide
When it comes to signing important documents, a digital signature can be a quick and secure way to authenticate your identity and ensure the integrity of the data. With the advancement in technology, creating a digital signature has become easier than ever before. In this short guide, we will walk you through the steps of creating a digital signature using the SigningHub software.
Step 1: Sign up for an account
To start creating your digital signature, you will need to have an account with SigningHub. If you don’t have one, simply sign up by clicking on the “Sign Up” button on the website and fill in the required information. After signing up, you will receive a confirmation email with a link to activate your account.
Step 2: Open SigningHub
Once you have created your account, open the SigningHub software either by directly accessing their website or by downloading and installing the software onto your computer. Sign in using the email address and password you used during the sign-up process.
Step 3: Create your digital signature
With SigningHub open, navigate to the “Digital Signatures” section. Click on the “Create” button to start the digital signature creation process. You will be prompted to enter your personal information, like your name and email address, in the designated fields. This information will be used to identify you as the signer of the document.
Step 4: Authentication and verification
Once you have entered your personal information, SigningHub will guide you through the process of authentication and verification. This may involve providing additional identification documents or answering security questions. This step ensures that the digital signature you create can be trusted and verified by others.
Step 5: Sign any document
Now that you have created your digital signature, it can be easily used to sign any document within the SigningHub software. Simply open the document you wish to sign, navigate to the designated signature field, and click on the “Sign” button. Your digital signature will be applied to the document, ensuring its authenticity and integrity.
Step 6: Save and secure your signature
After signing a document, you may want to save your digital signature for future use. SigningHub allows you to save your signature in a signature folder, making it easily accessible for future signing. This way, you can quickly sign documents without the need to recreate your signature each time.
In conclusion, creating a digital signature using SigningHub is a simple and efficient process. By following these few steps, you can ensure the authentication and verification of your digital signature while maintaining the integrity of your documents.
Step 4: Sign any document
Once you have created your account and completed the necessary steps to set up your digital signature, you can easily sign any document using SigningHub’s software. This guide will show you how to sign a document in just a few simple steps.
- Start by opening the document you want to sign in SigningHub.
- Click on the field or area in the document where your signature should be placed.
- A short verification process may occur to ensure the integrity of your digital signature.
- Next, you will see a pop-up window where you can sign the document.
- SigningHub often uses cryptographic data for identification and authentication purposes, so you may be prompted to enter your password.
- Once you have entered your password, click on the “Sign” button.
- Your digital signature will then be applied to the document.
- The signed document can be downloaded or saved directly into a folder of your choice.
Signing any document with your digital signature ensures that it has been signed by you and verifies your role in the signing process. The same digital signature can be used for multiple documents, and it is a secure way to authenticate your data while maintaining its integrity.
How do I create a digital signature in Word
Creating a digital signature in Word is a short and easy process that ensures the integrity and authenticity of your documents. With a digital signature, you can sign your Word documents electronically, just like you would with a pen and paper.
To create a digital signature in Word, follow these simple steps:
- Open the Word document that you want to sign.
- Click on the “Insert” tab in the top menu bar.
- In the “Text” section, click on the “Signature Line” option.
- A dialog box will appear with the title “Signature Setup”. Fill in the necessary information, like your name, title, and email address.
- Click on the “OK” button to create the signature field in your document.
- Now, you have a signature field in your Word document. To sign it, you can either:
- Click on the signature field and start signing with a pen tablet or your mouse.
- Click on the signature field and sign it directly on your touch-enabled device.
- After signing, click on the “Sign” button to complete the signing process.
- Your digital signature is now created and embedded in your Word document. It can be used to verify the authenticity and integrity of the document.
- What happens behind the scenes:
- When you create a digital signature in Word, it uses cryptographic software to generate a unique identification for you as the signer.
- This signature ensures the authenticity and integrity of the document. It also provides a verification of your identity as the signer.
- By following these steps, you can easily create a digital signature in Word. It is a secure and efficient way to sign your documents, as well as protect them from any unauthorized access or forgery.
So, next time you need to sign a Word document, just follow this guide to create your digital signature and get your documents signed quickly and securely.


