If you’re tired of chapped lips and want to wear a beautiful lip color that also helps to smooth and protect your lips, making your own lip balm is the best solution. With this DIY tutorial, you’ll learn how to make your own natural chapstick in no time.
The key ingredient in this lip balm recipe is the fatty oil. Castor oil is a great option, as it gives your balm a smooth texture and helps it to stay on your lips longer. You can also customize the scent of your lip balm by adding a few drops of your favorite essential oil.
Before you start preparing the lip balm, make sure you have all the necessary ingredients and containers. Storing your homemade lip balm in small containers, similar to those used for storing lipstick, makes it convenient to carry and apply on the go.
To make the lip balm, you’ll need to melt the butter and the oil. This can be done in a microwave or on a stovetop. Once melted, mix in the desired amount of color and scent. Pour the mixture into the containers and let it cool and solidify. Voila! Your own homemade lip balm is ready to use.
Using this DIY lip balm is simple. Just open the container, apply a small amount onto your lips, and spread it evenly. Reapply at regular intervals, especially if your lips tend to get dry easily.
This homemade lip balm is not only a great addition to your beauty routine, but it also makes a wonderful gift for friends and family. You can customize the color and scent to match the recipient’s preferences, and the photo-worthy packaging will make the gift even more special.
So, next time you find yourself in need of a chapstick, skip the store-bought options and try making your own lip balm. It’s easy, natural, and gives your lips the care and hydration they deserve.
Easy Lip Balm Gloss Recipe
If you’re tired of buying expensive lip balms that don’t always live up to your expectations, why not make your own at home? With this easy DIY recipe, you can create a beautiful lip balm gloss that is not only customizable but also helps to keep your lips smooth and moisturized.
What you’ll need:
| – | 1 tablespoon of beeswax |
| – | 1 tablespoon of shea butter |
| – | 1 tablespoon of castor oil |
| – | A few drops of your favorite essential oil for scent |
| – | A pinch of a natural colorant (optional) |
How to make the lip balm gloss:
- In a microwave-safe container, melt the beeswax, shea butter, and castor oil together. This can be done in intervals of 30 seconds, stirring in between, until everything is fully melted and combined.
- If desired, add a few drops of your favorite essential oil for a pleasant scent.
- If you want to add some color to your lip balm gloss, you can add a pinch of a natural colorant. Mix it well until the color is evenly distributed.
- Pour the mixture into lip balm containers or small jars and let them cool completely before use.
- Now you have your very own homemade lip balm gloss, perfect for smooth and moisturized lips.
Tips for preparing and storing:
When preparing the lip balm gloss, it’s important to use a microwave-safe container and handle it with caution as it can get hot. You can customize the recipe by using different essential oils or colorants to match your preferences.
For the best results, apply the lip balm gloss on your lips whenever they feel chapped or dry. The fatty acids in the shea butter and castor oil help to nourish and protect your lips, giving them a smooth and glossy finish.
These homemade lip balm glosses also make great gifts for friends and loved ones. Take a photo of your beautiful creations to share on social media and spread the joy of natural DIY beauty.
Remember to store your lip balm gloss in a cool and dry place to prevent melting. Using small containers with tight lids will help to keep the product fresh for longer intervals.
Now that you know how easy it is to make your own lip balm gloss, why not give it a try? Your lips will thank you for it!
How to Make Natural DIY Lip Balm
Creating your own lip balm is a fun and rewarding DIY project. Not only does it save you money, but it also allows you to customize the ingredients to suit your preferences. This tutorial will guide you through the process of making a natural lip balm that is perfect for keeping your lips smooth and moisturized.
What You’ll Need:
- 1 tablespoon of beeswax
- 1 tablespoon of shea butter
- 1 tablespoon of coconut oil
- 1 tablespoon of almond oil
- 10 drops of essential oil (optional, for scent)
- Lip balm containers
Step 1: Preparing Your Ingredients
Before you start making your lip balm, it’s important to have all your ingredients measured and ready to go. Melt the beeswax, shea butter, coconut oil, and almond oil in a microwave-safe container at 30-second intervals until they are fully melted and combined.
Step 2: Adding Color and Scent
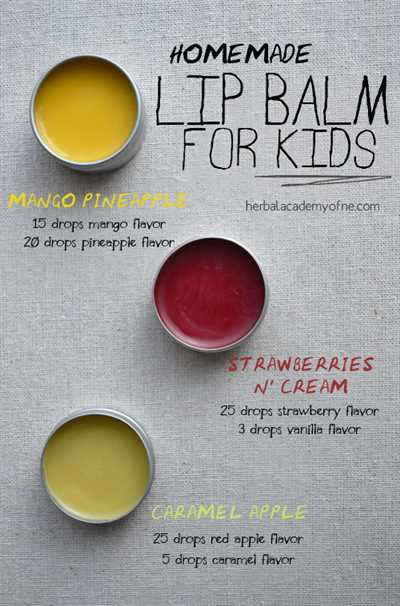
If you’d like to add color to your lip balm, you can do so by adding a small amount of lipstick or lip gloss to the melted mixture. Stir it well to evenly distribute the color. For a natural scent, you can add 10 drops of your favorite essential oil, such as lavender or peppermint.
Step 3: Pouring Into Containers
Once you have your lip balm mixture ready, carefully pour it into the lip balm containers. Be sure to leave a little space at the top to avoid overflowing. Allow the containers to cool and solidify for about 30 minutes before using or storing them.
Step 4: Tips and Next Steps
Now that you have your homemade lip balm, here are a few tips to help you get the most out of it:
- Apply the lip balm using clean fingers or a lip brush for a more precise application.
- Wear it alone for a natural look or as a base before applying lipstick for a smoother finish.
- If you have chapped lips, apply a thick layer of lip balm before bed as an overnight treatment.
- Store your lip balm in a cool, dry place to prevent it from melting or becoming too soft.
- You can also give your homemade lip balm as a gift to friends and family. Personalize the containers with labels or decorate them to make them extra special.
Making your own natural DIY lip balm is an easy and enjoyable process. With the right ingredients and a little bit of time, you can have your own customized lip balm that helps keep your lips soft, moisturized, and beautiful.
Giving DIY Lip Balm as a Gift
Making your own lip balm is a fun and easy DIY project that can result in a beautiful and personalized gift. Whether you’re looking for a thoughtful present for a friend or a small token of appreciation for a loved one, homemade lip balm is a practical and heartfelt choice.
One of the most important aspects of giving DIY lip balm as a gift is the opportunity to customize it. You can choose the ingredients, such as oils and scents, that best suit the recipient’s preferences. This personal touch will make the gift extra special and demonstrate the effort and care you put into making it.
To make your own lip balm, you’ll need a few key ingredients like beeswax, shea butter, and your choice of oils like coconut oil or castor oil. There are many online tutorials and recipes available that can guide you through the process. You can also experiment with different ingredients and quantities to create your own unique recipe.
Preparing the lip balm is relatively easy. In a microwave-safe bowl, combine the beeswax, shea butter, and oils. Heat the mixture in short intervals, stirring in between, until everything is melted and well combined. Be sure to use oven mitts or a towel to handle the hot bowl.
Once the lip balm mixture is smooth, you can add any desired color or scent using natural ingredients like beetroot powder or essential oils. Remember to test a small amount of the mixture to ensure the color and scent are to your liking before adding more.
Next, carefully pour the mixture into lip balm containers. You can find empty lip balm tubes or small jars online or at craft stores. Allow the lip balm to cool and solidify before closing the containers.
When gifting DIY lip balm, you can get creative with the packaging and presentation. Consider using small gift boxes, organza bags, or decorative tins to add that extra special touch. You can also include a handwritten note explaining the ingredients and recipe if you think the recipient might be interested in making their own lip balm in the future.
One of the best things about giving homemade lip balm as a gift is that it’s not only a practical item but also a luxurious one. The nourishing and moisturizing properties of the lip balm can help with dry or chapped lips, leaving them feeling soft and smooth. Additionally, the addition of oils like coconut or castor oil helps to add a natural glossy finish.
Whether you’re giving DIY lip balm as a gift for a birthday, holiday, or just because, it’s sure to be appreciated. The thoughtfulness and effort that go into making these homemade balms will not go unnoticed. So get ready to impress your loved ones with these easy and customizable lip balms!
Tips for Preparing, Using, and Storing Your DIY Lip Balm
Making your own lip balm at home can be a fun and rewarding DIY project. With just a few ingredients and some simple steps, you can create your very own homemade lip balms. This tutorial will provide you with valuable tips and tricks to make the best lip balms, as well as how to use and store them properly.
Preparing Your Lip Balm:
Before you start making your lip balm, there are a few important tips to keep in mind:
| 1. | Gather all the necessary ingredients and containers. You’ll need containers to store your lip balms once they’re made. Clean and sanitize these containers beforehand to ensure they’re free from any dirt or bacteria. |
| 2. | Select the best recipe for your lip balm. There are various recipes available online, so choose the one that suits your preferences and needs. |
| 3. | Be sure to have all the ingredients ready. Common ingredients for lip balms include oils (like castor oil and coconut oil), beeswax, shea butter, and essential oils for scent. |
Using Your Lip Balm:
Once you have prepared your lip balm, it’s time to put it to use. Here are some tips for using your DIY lip balm:
| 1. | Apply the lip balm to your lips using clean fingers or a lip brush. Make sure your lips are clean and free from any lip products before applying. |
| 2. | If you prefer a tinted lip balm, you can add a touch of color to your homemade lip balm using natural pigments or tinted lip-safe micas. This will give your lip balm a beautiful, customized shade. |
| 3. | Wear your lip balm regularly, especially during dry or cold weather. It helps to keep your lips moisturized and prevents them from getting chapped. |
Storing Your Lip Balm:
Proper storage is important to maintain the quality and longevity of your DIY lip balm:
| 1. | Store your lip balms in a cool and dry place away from direct sunlight. Excessive heat or light can cause the lip balm to melt or spoil. |
| 2. | If you’re making lip balms in bulk, consider using lip balm tubes or tins for easier application and portability. |
| 3. | Label your lip balms with their dates of creation so you can keep track of their shelf life. Lip balms usually last for around six months to a year. |
These tips will help you create, use, and store your homemade lip balms with ease. Whether you’re making lip balms for yourself or as a DIY gift, following these guidelines ensures you’ll have smooth and moisturized lips all year round.
Customize Your Lip Balm
Once you’ve learned how to make your own chapstick using a natural and easy recipe, you can take it a step further by customizing it to your liking. This DIY lip balm tutorial will show you how.
The first thing you can do to customize your lip balm is to add a scent that you love. Whether you’re into fruity scents like strawberry or citrus, or prefer something more calming like lavender or vanilla, adding a few drops of your favorite essential oil can transform your lip balm into a personalized experience.
If you like a little bit of color on your lips, you can also add a hint of lip-safe cosmetic-grade colorant to your lip balm mixture. This will give your homemade lip balm a subtle tint, similar to a lip gloss or lipstick, giving you the option to wear it as a standalone lip product.
Another great way to customize your lip balm is by using different oils in your recipe. While the base recipe typically uses beeswax, coconut oil, and a fatty oil like castor or jojoba oil, you can experiment with different ratios and combinations to achieve the texture and feel you prefer. Each oil has its own unique properties, so finding the ones that work best for your lips is important.
If you have chapped lips, adding nourishing ingredients like shea butter or cocoa butter to your lip balm recipe can help soothe and moisturize your lips. These natural butters are rich in fatty acids and vitamins, making them perfect for treating dryness and promoting smoothness.
Once you’ve prepared your customized lip balm, you’ll need containers to store them. There are many options available, from small plastic or glass jars to lip balm tubes. Choose the one that you find most convenient for your needs. You can even find containers specifically designed for DIY lip balms, which can add a beautiful touch to your homemade creations.
Now that you know how to make lip balm and customize it according to your preferences, it’s time to get creative! Try different scents, colors, and oils to find your next best lip balm formula. Whether you want a moisturizing lip balm for everyday wear or a glossy and colorful option for a special occasion, customizing your lip balm allows you to create a product that suits your unique style and needs.
So next time you’re preparing to make lip balm, remember these tips and have fun creating your own personalized lip balm recipe. The possibilities are endless!