

If you are an enthusiast of chicken breeding or simply want to learn about the fascinating process of egg development, then you should know how to candle an egg. Candling is a technique used to examine the inside of an egg without cracking it open. It allows you to see the embryo and monitor its development over time.
But why should you candle eggs? There are several reasons. First, candling helps you identify any problems with the embryos. You can spot if an egg is infertile or if there are any abnormalities or deformities. This is especially important if you are using an incubator, as you can remove any eggs that won’t hatch, preventing potential infections or deaths.
While candling is best done after a week into incubation, it can also be done earlier. During the first few days of incubation, you may not see much, but as the embryo develops, you will be able to observe the growth and track the progress. You can even check for signs of life, such as movement or the formation of blood vessels.
So, what do you need to candle eggs? The most important tool is a bright light source. A flashlight or a candle can work, but there are also specialized egg candlers available. The light must be strong enough to shine through the shell of the egg and reveal the inside. You will also need a dark room, as this will allow you to see the details of the embryo more clearly.
Candling Eggs
Candling is a method used to check the development of eggs, particularly in the early stages of incubation. It involves shining a bright light through the eggshell to see the internal contents. This process can be done at various times throughout the incubation period, usually around 7 to 10 days after the eggs have been laid.
One of the main purposes of candling eggs is to determine if they are fertile or not. Fertile eggs will show signs of embryo development, such as the presence of blood vessels. This is a good indication that the eggs are viable and can be incubated further to produce chicks.
When candling eggs, it is important to handle them carefully to avoid any cracks or damage to the shell. Cracks can allow bacteria to enter the egg and potentially infect the developing embryo. The best way to candle eggs is to hold them gently in your hand and shine a bright light directly onto the egg. You should be able to see through the shell and into the contents of the egg.
What you should look for during candling is the presence of a developing embryo. This can be seen as a dark shadow or a hairline crack inside the egg. As the embryo develops, you may also notice a network of blood vessels, often referred to as the “vein ring”. This indicates a healthy and developing embryo.
If you notice any problems during candling, such as blood rings or clear eggs with no signs of development, it may be an indication of infertility, early embryo death, or other issues. These eggs should be removed from the incubator to prevent any potential contamination.
Candling can also be done after the eggs have been shipped or stored for a while to check their viability. It is best to candle eggs as soon as possible after receiving them to track their development and ensure they are still viable.
In conclusion, candling eggs is an important process for anyone who wants to hatch chicks. It allows you to see the development of the embryos and identify any potential problems early on. By candleing the eggs at the right time and keeping track of their development, you can increase the chances of a successful hatch.
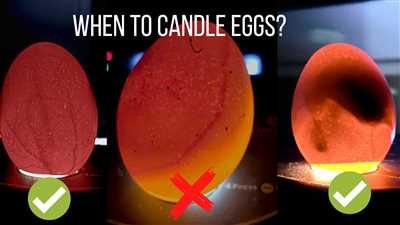
When is the best time to candle eggs to check they are fertile
When you allow eggs to develop for a few weeks, the best time to candle them is around seven to ten days after they have been laid. This is the period during which fertile eggs will start to develop embryos.
To candle eggs, you will need a candling device, which can be purchased or made at home. When using a candling device, you will hold the egg against the light source and look for signs of development inside the egg.
One of the key things to look for during candling is the presence of blood rings. A blood ring is a clear indicator that the egg is not fertile and that the embryo stopped developing. Another sign to look out for is a clear or uniformly dark egg, as this may also indicate a lack of embryo development.
On the other hand, if you see veins spreading out from a central point or a dark spot forming, this indicates that the egg is fertile and that the embryo is developing. This is a good sign, and you should keep these eggs in the incubator.
It is important to candle eggs before placing them in the incubator to track their progress and ensure they are viable. Candling can help identify any potential problems, such as cracks in the shell that may become infected or signs of chick death.
If you notice a hairline crack during candling, it is essential to mark the egg and keep an eye on it. While some hairline cracks can heal on their own, others may require intervention to prevent infection or further damage to the developing chick.
By candling eggs around the seven to ten-day mark, you can determine which ones are fertile and track their progress throughout the incubation period. This will help you ensure the best possible hatch rate and increase your chances of successfully hatching healthy chicks. Remember to candle eggs carefully, using a gentle touch and avoiding excessive movement to prevent harming the developing embryos.
Why Should You Candle Eggs
Candling eggs is a process that involves shining a light through the shell of an egg to examine its contents. It is a vital practice for anyone interested in hatching eggs or assessing their quality. Here are several reasons why you should candle eggs:
1. Identify Problems: When eggs are shipped or collected, they may have cracks or other issues that are not visible from the outside. By candling the eggs, you can detect any abnormalities or problems early on.
2. Keep Track of Development: Candling lets you monitor the development of the eggs. By examining the egg contents, you can determine whether the eggs are fertile, infected, or developing into embryos.
3. Assess Egg Quality: Candling allows you to check the quality of the eggs. By observing the appearance of the air cell, the size of the yolk, and the presence of any blood spots, you can ensure that you select the best eggs for incubation.
4. Determine Embryo Development: By candling eggs, you can track the development of the embryo. As the weeks progress, you can see the growth of blood vessels, the formation of the h
What to look for after two weeks
After two weeks of incubation, it is time to candle the eggs again to check for any developments or potential problems. Candling eggs is the process of holding them up to a strong light source, such as a flashlight, to see through the shell and examine the contents.
When you candle the eggs after two weeks, you should be able to see the embryo starting to develop. Fertile eggs will have a visible dark spot or a ring of blood vessels, indicating that the chick is growing inside. This is an exciting sign that everything is right on track.
However, not all eggs may show signs of development by this point. Some embryos may take longer to show visible signs, especially if the eggs were shipped or have been exposed to temperature fluctuations. This is why it is important to candle the eggs at different intervals to keep track of their progress.
During the candling process, you should also check for any cracks in the shell. Cracks can allow for bacteria to enter the egg, which can lead to infection or death of the developing chick. If you notice any cracks, it is best to remove those eggs from the incubator.
Another thing to look for is the presence of “hairline” cracks. These are very thin cracks that can be difficult to spot but can still allow for bacteria to enter. It is important to be thorough and check every egg carefully.
While candling, it is also possible to detect non-viable or “clear” eggs. These are eggs that have not developed an embryo and will not hatch. Clear eggs can be identified by their transparent appearance, as you will be able to see straight through them.
Overall, candling the eggs after two weeks is an important step in the incubation process. It allows you to check on the development of the embryos and identify any potential problems. By keeping a close eye on the eggs and taking the necessary steps, you can increase the chances of successful hatching and ensure the health of the chicks.
What To Look For While Candling Eggs
When you candle eggs, there are several things you should keep in mind to ensure the best incubation results.
- Before candling, make sure you have a quiet, dark room or space where you can easily see the eggs.
- While candling, hold the egg with the larger end up and shine a bright light through the smaller end. This will allow you to see into the egg and track its development.
- What you are looking for when candling eggs is the development of a living embryo. After about a week of incubation, you should start to see some signs of embryo development. At this point, you may be able to see the embryo’s blood vessels as well.
- A hairline ring or crack in the shell is a sign that the chick inside may have died or become infected. These eggs should be removed from the incubator to prevent the spread of infection to other eggs.
- Eggs that have not developed any embryos or show no signs of life after two weeks of incubation should also be removed.
- For shipped eggs, candling is especially important as the eggs may have experienced rough handling during transit. Look for hairline cracks that may have occurred during shipping.
- If you are candling eggs that have been incubated for several weeks, you may notice that the air cell inside the egg has become larger. This is a natural part of the incubation process and indicates that the chick is growing and using up the egg’s resources.
- It is also important to check for any unusual odors when candling eggs. If you detect a foul smell, it is likely a sign of infection or death, and the affected eggs should be removed.
- Remember that candling is not an exact science, and it can take some practice to become proficient at identifying the different signs and stages of egg development. But with time and experience, you will be able to confidently track the progress of your eggs and maximize your hatching success.
By following these guidelines, you will gain a better understanding of the health and viability of your eggs, enabling you to take appropriate actions to ensure the best possible outcomes.


