

If you’re looking for a spot where you and your child can escape into the world of books, then a book nook is just what you need. This cozy little space can be created under the stairs, in a corner of the room, or even inside a wooden crate. The main goal is to find a quiet place where your kids can dive into their favorite stories.
One of the benefits of making a book nook is that it allows you to customize the space to fit your child’s interests and personality. You can paint the walls in their favorite colors, add artwork related to their most loved books, or even create a fantasy-inspired world. The possibilities are endless!
To begin, you’ll first need to find the perfect location for your book nook. It can be under the stairs, in a corner of the room, or anywhere else that you think would be a great fit. Once you’ve found the right spot, it’s time to plan and gather the materials you’ll need.
If you’re not much of a DIY person, don’t worry! Making a book nook is a fun and creative craft that anyone can do. And if you don’t have much experience with woodworking, there are plenty of pre-made bookcases and shelves that you can use as a starting point.
The next step is to customize the space to make it truly unique. You can personalize the book nook by adding your child’s name, their favorite book covers, or even their own artwork. This will not only make the space their own, but it will also encourage them to keep their books organized and featured.
When it comes to the design of the book nook, let your imagination run wild. You can create a cozy reading corner with cushions and a small window seat, or you can go for a more whimsical theme, like a secret garden or a magical forest. The key is to make it a kid-friendly and inviting space that will inspire a love of reading.
Once you have a plan in place and all the materials you need, it’s time to get started. If you’re not confident in your woodworking skills, don’t worry. There are plenty of step-by-step tutorials available online that can guide you through the process. Just remember to take your time and don’t be afraid to ask for help if you need it.
After you’ve finished making the book nook, it’s time to sit back and enjoy the cozy space you’ve created. This little corner of the world will not only help your kids develop a love for reading but also provide a quiet and peaceful spot where they can escape into the pages of their favorite books. So grab a book and get ready to dive into a whole new world!
- How to Make a Book Nook
- Step 1: Find the Perfect Spot
- Step 2: Customize the Bookshelf
- Step 3: Plan the Layout
- Step 4: Begin the Construction
- Step 5: Customize the Space
- Step 6: Decorate and Personalize
- In summary, here are the steps to make a book nook:
- Making a book nook For Beginners
- STEP 3 – Paint the Letters and Crate to Customize for Your Kid
- Benefits of a Reading Nook
- Find the Perfect Spot
- Keep it Creative
- Personalize the Space
- Share this
- Like this
- Related
- How to make a Book Nook
- Video:
- I made a booknook with over 1500 individual tiny books
How to Make a Book Nook
If you’re looking to create a personalized space for your child’s reading area, a book nook is the perfect solution. Book nooks are small, simulated worlds that are inspired by books and help to create a cozy and inviting space for kids to read. Here’s a step-by-step guide on how to make a book nook:
Step 1: Find the Perfect Spot
The first step in making a book nook is finding the right spot for it. Look for an area near a window or a cozy corner in your child’s room where they can have some quiet time to read.
Step 2: Customize the Bookshelf
Next, personalize the bookshelf by painting it in colors that your child likes. You can also add their name or some artwork to make it more kid-friendly.
Step 3: Plan the Layout
Before you begin building the book nook, plan out the layout. Think about how much space you have and what you want to include in the nook. You can add stairs, a ladder, or even a wooden crate to add some dimension to the space.
Step 4: Begin the Construction
Once you have a plan in place, it’s time to start building the book nook. Start by creating the structure using wood or any other material you prefer. Make sure it’s sturdy and safe for your child to use.
Step 5: Customize the Space
Once the structure is complete, it’s time to customize the space inside the book nook. Add shelves for books, a cozy seating area, and any other features you think would be a great addition.
Step 6: Decorate and Personalize
The final step is to decorate and personalize the book nook. Add books, artwork, and any other decorations that your child would love. This is their special reading area, so let them have a say in how it looks!
Making a book nook is a fun and creative craft that not only helps kids develop a love for reading but also provides them with a dedicated space where they can dream and imagine. It’s a great way to keep their books organized and ensure that they always have a cozy spot to enjoy their favorite stories.
In summary, here are the steps to make a book nook:
- Find the perfect spot
- Customize the bookshelf
- Plan the layout
- Begin the construction
- Customize the space
- Decorate and personalize
Don’t be afraid to get creative with your book nook! Let your child’s imagination run wild and create a space that they will love spending time in.
Making a book nook For Beginners
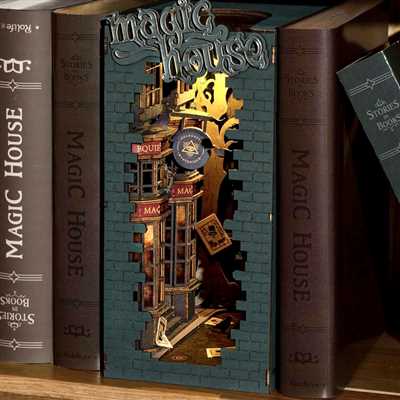
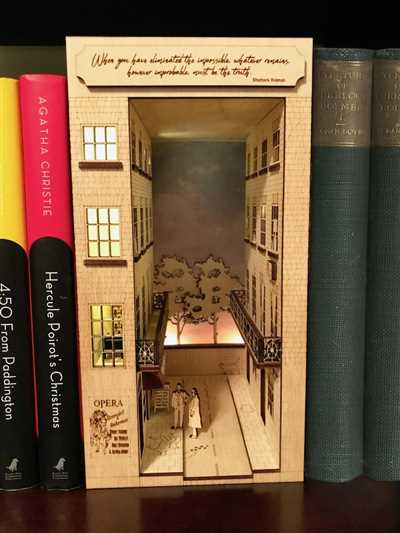
If you’re a book lover who has always dreamed of creating a cozy reading spot in your home, making a book nook is a perfect project for you. Book nooks are miniature worlds that fit into the space of a bookshelf, and they can transport you into a magical realm every time you open a book. Whether you want to simulate a window overlooking a breathtaking view or a kid-friendly space filled with bright colors and creative artwork, the possibilities are endless.
To begin, you’ll need a bookshelf or a small space where you can dedicate an area for your book nook. If you don’t have a bookshelf, you could repurpose an old crate or find a small spot under the stairs. The goal is to have a place where you can keep your books and create the book nook of your dreams.
Once you have your designated space, it’s time to think about what kind of book nook you would like to make. If you’re making a book nook for kids, you could paint the walls in fun, vibrant colors and include their favorite characters or letters. You could also add a kid-friendly reading chair or bean bag to make it a cozy spot for them to enjoy their books.
If you’re a fan of fantasy or adventure books, you could create a book nook that simulates a world related to your favorite books. For example, you could recreate the cozy bookstore featured in “The Malamander” or the magical world of “Harry Potter.” You could place miniature items such as tiny bookshelves, potion bottles, or magical creatures to bring the simulation to life.
Another great idea for a book nook is to personalize it with your own artwork. You could paint the walls with scenes from your favorite books or create a mural that inspires you while reading. You could also include quotes or excerpts from your favorite books to add a touch of literary magic to the space.
When making a book nook, it’s important to involve the kids in the process. They can help you customize the space and find items that they would like to include. This will not only make the book nook more enjoyable for them, but it will also encourage their love for reading and creativity.
Before you start the project, it’s a good idea to plan out your book nook and gather all the materials you will need. This includes paint, brushes, miniatures, and any other decorative elements you want to include. Then, set aside some time to dedicate to the project. Making a book nook is a craft that requires attention to detail and patience, so take your time and enjoy the process.
In conclusion, making a book nook is a great way to create a cozy and inspiring spot for reading. Whether you want a window simulation, a kid-friendly area, or a personalized space filled with artwork, there are endless possibilities to choose from. By involving the kids in the process, you can ensure that the book nook becomes a place they love to spend time in. So, gather your books, gather your materials, and get started on creating your very own book nook.
STEP 3 – Paint the Letters and Crate to Customize for Your Kid
Once you’ve decided on the perfect space for your book nook, it’s time to begin customizing it for your kid. One great way to personalize their book nook is by painting the letters of their name on a wooden crate.
Start by finding a wooden crate that fits well in the designated area. You can usually find crates at craft stores or online. Then, choose colors that your kid loves and that go well with the overall theme of the book nook. You can either paint the letters directly on the crate or paint them separately and then attach them. This will depend on your personal preference and artistic abilities.
If you need help finding inspiration, look for related artwork or characters from your child’s favorite books. For example, if they love the “Malamander” series, you could paint a sea creature or a beach scene on the crate.
Before painting, make sure to clean the surface of the crate to ensure the paint adheres properly. It’s also a good idea to sand the wood lightly to create a smoother surface for painting.
Invite your kid to help with the painting process. This not only allows them to be creative and feel involved in building their own book nook, but it also helps them develop their fine motor skills.
Once the letters are painted and the crate is dry, you can place it in the book nook. The crate can be used to keep their favorite books or act as a display spot for their artwork. It’s a great way to showcase their creations and encourage them to keep reading.
By customizing the book nook with their name and favorite colors, you create a kid-friendly and personalized space that they will love. It makes the reading area feel like their own little world.
Don’t forget to share their dream book nook with friends and family. They might find it inspiring and decide to create their own version!
Benefits of a Reading Nook
A reading nook is a dedicated space where you can create a cozy and comfortable spot to enjoy your favorite books. Making a reading nook has numerous benefits, especially for kids. Here are some of the advantages:
- Encourages Reading: Having a designated area for reading helps to develop a love for books and encourages daily reading habits.
- Provides a Quiet Place: A reading nook offers a peaceful and quiet environment away from distractions, making it easier to focus and immerse yourself in a book.
- Stimulates Imagination: By surrounding yourself with books, artwork, and decorations, a reading nook can help spark creativity and inspire the imagination.
- Creates a Cozy Atmosphere: With comfy seating, pillows, and blankets, a reading nook provides a cozy and inviting space to relax and get lost in a good book.
- Customizable and Personalizable: You can customize and personalize your reading nook according to your preferences, whether it’s by painting the walls, adding shelves, or displaying your favorite artwork.
- A Kid-Friendly Space: For parents, creating a reading nook for kids can be a great way to encourage reading and help them develop a love for books at an early age.
- Organizes Books and Materials: A reading nook provides a dedicated space to keep your books, making it easy to find and access them whenever you want to read.
- Create a Relaxing Retreat: A reading nook can be a place of relaxation and escape from the busy world outside, allowing you to unwind and de-stress.
- Inspires Creativity: By surrounding yourself with books and artwork, a reading nook can serve as a source of inspiration and help you explore new ideas and perspectives.
Whether you prefer a small corner with a comfortable chair or a larger space with a bookshelf and window seat, a reading nook is a wonderful addition to any home. The benefits it offers go beyond just a place to read – it creates a world of imagination and creativity.
Find the Perfect Spot
One of the most important steps in making a book nook is finding the perfect spot for it. Whether you’re making it for yourself or for your kids, you need to find a place that is just right for reading and getting lost in a good book.
If you’re making a book nook for your child, think about what kind of space they would dream of having. Do they like to be surrounded by books? Then a bookshelf area would be great for them. Do they like to have their own little world to escape to? Then a cozy corner with a kid-friendly chair and some cushions would be perfect.
For beginners, a small wooden crate or a step under the stairs can be a great place to start. You can customize it with some paint and artwork to make it their own personal reading nook.
When looking for a spot, pay attention to the lighting. Natural light from a window can be ideal, as it helps create a bright and inviting space. If that’s not possible, you can use a desk lamp or some string lights to create a warm and cozy atmosphere.
Another important factor to consider is the noise level. You want to find a spot away from distractions, so your child can fully immerse themselves in the world of books. If you have a busy household, you may need to think creatively and find a spot that is a bit more secluded.
Don’t forget to think about the comfort of the space. Make sure to have a comfortable chair or pillows for lounging, and keep a blanket or two nearby for added coziness. Having a place to keep their favorite books close at hand is also a must.
Once you’ve found the perfect spot for your book nook, you can begin to personalize it even more. Add some letters or artwork to the walls, paint the area in their favorite colors, or display some featured books. The possibilities are endless, and it’s a fun way to get your child involved in the process.
Remember, the goal is to create a space that inspires a love of reading and makes it easy for your child to dive into new worlds. So take your time to find the right spot and make sure it’s a place where they would love to spend time.
Keep it Creative
One idea is to find a wooden stairs or bookshelf that you can customize to fit your space. Paint it in vibrant colors or add artwork to personalize it even more. This helps ensure that your book nook is just as unique as you are.
For beginners, a great way to start is by using wooden crates as bookshelves. Paint them in different colors to add a pop of color to your nook. This can also help organize your books and letters.
If you have kids and want to create a spot for them to enjoy their favorite books, don’t be afraid to let their imagination run wild. Think about what they love and find ways to incorporate it into the design. You can even make a simulation of their dream nooks, inspired by their favorite books or characters.
Sharing your love for books with your children is a wonderful way to bond. Creating a book nook together can be a fun and educational experience. Get them involved in the planning and making of the space. Let them help choose the colors, artwork, and books to display. This not only helps them develop their artistic skills but also encourages a love for reading.
Another benefit of having a book nook is that it helps kids understand the importance of taking care of their books. By dedicating a specific spot for reading, they learn to value and respect their books. It’s a great way to teach them responsibility.
So, if you’re looking to make a book nook, keep it creative. Let your imagination run wild and don’t be afraid to try new things. Whether you’re a beginner or an experienced book nook maker, there’s always something new to explore. Remember, the key to a great book nook is finding the perfect spot and personalizing it to make it your own.
Personalize the Space
Once you have created your book nook, it’s time to personalize the space. This is where you can let your creativity run wild and make the nook truly yours. There are so many options and ideas you can explore to add a personal touch to your book nook.
One thing you can do is to find artwork or letters that you love and display them in your nook. This could be a painting, a print, or even a sign with your favorite quote. By adding these visual touches, you can make the space feel more like your own and create a unique atmosphere.
If you have kids, you can also involve them in personalizing the space. Let them create their own artwork or choose their favorite colors to paint the nook. This not only helps them unleash their creativity but also gives them a sense of ownership and pride in their little area.
If you’re unsure about where to find artwork or how to incorporate it into your book nook, don’t worry. You can try searching online for inspiration or visit a local art dispensary. They may have some great pieces that would be perfect for your nook.
Another way to personalize the space is by customizing the bookshelf itself. You can paint it in your favorite colors or add decals or stickers that reflect your interests. This adds a personal touch and makes the bookshelf more than just a spot to keep your books.
Wooden crates are also a great option for personalizing your book nook. You can stack them up and use them as shelves, or even turn them into a cozy reading nook with some cushions and blankets. The possibilities are endless, so don’t be afraid to get creative!
Lastly, don’t forget to think about lighting in your book nook. Adding soft, warm lighting can create a cozy and inviting atmosphere. Consider placing a lamp or string lights near the nook to ensure the perfect reading spot.
Remember, the goal is to make the space feel like your own little world. Personalizing your book nook helps create a comfortable and inspiring environment where you can escape into the stories and adventures found within the pages of your books.
So take some time to plan and customize your book nook to make it a dream come true. Whether you’re a beginner or an experienced craftsperson, these ideas can help you create a unique and personalized book nook that you’ll love spending time in.
Share this
Once you have decided to make a book nook, it can be helpful to share your project with others. Not only does sharing your creation bring a sense of accomplishment, but it also gives you an opportunity to inspire and help others who are interested in making their own book nooks.
For beginners who may not know how to start, sharing your process can be immensely valuable. You can provide step-by-step instructions on finding and making a wooden crate, how to make it kid-friendly, and how to customize it to make it a perfect fit for your child’s space. You can also share tips and ideas on how to paint and personalize the book nook, ensuring that it reflects your child’s interests and dreams.
If you have already completed your book nook, sharing pictures and details of your creation can be inspiring for others who are in the planning or making stages. By sharing the benefits of having a book nook, such as creating a dedicated spot for reading and artwork, you can motivate others to find their own perfect reading nook.
Sharing your book nook project can be done in various ways. You can create a blog post or social media post with step-by-step instructions, pictures, and related ideas. You can also join online communities and forums dedicated to book nooks and share your project there. Additionally, you can consider hosting a book nook workshop or craft event where you can teach others how to make their own book nooks.
By sharing your book nook project, you not only contribute to the creative community but also inspire others to create a special place for reading and imagination. So, don’t hesitate to share your book nook project and help others embark on their own book nook journey!
Like this
First, find a spot in your home where you want to set up the book nook. It could be a corner by a window, under the stairs, or even just a small area next to a bookshelf. Once you’ve decided on the location, measure the space to ensure it’s the right size for your child.
Next, gather the materials you’ll need for this craft. You’ll need a wooden crate, paint in your child’s favorite colors, paintbrushes, letters or stencils to personalize the crate, and any artwork or decorations you’d like to add. Make sure to choose kid-friendly materials and paint that’s safe for them to use.
Now it’s time to get creative! Begin by painting the wooden crate in your child’s chosen colors. Let them have fun with this step and express their creativity. You can also help them paint letters or use stencils to spell out their name or a fun word related to books.
Once the crate is dry, you can start customizing the space inside. Arrange books in a way that’s appealing to your child – they’re more likely to pick up a book if it’s displayed in an eye-catching manner. You can also add a cozy cushion or pillows for them to sit on while reading.
If you want to take it a step further, you can paint the inside of the crate to create a dreamy world of books. Let your child’s imagination run wild – they can paint bookshelves, a window with scenery, or even a magical creature like a malamander. This personal touch will make the book nook even more special.
Now you’re almost done! Place the book nook in the designated spot and let your child explore their new reading haven. Encourage them to share their favorite books with you and create a cozy atmosphere where they can get lost in the wonderful world of literature.
By making a book nook, you not only provide your child with a dedicated area for reading, but you also inspire their love for books and help them develop a lifelong habit of reading. Plus, it’s a great way to spend quality time together and bond over stories.
So why wait? Gather your materials, unleash your creativity, and start making your very own book nook. We’re sure your child will love it!
Related
When it comes to creating a book nook, there are many resources and ideas that can help you along the way. Books are the heart of any bookshelf, so finding the right ones to feature is a great first step. From classics to modern favorites, there are endless options to choose from.
To make the book nook a truly personalized and creative space, consider adding artwork or decorations that reflect your child’s interests. This can be anything from paintings to posters or even a small wooden crate to hold their favorite books.
One popular book nook idea is to create a miniature world inside a bookshelf. You can use items like stairs, windows, and even book dispensary to make the space feel more realistic. This type of book nook is a great way to encourage imaginative play and can provide hours of entertainment for kids.
Another way to personalize a book nook is to paint it in colors that your child loves. Whether it’s their favorite color or a combination of colors, painting the book nook can make it feel like a special spot just for them.
If you’re a beginner and not sure where to start, there are plenty of step-by-step guides and tutorials available online to help you along the way. These resources can show you everything from how to find the right spot for your book nook to how to customize it to perfection.
Nowadays, book nooks are not only for kids. Many adults are finding joy in creating these mini worlds and using them as a quiet spot to sit and read or display their favorite books.
The benefits of having a book nook are plentiful. Not only does it provide a dedicated space for reading, but it also encourages creativity and imagination. It can also help keep books organized and easily accessible, making it a great addition to any home.
If you’re looking for more inspiration, there are countless book nook ideas and pictures available online. From themed book nooks like Harry Potter or Alice in Wonderland, to more general designs, you’re sure to find something that suits your taste.
So whether you’re a book-loving adult or a kid who dreams of having their own special reading spot, a book nook is a great way to create a cozy and inspiring space. Don’t be afraid to think outside the box and let your imagination run wild – the possibilities are endless!
How to make a Book Nook
If you’ve been finding it challenging to get your kid to sit down and read, creating a book nook might be just what you need. A book nook is a dedicated space where kids can have their own little corner to read and explore the world of books. It helps create a cozy and inviting spot that inspires their imagination and love for reading.
Here are some step-by-step ideas on how to make a book nook:
- Find the perfect spot: Look around your house and find an area that would be perfect for a book nook. It could be under the stairs, in a corner of their room, or even in a small unused space.
- Gather the materials: You’ll need a bookshelf or wooden crate, paint in kid-friendly colors, brushes, letters to personalize, and any artwork or decorations you want to include.
- Plan and customize: Before making any changes, plan out how you want your book nook to look. Decide on the colors, artwork, and any other related elements.
- Prepare the space: Clear out the selected area and ensure it is clean and free of any clutter.
- Paint and decorate: Use the paint and brushes to paint the bookshelf or wooden crate. Let it dry completely before adding any additional decorations.
- Add personal touches: Once the paint is dry, personalize your book nook by adding letters, artwork, and any other decorations that reflect your child’s interests.
- A place for books: Organize the books in a way that is easily accessible for your child. You can use bins, baskets, or shelves to keep them tidy and within reach.
- Create a cozy reading spot: Add cushions, blankets, or a small chair to make the reading corner comfortable and inviting.
- Share the joy of reading: Once the book nook is complete, share it with your child and encourage them to spend time there. Read together, explore new books, and let their imagination soar.
Creating a book nook not only encourages reading but also helps foster creativity and a love for learning. It provides a dedicated space where kids can escape into the pages of their favorite books and create their own little dream world.
So, don’t wait any longer. Get inspired by these ideas and start making your own book nook today!


