

Creating fillable documents can be a valuable time-saving skill, especially for businesses and individuals dealing with a large number of forms or templates. Whether you want to convert a file into a fillable format or create a new one from scratch, there are several easy methods you can use to achieve this.
In this post, we will walk you through the process of making Word documents fillable, step by step. We will cover everything from the basics of form creation to more advanced options, so you can enjoy the ease and convenience of interactive documents without any problems.
Word offers a range of tools and features to help you in creating fillable forms. One option is to use the built-in form controls, such as text boxes, checkboxes, and drop-down lists, to add interactive fields to your document. Another choice is to use the Content Control feature, which allows you to add different types of controls, like a date picker or a picture control, to your form.
When it comes to form creation, each method has its limitations and advantages. The built-in form controls are more straightforward and easier to set up, but they might not provide the customization options you’re looking for. On the other hand, Content Controls offer more flexibility and can be customized to fit your specific needs, but they require a bit more expertise to set up properly.
If you want to convert an existing Word document into a fillable form, there are also several tools available that can help streamline the process. Applications like Foxit PhantomPDF, EaseUS PDF Editor, and others allow you to convert your Word document into a fillable PDF file with just a few clicks.
By following the steps outlined in this guide, you will be able to create fully functional fillable documents in Word, whether from scratch or by converting an existing file. You can choose the option that best suits your needs and preferences, and start enjoying the benefits of interactive forms right away.
- How to Create a Fillable Form in Word
- 1. Starting with a Blank Document
- 2. Adding Form Controls
- 3. Customizing Form Controls
- 4. Protecting the Form
- 5. Testing and Distributing the Form
- Problems in Creation and Limitations
- 1. Limited form fields
- 2. Limited protection options
- 4. Macro limitations
- 5. Conversion issues
- Creating a Form in Word
- Word’s Form Creation Tools
- Adding Form Controls
- Protecting the Form
- Creating Templates and Macros
- Generating and Sharing the Form
- Limitations and Problems
- The Bottom Line
- How to convert a Microsoft Word file to a PDF form
- Video:
- How to Auto Populate Repeating Text in Word – Simplify Letters & Contracts!
How to Create a Fillable Form in Word
Creating a fillable form in Word allows users to easily fill in information, check boxes, and add their personal details to a document without the need for printing and manual writing. Whether you want to create a simple fillable form or more complex ones, Word provides several features and options to make the process quick and efficient.
1. Starting with a Blank Document
To create a fillable form in Word, open a new document. Alternatively, you can start from an existing document and make the necessary changes.
2. Adding Form Controls
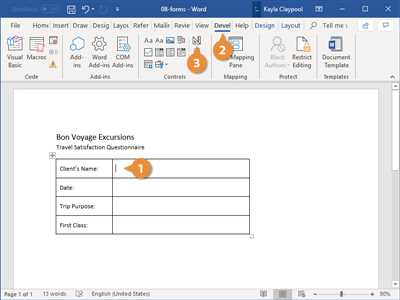
Word provides various form controls that you can add to your document, such as checkboxes, drop-down lists, and text fields. To add a form control, go to the “Developer” tab, click on “Legacy Tools” and select the desired control from the menu.
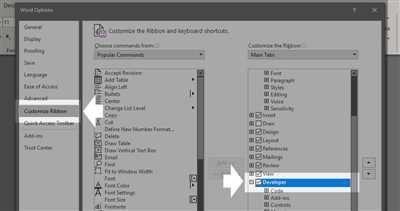
Note: If you don’t see the “Developer” tab, you may need to enable it in your Word settings. Go to “File” > “Options” > “Customize Ribbon” and check the box for “Developer” under the “Main Tabs” section.
3. Customizing Form Controls
After adding a form control, you can customize it to fit your needs. Right-click on the control and select “Properties” to change its default value, appearance, or behavior.
4. Protecting the Form
To prevent users from making unwanted changes to the form or structure, you can apply protection. Go to the “Developer” tab, click on “Protect Document,” and choose “Restrict Editing.” From there, you can set restrictions and password protection if needed.
5. Testing and Distributing the Form
Before distributing the form, it’s important to test it thoroughly to ensure everything works as expected. Fill in the form as a user would, check the checkboxes, enter text, and go through all the form controls to identify any problems or unrecognized entries.
Once you’re sure the form is working correctly, save it as a template or convert it to a PDF for easier distribution. Word allows you to save the document in various formats, including PDF, making it accessible to users without Word or with different operating systems.
By creating fillable forms in Word, enterprises can save time and resources by avoiding repetitive writing, while also ensuring data integrity. Users can fill in the forms easily, and the information they enter can be automatically processed or analyzed without the need for manual data entry.
With the right use of form controls, default values, and macros, creating fillable forms in Word can become an efficient part of any document creation process. So whether you’re making a plain fillable form or an interactive document with calendar, image, or other advanced features, Word provides the necessary tools to enjoy the benefits of fillable forms.
Creating fillable forms in Word is just one of the many features this powerful word-processing software offers. So why not give it a try and see how it can improve your document creation process?
Disclaimer: This post was created by EaseUS, and it comes from their suite of document processing software. The information provided here is for informational purposes only and should not be considered legal or professional advice.
Problems in Creation and Limitations
When it comes to creating fillable forms in Word, there are a few problems and limitations that users might encounter. Let’s discuss some of them:
1. Limited form fields
Word’s built-in form fields are limited and don’t provide advanced features like calendars or image pickers. This makes it difficult to create forms with interactive elements that users might expect.
2. Limited protection options
Word’s form protection options are limited compared to other document formats like PDF. Users can still make changes to the document, even if it is protected as a form. This can be a problem if you want to ensure that the form remains unchanged.
3. Lack of default templates
Unlike PDF documents, Word doesn’t come with a default set of fillable form templates. This means that users have to create a form from scratch every time they want to make one. However, there are third-party tools like Foxit that provide templates and ease the form creation process.
4. Macro limitations
If you want to create more complex forms, you might run into limitations with Word’s macro capabilities. Macros can be helpful in automating tasks, but they might not have all the features you need for creating advanced fillable forms.
5. Conversion issues
Word files can be converted to other formats like PDF, but the conversion might not always preserve the fillable form elements. This means that users might have to go through the form again and manually add the fields or make changes.
In conclusion, while Word allows users to create fillable forms, it does have its limitations. Users might encounter problems with limited form fields, protection options, default templates, and macro capabilities. Additionally, there might be issues with converting the forms to other formats. However, there are third-party tools and alternative formats like PDF that offer more advanced features and options for creating and displaying fillable forms.
Creating a Form in Word
Creating a form in Word can be a great way to gather information from your users, and Word provides a variety of tools and features to help you do just that. In this article, we will explore how to create a form in Word and the limitations and options that come with it.
Word’s Form Creation Tools
Word comes with a built-in form editor that allows you to add various form controls to your documents. These controls include text fields, checkboxes, dropdown menus, and more. You can also add tables to your form to organize the information collected.
To start creating a form in Word, open a new or existing document and go to the “Developer” tab. If you don’t see the “Developer” tab, you may need to enable it in Word’s options.
Once you’re in the “Developer” tab, click on the “Design Mode” button to enable the form controls. This will allow you to add and edit the form controls within your document.
Adding Form Controls
To add a form control, click on the desired control type from the “Controls” group in the “Developer” tab. For example, if you want to add a text field, click on the “Text Box” button.
After selecting a control, click and drag on the document where you want the control to appear. You can resize and reposition the control as needed.
To modify the properties of a form control, right-click on the control and select “Properties.” In the properties window, you can change various settings, such as the default text, tooltip, and format of the control.
Protecting the Form
Once you have added the desired form controls, you may want to protect the form to prevent users from making changes to the structure of the form. To do this, go to the “Protect” group in the “Developer” tab and click on the “Protect Form” button.
In the “Protect Document” pane that appears on the right side, you can choose the level of protection you want to apply to the form. You can enable editing restrictions, password protect the form, or allow only specific individuals or groups to make changes to the form.
Creating Templates and Macros
If you frequently create forms with similar fields and settings, you can save your form as a template. To do this, go to “File” and select “Save As.” Choose “Word Template” from the file format options and save the template file.
Additionally, Word allows you to enhance your forms with macros, which are small snippets of code that can automate tasks and add interactive elements to your form. You can create macros using Word’s built-in macro editor.
Generating and Sharing the Form
Once you have finished creating your form, you can generate a fillable form document by going to the “Developer” tab and clicking on the “Protect Document” button. Select “Restrict Editing” from the dropdown menu, and in the pane that appears, click on “Allow only this type of editing” and choose “Filling in forms.”
After taking these steps, save the document in a format that can preserve the form controls, such as DOCX or PDF.
You can now share the form with others, and they can fill it out using their own copy of Word or a compatible word processing software. The form can be accessed through the form controls you added and will automatically scroll through the form fields as the user enters their information.
Limitations and Problems
While Word’s built-in form creation tools provide a convenient way to create forms, there are some limitations and problems to be aware of.
First, the forms created in Word are based on the internal Word format, which means they may not work properly or display correctly in other word processing software.
Second, the form controls and formatting options in Word are limited compared to dedicated form creation software. If you need more advanced form features, you may want to consider using specialized form creation tools or online form builders.
Lastly, Word’s form controls do not support complex calculations or conditional logic. If you require advanced form functionality, you may need to use a more powerful form creation solution.
In conclusion, Word provides a simple and user-friendly way to create forms within its application suite. You can add form controls, protect the form, create templates, and even add macros to automate tasks. However, keep in mind the limitations and potential compatibility issues when using Word’s form creation tools for more complex or specialized form needs.
The Bottom Line
Creating fillable word documents is a valuable skill for individuals and enterprises alike. Through the use of code and word templates, conversion to fillable forms can be easily achieved. This feature allows users to fill in specific fields in the document, such as a calendar or table, based on their preferences or needs.
Several software options are available for creating fillable word documents. EaseUS PDF Editor, Foxit PhantomPDF, and Microsoft Office Suite are just a few examples of popular choices. Depending on the user’s preferences and requirements, each option comes with its own set of features and ease of use.
When creating a fillable word document, there are several steps to follow. First, open the document you want to convert into a fillable form. Then, go to the “Developer” tab, which might be unrecognized by default. To enable it, go to “File,” then “Options,” and select the “Customize Ribbon” option. Check the box next to “Developer” and click “OK.”
Once the “Developer” tab is displayed, users can begin adding fillable fields to their document. This can be done by selecting the desired field type from the “Controls” section, such as text boxes or check boxes. With each field added, users can specify the type of data they want the field to collect, whether it be text, numbers, or an image.
Once all fillable fields have been added, it’s important to protect the document to ensure that the form can only be filled in, rather than edited. This can be done by clicking on the “Protect Document” option in the “Developer” tab and selecting the desired level of protection.
After following these steps, the word document will be converted into a fillable form, ready for users to enter their information. To test the form, save the document and reopen it. Users will then be able to fill in each field with their desired values.
Creating fillable word documents offers a convenient and interactive format for users to input their information. Whether it’s for personal or professional use, this feature has many practical applications and can streamline the process of gathering data or input from others.
Overall, making word documents fillable is a useful skill for any writer or developer. By using the available tools and features in word processing software, users can create forms that are easy to fill, with added protection and control. This can benefit individuals and enterprises alike, ensuring that the information collected is accurate and organized.
How to convert a Microsoft Word file to a PDF form
Creating fillable forms in Microsoft Word can be a time-consuming process, especially if you have a lot of fields, tables, or other interactive elements that you want to include. However, when it comes to distributing these forms to users, it’s often more convenient to convert them into a PDF format. This way, users can easily fill out the form using their preferred PDF reader without worrying about any internal problems or limitations that might arise from editing a Word document.
If you want to convert a Word file to a PDF form, there are several methods you can choose from. Here are three popular options:
- Using Microsoft Word’s built-in features: Word has a native “Save As PDF” option that allows you to save your document in PDF format. However, this method only converts the Word file into a plain PDF document without any interactive form controls or fillable fields. So, if you want to create a PDF form, this might not be the best option.
- Using third-party software: There are various software programs available, such as Foxit PhantomPDF or Adobe Acrobat, that offer advanced PDF editing features. These programs allow you to add fillable form fields, checkboxes, radio buttons, and other interactive elements to your PDF document. With these tools, you can create a fully functional PDF form, complete with form validation and calculations.
- Using online conversion tools: If you don’t want to install additional software on your computer, you can also convert your Word file to a PDF form using online tools like EaseUS PDF Editor or SmallPDF. These tools allow you to upload your Word document and convert it into a PDF form with just a few clicks. However, keep in mind that some online tools might have limitations or require a subscription for advanced features.
To convert your Word file into a PDF form, follow these steps:
- Open your Word document that contains the form you want to convert.
- Make sure all the form elements, such as text boxes, checkboxes, and drop-down menus, are added to the document. If needed, use Word’s form controls under the “Developer” tab to add these elements.
- Review the document and make any necessary changes or modifications.
- Once you are satisfied with the form’s content, go to “File” and click on “Save As”.
- In the “Save As” dialog box, choose the location where you want to save the PDF file.
- From the “Save as type” dropdown menu, select “PDF (*.pdf)”.
- Click on the “Save” button to convert your Word document to a PDF form.
Once the conversion process is complete, you will have a newly created PDF file that retains all the form elements from your original Word document. Users can now easily fill out the form using a PDF reader, enter text in the designated fields, and make selections in the checkboxes or drop-down menus. They can then save the filled-out PDF and post it back to you or your organization.
Converting a Microsoft Word file to a PDF form is a simple and effective way to distribute interactive forms without worrying about compatibility issues or the need for specialized software. Whether you choose to use Word’s built-in features, third-party software, or online conversion tools, you can easily generate professional-looking PDF forms that will meet the needs of your users and streamline data collection for your business or enterprise.


