

When it comes to signing documents electronically, you may know that adding a signature is a crucial step. But have you ever wondered how to insert a signature preview into your PDF document? If you’re using an iPhone or iPad, there’s a simple solution that allows you to add signatures with ease.
One way to insert a signature preview is by using the Markup feature on your iPhone or iPad. This feature allows you to draw signatures directly on your device’s screen. To do this, open the document that you want to sign and tap on the Markup icon. Then, select the signature option and draw your signature using your finger or a stylus.
Another option is to create a signature using an image. If you already have a signature saved as an image on your device, you can easily insert it into your document. Simply open the document, tap on the + icon, select the Signature option, and choose the image from your device’s storage. Once inserted, you can resize and position the signature as needed.
One thing to note is that the signature preview should be added before you sign the document. The signature preview is a visual representation of your signature and serves as a placeholder. After adding the signature preview, you can then proceed to sign the document using your regular electronic signature.
So, now you know how to insert a signature preview into your PDF document. Whether you’re using an iPhone, iPad, or other devices, these steps should help you add a signature preview with ease. Remember, the signature preview allows you to track where your signature will be placed, ensuring that everything is in order before you sign the document electronically.
How to Add Image to PDF using Preview

If you need to add an image to a PDF document using Preview, it’s actually quite simple. Preview is a built-in application on macOS and iOS devices that allows you to view and edit PDF files. Here are the steps to add an image to a PDF using Preview:
- Open the PDF document in Preview. You can do this by double-clicking on the PDF file or right-clicking on it and selecting “Open With” and then choosing Preview.
- In Preview, go to the location in the document where you want to add the image. You can use the trackpad on a MacBook or trackpad gestures on an iPad or iPhone to navigate through the document.
- In the menu bar, click on “Tools” and then select “Annotate” and “Signature” from the dropdown menu.
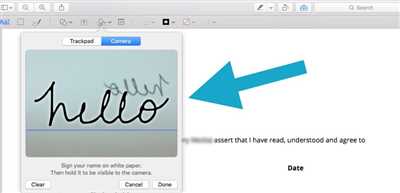
- A sidebar will appear on the right side of the Preview window with options for adding signatures and other annotations. Click on the “+” button at the bottom of the sidebar and select “Create Signature from Trackpad”.
- On a MacBook with a trackpad, use your finger to draw your signature on the trackpad. On an iPad or iPhone, use your finger or an Apple Pencil to draw your signature on the touchscreen.
- When you’re done drawing your signature, click on “Done” or press any key on the keyboard to finalize the signature.
- The signature will now appear in the sidebar under the “Signatures” section. Click on the signature and drag it to the desired location in the document.
- Resize and reposition the signature as needed. You can also rotate the signature by hovering over the green circle on the top of the signature box and dragging it left or right.
- Once the signature is in the correct position, click on the signature box to display additional options, such as changing the opacity or deleting the signature.
- Save the PDF document with the added signature by clicking on “File” and “Save” or using the keyboard shortcut Command + S.
Now you know how to add an image or signature to a PDF document using Preview on macOS and iOS devices. This feature is useful for adding digital signatures, annotations, or other images to your PDF documents.
Sources:
- https://support.apple.com/guide/preview/annotate-a-pdf-document-prvw2701/mac
- https://support.apple.com/guide/preview/annotate-a-pdf-document-prvw2701/ipad
Things You Should Know About Signatures
Signatures are an essential part of many documents, whether they are in a physical or digital format. Traditionally, signatures were handwritten on paper documents to indicate someone’s approval or consent. However, with the rise of digital documents and electronic communication, the process of signing documents has evolved.
Nowadays, you can add your signature to a digital document using various methods and tools. One popular option is to use an iPad or iPhone with a stylus or trackpad. With these devices, you can create your signature electronically, which will then be saved as an image. This image can be inserted into your document, just like any other image.
When it comes to digital documents like PDFs, there are different ways to insert a signature. Some applications provide built-in tools that allow you to add a signature directly onto the document. Others require you to create a signature image separately and then insert it into the document using a markup or annotation feature.
If you prefer a more traditional method, you can also print the document, physically sign it, and then scan it back into a digital format. Once you have a scanned copy of your signed document, you can insert it into other documents as needed.
It’s important to note that electronic signatures have legal validity in many jurisdictions, but the requirements and regulations can vary. It’s essential to familiarize yourself with the specific laws and regulations that govern electronic signatures in your jurisdiction.
When using electronic signatures, it’s crucial to ensure the security and integrity of your signature. Be cautious about where and how you store your signature image to prevent unauthorized use. Consider using password protection or encryption measures to protect your signature and the documents where it appears.
In conclusion, signatures have moved beyond the realm of pen and paper. With the advancements in technology, you can now sign documents electronically using various devices and methods. Whether you prefer a digital signature or a more traditional approach, make sure to follow the necessary steps and comply with the applicable legal requirements.
Steps to Electronically Sign a PDF Using Trackpad
Signing PDF documents electronically has become a common practice in the modern digital world. With the advancement of technology, it is now possible to sign PDFs using the trackpad on your device. This eliminates the need for a physical signature, making the process more efficient and convenient. In this guide, we will walk you through the steps to electronically sign a PDF using the trackpad on your device.
1. Open the PDF document that you want to sign using a compatible application. There are various applications available, like Adobe Acrobat, Preview on a Mac, or other PDF viewers.
2. Find the page in the document where you want to add your signature. You can navigate through the pages using the navigation options provided in the application.
3. Locate the “Signatures” or “Markup” option in the application’s menu. The location of this option may vary depending on the application you are using.
4. Select the “Signatures” or “Markup” option, and then choose the “Create Signature” or “Add Signature” option.
5. A window will appear asking you to create your signature. You can do this by using your trackpad or by selecting an image of your signature that you have saved on your device.
6. If you choose to use your trackpad, use your finger or a stylus to sign your name on the trackpad. The application will capture your signature and display a preview of it on the screen.
7. If you choose to use an image of your signature, select the option to import the image from your device. Navigate to the location where the image is saved and select it.
8. After creating or importing your signature, position it on the page where you want it to appear. You can adjust the size and rotation of the signature if necessary.
9. Once you are satisfied with the placement and appearance of your signature, save the document. The application will prompt you to save the changes you made to the document.
10. Congratulations! You have successfully electronically signed a PDF using the trackpad on your device.
It is important to note that electronic signatures have legal validity in most cases. However, it is always a good idea to check the specific regulations and requirements in your jurisdiction to ensure compliance. With this knowledge, you can confidently sign important documents electronically, knowing that your digital signature is legally binding.
On iPhone and iPad
If you want to create a signature preview on your iPhone or iPad, there are a few things you should know. Using the Markup feature, you can add a signature to documents electronically. Here are the steps to do it:
Step 1: Open the PDF document that you want to add a signature to.
Step 2: Tap on the Markup button, which looks like a pencil tip within a circle.
Step 3: Tap on the plus sign to add a new markup.
Step 4: Tap on the Signature option.
Step 5: Tap on the “Add or Remove Signature” option.
Step 6: If you already have a signature created, tap on the signature you want to use. Otherwise, tap on the “+” button to create a new signature.
Step 7: Use your finger or a stylus to sign your name on the trackpad or create a signature using an image or a stored signature. You can also choose to type your name and have it converted into a signature automatically.
Step 8: After creating or selecting your signature, tap on “Done.”
Step 9: Your signature will be added to the document. You can resize, move, or delete it as needed.
Note: When you add a signature using Markup, it is only added to the current document. If you want to use the same signature in other documents, you will need to repeat these steps.
That’s it! Now you know how to add a signature to your documents using Markup on your iPhone or iPad.
Sources: Apple Support
Источники
When it comes to inserting a signature preview into your digital documents, there are a few different sources you can use. Here are the steps on how to add a signature preview to your PDF documents using the Preview app on your Mac, iPhone, or iPad:
1. Open Preview on your Mac by clicking on the application icon in your dock or by searching for it using Spotlight.
2. Once Preview is open, select the PDF document you want to add a signature to. You can either navigate to the file using the file browser or drag and drop the file directly into the Preview window.
3. Click on the “Markup” toolbar icon, which looks like a pen tip, to reveal the markup tools.
4. From the markup tools, select the signature tool. It’s the one that looks like a signature, and it may be located in the “Tools” menu.
5. If you haven’t already created a signature, you can do so by using your trackpad or a regular open. Click on the “Create Signature” option and follow the prompts to create your signature.
6. Once you have a signature created, you can add it to your PDF document by clicking on the signature tool again and selecting the signature you want to use. Then, click on the location in the document where you want to add the signature.
7. If you need to move or resize the signature, click and drag it to the desired location. You can also use the resizing handles to adjust the size of the signature.
8. That’s it! Your signature is now inserted into your PDF document using Preview.
These are the steps you should follow when you want to add a signature preview to your digital documents using Preview. Now you know how to create, add, and manipulate signatures in Preview on your Mac, iPhone, or iPad. You can use this knowledge to sign PDFs and other documents without having to print them out and manually sign them.
Other than using Preview, there are also other sources which allow you to insert a signature preview into your digital documents, such as Adobe Acrobat, Microsoft Word, and other online platforms. Each source may have slightly different steps, so make sure to consult the documentation or support resources for the specific source you are using if you want to know more about how to insert signatures into your documents using that source.


