

If you’ve ever wondered how to cut glass bottles at home, this tutorial is for you! Cutting glass bottles might seem like a daunting task, but with the right tools and technique, it can be a fun and rewarding DIY project. In this guide, we will walk you through the step-by-step process of cutting a glass bottle, from marking the cut line to smoothing the edges.
Before we dive into the cutting process, there are a few things you’ll need. First and foremost, safety should be your top priority. Make sure to wear protective gloves and safety glasses to avoid any accidents. Additionally, you’ll need a glass cutter, which you can easily find online or at your local home improvement store. Some popular options include the glass bottle cutter from AliExpress or the AGPtek Glass Bottle Cutter.
Once you have all your tools ready, the first step is to mark the cut line on the bottle. You can use a pencil or a marker to make a clear and visible mark. Start by wrapping a piece of tape around the bottle where you want the cut to be. This will help to keep your line straight and prevent the glass cutter from slipping. Place the bottle securely in a bottle cutting station or simply improvise with a few posts and a rubber band. Make sure the bottle is stable and won’t move during the cutting process.
- Cutting Glass Bottles at Home- a Tutorial
- How to Cut a Bottle Step 1
- Adjust the bottle cutter
- Tips on cutting glass bottles with a tile saw
- Related Posts
- How I Cut Wine Bottles for Perfect Rings
- Cutting A Shape Into A Glass Bottle
- Trouble Shooting Tips
- Once again the tools you will need are
- Video:
- DIY: Cut Square Glass Bottle In 3 Simple Steps
Cutting Glass Bottles at Home- a Tutorial
If you’ve ever wondered how to cut glass bottles at home, then this tutorial is for you. With just a few simple tools and some patience, you can create beautiful, unique pieces without having to rely on expensive glass cutting services. Here, we will take you through a step-by-step process to help you achieve the perfect cut.
Before we begin, it’s important to remember that cutting glass can be a delicate process, so safety precautions are a must. Make sure you have the right tools for the job, such as a glass cutter, tape measure, and gloves to protect your hands.
Step 1: Preparation
Start by cleaning the glass bottle thoroughly. This will ensure a smooth, even cut. Remove any labels or adhesive residue from the bottle using hot, soapy water. Dry the bottle completely before moving on to the next step.
Step 2: Marking the Cutting Line
Measure the length you want to cut the bottle using a tape measure. Then, using a glass cutter, score a line around the circumference of the bottle at the desired height. Make sure to press firmly but not too hard, as excessive pressure could cause the bottle to break.
Step 3: Setting up the Cutting Station
Next, set up a cutting station using a sturdy table or workbench. Place two strips of tape on the table, parallel to each other and slightly wider than the width of the glass bottle. This will create a guide to keep the bottle in place while cutting.
Step 4: Cutting the Bottle
Once the tape guide is in place, carefully align the scored line on the bottle with the tape. Hold the bottle firmly with one hand and start rotating it slowly while keeping the glass cutter against the line. Apply light pressure and make a continuous scoreline around the bottle. You may need to go around the bottle a few times to deepen the score.
Step 5: Breaking the Bottle
Once the scoreline is deep enough, remove the bottle from the cutting station and use a pair of pliers or your hands to apply gentle pressure on both sides of the scoreline. The bottle should break cleanly along the line. If it doesn’t, you can repeat the scoring process and try breaking it again.
Step 6: Smoothing the Edges
After the bottle is cut, the edges might be sharp. You can use sandpaper or a tile saw to smooth them out. Be careful not to apply too much pressure, as the glass could break. Smooth the edges until they are safe to touch.
There you have it- a tutorial on cutting glass bottles at home. With these tips and methods, you can create beautiful glass bottle holders, vases, or any other DIY projects you can think of. Just remember to take your time, wear protective gloves, and exercise caution. Soon enough, you’ll be making finished pieces that you never would have imagined possible.
How to Cut a Bottle Step 1
Before you begin cutting a glass bottle, it’s important to take some safety precautions. First, make sure to remove any gloves or jewelry that may get in the way while you work.
Next, you’ll need to create a scoring mark on the bottle. This is the point where the bottle will eventually break. To do this, there are a few different methods you can try. One popular method involves using a tape measure to mark where you want your cut to be.
Another method involves using a glass cutter or a diamond-tipped tile saw blade to score the glass. The scoring mark should go all the way around the bottle, creating a line that will guide your cut.
Once you have your scoring mark in place, you’re ready to start cutting the bottle. Hold the bottle firmly with one hand and use the other hand to slowly rotate the bottle, keeping the cutter stationary. Apply a steady amount of pressure as you go, but be careful not to push too hard, as this can cause the glass to crack or break in the wrong place.
As you approach the bottom of the bottle, you’ll need to switch to a different cutting method. This is because the curvature of the bottle makes it difficult to score the glass smoothly. One common technique involves heating the score line with a candle or a small propane torch until it is red-hot, and then cooling it rapidly with cold water. This helps weaken the glass and makes it easier to break along the score line.
Remember to always wear safety goggles and gloves when working with glass, as it can be sharp and dangerous if it breaks. Taking your time and following these tips will help ensure that you cut your bottle in a safe and precise manner.
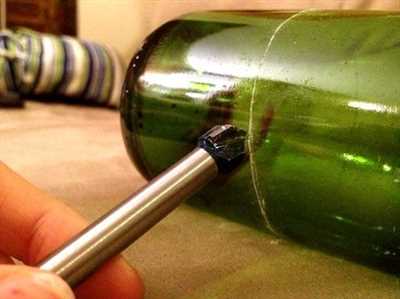
Adjust the bottle cutter
Once you’ve decided to cut glass bottles, you might need to adjust the bottle cutter to fit the size and shape of the bottle you’re working with. This step is one of the most important in the whole process, as it will determine how well and smoothly the bottle cuts.
First, wrap a strip of tape around the posts or rings of your bottle cutter. This will help protect the glass from getting scratched or damaged during the cutting process. You can also add some tape to the bottom of the bottle to provide extra grip.
The amount of tape you’ll need will depend on the thickness of the bottle you’re working with. You want to make sure the bottle is held securely in place, but not so tightly that it can’t move. It’s a delicate balance, so make sure to test it out before proceeding.
Next, make sure the scoring blade of the bottle cutter is aligned with the center of the bottle. You can do this by adjusting the rollers on the cutter. The scoring blade should be just above the bottom of the bottle, but not too high that it won’t score the glass properly.
You can use a ruler or a line as a reference point to make sure the blade is aligned correctly. It’s important to remember that the score line is where the glass will break, so make sure it’s in the right position. There are often tutorials and videos online that can help guide you through this step if you’re having trouble.
Once you’ve adjusted the bottle cutter, it’s time to start cutting the bottle. Make sure to wear gloves and eye protection, as the glass can be sharp and dangerous. Empty the bottle completely to avoid any spills or accidents.
Position the bottle in the bottle cutter, with the scoring blade lined up with the mark you made earlier. Hold the bottle firmly with one hand and use the other hand to push the cutter down, scoring the glass as you go. You’ll want to make a smooth, continuous motion to ensure a clean cut.
Once you’ve scored the glass all the way around the bottle, gently tap the bottom of the bottle with a stationary object (like a wooden dowel or a hammer). The idea is to apply even pressure so that the bottle breaks along the score line.
If the bottle doesn’t break cleanly, you can try scoring the line again, or gently tapping the bottle at a different point. Sometimes, it takes a few tries to get the bottle to break just right.
Remember, practice makes perfect. Don’t get discouraged if your first few attempts don’t turn out exactly as you hoped. The more you practice, the better you’ll become at cutting glass bottles.
Once you’ve finished cutting the bottle, you can use sandpaper or a special tool to smooth out any rough edges. This will make the finished product safe to use and handle.
So, now that you know how to adjust the bottle cutter, you can start making your own glass bottle creations at home. Just follow the steps outlined above and you’ll be well on your way to cutting glass bottles like a pro.
Tips on cutting glass bottles with a tile saw
If you’re looking for a quick and efficient way to cut glass bottles, using a tile saw can be a great option. With the right tools and techniques, you can easily transform empty beer or wine bottles into beautiful, custom pieces for your home.
Here are some helpful tips to ensure a successful glass bottle cutting process:
- Make sure you have all the necessary tools and materials before you begin. You will need a tile saw, glass bottle holders or rollers, tape, and a marker.
- To start, mark the point on the bottle where you want to make the cut. A steady hand and a ruler or template can help you create straight and even lines.
- Next, adjust the tile saw to the appropriate settings. The speed and depth of the blade will depend on the thickness and type of glass you are cutting.
- Before cutting, make sure the glass bottle is completely dry and remove any labels or plastic wrap from the surface. This will help prevent any slipping or trouble while cutting.
- For added safety, it’s a good idea to wear protective gloves and goggles to protect yourself from the sharp edges of the glass.
- Slowly feed the glass bottle into the tile saw, making sure to follow the marked lines. Take your time and do not rush the process.
- As the tile saw cuts through the glass, you may hear a noise, which is normal. Just continue to push the bottle towards the blade until the cut is complete.
- Once the cutting is done, you might notice some rough edges. To smooth them out, use sandpaper or a glass file to make the edges safe to handle.
- If you’re having trouble with the cutting process, there are many tutorial videos available on platforms like YouTube and AliExpress that can help you learn different methods and techniques.
- Remember, practice makes perfect. Cutting glass bottles can be a bit challenging at first, but with time and patience, you’ll soon become more comfortable with the process.
By following these tips and using a tile saw, you can create beautiful and unique pieces from glass bottles in no time. Whether you’re making vases, candle holders, or adding a touch of creativity to your home decor, cutting glass bottles can be a fun and rewarding DIY project.
Related Posts
If you’re interested in learning more about cutting glass bottles or are looking for additional tips and methods, here are some related posts that might help:
- How to Cut Glass Bottles with a Bottle Cutter: A step-by-step tutorial on using a glass bottle cutter to achieve smooth and precise cuts.
- Top Tools for Cutting Glass Bottles: A guide to the most commonly used tools for cutting glass bottles, including bottle cutters, tile saws, and glass scoring tools.
- Trouble-Free Tips for Cutting Glass Bottles: Helpful tips and tricks for avoiding common issues, such as bottles breaking or blades going off track, while cutting glass bottles.
- How to Cut Glass Bottles with a Stationary Saw: A tutorial on using a stationary saw, like a band saw or circular saw, to cut glass bottles.
- Adding a Smooth Finish to Glass Bottle Cuts: Tips for smoothing the cut edges of glass bottles, including using sandpaper, sanding drums, or a glass grinder.
- DIY Glass Bottle Projects: Creative ideas for repurposing cut glass bottles, such as turning them into vases, candle holders, or even self-watering plant pots.
- How to Remove the Neck of a Glass Bottle: Step-by-step instructions on how to remove the neck of a glass bottle using a scoring method and hot and cold water.
- How to Cut Glass Bottles Without a Glass Cutter: Alternative methods for cutting glass bottles if you don’t have a glass cutter, including using string and acetone or a homemade glass bottle cutter.
By exploring these related posts, you’ll gain more knowledge and find additional techniques and inspiration for your glass bottle cutting projects!
How I Cut Wine Bottles for Perfect Rings
If you’ve ever wondered how to cut wine bottles to create smooth and perfectly shaped rings, look no further. In this post, I will walk you through a step-by-step method that will help you achieve the desired results every time. Cutting glass bottles can be a bit tricky, but with a few tips and the right tools, you’ll soon be able to create beautiful rings for various purposes.
First and foremost, it’s important to gather the necessary tools for this project. You will need a glass cutting tool, which can be easily found in most home improvement stores or online on platforms like AliExpress. Another essential tool is a tile cutter or a stationary sharp blade. Additionally, make sure you have a marker or something to mark the bottle, and some plastic pots or rollers to support the bottle while cutting.
Now, let’s move on to the actual process. Start by wrapping a line around the bottle where you wish to make the cut. Use the marker or any other tool that creates a visible line. This line will serve as a guide for scoring the glass. It’s important to remember that the cut should be made above the base of the bottle, as the bottom tends to be more difficult to cut.
Once you’ve marked the bottle, it’s time to score the glass. Hold the bottle firmly, and use the glass cutting tool to make a continuous line along the marked line. Apply consistent pressure while scoring, and make sure to complete the full circle. This step might take some practice, but with time, you will improve.
After scoring the glass, it’s time to break the bottle along the scored line. Fill a plastic pot or a sink with hot water, and carefully pour cold water on the scored line. The sudden temperature difference will cause the glass to break at the weakest point, which is the scored line. It’s important to note that you might need to adjust the method slightly depending on the thickness of the glass.
If the bottle doesn’t break on its own after applying the temperature difference, you can try tapping it gently with a wooden dowel or a spoon handle. Just be careful not to apply too much force as it can cause the glass to break unevenly.
Once the bottle is broken, you can remove the top part and clean up the edges. Use sandpaper or a glass file to smooth out any rough edges and make the ring surface even. Be cautious while handling the broken glass to prevent any injuries.
And there you have it – a beautifully cut wine bottle ring! This method can be used to create rings for various purposes, such as jewelry or decorative items. Get creative and try experimenting with different bottle shapes and sizes.
Remember, practice makes perfect. Don’t get discouraged if you don’t achieve the desired results on your first try. With time and patience, you will develop the skills to cut glass bottles like a pro. And if you ever run into trouble or have any questions, there are many online resources and video tutorials available to help you along the way.
So go ahead, grab your glass cutting tool and start making perfect rings out of wine bottles!
Cutting A Shape Into A Glass Bottle
If you wish to add a unique touch to your home decor or create beautiful homemade gifts, making a custom shape in a glass bottle can be a great idea. Whether it is for candle holders, vases, or even wind chimes, cutting a shape into a glass bottle can give it a new life and purpose. In this tutorial, we will cover the process of cutting shapes into glass bottles using a glass bottle cutter.
Tools and Materials:
- Glass bottle cutter
- Masking tape
- Measuring tape
- Sandpaper or a sanding block
- Protective gloves
- Water
Step 1: Marking the Cutting Line
Start by measuring and marking the area where you want to cut the shape on the glass bottle using a measuring tape and a marker. Make sure to follow a straight line or the outline of the shape you wish to create. It is important to remember that the shape needs to be easily achievable with a glass bottle cutter.
Step 2: Securing the Bottle
Once you have marked the cutting line, wrap masking tape around the bottle at the marking. This will help provide stability and prevent the bottle from slipping during the cutting process. Make sure the tape is tightly secured.
Step 3: Adjusting the Glass Bottle Cutter
Next, adjust the glass bottle cutter according to the size of your bottle. The cutter usually comes with adjustable holders and rollers that can be moved to accommodate different bottle sizes. Follow the instructions provided with the cutter or watch a tutorial video to ensure you are adjusting it correctly.
Step 4: Scoring the Glass
Hold the glass bottle firmly and align the cutter with the marked line on the bottle. Roll the cutter along the line in one smooth motion. Apply slight pressure to score the glass, but avoid pressing too hard as it may crack the bottle. Repeat the scoring process a few times along the same line to create a deeper cut. Remember to keep the bottle still while scoring to ensure a clean and precise line.
Step 5: Applying Pressure
Once you have finished scoring the line, remove the tape and put on protective gloves. Hold the bottle firmly and apply pressure on the scored line using your thumbs or fingers. The idea is to create enough pressure to make the bottle break along the scored line. Be patient and careful during this step.
Step 6: Smoothing the Edges
Once the bottle breaks along the scored line, you may notice rough or sharp edges. Use sandpaper or a sanding block to carefully smooth out the edges. Take your time and make sure the edges are smooth and safe to touch.
Step 7: Finishing Touches
After smoothing the edges, clean the bottle, and inspect it thoroughly. Make any necessary adjustments or touch-ups to ensure the shape is perfect. You can also apply paint or other decorative elements to enhance the appearance of the finished shape.
Helpful Tips:
- Always wear protective gloves when working with glass bottles to prevent any potential injuries.
- Consider using a stationary saw or a drill with a tile-cutting attachment if you are having trouble with the glass bottle cutter.
- Empty glass bottles, such as wine or beer bottles, work best for cutting shapes into.
- Practice the scoring method on some old bottles before attempting it on your desired shape.
- Remember, a sharp glass cutter blade is essential for a clean cut.
- Make sure the bottle is completely dry before attempting to cut it.
Now you are ready to start cutting shapes into glass bottles! Follow the steps above and soon you will have creatively made holders, vases, or any other item you desire. Just remember to take your time, be patient, and always work with caution to achieve the best results.
Trouble Shooting Tips
If you’re having trouble cutting a glass bottle, don’t worry. Here are some tips to help you troubleshoot common issues:
1. The cutter isn’t scoring the glass: Make sure the cutter blades are sharp and haven’t become dull. You can find replacement blades on websites like AliExpress. Also, check if the bottle is completely dry – sometimes a small amount of moisture can prevent the cutter from scoring properly.
2. The bottle breaks unevenly: This could be due to the scoring line not being consistent. Take your time and follow a steady line around the bottle neck. Use a stationary cutter to ensure a smooth and even score.
3. The bottle won’t break along the score line: If the bottle is not separating along the scored line, it might be necessary to add some heat. Use a heat gun or boiling water to warm the line before trying to break the bottle again.
4. The tape method isn’t working: If you’re trying the tape method, where you wrap a strip of tape around the bottle and then score above it, and it’s not working, try using different types of tape. Some tapes have better adhesion and can help create a more defined score line.
5. The bottle shatters when trying to remove the finished piece: Be careful when removing the cut glass from the bottle. Sometimes, the glass edges can still be sharp, so wearing gloves can help protect your hands. Gently push out the scored piece with your thumbs or use pliers to pull it out if it’s difficult to remove.
Remember, practice makes perfect. Cutting glass bottles requires patience and precision, but with these troubleshooting tips, you’ll be well on your way to creating beautiful upcycled glass holders for your home or garden.
Once again the tools you will need are
- Glass bottle cutter
- Marker or scoring tool
- Masking tape
- Gloves
- Safety glasses
- Sandpaper or emery cloth
- Water container
- Candle or lighter
When it comes to cutting glass bottles, having the right tools is essential. A glass cutter is a must-have tool for this project. This specialized tool is designed to score the glass, creating a weak point where the bottle can be easily broken. You can find glass bottle cutters at most home improvement stores or online.
Next, you will need a marker or scoring tool. This will help you create a line on the bottle where you want to make the cut. You can use a permanent marker or a scoring tool specifically designed for glass.
Masking tape can also be useful when cutting glass bottles. You can use it to create a guide to ensure a straight and consistent cut. Simply wrap the tape around the bottle at the desired cutting point and use it as a guide for your glass cutter.
It’s important to protect your hands while working with glass, so a pair of gloves is essential. Choose gloves that provide a good grip and are resistant to cuts. Safety glasses are also recommended to protect your eyes from any flying glass shards.
After cutting the glass bottle, you may need to smooth down any rough edges. Sandpaper or emery cloth can be used for this purpose. Make sure to have a water container nearby to wet the sandpaper and prevent overheating of the glass.
A candle or lighter can be used to create a hot and cold shock, which helps in separating the glass along the scored line. By heating the scored line with a flame and then quickly cooling it with cold water, you can encourage the glass to break along the score.
Remember to always follow safety precautions and use caution when working with glass. This tutorial shows one method for cutting glass bottles, but there are other techniques and tools available. Feel free to explore different approaches to find the one that works best for you.


