

Welcome to our guide on how to tool leather! Leatherworking is a unique craft that requires patience, skill, and a little bit of creativity. If you’ve ever admired beautiful tooled leather designs on wallets, belts, or bags and wondered how to create them yourself, you’re in the right place. In this article, we will walk you through the step-by-step process of leather tooling, from choosing the right tools to finishing the final product.
Before we dive into the details, let’s briefly explain what tooling leather actually means. Leather tooling, also known as leather stamping, is a technique that involves creating patterns or designs on leather by using various tools and applying pressure. The pressure leaves impressions on the leather, resulting in beautiful and intricate designs. Whether you’re a beginner or an experienced leatherworker, this guide will help you enhance your skills and create stunning projects.
So where do you start? The first step is to gather all the necessary tools. A basic leather tooling kit consists of a mallet, bevelers, stamping tools, a swivel knife, and a stylus. These tools will help you create different patterns and designs on your leather. If you’re unsure about where to find these tools, there are many online resources and community forums dedicated to leatherworking that can guide you in the right direction.
Once you have your tools ready, it’s time to choose the right leather for your project. Not all leathers are suitable for tooling, so it’s essential to select the right type. Generally, vegetable-tanned leathers work best for tooling since they can hold patterns and designs well. Additionally, make sure the leather is damp or wet before starting the tooling process. This will help the tools create deeper impressions without damaging the leather.
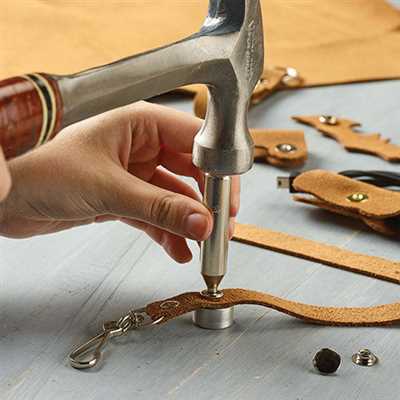
Now that you have your tools and leather, it’s time to get started. Begin by transferring your pattern onto the leather using a tracing paper or by drawing it freehand. Make sure the pattern is valid and aligns with the design you have in mind. Once the pattern is in place, start tooling by applying pressure to the tool and tapping it with a mallet. Remember to start with light pressure and gradually increase it to avoid making mistakes. Take your time and enjoy the process.
As you progress with your tooling, don’t be afraid to experiment with different techniques and designs. The wide range of tools available allows you to create various patterns, from geometric shapes to intricate weave designs. You can also add depth and dimension to your tooling by using different bevelers and stylus tips. The key is to practice and explore different possibilities to find your unique style.
Tooling leather requires patience and attention to detail. It’s a craft that rewards those who put in the time and effort to master it. So don’t rush the process. Take breaks if needed, and remember that practice makes perfect. Over time, you’ll develop your own techniques and style, and your tooling skills will improve.
We hope this guide has helped you understand the basics of how to tool leather. Remember to always enjoy the process and take pride in your creations. Thanks for choosing us as your resource, and we’re glad to have the opportunity to support you on your leatherworking journey. If you have any more questions or need further guidance, feel free to reach out to our community or explore more resources like wikiHow and Q&A sites. Happy tooling!
Large Basket Weave Pattern Hand Tooled
Hand tooling leather is a beautiful and unique technique that requires patience, time, and the right tools. In this guide, we will show you how to tool leather with a large basket weave pattern. This pattern is popular among leatherworking enthusiasts and can be used for a variety of projects such as wallets, belts, and bags.
To start, you will need the following tools:
| – Leather | – Basket weave stamping tool | – Beveler tool | – Water |
| – Stamping surface | – Mallet or hammer | – Edge beveler | – Craft knife or leather scissors |
Once you have gathered all the necessary tools, you can begin the tooling process by wetting the leather. Wetting the leather will make it more pliable and easier to work with. Use a sponge or a spray bottle to wet the leather evenly.
Next, place the leather onto a stamping surface and begin stamping the basket weave pattern with your basket weave stamping tool. Apply even pressure and make sure to overlap each stamp as you work your way across the leather. This will create a continuous pattern.
After stamping the basket weave pattern, use a beveler tool to bevel the edges of the leather. This step is important to ensure a smooth and finished look. Bevel the edges by running the beveler tool along the edges at a 45-degree angle.
Once you have completed the tooling process, allow the leather to dry completely. This may take several hours or overnight, depending on the climate. Avoid touching or applying any pressure to the leather while it is wet, as this can distort the pattern.
Finally, you can finish the leather as desired. There are many alternatives to choose from, such as dyeing, oiling, or waxing the leather to enhance its appearance and durability. Follow the instructions on your chosen product to achieve the desired finish.
Hand tooling leather with a large basket weave pattern can be a rewarding and enjoyable craft. It allows you to create unique and personalized leather goods that stand out from the rest. Take your time and compare your progress with the original pattern to ensure accuracy. With practice and the right tools, you will be able to create beautiful hand-tooled leather projects.
We hope this guide has helped you in your mission to learn how to tool leather. If you have any questions or need further assistance, feel free to reach out. We’re glad to assist you. Happy tooling!
How to Wet The Leather
Wetting the leather is an essential step in the tooling process of leatherworking. It helps to soften the leather so that it can be easily carved, stamped, and molded according to your needs. This guide will provide you with step-by-step instructions on how to wet the leather properly.
Before you begin, make sure you have the right type of leather for your projects. Different types of leather require different wetting techniques, so be sure to read up on the specific needs of your leather before proceeding.
To wet the leather, you will need a large container or a basin filled with water. The water should be deep enough to submerge the entire piece of leather you are working with. You can also wet the leather by using a damp sponge or a spray bottle if you prefer.
Once you have your container of water ready, place the leather into it and allow it to soak for a few minutes. The exact time will depend on the thickness and type of leather you are working with. Pay attention to how the leather looks and feels. It should start to darken in color and become more flexible.
After the leather has been properly soaked, take it out of the water and shake off any excess moisture. Lay it flat on a clean towel or a drying rack and let it air dry. Do not use any heat sources to speed up the drying process, as this can cause the leather to crack or become distorted.
Once the leather is completely dry, it is ready for tooling. You can start by transferring your desired pattern onto the leather using a tracing paper or a stylus. Be sure to apply even pressure with your tools to avoid uneven tooling or damaging the leather.
As you begin to tool the leather, be patient and work slowly. Carefully follow the pattern, using different techniques like stamping, beveling, or carving to create the desired design. Remember, each stroke counts, so take your time to ensure a beautiful end product.
Throughout the process, it’s important to pay attention to any feedback or advice from the leatherworking community. They can offer valuable insights and suggestions that can enhance your technique and improve your projects.
Lastly, always remember to thank the readers and the community for their support. Leatherworking is a unique craft, and the knowledge and resources shared by craftsmen are invaluable. Their guidance and the wikiHow leather tooling guide have greatly helped to ensure a successful outcome in your leatherworking endeavors.
How does Tooling Leather Compare to Other Leathers?
Tooling leather is a unique type of leather that stands apart from other leathers in many ways. Craftsmen and leatherworking enthusiasts often prefer tooling leather because of its distinct qualities and the artistic opportunities it presents.
One key difference is that tooling leather has a higher moisture content than other leathers. This extra moisture helps the leather become more pliable and easier to work with when tooling. It also allows the leather to absorb dyes and finishes more effectively.
Another notable feature of tooling leather is its ability to hold and retain tooling impressions. When pressure is applied with specific tools, the leather will retain the patterns and designs that have been stamped or carved onto its surface. This durability ensures that the finished product will stand up well over time, making it a popular choice for projects that require long-lasting beauty and functionality.
Tooling leather also offers craftsmen the flexibility to experiment with different techniques and designs. Because of its ability to retain impressions, tooling leather allows artisans to create intricate patterns, carve out letters or images, and add unique detailing to their projects. This artistic freedom is what sets tooling leather apart from other types of leathers and results in a truly custom and personalized finished product.
While tooling leather requires more effort and patience compared to other leathers, the end results are often worth it. Craftsmen must invest time and practice to master the techniques required for tooling leather, from selecting the right tools to applying the right amount of pressure. But once the skill is developed, tooling leather can unlock a world of creativity and artistic expression.
Some alternatives to tooling leather include full-grain leather, which has a smooth and natural look, and chrome-tanned leather, which is softer and more pliable. However, these leathers do not have the same ability to hold tooling impressions as tooling leather does. If you want to create a truly unique and personalized leather item, tooling leather is the way to go.
In summary, tooling leather is a standout option for leatherworking projects that require intricate patterns, lasting impressions, and an artistic touch. It offers craftsmen a canvas onto which they can bring their visions to life. While it requires more skill and practice, the end result is a beautiful, one-of-a-kind piece that will stand the test of time. So, whatever leather project you’re working on, consider using tooling leather and enjoy the artistic journey it will take you on.
Thank you for reading this guide! We hope that this information has helped you understand how tooling leather compares to other leathers and the unique advantages it offers. If you have any other questions, feel free to explore our community resources or reach out to our leatherworking community for further support and feedback.
Step 3: Bevel the Edges
After you have tooled your leather and have achieved the desired design, the next step is to bevel the edges. This process involves rounding the sharp edges of the leather to give it a more finished and professional look.
To bevel the edges of your leather product, you will need a beveling tool. This tool is usually a small, handheld instrument with a sharp, angled blade. It works by cutting the leather at an angle, creating a smooth and beveled edge.
Beveling the edges helps to prevent the leather from fraying or becoming damaged over time. It also adds a lot of visual appeal to your leatherworking projects, making them stand out from the rest.
To bevel the edges, dampen the leather slightly with water. This makes it easier to work with and prevents the leather from cracking while you apply pressure with the beveling tool. Wetting the leather also helps the tool glide smoothly along the edges for a clean cut.
Hold the beveling tool at a slight angle and push it along the edge of the leather, applying pressure as you go. Be patient and take your time, as working too quickly may result in uneven and sloppy cuts. Make sure to bevel all edges of your leather product, including the inside corners.
Beveling is an important step in leatherworking and is often overlooked by beginners. It adds a professional touch to your leather goods and shows your attention to detail. Many leather craftsmen compare beveling to adding a frame to a painting – it completes the look and elevates the overall quality of your work.
Before you claim your project as complete, compare the beveled edges to other leather products or patterns that catch your eye. This will help you understand if the beveling is satisfactory or if there is room for improvement. The leatherworking community is a great resource for feedback and helpful tips on techniques to achieve specific looks.
Remember, the mission is to create a unique and high-quality leather product. Taking the time to bevel the edges will ensure your work stands out and lasts longer.
Thanks for reading! We hope you find this guide helpful on your leatherworking journey. If you have any questions, feel free to ask in the comments section or check out some of our other resources. Your support means a lot to us, and we’re glad you’re part of the leatherworking community!
Community QA
How do I tool leather if I don’t have a lot of time?
If you’re short on time, there are some techniques you can use to make the tooling process quicker. One option is to use pre-made leather stamps or patterns, which can save you time on designing and carving your own patterns. Additionally, you can opt for simpler tooling designs or focus on tooling only specific areas of your leather project.
What tools do I need to start tooling leather?
The tools you’ll need for leather tooling depend on the specific project and technique you’re using. However, some common tools include: a swivel knife, bevelling tools, stamping tools, a mallet, a strop, and a ruler or measuring tape. It’s important to ensure that your tools are of good quality, as using poor-quality tools can result in unsatisfactory results.
Where can I find resources or tutorials on leather tooling?
There are many online resources available that can help you learn and improve your leather tooling skills. Websites such as WikiHow and YouTube offer detailed step-by-step guides and video tutorials on various tooling techniques. Additionally, leatherworking communities and forums are a great place to seek advice, ask questions, and learn from experienced craftsmen.
Do I need to wet the leather before tooling?
Wetting the leather before tooling can help make it more pliable and easier to work with. However, this step is not always necessary and depends on the type of leather you’re using and the effect you want to achieve. Some craftsmen prefer to moisten the leather with water, while others use alternatives such as saddle soap or leather conditioner.
How long does tooling leather last?
With proper care, tooled leather can last for many years. However, the lifespan of your tooled leather items also depends on factors such as the quality of the leather, how often and how heavily they are used, and how well they are maintained. Regular cleaning, conditioning, and storing in a dry, cool place can help extend the life of your tooled leather projects.
What is basket weaving in leather tooling?
Basket weaving is a popular technique in leather tooling that creates a woven pattern on the leather surface. It involves making a series of alternating cuts or impressions into the leather, then weaving strips of leather through these cuts to create the desired pattern. Basket weaving can add a unique and beautiful texture to your leather projects.
Sources
When it comes to tooling leather, there are a wide variety of resources available to help you learn different techniques and find the tools and materials you need. Here are some sources you can turn to for guidance and support:
| WikiHow WikiHow is a popular online community-driven resource that provides step-by-step guides on a wide range of topics, including leatherworking. They have a detailed guide on how to tool leather, which includes pictures and helpful tips. | Leatherworking forums and communities Joining online forums and communities dedicated to leatherworking can be a great way to connect with other craftsmen and enthusiasts who can offer advice and share their experiences. These communities often have resources and tutorials available for free. |
| Books and patterns There are many books available that provide in-depth information on leather tooling techniques. Some books also include patterns that you can use to create unique designs. You can find these books at your local library or purchase them online. | Leatherworking supply stores Specialty stores that sell leatherworking supplies often have knowledgeable staff who can help guide you in selecting the right tools and materials for your projects. They may also offer classes or workshops where you can learn new techniques. |
| Q&A websites Websites such as Stack Exchange and Quora have communities of experts who can answer specific questions you have about leather tooling. These platforms are a great place to get advice and clarification on any steps or techniques that you’re unsure about. | Leatherworking videos and tutorials Watching videos and tutorials can be a helpful way to learn new techniques and see them in action. Platforms such as YouTube have a wealth of videos on leather tooling that you can watch for free. |
Remember, tooling leather requires patience and practice, so don’t be too hard on yourself if things don’t turn out exactly as you envisioned. Enjoy the process and the journey of creating a beautiful and unique product!


