
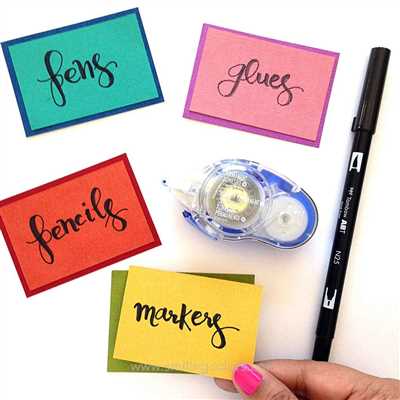

If you’re in need of labels, whether it’s for your home, office, or business, you can save time and money by creating your own cute labels. With the help of software like Microsoft Word or Google Docs, you can easily design and print out labels that are unique and eye-catching.
To create your own labels, start by opening a blank document in Microsoft Word or Google Docs. Next, determine the size of your labels and how many labels you’ll need. If you’re not sure where to start, you can find templates online or check with your local office supply store for pre-cut label sheets.
Once you have your document open, you can start designing your labels. You can choose from different fonts, colors, and graphics to make your labels more visually appealing. You can also add text, such as your address or business name, to personalize your labels. If you want to make your labels even more unique, you can create a single design for each label or use a different design for each label.
When it’s time to print your labels, make sure you have the correct settings for your printer. You should also test print your labels on a regular piece of paper first to make sure everything looks good. If you’re printing a large number of labels, it’s a good idea to do a test print with just one page to ensure that everything lines up correctly.
Once you’re confident that your labels will print correctly, you can feed your label sheets into the printer and click print. Make sure you don’t stack too many label sheets in the printer at once to avoid paper jams. After your labels have been printed, you can cut them out using scissors or a paper cutter.
Now you have your cute labels ready to use! Whether you’re using them for shipping, organizing your home, or creating name tags for an event, your labels are sure to make a statement. And the best part is, you can make more whenever you need them, so you don’t have to worry about running out. So go ahead and get creative with your labels and have fun making them!
How to make labels in Word
If you’re a small business owner, creating labels for your products or mailing nametags for an event, you may want to use Microsoft Word for the task. Word offers a variety of options for creating and printing labels, making it a convenient and user-friendly solution for label-making needs.
To start creating labels in Word, first open a new or existing document. If you’re new to Word, you can find it by typing “Word” into the search bar or clicking on the Word icon in your Start menu. Once Word is open, go to the “Mailings” tab and click on the “Labels” button.
In the Labels dialog box, you should see a “Label Options” button. Click on this button to select the label type you’d like to use. Word offers a wide range of label sizes and layouts, so you can choose the one that best fits your needs. If you’re unsure which label type to use, you can search for templates online or consult the label manufacturer’s website for guidance.
Next, click on the “New Document” button to create a new Word document with a table that is partially filled with labels. You can replace the default text in each label with your own information, such as names, addresses, or other details. Use the tab key to move between labels.
If you want to create labels using a different program or online service, you can save your label document as a PDF or graphic file from Word. This will allow you to use the labels in other graphic design or printing programs.
Once you have your labels set up and ready to print, make sure your printer is connected and turned on. Load a sheet of blank label paper into your printer, making sure to position it correctly according to your printer’s instructions.
In Word, go to the “File” menu and click on “Print” to bring up your printing options. Select the appropriate printer from the list and choose the number of copies you’d like to print. You can also choose to print a single label or a full sheet of labels, depending on your needs.
Finally, click on the “Print” button to start printing your labels. If you’re printing a full sheet of labels, make sure to allow enough time for the labels to dry before handling them, as smudging can occur if they are touched too soon.
With these simple steps, you can easily create and print labels in Word for your business or personal use. Whether you need shipping labels, address labels, or nametags for an event, Microsoft Word provides a versatile and convenient solution for all your labeling needs.
источники:
Open a Blank Google Document
When it comes to creating cute labels, there are several options you can choose from. One popular option is to open a blank Google Document. This allows you to easily create and customize your labels using the tools provided by Google Docs. Here’s how you can do it:
1. Open Google Docs and click on “Blank” to open a blank document.
2. Next, click on “File” and select “Page Setup.” Here, you can choose the size of your labels. If you’re creating nametags or labels for small items, you might want to choose a smaller size. If you’re creating labels for mailing or shipping, you should choose a size that fits the address you’re printing. You can also select landscape or portrait orientation, depending on your needs.
3. After setting up your document, you can start creating your labels. You can either type in the information manually or import it from other sources, like Microsoft Word or a spreadsheet. To import data, click on “File” and select “Import.” Choose the file you want to import and follow the prompts to replace the text on your labels with the data from your file.
4. Once you have your labels ready, you can make them look cute and attractive by adding graphics or other design elements. Google Docs offers a variety of options to enhance your labels. You can insert images, shapes, lines, and text boxes to make your labels stand out.
5. Finally, when your labels are complete, you can save them to your computer or print them directly from Google Docs. If you have a printer at home or in your office, you can print them immediately. If not, you can save the document as a PDF and take it to a local print shop or order professional printing online.
By following these steps, you can easily create cute labels using a blank Google Document. Whether you’re making labels for a business or for personal use, Google Docs provides a convenient and user-friendly platform to bring your label ideas to life.
Where can I print shipping labels

If you don’t have a printer or if you want more professional-looking shipping labels, there are several options available to you.
The first option is to use a local print shop or a small business printer. These places usually have the necessary equipment and expertise to print your labels. You can either bring your own label design or ask them to create one for you. Just make sure to provide them with the correct address information and any other text that should appear on the label.
Another option is to use an online printing service, such as Google Cloud Print. With this service, you can upload your label design and have it printed at a remote location. The printed labels can then be shipped to your home or office. Just make sure to follow the instructions provided by the service to ensure that your labels are printed correctly.
If you don’t have access to a printer at all, you can also consider using a local post office. Many post offices have self-service kiosks where you can create and print shipping labels. These kiosks usually have a full range of options, allowing you to choose the size, type, and design of your label. Just make sure to save your label design on a USB drive or in the cloud, so you can easily access it at the post office.
Finally, if you have Microsoft Word or a similar word processing program on your computer, you can create shipping labels from a blank document. Simply open a new document and set up a table with the same dimensions as a label sheet. Then, replace the cells with the necessary text and graphic elements. Once your label sheet is complete, save it as a record and print it on a sheet of blank label paper. If you’re partially printing a sheet of labels, make sure to record which labels have been used so you don’t print on the same ones again.
These are just a few sources where you can print your shipping labels. Whether you choose to go with a local printer, an online service, or a DIY approach, remember to double-check your labels for accuracy before sending out your packages.
Create a single label with a graphic
If you only need to create a single label with a graphic, you can do so by following these steps:
- Open Microsoft Word or any other word processing program you prefer. If you don’t have one installed on your computer, you can use online options like Google Docs.
- Create a new document or open an existing one.
- In the document, create a blank sheet where you want the label to be placed.
- In the empty space, click on “Insert” and then “Picture” to insert the graphic you want to use for your label. Make sure the graphic is in a format that the word processing program supports, like JPEG or PNG.
- Adjust the size and position of the graphic as desired.
- Next, click on “Insert” again and then “Text Box” to create a text box next to the graphic. This is where the label text will be placed.
- Click inside the text box and replace the default text with the desired label text. You can enter different text for each label if you are creating multiple labels on the same page.
- Format the text in the text box according to your preferences, such as adjusting the font, size, and color.
- If you’re creating address labels, you can use the “Mailings” tab in Microsoft Word or the equivalent feature in other word processing programs to merge the label text with a list of addresses from a spreadsheet or other data source. This can save you time if you have many labels to create.
- Once you’re satisfied with the label design, save the document.
- When you’re ready to print the label, make sure your printer is connected and functioning properly.
- In the print options, select the specific page or range of pages that contain the labels you want to print.
- Choose the appropriate paper size and type, such as “Avery” or “Sheet Labels,” if available in the print options.
- Click on the “Print” button to print your label.
Following these steps, you can easily create a single label with a graphic for personal or business use. Whether you’re shipping packages, organizing your home or office, or creating cute nametags for an event, this method can be used to make unique and eye-catching labels.
Sources

If you’re creating nametags or labels for a small event or business, you can make cute labels right at home using Microsoft Word. First, open a new blank document in Word. You can start from scratch or use a pre-designed template. Next, go to the “Mailings” tab and choose the “Labels” option. In the dialog box that opens, select the type of label you want to create, like address labels or nametags.
If you already have a list of names or addresses, you can use the “Full page of the same label” option to print multiple labels with the same information. If you don’t have a list, you can manually type in the text for each label or use the “New Document” option to create a single label and then copy and paste it to replace the text on the other labels.
Microsoft Word also allows you to add graphic elements to your labels, so you can make them more visually appealing. You can choose from a variety of clip art options or insert your own images. Just select the “Insert” tab and choose the “Clip Art” or “Pictures” option to add graphics to your labels.
If you’re making labels for a business or shipping, you may need to print labels that partially fill a sheet. In this case, you can use the “Options” button in the Label dialog box to specify which labels on the sheet you want to print. You can also select the “Single label” option to print only one label at a time.
Once you’ve customized your labels to your liking, you can save the document and print it on your local printer. If you have a different printer option, you can select it from the Print dialog box.
Creating cute labels in Microsoft Word is a quick and easy way to make your packages, mail, or event more special. With a few simple steps, you can create personalized labels that are sure to impress!


