

Welcome to the step-by-step guide on how to create a transparent watermark for your images! Watermarks are a great way to add a professional touch and protect your files from unauthorized use. In this article, we will discuss the process of adding watermarks to your images and how to modify their transparency to suit your needs.
Before we dive into the nitty-gritty details, let’s clear up what a watermark is. A watermark is a type of digital signature that is typically placed over an image or document to indicate its origin or ownership. It can be a logo, text, or any other identifying mark that helps establish the authenticity and copyright of the file.
Now, let’s get started with the first step. To begin, open your image editing software – whether it’s Adobe Photoshop, GIMP, or any other program you are comfortable with. Once the program is open, click on “File” and select “Open” to import the image you wish to add a watermark to. If you don’t have an image yet, feel free to use any image from your archives or download one to follow along.
Next, locate the “Layers” panel. This panel usually sits on the right-hand side of the screen. If you can’t find it, go to the “Window” menu and click on “Layers” to make it visible. In the “Layers” panel, right-click on the background layer of your image and select “Duplicate Layer.” This will create a duplicate layer that we will use to apply the watermark.
Once you have duplicated the layer, type your desired watermark text or place your logo on the image. You can use the text tool or import your logo file into the editor. Position the watermark in a location that doesn’t obstruct the main subject of the image but is still clearly visible. You can experiment with different placements and sizes to find the best fit for your image.
After you have positioned the watermark, it’s time to adjust its transparency. Find the “Opacity” or “Transparency” controls in your editing software. This is usually represented as a percentage. Set the opacity to a value that suits your needs – usually between 10% to 30% works well to make the watermark visible but not overpowering. You can always change the opacity later if you want to tweak the visibility of the watermark.
Once you are satisfied with the position and transparency of your watermark, it’s time to save your image. Go to the “File” menu and click on “Save” or “Export,” depending on your software. Choose the file format (PNG is recommended for images with transparency) and select a destination folder to save your watermarked image. Give the file a suitable name, making sure to include any relevant information such as the company name or the purpose of the image.
That’s it! You have successfully created a transparent watermark for your image. Now you can use this image in your blog posts, website pages, or any other place where you want to protect your files and maintain your professional identity. Remember to always keep a backup copy of the original, unwatermarked image in case you need to make changes in the future.
With the help of this guide, you now have the knowledge and skills to create and modify transparent watermarks with ease. Whether you are a company protecting confidential files or an individual looking to add a personal touch to your images, watermarks are a valuable tool in your creative arsenal. So go ahead, play around with different watermark styles, and make your images truly yours!
Legacy ImageMagick Discussions Archive
Welcome to the Legacy ImageMagick Discussions Archive! This panel serves as a repository of past discussions and posts related to using ImageMagick for creating transparent watermarks. Whether you’re a beginner or an experienced wizard, you’ll find valuable knowledge and useful tips within these pages.
In order to save and open ImageMagick files, make sure you have the appropriate software suite installed on your computer. Once you have the tools ready, you can proceed with the following steps:
- Import the image you wish to add a transparent watermark to. This can be done by clicking on the “Import” option in the controls panel.
- Set the opacity and type of the watermark you want to create. You can adjust these settings by modifying the code in the controls panel. Make sure to choose a suitable transparency level to achieve the desired effect.
- Position the watermark on the image. You can do this by clicking and dragging the watermark with your mouse. Alternatively, you can use the numeric controls in the panel to specify the exact position.
- Preview the watermark to see how it looks on the image. You can do this by selecting the watermark from the list of available options and clicking on the “Preview” button.
- If you are satisfied with the watermark, you can then proceed to export the image with the watermark. Click on the “Export” option and choose the desired file format, such as PNG.
Remember to save your ImageMagick files during the process, so you can easily access and modify them later. Make sure to appropriately label them with names that indicate their purpose or content. For example, “Draft_Logo.png” would be a suitable name for a watermark logo used in draft documents.
If you need further assistance or have any questions, don’t hesitate to ask in the discussions or post a new thread. Our community is here to help!
That’s all you need to know to create transparent watermarks using ImageMagick. Have fun and enjoy the learning process!
Reinforce your acquired knowledge through exercise files
One effective way to solidify the knowledge you gain during the learning process is to practice by working with exercise files. These files serve as a practical tool to apply what you have learned in a hands-on manner. By engaging with exercise files, you can further comprehend and internalize the concepts and techniques you have studied.
Exercise files are typically provided as a part of educational material, such as online courses, tutorials, or textbooks. They come in various formats, but most commonly as downloadable files that you can open on your computer.
To get started with exercise files, follow these steps:
- Select or create a folder on your computer where you want to organize the exercise files.
- Download the exercise files from the educational source and save them to the selected folder.
- Open the exercise files using the appropriate applications, depending on their file format.
- Play around with the files by modifying their content, experimenting with different settings, or following specific instructions provided by the learning material.
- Preview the changes you make to see the immediate impact and understand how they affect the outcome.
- Export or save your modified files to a new location or overwrite the original exercise files if desired.
Working with exercise files allows you to put theory into practice, giving you a deeper understanding of the subject matter. It also allows you to make mistakes and learn from them in a safe environment. By actively engaging with the exercise files, you can reinforce your learning, discover new possibilities, and gain confidence in applying your knowledge.
Remember that the exercise files are for your personal use and should not be shared or distributed unless explicitly stated otherwise. They often contain copyrighted or confidential material that is not meant to be made publicly available.
So, whether you are learning web development, graphic design, programming, or any other field, make sure to take advantage of exercise files to enhance your learning experience and solidify your acquired knowledge.
Watermark Controls
In discussions about how to make transparent watermarks, one of the most important aspects is understanding the controls that allow you to modify and create watermarks. These controls give you the ability to add a watermark to an image or logo, change its opacity, adjust its position, and more. In this article, we will explore the various controls available in different software tools.
First, let’s talk about the software tools that you can use to create transparent watermarks. There are many options available, but two popular choices are Adobe Photoshop and ImageMagick. Photoshop has a user-friendly interface with a wide range of features, while ImageMagick, a command-line tool, offers more advanced capabilities.
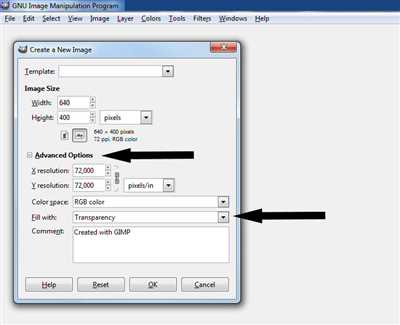
Once you have selected the software you want to use, the next step is to import or open the image or logo that you want to watermark. You can either create a new image or import an existing one. If you are starting with a new image, you can use the controls to set the canvas size, choose the file type (e.g., PNG), and save the draft.
After you have the image or logo open, you can proceed to add the watermark. In Photoshop, this can be done by selecting the “Type” tool and typing the desired text. You can then modify the font, size, color, and other properties of the text. In ImageMagick, you can use the “Legacy Panel” to apply a text or image watermark. You can also adjust the opacity, position, and rotation of the watermark using the available controls.
Before finalizing the watermark, it is important to preview how it will look on the image. In Photoshop, you can use the “Preview” panel to see a real-time preview of the watermark. In ImageMagick, you can use the command line to generate a preview image. This allows you to make any necessary adjustments to ensure that the watermark is positioned correctly and has the desired opacity.
Once you are satisfied with the watermark, you can save or export the final image. In Photoshop, you can use the “Save for Web” option to save the image in the desired format and quality. In ImageMagick, you can use the command line to specify the output file and format.
It is worth noting that the controls and steps may vary slightly depending on the software version and your familiarity with the tools. However, the general process remains the same. With the knowledge gained from this article, you can confidently create and apply transparent watermarks to your images or logos.
In summary, learning how to make transparent watermarks involves understanding and using the watermark controls available in software tools like Photoshop and ImageMagick. These controls allow you to import an image or logo, add a watermark, adjust its opacity and position, preview the result, and export the final image. By following these steps and practicing with different settings, you can master the art of creating professional-looking watermarked images.
Step 4 Change watermark opacity to suit

In order to make your watermark more transparent and suit the desired level of visibility, you will need to modify its opacity. Follow the steps below to adjust the opacity of your watermark.
1. Open the image with the watermark that you have previously created. If you have not created the watermark yet, refer back to Step 2 to learn how to create a watermark.
2. Select the watermark layer or the watermark in the image that you want to modify. You can do this by clicking on the layer or the watermark with the cursor in the Layers panel.
3. On the top menu, click on “Controls” to open the Controls panel for the selected layer.
4. In the Controls panel, locate the opacity code or control. This code or control will allow you to adjust the transparency of the watermark. The default value is typically set at 100% opacity.
5. Modify the opacity value to decrease or increase the transparency of the watermark. Lower values will make the watermark more transparent, while higher values will make it more visible. Use your knowledge or experimentation to find the desired opacity value for your watermark.
6. Preview the changes as you modify the opacity to see the effect on the watermark. This will help you determine the ideal opacity level.
7. Once you are satisfied with the opacity, save the changes to the image. You can either click on “Save” or “Export” options in the menu to save the modified image. Make sure to choose the appropriate image format, such as PNG, to preserve the transparency of the watermark.
Congratulations! You have successfully changed the opacity of your watermark to suit your needs. Now you can use this transparent watermark to add an extra layer of protection to your images, pages, posts, or any other files you want.
Save the Image as PNG
Once you have completed the process of adding transparent watermarks to your images, it’s time to save the final result. One of the best file formats to save these images with transparency is PNG (Portable Network Graphics). In this step, you will learn how to save your image as a PNG file.
- First, click on the file menu in the top left corner of the program panel.
- Select “Export” or “Save As” from the menu options.
- A dialog box will appear, allowing you to choose the location where you want to save the file.
- Navigate to the desired folder and select it.
- In the file name input field, type a name for the file.
- Make sure the file type is set to PNG.
- Adjust any other settings you want, such as the image quality or compression level.
- Once you are satisfied with the settings, click the “Save” or “Export” button.
Now your image with the transparent watermark will be saved as a PNG file. It is important to note that the PNG format supports transparency, so the watermark will remain intact and visible after the save process. This means that you can use the image in various contexts without worrying about the watermark affecting the overall appearance.
Now that you have learned how to save the image as a PNG, you can confidently apply this knowledge to other files and projects. Whether you’re working on personal images, professional designs, or any other type of visual content, knowing how to save files with transparency can prove to be a valuable skill.


