

If you’re interested in soapmaking, there’s no better time than now to learn how to make your own natural, chemical-free soaps. Making soap at home is a fun and rewarding process that allows you to create unique and personalized products tailored to your preferences. Whether you’re a beginner or have some experience with soapmaking, this article will guide you through the basic steps of soap making.
One of the first things you’ll need to know about soapmaking is the different ways you can make soap. There are cold process and liquid soap recipes, each with its own set of ingredients and techniques. Both methods involve combining oils with a reaction-inducing chemical, such as lye, to create soap. The cold process method is more popular among beginners, as it’s relatively easier and doesn’t require as many specialized tools.
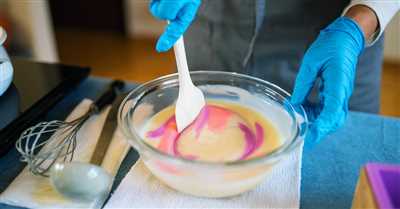
Once you’ve chosen the soapmaking method you want to try, you’ll need to gather the necessary ingredients and equipment. Oils, lye, and water are the basic components of soap, but you can also experiment with additives such as essential oils, herbs, and colorants to customize your soaps. Make sure you have a container to safely mix the ingredients, and don’t forget to wear gloves and eye protection during the soapmaking process.
Now that you have everything you need, it’s time to make soap! Follow the instructions of your chosen soap recipe, measuring the oils and lye carefully and adding them to your container. Watch the chemical reaction as the ingredients start to mix and transform into soap. This is an exciting part of the process, so make sure to open a window or work in a well-ventilated area.
After the soap has gone through the saponification process, you can then mold it into your desired shape and let it cure for a few weeks. This allows the soap to harden and ensures that it is safe to use. Once the curing period is over, you’ll have homemade soaps that are ready to be used or gifted to others. Prepare to indulge in the luxurious, natural goodness of your own handmade soaps!
How to Make Cold Process Soap at Home
If you’re interested in soapmaking, making your own cold process soap at home is a great way to learn. Cold process soapmaking is a method that involves a chemical reaction between oils and a liquid called lye. This reaction creates soap.
Before you start making your soap, there are a few things you’ll need. First, you’ll need a container to mix your ingredients in. A stainless steel or heat-resistant plastic container will work best. You’ll also need a thermometer to monitor the temperature of your ingredients, as well as a scale to accurately measure your oils and lye.
When making cold process soap, it’s important to understand the basics of the process. First, you’ll combine your oils and heat them to a specific temperature. Then, you’ll mix your lye with water and wait for it to cool to a specific temperature. Once both the oils and lye solution are at the right temperature, you’ll combine them and begin the saponification process.
During the saponification process, the oils and lye solution will react, transforming into soap. This process typically takes a few hours to complete. Once the soap has reached its desired consistency, you can add any fragrance or colorants and pour it into molds. Then, you’ll need to let the soap cure for several weeks to allow excess water to evaporate and for the soap to harden.
There are many ways you can customize your own cold process soap recipes. You can experiment with different combinations of oils to achieve specific properties in your soap, such as lathering or moisturizing. You can also add natural ingredients like herbs or essential oils for added benefits.
If you’re a beginner, it’s important to start with basic recipes and watch the soapmaking process carefully. Cold process soapmaking can be a fun and rewarding hobby, but it does require some knowledge and caution. Be sure to wear gloves and safety goggles when handling lye, and work in a well-ventilated area.
By making your own cold process soap at home, you’ll have natural, handmade soaps that are more personalized, eco-friendly, and often gentler on the skin than commercially made options. So why not give it a try and start creating your own unique soaps today?
Making Soap: A Basic Chemical Reaction
Soapmaking is a basic chemical reaction that has been used for centuries to create a wide range of soap products. Now, with homemade soap recipes widely available, soapmaking has become more accessible than ever. If you’re a beginner interested in learning how to make your own soap at home, there are several ways to embark on this rewarding process.
One basic method of making soap is called the cold process. This method involves mixing oils and a lye solution in a container, then allowing the mixture to go through a chemical reaction that turns it into soap. It’s important to note that lye is caustic and should be handled with care. However, once the chemical reaction is complete, the lye is neutralized and safe to use in soap.
To make cold process soap, you’ll first need to gather your ingredients, such as oils, lye, and water. You’ll also need a scale to measure the precise amounts of each ingredient. Once you have all your ingredients ready, you’ll mix the oils and lye solution together in a container and then blend until they reach trace. This is the point at which the mixture thickens and resembles pudding.
After achieving trace, you can add any desired scents, colors, or additives to personalize your soap. Then, it’s time to pour the soap into molds and let it cure for several weeks. During the curing process, the soap becomes harder and milder, making it suitable for use. Once cured, you can then cut the soap into bars and let them continue to cure in an open, dry environment.
If you’re more interested in a quicker and easier soapmaking method, you can also try the melt and pour method. With melt and pour soapmaking, you start with a pre-made soap base that you melt, add color or scent if desired, and then pour into molds. This method does not require the use of lye and is a great option for beginners or those looking for a more convenient way to make soap.
In conclusion, making soap is a basic chemical reaction that allows you to create your own natural and homemade soaps. Whether you choose the cold process method or opt for the melt and pour method, there are endless possibilities for creating unique and personalized soap creations. So, if you’re ready to embark on your soapmaking journey, gather your ingredients, learn about the process, and then watch as the basic chemical reaction turns your oils into luxurious bars of soap.
Watch Now How to Make Your Own Soap
If you’re a beginner who wants to learn more about making your own hand soaps at home, then this article is for you. There are many ways to make homemade soaps, but in this article, we’ll focus on the cold process method. This method is a natural way to make soap without any chemical reactions.
First, you’ll need a few basic ingredients and tools. You’ll need oils, such as olive oil or coconut oil, a container to mix the ingredients, and lye, which is a key ingredient in making soap. You’ll also need some liquid, like water or milk, to help the soap form.
Now, let’s walk through the process step by step. First, open up your favorite soap recipe and gather all the ingredients. Make sure you have all the oils, lye, and liquid ready before you begin.
Next, carefully measure out the required amounts of oils and lye. It’s crucial to follow the recipe instructions closely, as too much or too little of any ingredient can affect the final product. Once you have the measured ingredients, pour the lye into the liquid and mix thoroughly.
After that, slowly add the oils to the lye mixture and blend everything together. This is where you’ll need to use some muscle to stir the mixture until it thickens. This process is called saponification, which is the chemical reaction that turns the oils and lye into soap.
Once your soap batter reaches a thick, pudding-like consistency, it’s ready to be poured into a mold. You can use a variety of molds, from silicone trays to old milk cartons. Just make sure they’re clean and dry before pouring in the soap mixture.
Now comes the waiting game. Raw soap needs to cure and harden over time, usually for several weeks. During this time, it will go through a process called “gel phase,” where the soap undergoes a final chemical reaction to become fully saponified.
Finally, after the curing period, you can unmold your soap and cut it into bars. You’ll have your very own handmade soap ready to use or give as gifts. The cold process method allows for endless creativity, as you can customize your soap with different colors, scents, and textures.
So why not give it a try now? Watch our instructional video to learn more about the cold process method and start making your own homemade soaps today!
How to make liquid hand soap
If you’re a beginner soapmaker or want to learn a new method of soapmaking, then you’ll want to learn how to make your own liquid hand soap. Making liquid hand soap is a more advanced soapmaking process than making bar soaps, but it’s definitely worth the effort.
There are basic ways to make liquid hand soap, and in this article, we’ll talk about a cold process method. This method uses natural oils and lye to create a chemical reaction that turns the oils into soap.
First, you’ll need to gather the ingredients and equipment. You’ll need a container to hold the soap mixture, such as a glass jar or plastic bottle. You’ll also need lye, water, and oils. You can choose different oils depending on your preferences, but some popular choices include olive oil, coconut oil, and castor oil.
Now, let’s begin the soapmaking process. It’s important to note that you should always wear protective gear, such as goggles and gloves, when working with lye. Lye can be dangerous if it comes into contact with your skin.
- Measure out the correct amount of water and lye according to your recipe.
- Add the lye to the water, never the other way around. Stir gently until the lye is fully dissolved. Be careful as the mixture will heat up and emit fumes.
- In a separate container, measure out the oils and heat them until they are melted and combined.
- Once the lye mixture and oils have cooled to the same temperature, slowly pour the lye mixture into the oils while stirring continuously.
- Continue stirring until the mixture reaches trace. This is a point in the soapmaking process where the mixture thickens to a consistency similar to pudding.
- Add any fragrance or colorants to the mixture, if desired.
- Pour the soap mixture into your chosen container and cover it with a lid.
- Now, you’ll need to watch and wait. The soap will go through a saponification process, where the lye and oils react to form soap. This can take several weeks.
- After the soap has fully saponified, you can open the container and check if the soap is the desired consistency. If it’s too thick, you can add water to thin it out.
- Your homemade liquid hand soap is now ready to use!
Remember, soapmaking can be a fun and rewarding hobby, but it’s important to always use caution when working with lye and other chemicals. Follow the recipes and instructions carefully, and you’ll be on your way to making your own natural liquid hand soap.
Learn More About How to Make Soap
If you’re a beginner in soapmaking or are interested in making your own natural hand soaps at home, then this article is for you. Here, you’ll learn more about soapmaking and discover different methods and recipes to create your own homemade soaps.
Soapmaking is a chemical reaction that occurs when oils and a alkaline solution, such as sodium hydroxide (lye), are combined. There are different ways to make soap, including the cold process method and the hot process method. Each method has its own benefits and allows you to create unique soap creations.
When making soap at home, it’s important to have the right tools and equipment. You’ll need a container to mix and hold your soap mixture, as well as measuring cups, a thermometer, and a stick blender or spoon to mix the ingredients together. It’s also crucial to wear protective gear, such as gloves and goggles, to ensure your safety.
If you’re just starting out, it’s recommended to begin with a basic recipe that uses a combination of oils, such as coconut oil, olive oil, and palm oil. These oils provide the necessary fats to create a moisturizing and cleansing soap. As you gain more experience, you can experiment with different oils and additives to create unique soap blends.
There are endless possibilities when it comes to soapmaking, and you can let your creativity run wild. You can add natural colorants, such as herbs or clays, to give your soap a unique appearance. You can also incorporate essential oils or fragrance oils to add a pleasant scent to your handmade soaps.
To learn more about how to make soap, there are many resources available. You can watch online tutorials on soapmaking or read books and articles written by experienced soapmakers. There are also soapmaking communities and forums where you can connect with fellow soapmakers and learn from their experiences.
Now that you have a basic understanding of soapmaking and the different ways to make soap, you’re ready to dive into this rewarding and creative hobby. Start with a beginner-friendly recipe, gather your ingredients and tools, and begin your soapmaking journey. You’ll soon discover the joy of creating your own unique and natural hand soaps.


