

Are you tired of your old shoes? Looking for a fun and creative way to give them a fresh and stylish makeover? Painting your shoes might be just the thing you need. It’s a great DIY project that allows you to express your personal style and create one-of-a-kind footwear that reflects your personality.
Before you start, gather all the materials you’ll need. The stuff you’ll typically require includes paint (acrylic or fabric paint work best), brushes, a deglazer (to strip any existing finishes from the shoes), tape to protect certain areas, and a finisher to seal the paint and make it last longer.
Step 1: Prepare the shoes. Clean the surface of your shoes with a sponge and some water. Use the deglazer to remove any dirt, oils, or existing finishes. This will help the paint adhere better and ensure a smooth application.
Step 2: Protect the areas you don’t want to paint. Use tape to cover any parts of the shoe that you want to keep in their original color. This will help you achieve clean and sharp lines between different colors.
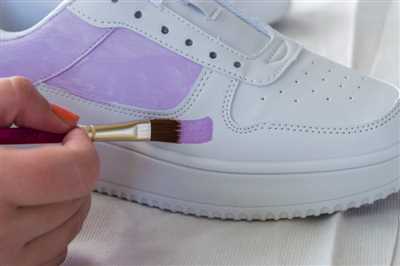
Step 3: Choose your colors and start painting. You can use acrylic or fabric paint, depending on the material of your shoes. Acrylic paint works well on canvas and leather, while fabric paint is better for synthetic materials such as plastic or vinyl. Remember to start with light colors and layer darker ones on top to create depth and dimension.
Step 4: Let the paint dry. Give each coat of paint a few hours to dry before applying the next one. If you’re in a hurry, you can use a hairdryer to speed up the process, but remember to keep it on the lowest setting to avoid damaging the paint.
Step 5: Add some finishing touches. Once the paint is completely dry, you can add additional details to your shoes, such as patterns or metallic accents. This will give your footwear a unique and personalized touch.
Step 6: Apply a finisher. To protect your newly painted shoes and make the colors last longer, apply a finisher. This will also give your shoes a professional and polished look. Follow the instructions on the finisher bottle for best results.
And there you have it! In just 6 steps, you can transform your old shoes into a work of art. Whether you’re painting canvas Vans or giving your favorite sneakers a sunflower design, these tips will help you achieve a stunning result. So, grab your brushes, open up your creative side, and start painting! Remember to take it slow, use thin coats of paint, and always let each layer dry before applying a new one.
Before you start your shoe painting adventure, make sure to comment below and let us know your favorite shoe painting techniques or any tips and tricks you’ve found along the way. Happy painting!
- How to Paint Shoes in 5 Easy Steps: DIY Sunflower Shoes
- Step 1: Gather Your Materials
- Step 2: Prepare Your Shoes
- Step 3: Tape and Strip
- Step 4: Start Painting
- Step 5: Add Finishing Touches
- Materials
- Protect the paint
- Add a comment
- Step 3: Strip the Shoes
- 6-Steps on How to Spray Paint your Shoes
- How to Protect your Spray Painted Shoes
- Tips for Spray Painting Shoes
- Video:
- Trying COLOR SHIFTING Paints For The First Time!
How to Paint Shoes in 5 Easy Steps: DIY Sunflower Shoes
If you’re looking to give your plain and boring shoes a new life, why not try painting them yourself? With just a few materials and some creativity, you can transform your shoes into a unique and stylish piece of art. In this tutorial, we’ll show you how to paint shoes using sunflower design in 5 easy steps.
Step 1: Gather Your Materials
Before you start painting, make sure you have all the materials you need. Here’s what you’ll need:
- A pair of canvas shoes (Vans or similar)
- Acrylic paints in the colors of your choice
- Paint brushes in various sizes
- Water and a sponge
- Newspaper or plastic bags to protect your work surface
- Masking tape
- Paint deglazer (if your shoes have a finisher)
Step 2: Prepare Your Shoes
To ensure that the paint adheres well to the surface of your shoes, you’ll need to prepare them properly. Start by cleaning your shoes thoroughly with water and a sponge. If your shoes have a finisher on them, use a paint deglazer to remove it. Let your shoes dry completely before moving on to the next step.
Step 3: Tape and Strip
To protect certain areas of your shoes from getting painted, use masking tape to cover them. Strip the laces from your shoes and set them aside for now. You can also stuff the inside of your shoes with newspaper or plastic bags to give them a firm surface to paint on.
Step 4: Start Painting
Now it’s time to get creative and start painting! Use your paint brushes and acrylic paints to create a sunflower design on your shoes. You can follow a template or design your own. Start with the lightest colors first and gradually add darker colors for shading. Take it slow and let each layer of paint dry before applying the next one. This will ensure a smooth and even finish.
Step 5: Add Finishing Touches
Once you’re done painting, let your shoes dry for a few hours or overnight. If you want to add some extra protection or shine to your shoes, you can apply a finisher. This will help to seal the paint and make it last longer. Remember to remove the masking tape and insert the laces back into your shoes once they’re completely dry.
Voila! You now have your very own DIY sunflower shoes. You can wear them with pride and show off your artistic skills. If you have any tips or comments on how to paint shoes, feel free to leave them in the comment section below. Happy painting!
Materials
When it comes to painting shoes, you’ll need a few materials to get started. Here are the essential items you’ll need for this DIY project:
- Canvas or leather shoes
- Plastic bags or newspaper to protect your work surface
- Tape to cover areas you don’t want to paint
- Deglazer or rubbing alcohol to prep the surface
- Acrylic paints in your desired colors
- Water to thin the paints if needed
- Sponge or brushes to apply the paint
- Spray finisher to seal and protect the paint
These materials can be easily found at your local craft store or online. Make sure to choose paints that are specifically designed for shoes, as they will provide the best results and durability.
Before you start painting, it’s important to clean and prep the shoes. Use the deglazer or rubbing alcohol to remove any dirt or oils from the surface. This will help the paint adhere better and ensure a long-lasting finish.
Once the shoes are prepped, you can start painting. Use a light hand and apply thin coats of paint, allowing each coat to dry completely before applying the next one. This will help prevent any clumping or streaking in the final result.
Depending on the color and finish you want to achieve, you may need to apply multiple coats of paint. Metallic colors, for example, may require more coats to achieve full coverage. Be patient and take your time to ensure an even and smooth application.
When you’re done painting, let the shoes dry completely, preferably in a well-ventilated area or under a fan. This can take several hours, so make sure you have enough time before wearing or handling them.
After the shoes are fully dry, you can apply a spray finisher to protect the paint from water and wear. This will help the colors stay vibrant and prevent them from fading over time. Follow the instructions on the finisher bottle for the best results.
Remember, practice makes perfect! If you’re new to shoe painting, start with a simple design or pattern before attempting more intricate applications. And always test the paint on a small area first to make sure you’re happy with the color and finish.
That’s it! With these materials and steps, you’ll be well on your way to creating your own custom painted shoes. Happy crafting!
Protect the paint
After you’ve finished painting your shoes, you’ll need to take steps to protect the paint and ensure that it lasts for a long time. Here are some easy tips to help you protect the paint on your newly painted shoes:
- Apply a thin layer of finisher: Once the paint is dry, apply a coat of finisher to protect the paint from water, light, and other elements. You can use a sponge or a brush to apply the finisher.
- Avoid excessive wear and tear: While your painted shoes are designed to be worn, remember that they may not withstand heavy usage or rough conditions. Try to avoid excessive wear and tear to ensure that the paint stays intact.
- Store your shoes carefully: When you’re not wearing your painted shoes, store them in a cool, dry place to prevent any damage to the painted surface. Keep them away from bags or other items that may rub against the paint and cause it to chip off.
- Avoid direct sunlight: Prolonged exposure to direct sunlight can cause the paint to fade or crack over time. To prevent this, try to keep your painted shoes out of direct sunlight as much as possible.
- Use protective sprays: There are also spray-on finishes available that can add an extra layer of protection to your painted shoes. Make sure to follow the instructions on the spray can and apply it evenly over the painted surface.
- Consider a deglazer: If you ever want to repaint your shoes or strip off the existing paint, a deglazer can help in removing the previous paint. Apply it with a sponge or a clean cloth and follow the instructions provided.
By following these steps, you can help ensure that the paint on your shoes lasts longer and remains vibrant. If you have any tips or comments on how to protect painted shoes, feel free to share them below!
Add a comment
After following these 6 steps to paint your shoes, don’t forget to add a comment to share your experience! Your insights and tips may help others who are also looking to customize their footwear.
Here are a few tips to help you get started:
- – Remember to view the shoe from all angles before you start painting. This will help you visualize the design and make any necessary adjustments.
- – Tape off any areas of the shoe that you don’t want to paint. This will ensure clean lines and a professional looking finish.
- – Use a deglazer to strip the shoe of any finishes or coatings. This will help the paint adhere better.
- – Apply thin coats of paint to prevent dripping and ensure even coverage. It’s better to do multiple thin coats than one thick coat.
- – Allow each coat of paint to dry for a few hours before applying the next. This will help prevent smudging and ensure a long-lasting finish.
- – If you’re using metallic paints, be sure to give them a good shake before use to distribute the pigments evenly.
- – Always work in a well-ventilated area or even outdoors to avoid inhaling fumes from the paint.
- – Use a light hand when painting with water-based paints, as they can easily be diluted or smudged if too much pressure is applied.
- – Spray a thin layer of finisher over the painted surface to protect the design and make it more durable.
- – If you need help coming up with a design, try searching for inspiration online. Many cosplayers and DIY enthusiasts have published their shoe painting projects.
- – In case any mistakes or accidents happen, keep a sponge and water nearby to wipe off the paint quickly.
- – To avoid getting paint on your hands, wear gloves or wash them frequently during the painting process.
- – After you’re done painting, let the shoes dry for at least 24 hours before wearing them. This will ensure that the paint is fully cured and won’t rub off onto surfaces.
- – If you want the painted shoes to last longer, avoid exposing them to direct sunlight for extended periods of time. The UV rays can cause the paint to fade or crack.
- – Lastly, don’t forget to have fun and experiment with different colors and finishes! Painting shoes is an easy and creative way to transform your footwear.
So go ahead and share your tips, tricks, and experiences in the comment section below. We can’t wait to hear how your shoe painting project turned out!
Step 3: Strip the Shoes
Before you start painting your new pair of shoes, you’ll need to strip them of their current finishes. This step is essential to ensure that the paint adheres properly and lasts longer on the surface of the shoes.
To strip your shoes, you’ll need some materials. One option is to use a deglazer, which is a chemical designed to remove old finishes from materials like canvas or leather. You can easily find deglazers in DIY stores or online. Another option is to use acetone or nail polish remover, but be careful as they can be harsh and might damage certain shoe materials.
To strip your shoes, you can follow these steps:
1. Start by opening a well-ventilated area, as some of the products can have strong odors. You can also wear gloves to protect your hands.
2. Place some newspaper or an old cloth on your work surface to avoid staining it.
3. Dip a sponge or a cloth into the deglazer or solvent of your choice. Make sure it is damp, not dripping wet.
4. Gently rub the sponge or cloth over the shoes, focusing on the areas with the old finish. Be careful not to apply too much pressure, as it might damage the shoe surface.
5. Keep rubbing until you see the old finish coming off. You might need to repeat this step a few times to remove all the coatings.
6. Once you’re done, let the shoes dry for a few hours. This step is important to ensure that the shoes are completely free of any residue before you start painting them.
Remember, always read and follow the instructions on the deglazer or solvent’s packaging. It’s also a good idea to do a patch test on a small surface of the shoe to make sure that the product doesn’t damage or discolor the material. Take your time with this step to strip the shoes properly; it will help achieve a better and longer-lasting finish.
6-Steps on How to Spray Paint your Shoes
If you want to give your shoes a new look, spray painting them is a fun and easy DIY project. With just a few materials and some simple steps, you can transform your plain shoes into stylish works of art. Here are 6 steps to help you get started:
- Step 1: Prepare your shoes
- Step 2: Protect and prepare your workspace
- Step 3: Choose your paint
- Step 4: Begin painting
- Step 5: Add finishing touches
- Step 6: Protect and finish
Start by cleaning your shoes with a deglazer or rubbing alcohol to remove any dirt or oils. This will help the paint adhere better to the surface. Use a sponge or cloth to apply the deglazer or rubbing alcohol and let the shoes dry completely.
Cover your workspace with newspaper or plastic bags to protect it from overspray. You can also tape off any areas of the shoes that you don’t want to paint, such as the soles or laces.
There are many spray paints available for painting shoes, but it’s important to choose one that is designed for use on fabric or leather. Look for paints that are flexible and have thin applications for a smooth and even finish. You can also use metallic or special effect paints for a unique look.
Hold the spray can about 6-8 inches away from the shoes and apply a light coat of paint. It’s better to do several light coats than one heavy coat to avoid drips and uneven coverage. Allow each coat to dry before applying the next one. Remember to spray in a well-ventilated area or outdoors for safety.
Once the base coats are dry, you can add more colors or designs using stencils or freehand techniques. Be creative and experiment with different patterns or color combinations. Allow the additional paint to dry completely before moving on to the next step.
To protect your newly painted shoes and make the colors last longer, apply a finisher or sealant designed for use on shoes. This will help protect the paint from coming off or peeling. Follow the instructions on the finisher product for best results.
By following these 6 steps, you’ll be able to spray paint your shoes and give them a fresh new look. Whether you’re painting canvas sneakers or leather boots, remember to always start with clean shoes and take your time for the best results. Happy painting!
How to Protect your Spray Painted Shoes
Once you’ve completed the fun and creative process of painting your shoes, it’s important to take the necessary steps to protect your artwork. By following these easy steps, you can ensure that your spray painted shoes will last longer and stay looking vibrant.
1. Start by gathering your materials. You’ll need plastic bags, newspaper, tape, and a deglazer. These items will help protect the surfaces you don’t want to paint and prepare your shoes for the next step.
2. To protect your shoes from overspray, stuff them with plastic bags or newspaper. This will keep the paint from getting inside your shoes and potentially ruining the insides. Make sure to cover the rest of the shoe with plastic bags or newspaper as well.
3. Before applying any protective finish, you’ll need to deglaze your shoes. This will remove any dirt, oils, or previous finishes that could interfere with the paint’s adherence. Use a deglazer specifically designed for shoes and apply it with a sponge, following the manufacturer’s instructions.
4. Once your shoes are prepared, it’s time to apply the protective finish. Use a spray-on finisher designed for shoes and follow the instructions on the bottle. Apply thin and even coats to ensure proper coverage. Allow the finisher to dry for at least 24 hours before wearing your newly protected shoes.
5. Remember to give your shoes a touch-up if needed. Over time and with wear, the finish may start to fade or chip. By keeping a small amount of the spray paint on hand, you can easily fix any imperfections that may arise.
By following these steps, you can add an extra layer of protection to your spray painted shoes and ensure that they last longer. The process may take a little extra time, but it will help preserve the color and finish of your shoes, allowing you to wear them with confidence for many hours to come.
Have you tried spray painting your shoes? Share your results in the comments below!
Tips for Spray Painting Shoes
If you want to give your shoes a fresh new look, spray painting can be a fun and easy DIY project. With a few materials and some simple steps, you can transform your old or boring shoes into a unique and stylish pair. Here are some tips to help you get started:
| Step 1: Prepare the surface Before you start spraying, make sure to clean your shoes. Use a deglazer or a sponge with some soap and water to remove any dirt or finishes that may be on the shoes. It’s important to have a clean and smooth surface for the paint to adhere to. |
|
|
| Step 2: Protect the surrounding stuff When spray painting, it’s important to protect the surrounding area from overspray. Cover the floor with newspaper or plastic bags, and use tape to protect any parts of the shoes that you don’t want to be painted. |
| Step 3: Start with a light coat When you spray the paint, start with a light coat. It’s better to apply multiple thin coats than one heavy coat. This will help the paint to dry faster and give a more even finish. |
|
|
| Step 4: Let it dry between coats After each coat of paint, let the shoes dry for a few hours. This will ensure that the paint adheres properly and lasts longer. |
| Step 5: Add finishing touches Once you are done with the painting, you can add some finishing touches. Consider using metallic colors or a color strip to give your shoes a unique look. You can also use a paint finisher or a sunflower oil to protect the paint and make it last longer. |
|
|
| Step 6: Tips to remember
|


By following these 6 steps and keeping these tips in mind, you can easily spray paint your shoes and give them a new life. Whether you’re painting canvas sneakers or leather boots, spray painting can be a great way to personalize your footwear for cosplay, special events, or just to add a pop of color to your everyday style.


