

Vanilla, known for its rich and luscious flavor, is one of the most popular and versatile ingredients in the baking world. It’s used in everything from cookies to cakes, and its floral and fruity notes can add depth and complexity to any dish. If you’re a baker or simply a vanilla enthusiast, making your own vanilla extract is a must-try project that will take your culinary creations to the next level.
Here, we’ll show you how to make your own vanilla extract from scratch, using only two ingredients: vanilla beans and alcohol. While there are many varieties of vanilla beans available, the most popular and widely used are Bourbon and Mexican vanilla beans. Bourbon beans, native to the Bourbon Island in Madagascar, have a higher oil content and a deep, dark color. Mexican beans, on the other hand, have a more floral and fruity flavor. The choice between these two varieties ultimately comes down to personal preference.
Before you start making your own vanilla extract, it’s important to note that patience is key. The longer you wait, the better the results will be. While some recipes suggest a minimum steeping time of a few weeks, we recommend waiting at least three months for the flavors to fully develop. You can also let it steep for a year or more, which will result in a more intense and pronounced vanilla flavor. Remember, good things come to those who wait!
Step 1: Gather all the ingredients you’ll need for this recipe. You’ll only need two things: a bunch of fresh, high-quality vanilla beans and a bottle of your choice of alcohol. For the alcohol, you can use vodka, bourbon, rum, or any other neutral-flavored spirit that has at least 35% alcohol content. Make sure to buy whole vanilla beans from a reputable source, as the ones you find in most grocery stores are usually dried out and less flavorful.
How to make vanilla extract
Making your own vanilla extract is a popular and cost-effective way to have a supply of this delicious flavor enhancer on hand for all your baking needs. Additionally, homemade vanilla extract is made from just a few simple ingredients, gives you control over the strength and flavor, and can last for years when stored properly.
To make your own vanilla extract, you will need:
| – | A bunch of fresh vanilla beans |
| – | A high-quality alcohol, such as vodka or bourbon |
Here is a step-by-step guide on how to make homemade vanilla extract:
1. Start by cleaning and hulling your vanilla beans. Split each bean lengthwise and scrape out the tiny seeds with a knife.
2. Place the beans and seeds in a clean glass bottle or jar. You can use as many beans as you like, but a general rule of thumb is to use about 1 ounce (30 grams) of beans per 1 cup (240 milliliters) of alcohol.
3. Pour the alcohol over the vanilla beans, making sure they are completely submerged. Seal the bottle or jar tightly.
4. Store the bottle or jar of vanilla extract in a cool, dark place – such as a pantry or cupboard – and let it sit for at least six weeks. During this time, shake the bottle or jar every week to help with the extraction process. The longer you wait, the stronger the flavor will become.
5. After at least six weeks, you can start using your homemade vanilla extract. Simply measure out the desired amount for your recipe and enjoy the delicious flavor it adds to your baked goods.
It’s worth noting that vanilla extract made with vodka will have a clean and neutral flavor, while bourbon will add a more robust and slightly fruity taste. Choosing between the two depends on your personal preference and the flavor pairing you’re looking for.
In addition to the traditional vanilla extract, there is also a variety known as Mexican vanilla extract, which is made with a different species of vanilla bean native to Mexico. This type of extract has a floral and slightly fruity flavor profile and is often used in Mexican cuisine.
When making your own vanilla extract, make sure to use high-quality vanilla beans. Grade B beans are often recommended for extraction because they have a higher moisture content and more seeds than Grade A beans. This results in a stronger and more flavorful final product.
Now that you know how to make your own vanilla extract, you can enjoy the rich and natural taste of homemade vanilla in every baked good you make. Say goodbye to store-bought vanilla extracts and enjoy the satisfaction of using pure, homemade vanilla extract in your favorite recipes!
Step 1 – Clean your bottle

To make homemade vanilla extract, the first step is to clean your bottle before adding the ingredients. A clean bottle is essential for storing and preserving the vanilla extract.
You can use a glass bottle or jar with a tight-fitting lid. Make sure to choose a bottle that is dark in color, such as amber or brown. This helps to protect the vanilla extract from light, which can cause it to degrade over time.
If you’re using a new bottle, wash it thoroughly with hot soapy water and rinse it well. If you’re reusing a bottle, make sure to wash it with hot soapy water and rinse it well to remove any residue from previous use.
After cleaning the bottle, you need to sterilize it to ensure that it’s free from any bacteria or contaminants. You can do this by boiling the bottle in water for about 5 minutes or by running it through a dishwasher cycle.
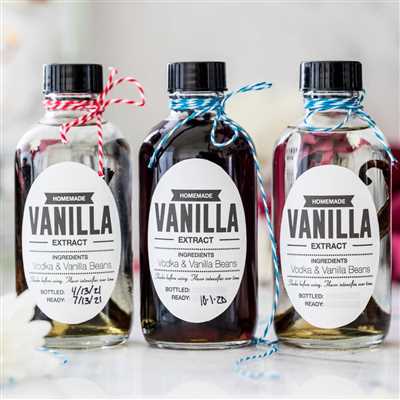
Once the bottle is clean and sterilized, you can proceed with making your own vanilla extract. Remember to label the bottle with the date and the type of vanilla beans used. This will help you keep track of the aging process and ensure that you use the extract when it’s at its peak flavor.
How to Make Homemade Vanilla Extract
Vanilla extract is a staple ingredient in most baked goods, giving them a rich and aromatic flavor. While you can easily find vanilla extract in the grocery store, making your own homemade version allows you to have more control over the ingredients and customize the flavor to your liking. Plus, it’s a fun and rewarding process!
To make homemade vanilla extract, you’ll need just two main ingredients: vanilla beans and alcohol. The type of alcohol you choose to use will depend on your personal preference. Vodka is the most commonly used alcohol for vanilla extract, but you can also use bourbon or rum for different flavor profiles. Just make sure the alcohol is a high proof, at least 35% alcohol by volume (70 proof).
Here’s a step-by-step guide to making homemade vanilla extract:
1. Gather your ingredients. You’ll need about 3 to 5 vanilla beans for every 1 cup of alcohol. Make sure to choose high-quality vanilla beans for the best results. Look for plump and oily beans with a strong vanilla scent. You can find vanilla beans online or at specialty spice stores.
2. Prepare the vanilla beans. Using a sharp knife, split each vanilla bean lengthwise to expose the seeds. If the beans are too long, you can cut them in half to fit them into your bottle.
3. Combine the vanilla beans and alcohol. Place the split vanilla beans into a clean, dark glass bottle. Pour the alcohol over the beans, making sure they are fully submerged. Give the bottle a good shake to distribute the vanilla seeds and speed up the extraction process.
4. Store in a cool, dark place. Find a cool and dark spot in your kitchen or pantry to store the bottle. The vanilla extract will need time to mature and develop its flavor. The longer you let it sit, the stronger and more flavorful it will become. It’s best to let it age for at least 2 months before using, but it can be used after just a few weeks if you’re in a hurry.
5. Shake the bottle regularly. Throughout the extraction process, give the bottle a gentle shake every now and then. This will help distribute the vanilla seeds and enhance the flavor extraction.
6. Enjoy your homemade vanilla extract! After the recommended aging period, your vanilla extract is ready to use. It can be used in a variety of recipes, from cookies and cakes to ice creams and custards. Remember to use it in moderation, as a little goes a long way.
7. Keep refilling and reusing. As you use up your homemade extract, you can continue to top up the bottle with more alcohol. The vanilla beans will continue to impart flavor over time, so you can keep using them for several years before they need to be replaced.
Homemade vanilla extract allows you to experience the true depth and richness of real vanilla. The flavor is more intense and complex than store-bought extracts, with floral and fruity notes that are simply irresistible. Once you try homemade vanilla extract, you’ll never go back!
So, why wait? Gather your ingredients and get started on your homemade vanilla extract journey. Your inner baker will thank you!
How to Store Vanilla Extract
After making your own vanilla extract using Mexican or Bourbon vanilla beans, you need to know how to store it properly to preserve its flavor and extend its shelf life. Storing vanilla extract correctly will ensure that you have a high-quality ingredient to use in your favorite recipes for years to come.
The first step is to select a clean, airtight bottle or container to store your vanilla extract. Glass is the best option, as it is non-reactive and will not alter the flavor of the extract. Make sure the bottle has a tight lid to prevent air from entering and oxidizing the extract.
When transferring your vanilla extract into the storage bottle, keep in mind that the beans may settle at the bottom. Give the bottle a good shaking every once in a while to redistribute the beans and ensure even flavor extraction. This shaking also helps release more of the vanilla’s aromatic compounds.
The ideal storage location for vanilla extract is in a cool, dark place away from direct sunlight. Heat and light can degrade the flavor over time, so find a cupboard or pantry that meets these conditions. Storing the extract in a dark bottle can also help to block out light.
To maintain the quality and freshness of your vanilla extract, the room temperature should be kept as stable as possible. Avoid drastic temperature changes that can alter the extract’s flavor. The temperature range should be around 60-70°F (15-21°C) for optimal storage.
In terms of the shelf life, vanilla extract will generally stay potent for 2-4 years after the extraction process. However, the extract may still be usable and retain some flavor for much longer. Over time, the flavor may mellow and the aroma may diminish, but the extract should still be safe to use.
Another important note is to never refrigerate or freeze your vanilla extract. The cold temperatures can cause the extract to solidify, making it difficult to pour and use. Plus, condensation can form inside the bottle, which can introduce moisture and promote the growth of mold or bacteria.
When using your vanilla extract, be sure to give it a sniff before adding it to your recipes. The aromatic compounds should have a strong, floral scent. If the extract smells off or has a strange odor, it may be past its prime and should be replaced.
In summary, to store your homemade vanilla extract:
- Select a clean, airtight glass bottle with a tight lid.
- Shake the bottle occasionally to redistribute the beans and enhance flavor extraction.
- Store in a cool, dark place away from direct sunlight.
- Keep the room temperature stable, ideally between 60-70°F (15-21°C).
- Avoid refrigerating or freezing the extract.
- Check the aroma before using and replace if it smells off.
By following these storage guidelines, you can ensure that your vanilla extract remains fresh, flavorful, and ready to enhance your baked goods, desserts, and other culinary creations.
Indri’s Vanilla Bean Group
Welcome to Indri’s Vanilla Bean Group, your ultimate guide to making homemade vanilla extract! If you’re a fan of vanilla-flavored goodies and want to take your baking to the next level, then you’re in the right place. Here, we will teach you how to make your own pure and natural vanilla extract using only a few simple ingredients.
At Indri’s Vanilla Bean Group, we believe that the key to a great vanilla extract is high-quality beans. The selection of beans is crucial, as it determines the final flavor and aroma of your homemade vanilla. We recommend using Grade A Madagascar vanilla beans, known for their rich and full-bodied taste.
To make your own vanilla extract, you will need the following:
- A bunch of Grade A Madagascar vanilla beans
- A clean glass bottle with a tight-fitting lid
- A high-quality alcohol, such as vodka or bourbon
First, take your vanilla beans and carefully hull them. This means slitting each bean lengthwise and scraping out the seeds using a sharp knife. Place the beans and seeds into your glass bottle.
Next, pour your chosen alcohol over the beans until they are fully submerged. The higher the alcohol content, the faster the extraction process will be. We recommend using at least 35% alcohol by volume.
Now, seal the bottle tightly and give it a good shake to distribute the vanilla seeds evenly. Place the bottle in a cool, dark place like a pantry or cupboard. Let the mixture sit undisturbed for at least 1 week, but for the best results, wait for at least 2-3 months. The longer you wait, the more flavorful your homemade vanilla extract will be.
After the waiting period, your vanilla extract is ready to use! You can add it to your favorite cookie recipe, pastry dough, or even make your own homemade ice cream. The possibilities are endless!
Indri’s Vanilla Bean Group is also known for its variety of other vanilla products. If you’re looking for a fruity and floral alternative to your homemade vanilla extract, we offer vanilla beans from Tahiti, another popular source for vanilla beans. These beans have a unique flavor profile that pairs well with light desserts.
So why buy store-bought vanilla extract when you can easily make your own at home? With Indri’s Vanilla Bean Group as your guide, you’ll never have to worry about a lack of flavor in your baked goods. Cheers to homemade vanilla extract!
Sources
In order to make the best homemade vanilla extract, it’s important to use high-quality ingredients. Here are some sources where you can find the necessary supplies:
1. Grocery Store: You can find vanilla beans, vodka, and bourbon at your local grocery store. Make sure to check the aisle that sells baking supplies or spices.
2. Online Retailers: There are many online retailers that specialize in selling vanilla beans and extracts. Some popular options include Indri’s Vanilla, The Vanilla Company, and Beanilla. These stores offer a wide selection of vanilla products, including different varieties and grades of beans.
3. Specialty Stores: If you’re looking for a more unique variety of vanilla beans or want to explore different flavor profiles, specialty stores might be your best bet. These stores often carry vanilla beans from different regions around the world, such as Madagascar, Tahiti, and Mexico.
Note: When buying vanilla beans, make sure to select plump and moist beans. They should have a strong and sweet aroma. Avoid beans that are dry or have split skins.
4. Wine and Liquor Stores: Besides vodka and bourbon, you can also use other types of alcohol to make vanilla extract. Some bakers prefer using dark rum or even wine for a unique flavor profile. Just make sure the alcohol has a minimum of 35% alcohol content and is as pure as possible.
5. Homemade: If you want to take your vanilla making to the next level, try making your own vanilla extract at home. This allows you to control the quality and flavor intensity. All you need are vanilla beans, alcohol, and a little bit of patience. It’s a fun project that yields delicious results!
With these sources, you can make your own homemade vanilla extract that will elevate the taste of every cookie, cake, or dessert you bake. Whether you opt for bourbon or vodka, a variety of beans or just a single type, your homemade vanilla extract will add a rich and aromatic flavor that store-bought varieties can’t match.


