

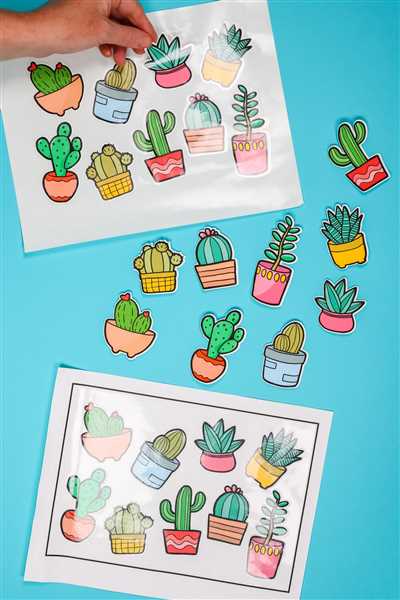
Are you a Cricut customer who loves making stickers? Adding a laminate layer to your stickers can make them more durable and resistant to wear and tear. In this tutorial, we will show you how to laminate your stickers using Cricut, so you can ensure that your designs stay vibrant and long-lasting.
When it comes to making stickers, Cricut is the go-to cutting machine for many crafters. Whether you’re creating Halloween stickers, snowman designs, or even your own logo, Cricut can help you bring your ideas to life.
Here’s how to laminate your stickers with Cricut:
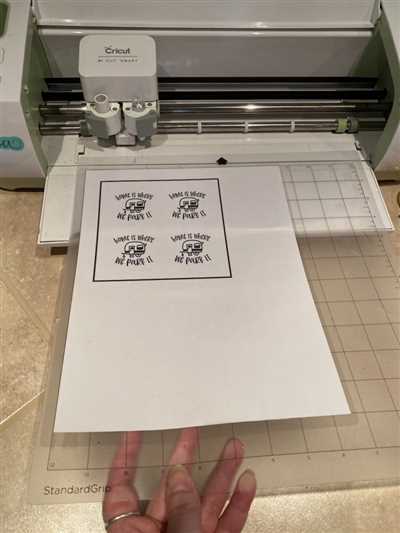
- Design and Print: Use your computer to design and print your stickers on printable paper. Make sure to set the print settings to achieve the best quality for your stickers.
- Cut the Stickers: Once your stickers are printed, use your Cricut machine to cut them out. The Cricut cutting technology ensures precise cuts and clean lines, giving your stickers a professional look.
- Laminate the Stickers: Now it’s time to laminate! Open the package of laminate sheets and carefully place your stickers between the sheets. Peel the protective backing off the laminate and press it firmly over your stickers, removing any air bubbles or dust.
- Celebrate and Share: Congratulations! Your stickers are now laminated and ready to be shared with the world. Whether you’re hosting a sticker party or selling them online, your laminated stickers will be a hit.
At Cricut, we understand the importance of keeping your designs safe and durable. That’s why we offer a wide range of laminate options to suit every need. From glossy to matte, from bulk orders to individual sheets, we have you covered.
Why choose laminated stickers? Laminated stickers are more likely to withstand the test of time, as they are resistant to fading, scratching, and moisture. It’s like adding an armor to your precious designs that keeps them looking fresh and vibrant.
Don’t miss out on our special offer! Use the coupon code “LAMINATE15” to get a 15% discount on your first laminated sticker order. Order now and experience the difference a laminated sticker can make!
Join the Cricut community today and unlock a network of creative possibilities. Learn how to make stickers, explore new ideas, and connect with fellow crafters who share your passion. With Cricut, every day is a celebration of creativity and craftsmanship.
So, what are you waiting for? Start laminating your stickers today and let your designs shine like never before. Your customers will appreciate the extra effort you put into providing them with high-quality, long-lasting stickers.
Because when it comes to sticker making, Cricut is the right choice every time.
- Printable Waterproof Sticker Set – US Letter 6 ct
- How to Make Stickers with Cricut
- Similar Posts
- DIY Flag Banner
- Computer Dust Cover
- Why I Do Not Celebrate Halloween
- Easter Themed Pine Cone Tree
- Painting the Shed Trim
- Armor of God Birthday Party Ideas
- Video:
- How To Laminate Your Stickers (Without A Laminating Machine)
Printable Waterproof Sticker Set – US Letter 6 ct
Are you tired of your stickers getting ruined by water, dust, or wear and tear? Look no further! Our Printable Waterproof Sticker Set is the perfect solution for you. Made using high-quality materials, these stickers are resistant to water and can withstand the toughest conditions.
Print, cut, and laminate your own stickers using the Cricut machine. With the help of our detailed instructions, you can easily create professional-looking designs that will wow your friends and family. Whether you’re a DIY enthusiast or a professional designer, our sticker set is an excellent addition to your collection.
Each set includes US Letter 6 ct sticker sheets, providing you with plenty of space to print and cut your designs. The stickers are also compatible with other popular cutting machines, so you can use them no matter which printer or machine you have.
Not only are these stickers waterproof, but they are also dust resistant. This means that your designs will stay vibrant and beautiful for a long time, even in the harshest environments.
Whether you’re looking to create custom stickers for an Easter banner, a Halloween party, a birthday celebration, or just for fun, our Printable Waterproof Sticker Set has got you covered. You can print your favorite characters, logos, or designs and turn them into stickers that will make any event or space more colorful and exciting.
And here’s the best part – when you purchase our Printable Waterproof Sticker Set, you also get a free coupon for your next purchase. So not only will you get high-quality stickers, but you’ll also save money on your future orders.
Why wait? Don’t miss out on this amazing product! Start making your own printable waterproof stickers today!
How to Make Stickers with Cricut
To get started, there are a few things you’ll need. First, make sure you have a Cricut machine. These machines come in many different models and have various features, so be sure to choose the one that best suits your needs. You’ll also need sticker paper that is compatible with your Cricut machine. You can find printable sticker paper at craft stores or online.
Once you have your materials, you can start designing your stickers on your computer. Cricut provides a user-friendly design software called Cricut Design Space. You can create your stickers from scratch or use pre-made designs available in the software’s library. If you have a specific theme in mind, you can search for themed designs and customize them to your liking. You can add text, shapes, colors, and even upload your own logo or artwork.
When you’re happy with your design, you can proceed to the printing and cutting stage. Cricut machines use a cutting blade to precisely cut out the designs from the sticker paper. Make sure you load the sticker paper correctly, and follow the instructions provided by your machine.
Once the stickers are cut, you may want to laminate them for added protection. This step is optional but recommended, especially if you plan to use the stickers in high-traffic areas or expose them to moisture. Laminating stickers will make them more durable and resistant to fading. There are various methods to laminate stickers, but one popular option is using a self-adhesive laminating sheet. Simply peel off the backing and apply it to the front of your sticker. Make sure to smooth out any air bubbles or wrinkles for a polished finish.
Now that your stickers are ready, you can start using them in a variety of ways. You can stick them onto your journal, decorate your laptop, personalize your water bottle, or even create custom party favors. The possibilities are endless!
Remember, making stickers with Cricut is not only a fun and creative activity, but it also allows you to celebrate your unique style and express yourself. So why wait? Grab your Cricut machine and start turning your ideas into colorful and eye-catching stickers today!
Similar Posts
Looking for a printer that can handle laminating stickers with your Cricut? You’re in luck! Most printers can handle this task, usually between 6 and 8 inches wide. Just trim your sticker to the desired size, laminate it using a sticker-laminating machine, and you’re good to go!
If you’re concerned about shipping, don’t worry! There are many online retailers where you can purchase sticker laminating machines, with fast and reliable shipping options. Just make sure to check the return policy and customer reviews before making your purchase.
Not sure where to start with sticker laminating? Don’t worry, there are plenty of online tutorials and forums available to help guide you through the process. You’ll be a pro in no time!
Looking for customized stickers for a special event or celebration? There are plenty of online platforms where you can design and order personalized stickers. From holiday-themed stickers like Halloween or Easter, to personalized wedding or birthday stickers, the possibilities are endless!
When it comes to printable stickers for your Cricut, the options are vast. Many online platforms offer high-quality printable sticker designs that you can easily upload to your Cricut machine and cut. Plus, some platforms even offer free printable sticker designs!
If you’re looking to buy printable sticker designs in bulk, be sure to check for any discounts or coupon codes available. Buying in bulk can save you money, especially if you have multiple projects in mind.
Looking to add a personal touch to your laptop, water bottle, or any other items? Stickers are a great way to do just that! Use your Cricut to cut out personalized sticker designs and turn any ordinary item into a unique masterpiece.
Remember, sticker laminating not only protects your stickers from dust and wear but also gives them a glossy and professional finish. So, start exploring the world of sticker-making with your Cricut and let your creativity run wild!
|
|
DIY Flag Banner
Are you tired of the same old generic party decorations? Do you want something unique and personalized for your next event? Look no further than our DIY Flag Banner! With this simple and fun project, you can create your own custom flag banners to add a festive touch to any occasion.
Using your Cricut cutting machine and the stickers you laminated, this DIY Flag Banner allows you to showcase your creativity and celebrate in style. Whether you’re throwing a birthday party, hosting a holiday gathering, or just want to add a pop of color to your space, this project is perfect for you.
To make your own flag banner, follow these easy steps:
- Gather your materials: laminated stickers, string, scissors, and a hole punch.
- Cut out your flag shapes from the laminated stickers. You can choose different colors and designs to make your banner more visually appealing.
- Punch holes on the top corners of each flag.
- Cut a piece of string to your desired length, keeping in mind where you want to hang the banner.
- Thread the string through the holes of each flag, alternating colors and designs as you go.
- Hang your DIY Flag Banner and admire your handiwork!
This DIY Flag Banner is a great way to add a personal touch to your next event. You can use it for birthdays, weddings, baby showers, holidays, or any other special occasion you want to celebrate. It’s also a fun project to do with kids, allowing them to unleash their creativity and help you create something memorable.
What sets our DIY Flag Banner apart from similar products on the market is the customization it offers. By laminating your own stickers and designing your own flags, you have complete control over the look and feel of your banner. You can choose the colors, patterns, and even add your own text or graphics to make it truly one-of-a-kind.
At [Company Name], we strive to provide our customers with the best tools and resources to bring their creative visions to life. We offer a wide range of products and accessories for Cricut machines, including sticker laminating sheets, cutting mats, and more. Our dedicated customer support team is here to help you every step of the way, providing tips, tutorials, and troubleshooting assistance to ensure your success.
So why wait? Start making your own DIY Flag Banner today and impress your guests with your creativity and craftsmanship. Order now and enjoy fast shipping, hassle-free returns, and a 100% satisfaction guarantee. Don’t miss out on this opportunity to turn your party decorations into works of art!
All rights reserved © CT Flags and Banners Inc.
Computer Dust Cover
Are you tired of constantly cleaning your computer from accumulated dust and debris? Look no further! Introducing our printable Computer Dust Cover, the perfect solution to keep your valuable devices clean and protected.
With our easy-to-use spray, you can effortlessly laminate stickers cricut and create a durable barrier against dust and other particles. This innovative product is compatible with all printers and machines, making it an essential accessory for any computer owner.
Our Computer Dust Cover is made of high-quality materials that provide the ultimate armor for your devices. Its waterproof design ensures that your computer remains safe and protected, even in the most challenging environments. Say goodbye to dust-related malfunctions and hello to a reliable and efficient computer.
To celebrate the launch of our Computer Dust Cover, we are offering a special discount. Simply email us and mention the code “DUSTFREE” to receive a coupon for free shipping on your first order. Don’t miss this opportunity to save money and protect your computer.
If you’re a business owner, our Computer Dust Cover is also an excellent product to sell in your store. Customers are always in need of effective ways to keep their devices clean, and our dust cover will be a hit. Take advantage of this opportunity to increase your revenue and provide a valuable solution to your customers.
Not only is the Computer Dust Cover practical, but it also adds a touch of style to your workspace. With various designs to choose from, you can personalize your cover to reflect your unique taste. Whether you prefer a sleek minimalist design or a vibrant pattern, there’s a dust cover that suits your needs perfectly.
Still not convinced? Here are some tips from our satisfied customers:
- “I’ve been using the Computer Dust Cover for months now, and my computer has never been cleaner. It’s easy to install, and I love the added protection it provides.” – John S.
- “As a graphic designer, I’m always worried about dust damaging my equipment. The Computer Dust Cover gives me peace of mind and keeps my devices in top shape.” – Emily C.
- “I run a small printing business, and the Computer Dust Cover has been a game-changer. It helps maintain the quality of my prints and saves me time on cleaning.” – Mike T.
Don’t delay, give your computer the justice it deserves. Invest in a Computer Dust Cover today and keep your devices clean and protected. Don’t let dust and debris take up valuable space in your machine, order yours now!
Why I Do Not Celebrate Halloween
Every year, as the leaves turn shed and the weather begins to cool, the Halloween frenzy begins. But when it comes to celebrating this popular holiday, I choose to take a different path.
It’s not that I have anything against fun and creativity. In fact, as a DIY enthusiast and avid crafter, I love finding new and exciting ways to express my artistic side. From making stickers with my Cricut cutting machine to creating themed decorations for every holiday, I’m always looking for new ideas to enhance my creative space.
So what is it about Halloween that makes me want to skip the festivities? Well, it’s not just one thing – it’s a combination of factors that have led me to this decision.
First and foremost, I value the religious and cultural significance of other holidays, such as Easter, Christmas, and Thanksgiving. These holidays hold deep meaning for me and my family, and I prefer to focus my time and energy on celebrating and cherishing these important traditions.
Furthermore, the commercialization of Halloween has taken away some of the magic and charm that used to surround this holiday. It seems like every store is filled with Halloween-themed products, from spooky costumes to bulk bags of candy. The focus has shifted from creativity and imagination to consumerism and profit.
In addition, Halloween often promotes themes and characters that I find unsettling. From the horror movies that dominate the screens to the gremlins and monsters that adorn front yards, it’s just not something I find appealing. I prefer a more positive and uplifting atmosphere, which is why I choose to celebrate holidays that focus on love, joy, and gratitude.
Lastly, I must address the issue of safety. While Halloween can be a fun time for children and families, it can also present certain risks. From unsafe costumes to the potential for dangerous pranks, there are legitimate concerns that come with this holiday. As a parent, it’s important for me to prioritize the well-being and security of my loved ones.
So, while I understand the excitement and enjoyment that Halloween brings to many people, it’s just not the right fit for me. I choose to celebrate other holidays that align with my values and provide a meaningful and enriching experience for my family.
And as I continue to laminate stickers with my Cricut machine, make DIY decorations, and explore new creative ventures, I’m reminded of the power of choice. We all have the right to celebrate – or not celebrate – as we see fit.
Easter Themed Pine Cone Tree
Looking for a fun and festive Easter craft that can bring a touch of seasonal charm to your space? Look no further than our Easter Themed Pine Cone Tree! This easy DIY project is perfect for kids and adults alike, and it’s a great way to get creative while celebrating the holiday.
To make your own Easter Themed Pine Cone Tree, you’ll need just a few supplies:
- Pine cones – gather them from your backyard or purchase them online
- Acrylic paint in various Easter-themed colors
- Paintbrushes
- Easter-themed stickers
- A small pot or vase
- Scissors
Start by painting the pine cones with the acrylic paint. You can get creative with different colors and designs. Once the paint is dry, you can start adding the Easter-themed stickers to your pine cones. The stickers will give your tree a festive touch and make it stand out.
Next, find a small pot or vase to use as the base of your tree. Fill it with soil or sand to keep the pine cones standing upright. You can also add some decorative Easter-themed elements, such as plastic eggs or mini bunny figurines, to enhance the festive feel.
Place the painted and stickered pine cones in the pot or vase, arranging them in a tree-like shape. You can stack them from largest to smallest or mix it up for a more eclectic look. The choices are endless, so get creative and have fun decorating your Easter Themed Pine Cone Tree!
Remember, this project is not only a fun activity for the family, but it also serves as a unique decorative piece for your Easter celebrations. You can display it on your table, mantle, or any other surface that needs a festive touch. Your guests will surely be impressed by your creativity and attention to detail.
So, why wait? Start making your own Easter Themed Pine Cone Tree today and bring the spirit of the holiday into your home. Don’t forget to share your creations with us on social media using the hashtag #EasterCrafts. We can’t wait to see what you come up with!
Painting the Shed Trim
When it comes to renovating your shed, painting the trim can make a huge difference in its overall appearance. Whether you want to refresh the existing color or go for a completely new look, adding a fresh coat of paint to the shed trim can give it a polished and finished look.
Here are some tips and tricks on how to paint the shed trim like a pro:
- Clean the surface: Before starting the painting process, make sure to clean the shed trim properly. Remove any dust, dirt, or cobwebs using a soft-bristle brush or a damp cloth. This will ensure that the paint adheres well to the surface.
- Choose the right paint: When selecting the paint for your shed trim, opt for a high-quality exterior paint that is waterproof and resistant to weather conditions. This will ensure that the paint lasts longer and withstands the elements.
- Prepare the area: Protect the surrounding areas by covering them with a drop cloth or plastic sheeting. This will prevent any accidental spills or splatters on the walls or the ground. Additionally, tape off any areas that you do not want to paint, such as windows or doors.
- Prime the trim: If your shed trim is made of bare wood or has an existing dark color, it is recommended to apply a primer before painting. This will create a smooth base and help the paint adhere better. Follow the manufacturer’s instructions for the specific primer you are using.
- Use a brush or a sprayer: Depending on your preference and the size of the shed trim, you can either use a paintbrush or a sprayer to apply the paint. A brush is usually recommended for smaller, intricate areas, while a sprayer can be more efficient for larger surfaces.
- Apply multiple coats: To achieve a smooth and even finish, it is often necessary to apply multiple coats of paint. Allow each coat to dry completely before applying the next one. This will ensure a professional-looking result.
- Finish with a topcoat: Once you have applied the desired number of paint coats, consider finishing the shed trim with a clear topcoat. This will provide an extra layer of protection and help prolong the life of the paint.
By following these steps, you can easily paint your shed trim and transform the overall look of your outdoor space. Whether you’re going for a classic and timeless look or want to add a pop of color, painting the shed trim is a DIY project that anyone can tackle.
Armor of God Birthday Party Ideas
Are you looking for a unique and meaningful theme for your next birthday party? Look no further than an “Armor of God” party! This theme is perfect for both boys and girls, and it teaches important lessons about faith and spiritual warfare.
Here are some ideas to help you plan a memorable Armor of God birthday party:
Invitations: Design invitations that resemble a suit of armor. Include a Bible verse about spiritual armor, such as Ephesians 6:11 – “Put on the full armor of God, so that you can take your stand against the devil’s schemes.”
Decorations: Create a battlefield atmosphere by using camouflage and military-inspired decorations. Hang a banner that says “Armor of God Birthday Party” and display pictures of armor and shields on the walls. You can also add balloons in the colors of the spiritual armor – red, orange, yellow, green, blue, and purple.
Activities: Plan interactive activities that promote the idea of spiritual warfare. Set up an obstacle course where kids have to navigate through “enemy territory” (obstacles) while wearing armor. You can also have a “sword training” station where kids learn about the Sword of the Spirit (the Word of God).
Games: Play games that reinforce the theme of spiritual armor. For example, you can have a “Shield Wall” game where kids have to work together to protect each other by holding a large shield. Another game idea is “Armor of God Bingo” where kids have to match pictures of the various armor pieces on their bingo cards.
Party Favors: Send kids home with their own mini armor set. You can create stickers or temporary tattoos with the Armor of God logo and include them in a goodie bag along with other themed items, such as small toy swords or mini Bibles.
Food and Drinks: Serve food items that tie in with the theme. For example, you can have “Chicken Warrior Nuggets” or “Armor-shaped Sandwiches”. For drinks, consider serving “Living Water” (water bottles with personalized labels) or “Warrior Juice” (fruit punch).
Cake: Get a custom cake made in the shape of a suit of armor or a shield. You can also order a standard cake and use edible cake toppers or decorations that feature the Armor of God characters.
Party Music: Create a playlist of songs that have spiritual themes or mention the Armor of God. Songs like “Onward Christian Soldiers” and “Our God” by Chris Tomlin are great choices.
Conclusion: An Armor of God birthday party is a unique and educational way to celebrate your child’s special day. It’s an opportunity to teach kids about their spiritual identity and the importance of putting on the full armor of God. Don’t miss out on this exciting party theme!


