

Whether you’re tired of the same old hoodie designs or you want to save some money by creating your own, making a hoodie from scratch can be a fun and rewarding project. With just a few yards of material and some basic sewing skills, you can create a cozy and stylish sweatshirt that will keep you warm all winter long. In this post, we’ll walk you through the process of making your own hoodie, from choosing the right fabric to adding the finishing touches.
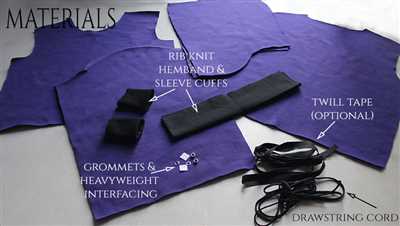
To start, you’ll need to gather your materials. Look for a fleecy or blend fabric that will provide both comfort and warmth. Polyester blends are a popular choice because they’re easy to care for and they hold their shape well. You’ll also want to pick up some ribbing for the cuffs, bottom, and neckline, as well as a drawstring if you want to add a hood.
Once you have your materials, it’s time to get started. Begin by cutting out the pieces for your hoodie. You’ll need a front and back piece, two sleeves, and a hood if you’re adding one. Make sure to follow the pattern or measurements carefully, as this will determine the fit of your hoodie.
Next, you’ll want to sew the pieces together. Start by sewing the shoulder seams and then attach the sleeves. Once the sleeves are in place, you can sew up the side seams and add the ribbing to the cuffs and bottom of the hoodie. This will give your hoodie a more finished look and help it keep its shape.
If you’re adding a hood, now is the time to attach it. Carefully sew the hood to the neckline, making sure to line up the seams. You can also add a drawstring to the hood if you like.
The last step is to add any finishing touches, such as pockets or a zipper. Pockets are a convenient and stylish addition to any hoodie, and they can be easily sewn onto the front of your hoodie. If you’re adding a zipper, make sure to sew it in carefully, taking your time to ensure that it’s straight and centered.
Once all the sewing is done, give your hoodie a good press to set the seams and give it a polished look. Now you’re ready to rock your new creation! Pair your hoodie with jeans or joggers for a casual and complete outfit that’s perfect for everyday wear.
In conclusion, making your own hoodie is a great way to get a unique and personalized piece of clothing. It allows you to express your creativity and have a one-of-a-kind garment that no one else will have. So why not give it a try? Follow the steps outlined above, and you’ll be well on your way to creating a warm and stylish hoodie that you can be proud of.
The Official Hoodie Tutorial
If you’re looking to make your own hoodie, you’re in luck! With a few simple steps, you can have a warm and stylish hoodie that’s perfect for any occasion. Whether you want a classic zip-up style or a trendy pullover, this tutorial will guide you through the process.
Step 1: Get your materials together
- Choose a fabric that is recommended for hoodies. You can find a wide variety of colors and styles at your local fabric store.
- Measure your body to determine the sizing for your hoodie. Make sure to account for any extra room you want for comfort.
- Get all the necessary supplies, including fabric, thread, a sewing machine, and a zipper or drawstring if desired.
Step 2: Cut the fabric
Carefully fold your fabric in half, making sure the right sides are facing each other. Use a straight edge to cut out the pieces for your hoodie, according to the pattern or measurements you have. Be sure to leave extra fabric for seam allowance.
Step 3: Assembling the hoodie
With right sides together, sew the pieces of the hoodie together using a sewing machine or a serger. Make sure to follow the pattern or instructions carefully. Don’t forget to leave a hole for the zipper or drawstring if applicable.
Step 4: Add the finishing touches
Once the main parts of the hoodie are sewn together, you can add pockets, cuffs, or other details as desired. Topstitching along the seams not only adds a professional touch but also helps to keep the fabric flat and prevents it from curling.
Step 5: Zip-up or drawstring?
If you’re adding a zipper, carefully measure and sew it in place. If you prefer a drawstring, thread it through the hole and tie a knot at each end to keep it secure.
Step 6: Enjoy your new hoodie
Once all the sewing is done, give your hoodie a good press with an iron, and it’s ready to wear! Whether you made it for yourself or as a gift, you can be proud of the high-quality and stylish hoodie you’ve created.
Remember to check the care instructions for the fabric you used. Some fabrics may require special washing or drying methods to ensure they last. With proper care, your hoodie will keep you warm and fashionable for years to come!
We hope this tutorial has been helpful in guiding you through the process of making your own hoodie. Now it’s time to get to work and create a hoodie that’s unique to your style and preferences. Good luck!
Step 1: Pick a Hoodie From Our Catalog
Before you start making a hoodie, you need to choose the perfect one from our extensive catalog. We offer a wide range of options, so take your time to find the hoodie that suits your needs and style.
First, decide on the type of hoodie you want. We have unisex hoodies that are suitable for everyone, as well as hoodies specifically designed for men or women. Consider the comfort, fit, and style of the hoodie before making your selection.
Next, verify the measurements provided in our catalog. It’s essential to ensure that the hoodie you choose will fit you perfectly. To do this, take your own measurements using a measuring tape. Pay attention to the chest size, sleeve length, and hoodie length. Don’t forget to consider whether you want a loose fit or a more fitted style.
Once you have chosen a hoodie, it’s time to consider the design details. Are you looking for a hoodie with a zip or a pullover style? Do you prefer a hood with drawstrings or without? Take a close look at the pictures and descriptions to make sure the hoodie has all the features you desire.
Also, consider the material of the hoodie. We offer a variety of options, including cotton, polyester, and fleece blends. Depending on your needs, you may want a hoodie that is warm and cozy or one that is lightweight and breathable.
Our hoodies come in various colors and patterns. From classic plain colors to all-over prints, we have something for everyone. Choose a color or pattern that suits your personal style and preference.
Lastly, don’t forget to read the washing instructions for each hoodie. Some hoodies can be machine-washed, while others need to be hand-washed or dry-cleaned. Following the recommended care instructions will ensure that your hoodie stays in good condition for a long time.
Once you have found the perfect hoodie, add it to your cart and proceed to the next step. With our wide selection and easy-to-navigate catalog, finding the right hoodie has never been easier.
Unisex Hoodie
If you’re in the market for a stylish and comfortable hoodie, look no further than our unisex hoodie. With its multicolored options and versatile design, it’s a perfect solution for both men and women. Whether you’re planning on wearing it to a casual outing or just lounging around at home, this hoodie is a must-have addition to your wardrobe.
Our unisex hoodie is made from a high-quality blend of polyester and cotton, ensuring that it’s both soft and durable. The material is also warm, making it ideal for those cooler days and nights. You’ll find it comfortable and cozy, with the added bonus of being able to express your personal style.
When it comes to making your hoodie, we’ve got you covered. Here are the steps you’ll need to follow:
- Gather your materials: You’ll need several yards of fabric in the color or colors of your choice, as well as a drawstring, thread, and a sewing machine.
- Prepare the fabric: Lay the fabric flat and fold it in half, with the right sides together. Pin the pattern pieces in place, making sure to leave room for seam allowances.
- Cut out the pieces: Carefully cut along the pattern lines, cutting through both layers of fabric. This will give you the front and back pieces of your hoodie.
- Sew the shoulder seams: With right sides together, pin the shoulder seams and sew them using a straight stitch.
- Add the sleeves: Pin the sleeves to the armholes, right sides together, and sew them in place.
- Construct the hood: Pin the hood pieces together, right sides together, and sew along the curved edge.
- Attach the hood: Pin the hood to the neckline of the hoodie, making sure the seam lines up with the center back. Sew along the edge to attach the hood.
- Add the drawstring: If desired, you can add a drawstring to the hood by creating a small hole on each side using a seam ripper. Thread the drawstring through the holes and tie the ends together.
- Finish the seams: Use a serger or a zigzag stitch to finish the raw edges of the seams, preventing fraying.
- Try it on: Once you’ve completed all the steps, try on your hoodie and make any necessary adjustments for fit.
Now that you know how to make a unisex hoodie, it’s time to find the perfect material and colors for your new sweatshirt. You can pick from our wide range of options, including solid colors or multicolored prints. Don’t forget to browse our official catalog pages for more inspiration and instructions.
When it comes to washing your new hoodie, follow the instructions on the product pages. This will ensure that it stays in good condition and lasts for a long time. With proper care, your hoodie will look and feel great, whether you’re wearing it for a casual day out or a cozy night in.
Don’t wait any longer – step up your wardrobe game and make yourself a fabulous unisex hoodie today!
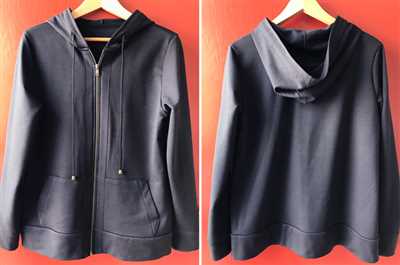
Zip Hoodie
If you’re looking for an easy and stylish hoodie to make, a zip hoodie is a great choice. Zip hoodies are unisex and popular for everyday wear. In this tutorial, we will show you how to make a zip hoodie step by step.
First, gather all the materials you will need: fabric (fleecy or multicolored), zipper, thread, and a sewing machine. Measure and cut the fabric carefully into the pieces you’ll need for the hoodie, including the front, back, sleeves, and hood.
Verify the measurements and pin the pieces together. Sew the seams together using a straight stitch, making sure to keep the right sides of the fabric facing each other. Then, fold the seam allowances down and press with an iron to create a neater finish.
Next, sew the shoulder seams together and attach the sleeves. Pin the sleeves in place, aligning the top of the sleeve with the shoulder seam, and sew them in. Repeat this step for both sleeves.
Once the sleeves are attached, it’s time to add the zipper. Open the zipper and pin it to the front of the hoodie, making sure it aligns with the center front. Sew the zipper in place using a zipper foot attachment on your sewing machine.
After the zipper is attached, sew the side seams from the bottom of the hoodie to the end of the sleeves. This will create the basic shape of the hoodie.
Now it’s time to add the hood. Pin the hood to the neckline of the hoodie, aligning the center of the hood with the center back of the hoodie. Sew the hood in place, making sure to catch all layers of fabric.
Finally, add any additional details like pockets or printed designs. You can sew pockets onto the front of the hoodie or add unique printed designs to make your hoodie more personalized.
Once all the steps are complete, you can try on your new zip hoodie. It’s important to wash and care for your hoodie properly to ensure its longevity. Make sure to follow the washing instructions and keep it away from direct heat sources.
We hope this tutorial has been helpful in guiding you through the process of making a zip hoodie. Whether you’re making one for yourself, your kids, or as a gift, a zip hoodie is a comfortable and versatile piece of clothing that can be worn by anyone.
Crop Hoodie
A crop hoodie is a popular style of hoodie that is shorter in length, typically ending above the waist. It offers a trendy and unique look that can be perfect for creating a stylish outfit. If you want to make your own crop hoodie, follow these steps:
1. Pick a hoodie: Start by choosing a hoodie that you like. Whether you have an old one lying around or find a good option at a store, make sure it is in good condition and has a style that you like.
2. Wash and iron: Before you start working on your hoodie, wash and iron it to ensure that it is clean and free of wrinkles. This will make it easier to work with and ensure that your end product looks neat.
3. Measure and mark: Put the hoodie on and decide how short you want it to be. Use a fabric marker or pins to mark the desired length. Keep in mind that you can always cut off more later, but you cannot add fabric back, so start with a longer length if you’re unsure.
4. Crop the hoodie: Take off the hoodie and lay it flat on a table. Using fabric scissors, carefully cut along the marked line to crop the hoodie to your desired length. Take your time and make sure you cut in a straight line.
5. Finish the edges: If the edges of your fabric are fraying, you can use a serger or a zigzag stitch on your sewing machine to finish the raw edges and prevent further fraying. This step is optional but can give a more professional finish to your hoodie.
6. Hem the bottom: Fold the raw edge of the fabric up about 1/2 inch and pin it in place. Then, use a straight stitch on your sewing machine to sew along the folded edge, creating a clean hem. This will give a finished look to the bottom of your hoodie.
7. Try it on and make adjustments: Once you have hemmed the bottom, try the hoodie on to see if you are happy with the length. If you want it shorter, simply repeat the cutting and hemming process until you get your desired cropped length.
8. Optional additions: If you want to add extra style to your crop hoodie, you can consider adding details like drawstring at the waist, pockets on the front, or a zipper down the center. Depending on your sewing skills and available materials, you can get creative with these options.
9. Show off your unique creation: Once you are satisfied with your crop hoodie, show it off! Wear it with high-waisted jeans or skirts for a trendy look. Pair it with a printed t-shirt underneath for an even more unique style. Take photos and post them on your social media to share your creativity with others.
Remember: Making your own crop hoodie is a fun and easy DIY project! Get creative with color, fabric, and style options to create a hoodie that is perfect for your personal taste. Whether you’re making it for yourself or as a gift, enjoy the process of designing and sewing your very own unique hoodie.
And there you have it – a step-by-step guide on how to make a crop hoodie!
Kids Hoodie
If you’re looking to make a stylish and comfortable hoodie for your kids, you’ve come to the right place! Making a kids hoodie is a fun and easy project that will result in a versatile piece of clothing that your child will love to wear on an everyday basis.
First, you’ll need to find a good pattern for your kids hoodie. There are many options available, so take your time to browse through catalogs or look online to find the perfect one. Make sure to choose a pattern that is in the right sizing for your child, so they have enough room to move and grow.
Once you have your pattern, it’s time to gather all the materials you’ll need. You’ll need fabric in the color or print of your choice, ribbing for the cuffs and waistband, a zipper for the front opening (optional), and any other notions like drawstring cords or pockets that you want to add to your hoodie.
Next, carefully cut out all the pieces according to the pattern instructions. Be sure to pin the pattern to the fabric before cutting to ensure accurate sizing and avoid any mishaps. Once everything is cut, it’s time to start assembling the hoodie.
Begin by sewing the front and back pieces together at the shoulder seams. Then, attach the sleeves to the body, making sure to line up the seams. Once the sleeves are attached, it’s time to sew the side seams and the ribbing to the cuffs and waistband.
If you’re using a zipper, you’ll need to carefully sew it in place on the front opening, making sure it’s centered and lies flat. If you’re not using a zipper, don’t forget to sew up the front opening to complete the hoodie.
Next, hem the bottom of the hoodie and sew in the ribbing for the cuffs and waistband. This will give the hoodie a finished look and make it more comfortable to wear. You can also add pockets or any other additional details at this step.
Finally, give your hoodie a good press with an iron to make everything look neat and tidy. Verify that all seams are stitched well and the hoodie is ready for wear. Now it’s time to style it according to your kid’s preferences and enjoy their new hoodie!
Carefully follow these steps, and soon you’ll have a complete kids hoodie that will keep them warm and stylish. Don’t forget to check the washing instructions for your fabric – most hoodies made from polyester or a blend will tolerate machine washing, but it’s always good to double-check.
Now that you know how to make a kids hoodie, let’s get started! Click the link above to find a pattern that suits your needs and get sewing. We hope you and your child have fun making the hoodie together and that they enjoy wearing it for a long time!
Pattern Printing Instructions For Sewing A Hoodie
When it comes to sewing a hoodie, having a pattern is essential. It guides you in creating a well-fitted and stylish garment. Follow these instructions to print and assemble your hoodie pattern:
- Verify that your printer settings are set to the recommended settings to ensure accurate pattern printing.
- Pick the size of the hoodie pattern that corresponds to your body measurements. This is important for a good fit.
- Make sure you have enough fabric for your hoodie. Unisex hoodies typically require around 2-3 yards of fabric.
- Before printing, double-check that you have enough ink in your printer. You don’t want the pattern to fade or cut off midway.
- Click on the provided link to download the hoodie pattern. Save it to your computer and open it using a PDF viewer.
- Print the pattern on letter-sized or A4 paper, making sure to select the “actual size” or “100% scale” option. This ensures that the pattern pieces are printed to the correct dimensions.
- Once printed, check the dimensions of the pattern pieces with a ruler or measuring tape to make sure they match the measurements provided in the pattern instructions.
- Next, cut out the pattern pieces along the designated lines. Be careful to cut precisely and smoothly for accurate assembly.
- With your fabric spread out flat on a large working surface, place the pattern pieces on top, aligning them according to the instructions provided.
- Pin the pattern pieces to the fabric to secure them in place, making sure to keep the pins to the right side of the fabric.
- Using a fabric marker or tailor’s chalk, trace around the pattern pieces onto the fabric. This will serve as your sewing guide.
- Remove the pattern pieces and set them aside. You can now see the outline of your hoodie on the fabric.
- Follow the sewing tutorial that accompanies the pattern to sew the hoodie together. Pay close attention to the order of steps and any specific instructions for your chosen style.
- Don’t forget to add any ribbing, drawstring, or zipper if your hoodie design includes them. These details can enhance the overall look of your hoodie.
- Once the sewing is complete, try on the hoodie to verify that it fits well and looks as expected. Make any necessary adjustments to the fit if needed.
- Finally, wash and dry the hoodie according to the fabric care instructions. This will ensure that it lasts longer and retains its shape and color.
Following these pattern printing and sewing instructions will help you create a unique and well-fitting hoodie that suits your style and needs. Enjoy your new hoodie!
Verify Everything Is Lined Up and Cut
Before you start assembling your hoodie, it’s important to make sure that all the pieces are lined up correctly and accurately cut. This step is crucial to ensure that the final product looks perfect and professional.
Firstly, double-check that the front and back pieces of the hoodie are cut in the right size and shape. Use a tape measure to verify that the dimensions match the sizing chart or template you’re working from. Make sure the sleeves are also cut according to the desired length.
If you’re adding pockets to your hoodie, make sure that the pocket pieces are also cut accurately. Check that they match in size and shape and are symmetrical when placed on both sides of the hoodie.
Next, verify that the ribbing pieces for the cuffs, waistband, and hood are the correct length. They should fit snugly but not be too tight. You can use a measuring tape to ensure the right size. Remember to cut them slightly shorter than the corresponding edge they’ll be sewn onto to allow for stretching.
For zip-up hoodies, check that the zipper is the right length and color. Take into consideration the style and tone you want for your hoodie and pick a zipper that matches accordingly. If you’re going for a unique look, you could choose a contrasting zipper for a bold pop of color.
Finally, make sure all the pieces are straight and free of any fray or loose threads. Use scissors or a serger to clean up any uneven edges or loose threads before you start assembling the hoodie. This will give your hoodie a clean and polished finish.
In addition, if your hoodie features any graphics or prints, double-check that they’re lined up properly. If you’re using all-over printing or embroidery, make sure the pattern or design is centered and looks even on both sides.
Once you’ve verified everything, you can start pinning the pieces together for sewing. Pinning will help keep everything in place and ensure that it won’t shift while you’re sewing. Remember to pin carefully, making sure to align all the edges and corners.
By taking the time to verify everything is lined up and cut properly, you’ll be one step closer to creating a high-quality hoodie that looks and feels great. Attention to detail is key in making your hoodie, so don’t forget to measure, double-check, and triple-check before you start sewing!
HOW TO FADE A SWEATSHIRT
Fading a sweatshirt is an easy way to give it a stylish and worn-in look. Whether you want to achieve a faded vintage aesthetic or just want to create a unique design, fading a sweatshirt is easier than you might think. In this guide, we’ll walk you through the steps to fade your sweatshirt and achieve the perfect look.
Step 1: Prep your sweatshirt
Before you start fading your sweatshirt, make sure it’s clean and dry. This will ensure that the fading process applies evenly. Also, check the care instructions label to verify if fading is suitable for the specific fabric of your sweatshirt.
Step 2: Create your fade design
Decide on the specific fade design you want to achieve. You can opt for a gradient effect with a lighter tone at the top and a darker tone at the bottom, or you can fade specific areas of the sweatshirt. The choice is yours! Use this opportunity to let your creativity shine.
Step 3: Gather your materials
You’ll need a few materials to fade your sweatshirt, including fabric dye, a large bucket or basin, hot water, gloves, and a stir stick. Make sure you have everything you need before you start the fading process.
Step 4: Mix the dye
Follow the instructions on the fabric dye to mix it properly. Most fabric dyes require hot water, so be sure to use gloves and exercise caution during this step. Mix the dye until it reaches the desired color.
Step 5: Start the fading process
Place your sweatshirt into the dye mixture, making sure that the areas you want to fade are submerged in the dye. Leave it in the dye for the recommended amount of time to achieve the desired fade effect. Check the dye manufacturer’s instructions for specific timing.
Step 6: Rinse and wash
Once the desired fade is achieved, rinse your sweatshirt with cold water until the water runs clear. Then, wash your sweatshirt with cold water and a mild detergent to remove any excess dye. Follow the care instructions for washing to maintain the fade effect.
Step 7: Enjoy your faded sweatshirt
Once your sweatshirt is dry, it’s time to enjoy your newly faded creation. Wear it with pride, as you have just completed an easy and trendy DIY project!
Remember, fading a sweatshirt is a popular technique that can give your garment a unique and stylish look. From vintage-inspired fades to custom designs, the possibilities are endless. So, let your creativity take over and start fading your sweatshirt today!


