

If you don’t like the background of your photos and want to make them transparent, we’ve got you covered. In this tutorial, we will show you 7 simple steps to create transparent areas in your pictures using various image editors. Whether you prefer doing it manually or with the help of online programs, we have a method that will work for you.
Method 1: Using an Online Editor
If you’re not familiar with image editing software or just want a quick solution, using an online editor might be the best option. One of the most popular online editors is Publisher, which allows you to upload your pictures and remove the background with just a few clicks. All you need to do is open the editor, upload your file, pick the areas you want to make transparent using the eraser tool, and save the image in a file format that supports transparency, such as PNG.
Method 2: Using Image Editors
If you’re more comfortable using image editing software like GIMP or Photoshop, you can follow these steps to make your pics transparent:
Step 1: Open your image in the image editor of your choice.
Step 2: Select the part of the image you want to make transparent. You can use the lasso tool to manually draw around the area, or you can use the magic wand tool to automatically select the background.
Step 3: Once you have the desired area selected, press the delete or backspace key on your keyboard to remove the selected part.
Step 4: Check if the removed background is transparent. If not, use the eraser tool to manually remove any remaining unwanted parts.
Step 5: Save your edited image in a file format that supports transparency, such as PNG.
By following these simple methods, you’ll be able to make your pics transparent in no time. Whether you choose to use an online editor for a quick and easy solution or prefer to tweak the background manually in image editors, the end result will be a picture with a transparent background that you can use for various purposes.
- How to Make a Picture Transparent on PowerPoint
- Make a Picture Transparent in PowerPoint
- How to Make an Image Transparent on Word
- Step 1: Add the Image to Microsoft Word
- Step 2: Double Click on The Image
- Step 3 Choose ‘Remove Background’
- Step 4: Remove Background or Make Part of Image Transparent
- Step 5 Change Transparency of The Image
- Step 6: Save File As Image
- Make Background Transparent
- How to Make an Image Background Transparent
- Part 1: Using Online Image Editors
- Part 2: Manual Removal with Image Editors
- Way 1 Turn a Photo Background Transparent in PhotoWorks
- Way 2 Make Transparent Background with Paint
- Way 3 Remove a Photo Background in PowerPoint
- Way 4: Create Transparent Background in Photoshop
- Way 5 Erase a Photo Background in Publisher
- Way 6: Make a Transparent Background in GIMP
- Way 7: Turn a Photo Background Transparent Online
- Video:
- Clear Ketchup
How to Make a Picture Transparent on PowerPoint
If you are working with PowerPoint and need to make a picture transparent, there are several methods you can use to achieve this effect. This guide will walk you through a simple way to make a picture transparent in PowerPoint.
Step 1: Open PowerPoint and create a new slide or open an existing PowerPoint file.
Step 2: Insert the picture into the slide by clicking on the ‘Insert’ tab on the top toolbar, then selecting ‘Pictures’ from the dropdown menu. Navigate to the location where your picture is saved, select it, and click on the ‘Insert’ button.
Step 3: With the picture selected, click on the ‘Format’ tab on the top toolbar. In the ‘Adjust’ group, click on the ‘Color’ option.
Step 4: In the ‘Color’ menu, click on the dropdown arrow next to ‘Recolor’, then select ‘Set Transparent Color’ from the options.
Step 5: The cursor will turn into a crosshair. Click on the color in the picture that you want to make transparent. You can also press the ‘Ctrl’ key on your keyboard and click on multiple areas of the picture to select different colors to be made transparent.
Step 6: Immediately after choosing the color, you will see that portion of the picture become transparent. You can repeat this process for other areas of the picture if needed.
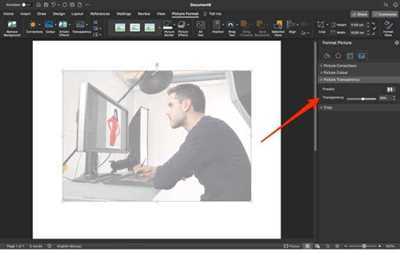
Step 7: To fine-tune the transparency, right-click on the picture and select ‘Format Picture’ from the dropdown menu.
Step 8: In the ‘Format Picture’ pane that appears on the right side of the screen, click on the ‘Picture’ icon at the top, then adjust the ‘Transparency’ slider to increase or decrease the amount of transparency. You can also type in a specific transparency percentage if desired.
Step 9: Once you have achieved the desired level of transparency, click on the ‘Close’ icon at the top right corner of the ‘Format Picture’ pane to close it.
Step 10: You can now move and resize the picture as needed on your PowerPoint slide. The transparent parts of the picture will blend with the background, giving you a professional and visually appealing design.
By following these steps, you can easily make a picture transparent in PowerPoint without the need for any external image editing software. If you would rather use a separate image editor or have more advanced editing options, there are other methods you can explore. Some popular image editors you can use include Adobe Photoshop, GIMP, and Paint.net. However, these methods may require more time and expertise.
PowerPoint offers a simple and user-friendly way to edit images and create transparent effects directly within the program. This makes it a convenient option for both beginners and those familiar with image editing.
Remember, when working with transparency, it’s important to choose the right colors and create a visually appealing design. Keep in mind that adding too much transparency can make the image hard to see, so it’s best to use transparent effects sparingly and with caution.
Make a Picture Transparent in PowerPoint
PowerPoint is a powerful tool for creating presentations, and one feature that can add a professional touch to your slides is the ability to make pictures transparent. This can be particularly useful if you want to overlay text or other images on top of a background picture, or if you simply want to create a more visually interesting slide.
There are several ways to make a picture transparent in PowerPoint, and I’ll show you two methods in this tutorial. The first method is quick and easy, while the second method offers more control over the transparency level.
Method 1: Using the Picture Tools
To make a picture transparent using the Picture Tools in PowerPoint, follow these steps:
- Select the picture you want to make transparent.
- In the Picture Tools tab that appears on the ribbon, click on the “Format” tab.
- Click on the “Color” dropdown menu in the Adjust group, and then select “Set Transparent Color”.
- Click on the color in the picture that you want to make transparent.
- The selected color will now be transparent. You can adjust the transparency level using the “Transparency” slider in the Format Picture pane.
- When you’re done, click on the “Close” button in the Format Picture pane to apply the changes.
- Save your PowerPoint presentation to keep the transparent picture.
Method 2: Using a Background Removal Tool
If you want more control over the transparency level or if you have a complex background, you can use a background removal tool. There are several software programs available, such as Adobe Photoshop or GIMP, that offer this functionality. Alternatively, you can use online tools like remove.bg to quickly remove the background from your images.
- Open the image in your preferred image editing software or online tool.
- Use the available tools to remove the background and make it transparent.
- Save the image with a transparent background.
- In PowerPoint, go to the slide where you want to insert the transparent picture.
- Click on the “Insert” tab, and then choose “Pictures” from the Images group.
- Select the transparent picture file from your computer.
- Click on the “Insert” button to place the picture on the slide.
- You can now resize and drag the picture to the desired location. If needed, you can also further tweak the image using PowerPoint’s built-in image editor.
By following these methods, you can easily make a picture transparent in PowerPoint and enhance your presentations with visually appealing images. Whether you prefer the quick and easy method or the more manual approach, the choice is yours. Experiment with different transparency levels and color combinations to find the right look for your slides. Have fun and get creative!
How to Make an Image Transparent on Word
If you use Microsoft Word for creating various documents, presentations, or slide decks, you might come across a situation where you want to make an image transparent. This can be helpful when you want to place an image on top of another element or give it a backdrop without distracting from the main focus.
While some image editors like Photoshop or Publisher offer automatic transparency effects, Word also provides a simple way to achieve this. Follow these steps to make an image transparent in Word:
Method 1: Manual Transparency
1. Open Word and insert the image you want to make transparent by going to the Insert tab and selecting Picture. Choose the image from your computer or the web.
2. With the image selected, you will see a new “Picture Format” tab in the menu. Click on it.
3. In the “Picture Format” tab, locate the “Color” section and click on the “Recolor” button.
4. A drop-down menu will appear, giving you various options to change the colors of the image. Choose “Set Transparent Color” from the list.
5. When you hover your mouse over the image, you will notice that it changes to a “+” sign. Click on the part of the image that you want to make transparent.
6. Word will automatically remove the background and make the selected area transparent.
7. If you want to tweak the level of transparency, you can double-click on the image again, go to the “Picture Format” tab, and adjust the “Transparency” slider.
Method 2: Using an Image Background Removal Tool
If you prefer a more automated approach, you can use various online tools or image editing software like Photoshop, GIMP, or PhotoWorks to remove the background and make the image transparent. Some popular online tools include Remove.bg and EditPhotosForFree.
These editors provide an intuitive and easy way to get transparent images. Just upload the photo you want to edit, and they will automatically remove the background, giving you a transparent image. From there, you can save it and place it into Word without any issues.
Keep in mind that these methods will only work with images, not other elements like text or shapes. If you want to make text transparent in Word, it’s suggested to use a text box and apply transparency effects to it instead.
Now you know how to create transparent images in Word using both manual and automatic methods. Pick the one that suits your needs and start giving your documents a professional touch!
Step 1: Add the Image to Microsoft Word
To begin the process of making a picture transparent, you will first need to add the image to Microsoft Word. Here’s how you can do it:
- Open Microsoft Word on your computer. If you don’t have it installed, you can download it from the Microsoft website.
- Click on the “Insert” tab at the top of the Word window. This will open a toolbar with various options for adding objects to your document.
- On the right side of the toolbar, click on the “Pictures” option. This will open a dialog box that allows you to search for and select the image file you want to make transparent.
- Navigate to the folder where your image is saved and select it. Then click on the “Insert” button at the bottom right corner of the dialog box. The image will now appear in your Word document.
Now that you have added the image to Microsoft Word, you can proceed to the next step to make it transparent.
Step 2: Double Click on The Image
Now that you have opened Microsoft Paint or any other image editor, the next step is to locate the image you want to make transparent. This can be an image you have saved on your computer or one that you have downloaded from the internet. You can also use an image from your PowerPoint presentation or any other online source.
To begin, open the image in your image editor by selecting “Open” from the File menu. Once the image is open, you will see it displayed on the editor’s canvas.
Double-click on the image to access its editing options. This step is essential as it allows you to access the tools and features needed to make the image transparent. When you double-click on the image, you will notice that some editing options appear, such as the ability to remove backgrounds, edit objects, add effects, and more.
In some image editors, like Microsoft Paint, you might only see a single button labeled “Edit,” “Image,” or “Format.” Clicking on this button will either save or ‘remove the background’ of the image, depending on the editor you are using. For more advanced editors, like Adobe Photoshop or GIMP, you might find a full range of editing options.
When you hover your cursor over the image, you will see a logo or some other indication that you have selected it. This selection is crucial because it allows you to apply changes specifically to the image rather than the entire canvas.
Double-clicking on the image should open a new tab, window, or separate section within the image editor, where you can work on the image and make it transparent. The exact design and layout of this section will vary depending on the image editor you are using, but most editors provide an intuitive interface that makes it easy to perform the required edits.
In this new section, you will find various tools and options to make the image transparent. Some editors provide a ‘Quick Selection’ tool that allows you to manually paint over the areas you want to keep or erase. Others offer a ‘Magic Wand’ tool that automatically selects similar parts of the image for removal.
Depending on the complexity of your image and the amount of control you want to have, you can choose the appropriate tool. For simple tweaks, you can use the ‘Quick Selection’ tool to pick and remove the background in just a few clicks. For more detailed edits, you can use the ‘Magic Wand’ tool and manually adjust the tolerance, strokes, size, and other settings to get the desired result.
Once you have made the necessary edits and achieved the desired level of transparency, you can save the image. Click on the “Save” or “Export” button to save the edited image as a new file. Make sure to choose a file name and location that you can remember for future reference.
And there you have it! You have successfully made your image transparent using an image editor. Now you can use this transparent image in your PowerPoint presentations, websites, or any other creative project!
Remember, practicing and experimenting with different image editors will give you a better understanding of how they work and what features they offer. Don’t be afraid to explore and try out new tools and effects to make your images stand out!
Step 3 Choose ‘Remove Background’
Once you have your image opened in a photo editor or program of your choice, you can start the process of making it transparent. There are various methods and tools available for removing the background from an image, but in this step, we will focus on using the ‘Remove Background’ option.
If you are working in Microsoft PowerPoint, Paint, or any other similar program, you might not have the automatic ‘Remove Background’ option. In such cases, you will need to manually edit the image using other methods.
But most full-fledged photo editors will have this intuitive feature. Here are the steps:
- Open your image in the photo editor.
- Find the ‘Remove Background’ option. It might be listed under the ‘Edit’ or ‘Image’ section, depending on the program you are using. In some editors, it may be a separate tool.
- Choose the ‘Remove Background’ option. This will automatically detect and select the background of your image.
- Tweak the selection if needed. The editor might not always select the exact areas you want to remove. In that case, you can manually change and separate the foreground and background using the eraser or other tools.
- Check the preview to see how your image looks without the background. Make any necessary adjustments to ensure the transparency is applied correctly.
- Save your file. Remember to save the image in a format that supports transparency, such as PNG or GIF.
By following these steps, you can easily remove the background from your image and make it transparent. This is a great option if you want to add your logo or any other object to different backgrounds without any unwanted backdrop. Just keep in mind that some programs or online editors may have limitations on the amount of free features they offer, so be sure to choose a suitable editor for your needs.
Step 4: Remove Background or Make Part of Image Transparent
Now that you have selected the area you want to make transparent, you can proceed to remove the background or make that part of the image transparent using various methods and tools. Here are a few options:
1. Photoshop or Similar Programs: If you have access to software like Adobe Photoshop or other similar programs, you can easily remove the background or make part of an image transparent. After opening the image file in the software, use the selection tool (e.g., lasso tool or magic wand tool) to select the area you want to make transparent. Then, simply press the ‘Delete’ button or use the eraser tool to remove the background or make the selected part transparent.
2. Manual Method: If you prefer a more manual approach, you can use software like Microsoft Paint or any image editing package. Open the image file in the program, and then select the ‘Eraser’ tool from the toolbar. Adjust the eraser size if needed, and then use the eraser tool to manually remove the background or make the selected part transparent.
3. Automatic Method: If you would like a quick and easy way to remove the background or make part of an image transparent, you can use online tools like PhotoWorks or download a software specifically designed for this purpose. These tools often provide an intuitive interface where you can simply pick a color or area to make transparent. Some tools even have a “Remove Background” button that automatically removes the background without much tweaking from your end.
4. Use Transparent Backgrounds: Another way to achieve transparency is by using images or logos that have a transparent background. These images or logos are designed in a way that allows you to add them on top of your design or photo without any background interfering. You can find a wide range of transparent background images online.
Remember, the methods and tools mentioned here may slightly differ from one software or platform to another. So, feel free to explore and find the one that works best for you. With these steps, you’ll be able to remove the background or make a part of your image transparent in no time!
Step 5 Change Transparency of The Image
To make your pics transparent, you can use the quick and simple tools provided by various image editing software. One such popular tool is Microsoft Publisher. If you are working on Windows, this software is readily available and intuitive to use.
After opening the Publisher, follow these steps to change the transparency of your image:
| Step 1 | Open the image you want to make transparent in Microsoft Publisher. |
| Step 2 | Select the picture or logo that you want to make transparent by clicking on it. |
| Step 3 | On the toolbar at the top, find and click on the “Format” tab. |
| Step 4 | In the “Adjust” section of the toolbar, click on the “Recolor” option. |
| Step 5 | A drop-down menu will appear. Choose the “Set Transparent Color” option. |
| Step 6 | Hover your mouse over the background of the image that you want to remove. The tool will automatically detect the color and make it transparent. |
| Step 7 | If the tool didn’t detect the background color accurately, you can manually remove it. Hover your mouse over the color you want to remove, hold the left mouse button, and drag the cursor to select the unwanted background color. |
| Step 8 | Once you have selected the background color, release the mouse button. The tool will remove the selected color and make it transparent. |
| Step 9 | Repeat the above steps if you have multiple objects or areas in the image that you want to make transparent. |
| Step 10 | After making the desired changes, click on the “Save” button to save your transparent picture. |
Alternatively, if you prefer to work with online tools, you can find many options by searching for “remove background” or “make picture transparent” in your preferred search engine. These online tools often have manual options as well if the automatic detection doesn’t work perfectly for your specific image.
Keep in mind that when making an image transparent, it’s important to select a clear and consistent background color to keep only the desired parts of the image. This will ensure that the transparency effects work as expected.
Step 6: Save File As Image
Once you’ve completed all the necessary edits and added transparency to your image, it’s time to save the file as an image. Here’s how you can do it:
- First, make sure the image you want to save is the active file in your photo editor. If you have multiple images open, you can click on the image you want to save to make it the active one.
- Next, go to the “File” menu at the top of the editor and select the “Save As” or “Export” option.
- A dialog box will appear, allowing you to choose where to save the image on your computer. Navigate to the desired location and choose a suitable name for the file.
- You may also have the option to choose the file format for your image. Most photo editors offer common formats like JPEG, PNG, and GIF. Pick the one that best suits your needs.
- After selecting the desired format, click the “Save” or “Export” button to save the image. Depending on the size and complexity of the image, it may take a few moments to save.
- Once the image is saved, you can use it in any way you like. Whether you want to add it to a document, publish it on a website, or simply keep it for your own personal use, the image is now ready to be used with its transparent background intact.
By following these steps, you can effectively save an image with transparent areas using popular photo editing programs like Photoshop, GIMP, and PhotoWorks. If you prefer an online tool, options like Remove.bg also offer an easy way to save images with transparency. Keep in mind that different editors and methods may have slight variations in their interface and terminology, but the general idea and workflow remain the same.
Make Background Transparent
If you want to make the background of your pictures transparent, there are several methods you can choose from. Whether you prefer using online tools or software packages like GIMP or Photoshop, there are steps you can follow to achieve the desired result.
One way to make the background of an image transparent is by using the ‘remove background’ option in Microsoft Word. This method is quick and easy, especially if you have a logo or a simple picture that needs editing. Simply open the picture in Word, select the image, and choose the ‘Remove Background’ option from the toolbar.If you prefer more advanced editing options, you can use photo editing software like GIMP or Photoshop. These programs provide a full range of tools to edit your pictures and give you more control over the process. Here is a step-by-step tutorial on how to make the background of your images transparent using GIMP:
- Open GIMP and open the image you want to edit.
- Select the ‘Fuzzy Select Tool’ from the toolbar on the left side of the screen.
- Click on the parts of the image that you want to be transparent. If you want to select multiple areas, hold down the Shift key on your keyboard while clicking.
- Once you have selected the areas you want to be transparent, click on the ‘Layer’ option in the top menu and choose ‘Transparency’.
- In the dropdown menu, select ‘Add Alpha Channel’ if it is not already selected. This will allow you to make the background transparent.
- With the areas selected, click on the ‘Edit’ option in the top menu and choose ‘Clear’.
- Finally, go to File > Export As and save your image with a transparent background.
By following these steps, you can easily make the background of your images transparent using GIMP. Remember that the amount of transparency you choose will depend on your specific needs and preferences.
If you don’t have access to a photo editing software or prefer to work online, there are also a variety of online tools available. Websites like PhotoWorks, Remove.bg, or Microsoft Word online offer user-friendly interfaces for removing backgrounds and making them transparent.
Whether you choose to use software packages like GIMP or Photoshop, or opt for online tools, making the background of your pictures transparent is an easy and accessible way to enhance your designs, presentations, or personal photos. Just choose the method that suits you best and follow the steps outlined above to achieve your desired result.
How to Make an Image Background Transparent
Turning the background of an image transparent can be a useful technique for a variety of purposes. Whether you want to keep only the main object in the picture or create a more dynamic presentation in PowerPoint, making the background transparent can be a simple process. Here are some intuitive steps to make an image background transparent.
Part 1: Using Online Image Editors
If you’re doing this on a computer with Windows or Mac, there are quick online options available that allow you to remove the background from your pictures. One popular tool is Remove.bg – an easy-to-use online editor that lets you remove the background with just a few clicks. Here’s how to do it:
- Go to the Remove.bg website and click on the “Choose a picture” button to select the image you want to edit.
- Remove.bg will automatically separate the main objects in your picture from the background, making them transparent.
- Download the edited image with the transparent background and you’re done!
Part 2: Manual Removal with Image Editors
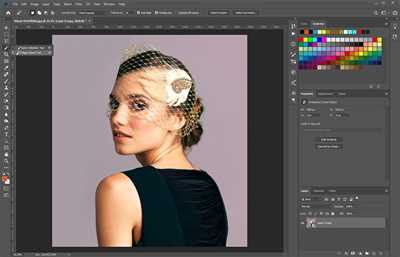
If you prefer to have more control over the process, you can use image editors like Photoshop to manually remove the background. Here’s how:
- Open your image editor of choice (e.g., Photoshop) and open the image you want to edit.
- Choose the “Background Eraser Tool” from the toolbar. This tool allows you to erase the selected areas of the picture while keeping the rest of the image intact.
- Create a new layer for the background of your image so that you can easily tweak the transparency later if needed.
- Start erasing the parts of the image you want to make transparent by dragging the eraser over them. You can adjust the size of the eraser tool and the amount of transparency by pressing keys on your keyboard.
- Once you’ve finished erasing the background, save your image as a file format that supports transparency, such as PNG.
Whether you choose to use online tools or image editors like Photoshop, making an image background transparent is a simple process that allows you to remove unwanted parts and create more visually appealing pictures. Use these steps to create transparent images for presentations, or to add unique effects to your photos.
Way 1 Turn a Photo Background Transparent in PhotoWorks
If you’re looking for a simple and quick way to make the background of your photos transparent, PhotoWorks is here to help. With its user-friendly interface and powerful editing tools, you can easily remove the backdrop from your image and give it a professional touch. Plus, this method doesn’t require you to have any design or Photoshop skills!
To start, download and install PhotoWorks on your Windows computer. Once you have it up and running, follow these steps:
Step 1: Open the PhotoWorks application and add the photo you want to make transparent by clicking on the “Add file” button.
Step 2: On the toolbar, locate and click on the “Change Background” tab.
Step 3: In the next section, you will see a list of methods available for changing the background. Hover over the “Remove Background” option and click on it.
Step 4: The program will automatically separate the main part of your image from the background. To refine the selection, use the eraser tool located on the left-hand side. Simply click and drag the eraser over the parts you want to remove.
Step 5: Once you’re satisfied with the selection, click on the “Apply” button to see the background removed. If there are any additional tweaks you’d like to make, use the sliders and settings on the right-hand side.
Step 6: Finally, when you’re happy with the transparent background, click on the “Save” button to save the image in a format of your choice (such as PNG) and with the transparency intact.
And that’s it! With PhotoWorks, you can turn a photo’s background transparent in just a few simple steps. This method is not only quick and easy, but it also saves you the hassle of learning complex design programs like Photoshop. Whether you’re creating a logo, working on presentations, or doing any graphic design work, PhotoWorks has got you covered. Plus, don’t forget that PhotoWorks offers a free trial for new users to give it a try!
Way 2 Make Transparent Background with Paint
Microsoft Paint is a simple but powerful tool for editing and designing images. While there are many online editors and photo package editors available, Paint is an intuitive option that can be found right on your computer. Here’s how to make the background of your pictures transparent using Paint:
- Open Microsoft Paint by clicking on the Start menu, then going to “Accessories” and selecting “Paint”
- Once Paint is open, click on the “File” tab in the toolbar and choose “Open”
- Select the picture you want to edit with transparent background and click “Open”
- In the top menu, click on the “Select” button and choose “Rectangular selection”. You can also press Ctrl+E on your keyboard for a quicker way to select the entire picture
- Next, click on the “Image” button in the top menu and select “Transparent selection”
- To remove a specific color from the picture, click on the “Color 1” or “Color 2” box in the Colors section on the left side of the toolbar. If you don’t prefer any specific color to be erased, choose the “Transparent” option
- Now, use the eraser tool to delete the background. You can choose the eraser size and keep in mind that larger sizes are better for erasing larger parts of the picture
- Drag the eraser tool over the background to erase it. Make sure to be careful around the edges of the main objects to avoid erasing parts you want to keep
- Once you have finished erasing the background, click on the “File” tab in the toolbar and choose “Save” to save your photo with the transparent background. You can also press Ctrl+S on your keyboard for a quicker way to save
- Your picture will now have a transparent background, ready to be used in any design or presentation software. You can also copy and paste the image onto a new slide in PowerPoint, or use it in Microsoft Publisher
This method is a quick and easy way to make the background of your pictures transparent using Microsoft Paint. It is especially useful when you need to remove the backdrop of an image and place it into a different background. However, if you would rather use something more advanced, there are other methods and online editors that can provide more editing features and effects. One such tool is PhotoWorks, which makes it even easier to edit, change and remove photo backgrounds.
Way 3 Remove a Photo Background in PowerPoint
If you don’t have access to advanced image editing software like Photoshop or GIMP, you can still remove the background of a photo in PowerPoint. While not as powerful as those tools, PowerPoint offers a simple and intuitive way to remove background from pictures. Here’s how you can do it:
- Select the photo you want to remove the background from and go to the “Format” tab at the top of PowerPoint.
- Click on the “Remove Background” option, which you’ll find in the Adjust group of tools.
- PowerPoint will automatically try to detect the background of your photo and mark it with a pink color. It will also add a selection box around the main subject of the photo.
- At this point, you can manually tweak the selection, if needed. You can click and drag on the selection box’s handles to adjust its size and position. You can also use the “Mark Areas to Keep” and “Mark Areas to Remove” options to fine-tune the selection.
- After making any necessary adjustments, simply press the “Keep Changes” button in the “Background Removal” section.
- The background of your photo will now be removed, leaving only the main subject. You can further edit the photo or place it into your presentations as desired.
This method is especially useful if you want to quickly remove the background from a photo without the need for advanced image editing skills. It’s a simple and easy way to make your pictures transparent in PowerPoint.
However, keep in mind that PowerPoint’s background removal tool is not as precise as dedicated image editors like Photoshop or GIMP. If you need more control over the process or have complex background removal requirements, we suggest using those professional tools instead.
Way 4: Create Transparent Background in Photoshop
If you need to create a transparent background for your images using Photoshop, there are several methods you can choose from. In this section, we will discuss one of the most popular and quick ways to achieve transparency in your pictures.
Step 1: Open Photoshop and drag the photo you want to edit into the workspace. Otherwise, you can use the “File” option in the toolbar and select “Open” to browse and pick the image you want to work with.
Step 2: Once your photo is open, go to the toolbar and choose the “Magic Wand” tool or press “W” on your keyboard. This tool allows you to select and remove specific parts of your image easily.
Step 3: Click on the areas of the image that you want to make transparent. Photoshop will automatically select similar pixels based on the color and tone you clicked on. You can hold down the Shift key to add or subtract areas from the selection.
Step 4: After making your selection, go to the top menu and select “Edit” > “Clear” or press the “Delete” button on your keyboard. This will remove the selected areas, making them transparent.
Step 5: If you need to refine the transparency further, you can use the “Eraser” tool. It allows you to manually erase unwanted parts or fine-tune the edges of your selection.
Step 6: Once you are satisfied with the transparency, save the image by going to “File” > “Save As” and choose a file format that supports transparency, such as PNG or GIF. Give the file a name and save it to your desired location.
That’s it! Now you have a picture with a transparent background that you can use for various purposes, like adding a logo to your website, creating presentations, or packaging it with other graphics in graphic design editors.
While Photoshop offers a quick and efficient method for creating transparent backgrounds, there are also online tools like “Remove.bg” or standalone programs like GIMP that you may prefer to use. These tools typically work by automatically detecting the background and removing it without the need for manual editing.
Keep in mind that the method described here works best for images with distinct colors and well-defined edges. For images with complex backgrounds or gradients, you may need to apply more advanced techniques or use a combination of tools to achieve the desired transparency.
Way 5 Erase a Photo Background in Publisher
If you want to make the background of your pictures transparent, you can use the “Remove Background” option in Publisher. With this tool, you can easily erase the background and keep only the main objects or parts of the image. Here’s a simple tutorial on how to do it:
- Open Publisher and place your picture on the slide where you want to make the background transparent.
- Select the picture by clicking on it once.
- On the right-click menu, choose the “Remove Background” option.
- Publisher will automatically try to remove the background for you. You may find that some areas are not edited correctly, so you can use the “Mark Areas to Keep” and “Mark Areas to Remove” options to manually erase or keep certain parts of the background.
- If you want to add some strokes or effects to the picture, like changing its size or adding a transparent background, you can use the “Picture Effects” button in the “Format” tab.
- After you have finished editing the background, click on the “Remove Background” button to save the changes.
- To check the transparency of your picture, you can hover over it to see the background as transparent.
By following these steps, you can easily remove the background of your pictures in Publisher and create transparent images for your presentations or design projects. If you prefer using a different tool, like GIMP or PhotoWorks, there are also other methods available to make pics transparent. However, Publisher’s built-in tool makes the process quick and simple, especially if you are doing it for the first time.
Way 6: Make a Transparent Background in GIMP
If you’re looking to create a transparent background for your images, GIMP is a powerful and free image editor that can help you achieve this. While programs like Photoshop offer automatic tools to remove backgrounds, GIMP provides an intuitive way to manually remove the background and make it transparent.
Follow these steps to make a transparent background in GIMP:
- Step 1: Open GIMP and import the image you want to edit by clicking “File” and then “Open.”
- Step 2: On the toolbar, locate and click the “Fuzzy Select Tool,” which is represented by a magic wand icon.
- Step 3: Click on the part of the image’s background that you want to make transparent. If there are multiple objects in the image, you may need to repeat this step for each separate background area.
- Step 4: Adjust the tool options. In the “Tool Options” section, you’ll find a “Threshold” slider. Slide it until you see the dotted line around the areas you want to remove.
- Step 5: Once you’ve made the selection, press the “Delete” key on your keyboard to remove the selected background.
- Step 6: If there are other parts of the image that need to be removed, repeat steps 3-5 until you’re satisfied with the result.
- Step 7: Click “File” and then “Export As” to save the edited image with a transparent background. Choose a file format that supports transparency, such as PNG.
GIMP allows you to adjust the amount of transparency for each photo you edit, giving you greater control over the final result. This can be especially useful if you plan on placing your edited image into a design or using it as a logo.
While GIMP may have a slightly different interface compared to other image editors like Photoshop or Microsoft Paint, it’s a popular choice among users because of its powerful features and the fact that it’s free to download and use on Windows, Mac, and Linux.
Give GIMP a try and discover how easy it is to make a transparent background in your photos. After a few tweaks and some practice, you’ll find that it’s a quick and efficient way to remove unwanted parts of an image and create stunning visuals with transparent backgrounds.
Way 7: Turn a Photo Background Transparent Online
If you don’t have Photoshop or any other editing software installed on your computer, you can still make your photo background transparent by using online tools. One popular option for this is Remove.bg.
Here are the steps to turn a photo background transparent using Remove.bg:
- Open your web browser and go to the Remove.bg website.
- Click on the “Upload Image” button and select the photo you want to edit.
- Wait for the website to upload and process your image. This may take a few seconds.
- Once the image is processed, you will see a preview of the image with the background removed. You can tweak the result by selecting the “Edit” option.
- If you’re satisfied with the result, click on the “Download” button to save the edited image with a transparent background.
- Alternatively, you can also choose to copy the image URL or directly share the image on social media.
Remove.bg is a free online tool that uses artificial intelligence to automatically remove the background from photos. It works well for most pictures, but it may not be perfect in every case. If you prefer more control over the background removal process or need to edit other aspects of your photo, you may want to consider using a professional photo editing software like Adobe Photoshop or GIMP.
Keep in mind that while online tools can be quick and easy to use, they may not always provide the best results. The amount of tweaking you can do with online tools is often limited, and automatic background removal may not be as accurate as manual editing. Additionally, the size and color quality of your edited image may not be as high as when using professional editing programs.
If you’re working with Windows programs like Microsoft Word, PowerPoint, or Publisher, you can also use the built-in image editing tools to remove the background from your photos. While not as powerful or intuitive as dedicated editing software, these programs offer a simple way to remove the background of an image and add it to your designs or presentations.


