

If you are looking for a simple and direct way to create collages using your iPhone, then this article is for you. With the editing options available right at your fingertips, making collages has never been easier. Whether you want to scroll through a page of Google-searched images or create a post for your best friend’s birthday on Instagram, this guide will provide you with the step-by-step instructions to convert your photos into stunning collages.
To begin, open your gallery and select the photos you want to use for your collage. With a wide range of options and styles to choose from, you have full control over the layout and design of your collage. Once you have chosen your photos, open the Photos app and select the “Grid” option. This will open a screen with various layouts for your collage.
Now it’s time to get creative! Simply drag and drop your photos into the different grids to see which layout works best for you. You can also use the “Open” icon at the bottom of the screen to add more photos from your gallery. If you want to add a personal touch to your collage, there are additional editing options available, such as filters and effects.
Once you are happy with your collage, click on the “Share” icon. This will give you the option to share your creation directly on social media platforms or save it to your camera roll. With just a few simple steps, you can create a stunning collage that is sure to impress your friends and followers. So go ahead and check out the simple, yet powerful, collaging features on your iPhone today!
How to Make a Photo Collage on iPhone
Looking to create a photo collage on your iPhone? With the use of photo editing apps and tools, making a collage has never been easier. Follow these simple steps to turn your photos into a stunning collage.
1. Open your iPhone’s gallery and select the photos you want to use for your collage.
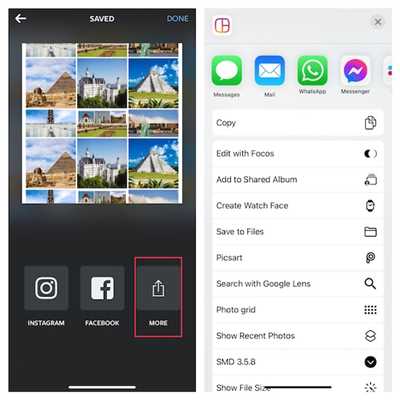
2. Tap on the “Share” icon located at the bottom of the screen.
3. Scroll through the options and look for the “Create a Collage” option. It may be under the “More” icon depending on the layout of your gallery.
4. Once you tap on “Create a Collage,” a grid of different collage styles will appear. Choose the style that you prefer.
5. After selecting the style, you can rearrange the photos by tapping and dragging them. You can also pinch and zoom on the photos to resize them.
6. If you want to add more photos, tap on the “+” icon and select additional photos from your gallery.
7. Once you’re satisfied with the collage, tap on the “Next” or “Done” button.
8. You will now have the option to further edit the collage, such as adding filters or adjusting the brightness and contrast.
9. When you’re done editing, tap on the “Next” or “Done” button again.
10. Finally, select the option to save the collage to your gallery or share it directly to social media platforms such as Instagram or Facebook.
These steps are a general guideline, and the options may vary depending on the photo editing app or tool you’re using. However, the basic concept remains the same – select the photos, choose a collage style, arrange the photos, edit if desired, and save or share your masterpiece.
Key Takeaways from this “How to Make a Photo Collage on iPhone” episode:
- Open your iPhone’s gallery and select the photos to use.
- Tap on the “Share” icon and scroll for the “Create a Collage” option.
- Select a collage style and arrange the photos.
- Add more photos if desired.
- Edit the collage if needed.
- Save or share the collage.
There are other options available for creating photo collages on your iPhone, such as using shortcuts or third-party apps from the App Store. You can also convert an image into a collage without using any apps, but these may not provide the same level of customization and options as dedicated collage apps.
Check out the detailed instructions and tutorials from online sources or the Apple website if you’re looking for more specific information or guidance on creating collages on your iPhone.
So, now that you know how to make a photo collage on your iPhone, go ahead and unleash your creativity!
How to Make a Photo Collage on iPhone Using Shortcuts
If you’re looking for a simple and quick way to create photo collages on your iPhone, using shortcuts is the best option for you. With the help of shortcuts, you can convert a detailed and time-consuming process into just a few simple steps. Here’s how to make a photo collage on iPhone using shortcuts:
Step 1: Open the Shortcuts app on your iPhone. If you can’t find it, you can search for it by swiping down on the home screen and typing “Shortcuts” in the search bar.
Step 2: Tap on the + icon in the top right corner to create a new shortcut.
Step 3: On the next screen, tap on the “Add Action” button.
Step 4: In the search bar at the top of the screen, type “Photos” and select the “Choose Photos” action from the list of options.
Step 5: Scroll down to the “Images” section and select the images you want to use for your collage. You can choose multiple photos by tapping on each image.
Step 6: Once you have selected all the photos, tap on the checkmark icon in the top right corner.
Step 7: Now, tap on the + icon again to add another action to your shortcut.
Step 8: In the search bar, type “Markup” and select the “Markup” action from the list of options.
Step 9: On the next screen, tap on the option to “Convert images to PDF” in the bottom section of the screen.
Step 10: Tap on the “Done” button in the top right corner.
Step 11: Now, your images will be converted into a PDF document, which you can edit as a photo collage.
Step 12: Tap on the “Share” icon in the top right corner of the screen.
Step 13: From the options that appear, select “Save to Files” or “Save to Google Drive” to save the photo collage to your preferred location.
Step 14: After saving the photo collage, you can directly share it on Instagram or other social media platforms by opening the respective apps and selecting the “Post” option.
Creating a photo collage on iPhone using shortcuts is a quick and easy way to make collages without the need for any other editing or gallery apps. Plus, you can use the photos directly from your gallery or from other sources like Google Photos. So why wait? Follow these steps to make your own stunning photo collages using shortcuts now!
Use Google Photos to Create Photo Collages on iPhone
If you’re looking for an easy and simple way to create photo collages on your iPhone, then Google Photos is the option you’re looking for. In this post, we will dive into detailed steps on how to use Google Photos to create photo collages and share them directly from your iPhone.
Step 1: Open the Google Photos app on your iPhone. If you haven’t installed it yet, you can download it from the App Store.
Step 2: Scroll through your photo gallery and select the photos you want to use for your collage.
Step 3: Tap the “+” icon at the bottom of the screen and then select the “Collage” option.
Step 4: Google Photos will convert the selected photos into a collage layout. You can choose from different styles and layouts for your collage.
Step 5: After selecting the layout, Google Photos will create the collage for you. You can make any necessary adjustments or editing to the collage if needed.
Step 6: Once you’re happy with the collage, tap the “Share” icon on the top right corner of the screen.
Step 7: Google Photos will provide you with various options to share the collage. You can share it directly to Instagram, send it via email, or save it to your iPhone’s gallery.
Key takeaways:
| ● | Google Photos is a great option for creating photo collages on your iPhone. |
| ● | You can choose from different styles and layouts for your collage. |
| ● | You can make any necessary adjustments or editing to the collage before sharing it. |
| ● | Google Photos provides various options to share the collage directly from the app. |
So, if you want to create photo collages on your iPhone without any hassle, give Google Photos a try and start making stunning collages with just a few simple steps.
Sources: Google Photos Support
If you use an iPhone, making collages on Instagram is a simple process. With the photo editing options available on the app, you can easily convert your photos into a collage and share them with your followers.
To make a collage on Instagram, follow these simple steps:
Step 1: First, open the Instagram app on your iPhone. If you don’t have it installed, you can download it from the App Store.
Step 2: Scroll through your feed or tap on the search icon to check out other Instagram posts and find inspiration for your collage.
Step 3: To create a collage, tap on the “+” icon at the bottom of the screen. This will open the options for creating a new post.
Step 4: Choose the “Layout” option from the list of options. This will take you to the collage editor in Instagram.
Step 5: On the collage editor screen, you’ll see a grid with various layouts to choose from. Scroll through the options and select the one that you like the best.
Step 6: Tap on the empty spaces in the grid to add photos from your gallery. You can select multiple photos to add to the collage.
Step 7: If you want to make any adjustments to the photos, such as zooming in or rotating them, you can do so using the editing options available for each photo in the grid.
Step 8: Once you’re satisfied with the collage, tap on the “Next” button at the top right corner of the screen.
Step 9: On the next page, you can add a caption, tag people, add a location, and choose other options for your post. You can also use hashtags to make your collage more discoverable.
Step 10: Finally, tap on the “Share” button to post your collage directly to your Instagram feed.
In conclusion, making a collage on Instagram is a quick and easy way to showcase your photos. The detailed options and steps provided in this article will guide you through the process, allowing you to create stunning collages without the need for any external apps or shortcuts.
Key Takeaways:
- Instagram offers a built-in collage maker that allows you to create collages directly within the app.
- To make a collage, open the Instagram app, select the “Layout” option, choose a layout, add photos from your gallery, make any necessary adjustments, and then post the collage to your feed.
- The collage editor in Instagram provides various layout options, giving you the freedom to customize the arrangement of your photos.
- Remember to add a caption and use hashtags to enhance the visibility of your collage on Instagram.
By following these easy steps, you can create beautiful collages on Instagram and impress your followers with your creativity.
● Key Takeaways from This Episode →
In this episode, we discussed how to make collages on an iPhone. Here are the key takeaways:
- Editing: There are various options available for editing your photos before creating a collage. You can use the built-in editing tools in the Photos app or explore third-party apps for more advanced editing options.
- Collages: To create a collage, open the Photos app and select the “Collages” tab at the bottom of the screen. You will find different collage styles to choose from.
- Layout: After selecting a collage style, you can customize the layout by dragging and dropping photos into the collage cells. You can also change the size, position, and rotation of the photos.
- Shortcuts: If you’re looking for a simple and quick way to create a collage, you can use the Shortcuts app. There are pre-made shortcuts available that will convert your selected photos into a collage automatically.
- Directly from Gallery: If you have specific photos in mind that you want to include in your collage, you can select them directly from your photo gallery and then choose the “Collages” option from the share icon.
- Share and Save: Once you’ve created your collage, you can share it directly to your Instagram or other social media accounts. You can also save the collage to your photo gallery or post it to Google Photos.
- Detailed Steps: For a more detailed explanation on how to create a collage on an iPhone, check out the detailed steps provided in this episode.
By following these key takeaways and exploring the options available on your iPhone, you’ll be able to create beautiful collages without any hassle.
Источники
If you’re looking to create collages on your iPhone, there are several options you can use. Here are some key takeaways and other sources to check out:
1. Photos App

One simple option is to use the built-in Photos app on your iPhone. You can directly open the app and select the photos you want to include in your collage. From there, you can use the editing options to convert them into a collage with different layout styles such as grid or a freeform.
2. Google Photos
If you have a Google account, the Google Photos app is another great option. You can create collages using the app’s built-in collage feature, which allows you to choose photos from your gallery and select a layout for your collage.
3. Third-Party Apps
If you’re looking for more detailed options and creative styles, you can explore third-party collage apps available on the App Store. Some popular choices include Photo Grid, Layout, and Collage Maker. These apps offer a variety of options and features to help you create the best collage for your needs.
4. Shortcuts App
If you’re familiar with the Shortcuts app on your iPhone, you can create a shortcut to automate the collage-making process. This can save you time and make it more convenient to create collages without having to go through multiple steps manually.
5. Instagram
If you’re an avid Instagram user, the app also offers a collage option. When creating a new post, you can select multiple photos and choose the collage layout. This is a great way to share collages directly on Instagram without having to use a separate app.
These are just a few options to consider when making collages on your iPhone. You can choose the one that suits your needs and preferences the best. Whether you want a simple and quick way to create collages or more detailed editing options, there’s an option out there for you!


