

If you’re a breastfeeding mom, you’ve probably heard about the many benefits of breastmilk. But did you know that breastmilk can also be used to make soap? It may sound strange at first, but making breastmilk soap is actually a fun and easy process that can be done right in your own kitchen.
To make breastmilk soap, you’ll need a few simple ingredients. First, you’ll need to gather your breastmilk. If you have a small amount, say from a single pumping session, you can use that. Otherwise, you can mix together breastmilk from different pumping sessions until you have enough to make a batch of soap.
Next, you’ll need to gather the other ingredients for the soap. This includes oils, lye, and any optional additives you’d like to include, such as colorants or fragrance oils. Lye is an important ingredient in soap-making, but it can be dangerous to handle. If you’re not comfortable working with lye, you can purchase pre-mixed lye solutions that are safer and more user-friendly.
Once you have all your ingredients gathered, it’s time to start the soap-making process. The first step is to melt the oils and lye together. You’ll want to do this in a double boiler or using a microwave-safe container. Once everything is melted, you can then pour your breastmilk into the mixture and give it a good stir.
After adding the breastmilk, you can also add any optional additives, such as colorants or fragrance oils. This is where you can get creative and make your soap truly unique. Just be sure to follow the recommended amounts for the additives, as too much can affect the overall quality of the soap.
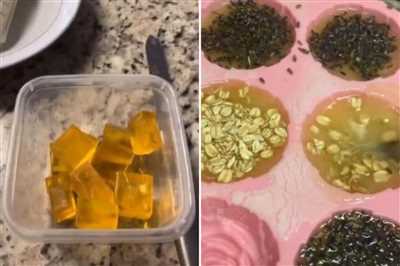
Once everything is mixed together, you can pour the soap mixture into your desired mold. A silicone mold works well for this, as it’s easy to remove the soap once it’s set. You can also use an old plastic container or a soap mold specifically designed for soap-making.
Now comes the waiting game. You’ll need to let the soap sit and harden for at least 24 hours. After that, you can remove it from the mold and let it cure for a few weeks. This will help the soap become harder and less likely to dissolve quickly in the bath or shower.
Once your breastmilk soap has cured, you can start using it in your daily routine. It’s a great way to treat your skin to the benefits of breastmilk, even if you’re no longer breastfeeding. Plus, if you have any leftover breastmilk, making soap is a creative way to use it up instead of letting it go to waste.
So, if you’re a breastfeeding mom looking for a DIY project, why not give breastmilk soap-making a try? It’s easy, fun, and a great way to put that liquid gold to good use. Plus, you’ll have a unique soap that’s perfect for gifting or keeping for yourself. Hooray for breastmilk soap!
Breast Milk Recipe Breast Milk Lotion
When it comes to making breastmilk soap, why stop there? You can also use your breast milk to make a luxurious breast milk lotion that nourishes your skin and leaves it feeling silky smooth. This homemade lotion is gentle, all-natural, and perfect for moms and babies alike.
To make breast milk lotion, you will need the following ingredients:
- 1/4 cup of melted coconut oil
- 1/4 cup of melted shea butter
- 1/4 cup of breast milk
- A few drops of any essential oil you like (optional)
Here’s how to make it:
- Mix the melted coconut oil and shea butter together until well combined.
- Add the breast milk to the mixture and stir until thoroughly mixed.
- If desired, add a few drops of essential oil for fragrance.
- Pour the mixture into a small jar or container and let it cool.
- Once cooled, the lotion can be used immediately or refrigerated for a longer shelf life.
And voila! You now have a homemade breast milk lotion that is gentle on the skin and perfect for daily use. The nourishing properties of breast milk combined with the moisturizing effects of coconut oil and shea butter make this lotion truly special.
Make sure to label your container with the date and keep track of how long the lotion has been stored. Breast milk lotion typically lasts for around three months when refrigerated.
Just like with soap-making, it’s important to handle lye with caution. If you’re not comfortable working with lye or don’t have access to it, there are lye-free breast milk lotion recipes available. Check out some breastfeeding-friendly sources and DIY blogs for more lye-free recipes.
So go ahead and give it a try! Enjoy the benefits of breast milk in a new and exciting way with this easy breast milk lotion recipe. Your skin will thank you!
How to DIY breast milk soap – no lye mixing easy recipe

Making your own breast milk soap can be a fun and rewarding project for moms looking to utilize their excess breast milk. While many traditional soap-making recipes use lye, which can be harsh and dangerous to handle, this easy recipe allows you to make soap without the use of lye. Here’s how you can create your own breast milk soap using simple ingredients and a straightforward process.
What you’ll need:
- Small saucepan
- Soap molds
- Measuring cups and spoons
- Immersion blender or whisk
- Thermometer
- Essential oils or fragrance (optional)
- Colorant (optional)
Ingredients:
- 1 cup breast milk
- 1 cup coconut oil
- 1 cup olive oil
- 1 cup shea butter
- 1 cup cocoa butter
- 1 tablespoon vitamin E oil
- 1 tablespoon honey (optional)
Instructions:
-
In a small saucepan, melt the coconut oil, olive oil, shea butter, and cocoa butter over low heat. Make sure to stir occasionally to prevent burning.
-
Once the oils and butters have melted, remove the saucepan from heat and let it cool down to around 100-110°F (37-43°C). Use a thermometer to monitor the temperature.
-
If desired, add essential oils or fragrance to the mixture for a pleasant scent. You can also add colorant for a visually appealing soap.
-
Slowly pour the breast milk into the cooled oil mixture while stirring gently. It’s important to stir continuously to ensure the breast milk is well incorporated with the oils.
-
Continue stirring until the mixture thickens to a pudding-like consistency. This may take about 10-15 minutes, so be patient.
-
Once the mixture has thickened, pour it into soap molds and tap the molds gently on a flat surface to remove any air bubbles.
-
Let the soap sit undisturbed for at least 24 hours to allow it to cure and harden.
-
After 24 hours, remove the soap from the molds and cut it into desired shapes. If the soap is still too soft, you can let it cure for a few more days.
-
The breast milk soap can be used immediately but is best stored in a cool, dry place for a few weeks to allow it to fully harden.
- Enjoy your homemade breast milk soap! It’s a wonderful way to make use of your excess breast milk and create something special for yourself or as a gift for others.
Remember to always practice safe handling when working with soap-making ingredients and equipment. If you are unsure about any step in the process, consult reputable sources or seek guidance from experienced soap-making moms. Have fun experimenting with different recipes and techniques to create unique breast milk soaps that are gentle and nourishing for both you and your little one.
Cold Process Soap Vs Melt and Pour Soap
When it comes to making soap at home, there are two popular methods: cold process soap and melt and pour soap. Each method has its own advantages and considerations, so let’s take a closer look at the differences between the two.
Cold Process Soap:
The cold process soap-making method involves combining oils and lye to create a chemical reaction that results in soap. This method allows for complete control over the ingredients used and the ability to customize the formula to your liking. Cold process soap also allows for more creativity in terms of shape, color, and fragrance.
However, it’s important to note that cold process soap requires more time, skill, and safety precautions. Handling lye can be dangerous if not done properly, and the curing process can take several weeks. Additionally, the soap needs to be tested for pH levels to ensure it is safe to use on the skin.
Melt and Pour Soap:
Melt and pour soap is a beginner-friendly option that involves melting pre-made soap base and adding your own ingredients, such as colors, fragrances, and exfoliants. It’s a quick and easy way to make soap without the need for lye or long curing times.
Melt and pour soap is a great option for those who want to make soap without the hassle of handling lye or waiting for it to cure. It’s also a fun project for kids to get involved in with adult supervision. However, it’s important to note that melt and pour soap does not offer the same level of control over the ingredients as cold process soap, as you are limited to the pre-made soap base.
In conclusion, both cold process soap and melt and pour soap have their benefits and drawbacks. If you enjoy the chemistry and creativity of making soap from scratch, cold process soap may be the way to go. On the other hand, if you’re looking for a quick and easy DIY soap-making option, melt and pour soap is a convenient choice. Ultimately, it’s up to personal preference and the level of control you desire in your soap-making process.
Adding Ingredients
Once you have gathered all the necessary ingredients and tools for making breast milk soap, it’s time to start the process. Here’s a simple recipe to get you started:
| Ingredients | Amounts |
|---|---|
| Breast milk | 4 ounces |
| Lye | 2.2 ounces |
| Oils | 16 ounces |
First, make sure you are handling the lye with care as it can be dangerous to work with. Protect yourself by wearing gloves and safety goggles.
Here’s how to go through the process:
- Mix the breast milk and lye together slowly, stirring until they are well combined.
- While the milk and lye mixture is cooling down, melt the oils in a pot over low heat.
- Once both mixtures have cooled to around 100°F, slowly pour the lye mixture into the melted oils while continuously stirring.
- Continue to stir the mixture until it reaches trace, which is when it starts to thicken and follows the trail of the spoon.
- At this point, you can add any additional ingredients or scents you would like, such as essential oils or dried flower petals.
- Once everything is mixed together, pour the soap mixture into soap molds.
- Let the soap sit for 24 hours to allow it to harden.
- After 24 hours, you can remove the soap from the molds and let it cure for an additional 2-3 weeks.
Hooray! You’ve just made your own breast milk soap without any fuss. The process is easy and the end result is a gentle and nourishing soap that is perfect for moms and even for kids.
Remember to keep the soap refrigerated if you’re not using it right away, as breast milk soap has a shorter shelf life compared to other soap recipes. It can be kept for up to three months when refrigerated.
Now that you know how to make breast milk soap, you can experiment with different ingredients and scents to create personalized bars of soap for yourself or as gifts for others. Happy soap-making!
Handling Lye

Handling lye is an important step in making breastmilk soap. Lye, also known as sodium hydroxide, is a caustic substance that is necessary for turning oils into soap. When handling lye, it is crucial to take the necessary precautions to ensure safety for you and your kid.
Before starting the soap-making process, make sure you have all the necessary ingredients and equipment. This includes gloves, goggles, a face mask, a well-ventilated area, and a heat-resistant container. Lye should never come in contact with your skin, as it can cause burns. Be sure to keep lye out of reach of children and pets.
To mix the lye with breastmilk, start by refrigerating the breastmilk for a few hours or overnight. You’ll need about 300 grams, or 10.6 ounces, of breastmilk for this recipe. Once the breastmilk is cold, place it in a small heat-resistant container and slowly add the lye to it, stirring with a non-reactive utensil, such as stainless steel or silicone, until it is fully dissolved. You may notice that the mixture will start to produce small bubbles and heat up slightly – this is normal. It is important to note that breastmilk soap may not produce as much lather as regular soap, but it is still effective.
After the lye and breastmilk mixture is complete, you can proceed with melting the oils. You can use a variety of oils for your soap, such as coconut oil, olive oil, and castor oil. You can even add other oils or butters to customize the recipe to your liking. Melt the oils in a heat-resistant container, such as a double boiler, until they reach a temperature of about 120°F (49°C).
Once the oils are melted, slowly pour the lye and breastmilk mixture into the oils, stirring continuously. You may notice that the mixture will start to thicken and become opaque. This is a sign that the saponification process has begun.
If you want to add color or fragrance to your soap, this is the time to do so. You can use natural colorants, such as herbs or spices, or even purchase soap colorants specifically made for soap-making. Likewise, you can add essential oils or fragrance oils for scent. Just remember to use them sparingly, as they can be strong.
Once you have mixed everything together, it’s time to pour the soap into molds. You can use any molds you like, or even a traditional soap mold. Silicone molds work well and make it easy to remove the soap once it has hardened. Tap the molds gently on a hard surface to release any air bubbles that may have formed during the pouring process.
After pouring the soap into the molds, let it sit undisturbed for at least 24 hours, or until it is firm to the touch. Once the soap has hardened, remove it from the molds and allow it to cure for about three to four weeks. This will allow the soap to fully set and become harder.
Handling lye may seem intimidating, but with proper precautions and education, it can be done safely. Whether you’re a DIY enthusiast or a mom looking for a natural and gentle soap for your kid, breastmilk soap is a great option. So give it a try and enjoy the process of making your own unique soap!
Friendly For Kid
If you’re a mom who has breastmilk and wants to try making soap for your little one, this recipe is perfect! It’s easy to make and uses friendly ingredients, so you can be confident about using it on your kid’s delicate skin.
Unlike other soap recipes, this one doesn’t require lye, which can be a bit intimidating for some moms. Instead, we’ll be using a melt and pour soap base and adding breastmilk to it. That’s right – breastmilk soap! Hooray!
The process is quite simple. Start by melting the soap base in small amounts. You can do this in the microwave or on a stovetop using a double boiler. Once the soap has melted, remove it from heat and let it cool slightly. While it’s cooling, mix a small amount of breastmilk with some lotion. You can use any breast lotion that’s safe for your kid’s skin.
Next, stir the breastmilk and lotion mixture into the melted soap base. You can also add a few drops of your favorite essential oils for fragrance. If you want to give the soap a fun color, you can add a few drops of food coloring or natural colorants.
Once everything is mixed and blended well, it’s time to pour the soap into your desired mold. You can use any mold you like, as long as it’s safe for soap-making. Silicone molds work great for this recipe.
After pouring the soap, let it sit and cool for a few hours. You can speed up the process by placing the mold in the refrigerator. Once the soap has completely hardened, remove it from the mold and it’s ready to use!
Now you have a homemade breastmilk soap that’s friendly for your kid’s skin. It’s a great alternative to store-bought soaps that may contain harsh chemicals.
Remember to keep the soap refrigerated to prolong its shelf life. Also, make sure to label it properly so you don’t accidentally use it for yourself!
Feel free to experiment with different ingredients and scents to customize the soap for your kid’s preferences. You can even make it a fun DIY project with your little one!
For additional recipes and tips on soap-making, check out the sources provided at the end of this article. Happy soap-making!
DIY Breastmilk Soap
Making soap at home is a popular activity for moms who want to utilize their excess breastmilk. Breastmilk soap is gentle and nourishing for the skin, making it a great choice for both moms and kids.
Soap-making with breastmilk is actually quite easy, and you can customize the recipe to fit your preferences. Here’s a simple recipe that can be used:
Ingredients:
- 1 cup of breastmilk
- 2 cups of melt-and-pour soap base
- A few drops of essential oils (optional)
- A few drops of food coloring (optional)
Instructions:
- Melt the soap base in a microwave or double boiler, following the instructions on the package.
- Once the soap is melted, add the breastmilk and stir gently.
- If desired, add a few drops of essential oils for fragrance and a few drops of food coloring for color.
- Pour the mixture into soap molds and let it cool and harden for a few hours.
- Once the soap has completely hardened, it’s ready to use!
That’s it – you’ve made your own breastmilk soap! It’s a great way to repurpose and use up breastmilk that may otherwise go to waste. Just remember to only use breastmilk that has been refrigerated and is still within its recommended storage time.
When handling lye, which is a common ingredient in soap-making, it’s important to take safety precautions. Wear gloves, eye protection, and work in a well-ventilated area.
Using breastmilk soap can be a lovely experience for both moms and kids. The soap produces gentle bubbles and gives a moisturizing effect to the skin. Plus, it’s a fun and rewarding DIY project for moms to try!
So, don’t let all that extra breastmilk go to waste. Try making your own breastmilk soap and enjoy the benefits of a natural, homemade soap that’s friendly to both your skin and the environment.
Sources
In the process of making breastmilk soap, there are several sources that can provide guidance and recipes. Here are a few sources that you may find helpful:
| – DIY Mommy’s Cold Process Breast Milk Soap Recipe: | DIY Mommy provides a step-by-step guide on how to make breastmilk soap using the cold process method. She also includes information on the ingredients and amounts used. |
| – Breast Milk Soap Recipe: | This article from Not Just a Housewife provides a recipe for breastmilk soap that is easy to follow and requires only a few ingredients. The recipe makes a small amount of soap, perfect for those who want to try their hand at soap-making without purchasing a large quantity of supplies. |
| – Hooray Homemade’s Breastmilk Soap: | Hooray Homemade offers a recipe for breastmilk soap that is friendly to moms who want to give their babies a natural and gentle soap. The recipe includes instructions on how to melt the oils, mix in the breastmilk, and add any desired scents or colors. |
| – Mommy Engineering’s Breast Milk Bath Soap: | Mommy Engineering shares a recipe for breastmilk soap that can also be used as a bath soap. The article provides tips on handling lye, as well as suggestions for adding ingredients like lotion or other oils to make the soap more moisturizing. |
| – Breast Milk Soap Recipes: | If you’re looking for more options, this article from The Stir offers three different breastmilk soap recipes. Each recipe has its own unique ingredients and process, giving you even more options for making soap from breastmilk. |
These sources can provide you with the information you need to successfully make breastmilk soap. Whether you’re a DIY enthusiast or new to soap-making, these recipes and tips will help you create a gentle and nourishing soap for your little one.


